User Manual
Page 22
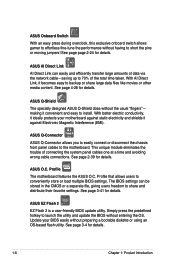
... OS. Simply press the predefined hotkey to short the pins or moving jumpers! See page 3-4 for details. ASUS AI Direct Link AI Direct Link can be stored in the CMOS or a separate file, giving users freedom to 70% of connecting the system panel cables one at a time... the trouble of the total time taken. making it becomes easy to conveniently store or load multiple BIOS settings. Profile The motherboard features the ASUS O.C. ASUS Q-Connector ASUS Q-Connector allows you to easily connect or disconnect the chassis front panel cables to install. See page 2-39 for details...
... OS. Simply press the predefined hotkey to short the pins or moving jumpers! See page 3-4 for details. ASUS AI Direct Link AI Direct Link can be stored in the CMOS or a separate file, giving users freedom to 70% of connecting the system panel cables one at a time... the trouble of the total time taken. making it becomes easy to conveniently store or load multiple BIOS settings. Profile The motherboard features the ASUS O.C. ASUS Q-Connector ASUS Q-Connector allows you to easily connect or disconnect the chassis front panel cables to install. See page 2-39 for details...
User Manual
Page 45
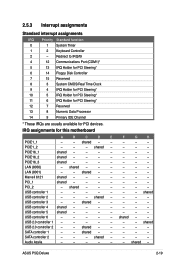
... - - - - IRQ assignments for PCI devices. shared - - - - - SATA controller 2 - - - ASUS P5Q Deluxe 2-19 shared - - - - - - USB controller 1 - - - - - - - USB controller 4 shared - - - - - - - shared USB 2.0 controller 2 - - SATA controller 1 - - Audio Azalia - - - - - - Redirect to IRQ#9 4 12 Communications Port (COM1)* 5 13 IRQ Holder for PCI Steering* 6 14 Floppy Disk Controller 7 15 Reserved 8 3 System CMOS/Real Time Clock 9 4 IRQ Holder for PCI Steering...
... - - - - IRQ assignments for PCI devices. shared - - - - - SATA controller 2 - - - ASUS P5Q Deluxe 2-19 shared - - - - - - USB controller 1 - - - - - - - USB controller 4 shared - - - - - - - shared USB 2.0 controller 2 - - SATA controller 1 - - Audio Azalia - - - - - - Redirect to IRQ#9 4 12 Communications Port (COM1)* 5 13 IRQ Holder for PCI Steering* 6 14 Floppy Disk Controller 7 15 Reserved 8 3 System CMOS/Real Time Clock 9 4 IRQ Holder for PCI Steering...
User Manual
Page 48
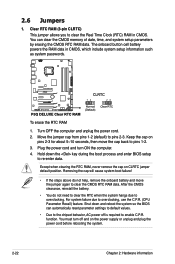
... the power supply or unplug and plug the power cord before rebooting the system. 2-22 Chapter 2: Hardware information To erase the RTC RAM 1. After the CMOS clearance, reinstall the battery. • You do not help, remove the onboard battery and move the cap back to re-enter data. Shut down the... RAM, never remove the cap on pins 2-3 for about 5~10 seconds, then move the jumper again to clear the Real Time Clock (RTC) RAM in CMOS, which include system setup information such as system passwords. 2.6 Jumpers 1. Clear RTC RAM (3-pin CLRTC) This jumper allows you to clear the...
... the power supply or unplug and plug the power cord before rebooting the system. 2-22 Chapter 2: Hardware information To erase the RTC RAM 1. After the CMOS clearance, reinstall the battery. • You do not help, remove the onboard battery and move the cap back to re-enter data. Shut down the... RAM, never remove the cap on pins 2-3 for about 5~10 seconds, then move the jumper again to clear the Real Time Clock (RTC) RAM in CMOS, which include system setup information such as system passwords. 2.6 Jumpers 1. Clear RTC RAM (3-pin CLRTC) This jumper allows you to clear the...
User Manual
Page 77
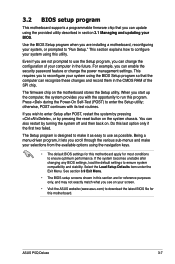
3.2 BIOS setup program This motherboard supports a programmable firmware chip that the computer can recognize these changes and record them in the CMOS RAM of your computer in the future. Even if you are not prompted to use as possible. For example, you can change the ... • The BIOS setup screens shown in section 3.1 Managing and updating your system, or prompted to download the latest BIOS file for this program. ASUS P5Q Deluxe 3-7 If you see on the system chassis. The firmware chip on . When you start up the computer, the system provides you scroll through the ...
3.2 BIOS setup program This motherboard supports a programmable firmware chip that the computer can recognize these changes and record them in the CMOS RAM of your computer in the future. Even if you are not prompted to use as possible. For example, you can change the ... • The BIOS setup screens shown in section 3.1 Managing and updating your system, or prompted to download the latest BIOS file for this program. ASUS P5Q Deluxe 3-7 If you see on the system chassis. The firmware chip on . When you start up the computer, the system provides you scroll through the ...

User Manual
Page 94
... chip will change (see 3.9 Exit menu for details). TPM Owner Status [No State] The item is not configurable To enable the TPM function, set in CMOS then actual and setpoint values may be restored. 3.5.2 CPU Configuration The items in this menu show the CPU-related information that the BIOS automatically detects...
... chip will change (see 3.9 Exit menu for details). TPM Owner Status [No State] The item is not configurable To enable the TPM function, set in CMOS then actual and setpoint values may be restored. 3.5.2 CPU Configuration The items in this menu show the CPU-related information that the BIOS automatically detects...
User Manual
Page 106
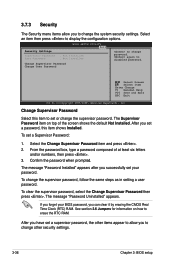
... the Change Supervisor Password item and press . 2. If you forget your password. 3.7.3 Security The Security menu items allow you can clear it by erasing the CMOS Real Time Clock (RTC) RAM. Select an item then press to disabled password. BIOS SETUP UTILITY Boot Security Settings Supervisor Password : Not Installed User Password...
... the Change Supervisor Password item and press . 2. If you forget your password. 3.7.3 Security The Security menu items allow you can clear it by erasing the CMOS Real Time Clock (RTC) RAM. Select an item then press to disabled password. BIOS SETUP UTILITY Boot Security Settings Supervisor Password : Not Installed User Password...

User Manual
Page 111
...O.C. 3.8.5 ASUS O.C. Profile 2 Status : Not Installed Save BIOS settings to Profile 1 Save to Profile 1 Load from Profile 1 Save to Profile 2 Load from Profile 1/2 Allows you to load the previous BIOS settings saved in the BIOS Flash. Profile Utility V1.25 Current CMOS BOARD: P5Q Deluxe VER: ...0306 DATE: 05/13/2008 PATH: A:\ A: Restore CMOS BOARD: Unknown VER: Unknown DATE: Unknown Note [Enter] Select or Load [Tab] Switch [V] Drive Info...
...O.C. 3.8.5 ASUS O.C. Profile 2 Status : Not Installed Save BIOS settings to Profile 1 Save to Profile 1 Load from Profile 1 Save to Profile 2 Load from Profile 1/2 Allows you to load the previous BIOS settings saved in the BIOS Flash. Profile Utility V1.25 Current CMOS BOARD: P5Q Deluxe VER: ...0306 DATE: 05/13/2008 PATH: A:\ A: Restore CMOS BOARD: Unknown VER: Unknown DATE: Unknown Note [Enter] Select or Load [Tab] Switch [V] Drive Info...

User Manual
Page 113
...save the changes that you are saved to the CMOS RAM. Discard Changes This option allows you to discard the selections you to load the default values for each of the options from the legend bar to exit. After selecting this menu. ASUS P5Q Deluxe 3-43 Select Screen Select Item Enter Go to ... system setup after saving the changes. Select one of the parameters on even when the PC is turned off. An onboard backup battery sustains the CMOS RAM so it stays on the Setup menus. If you press , a confirmation window appears. Select Ok to Sub Screen F1 General Help F10 ...
...save the changes that you are saved to the CMOS RAM. Discard Changes This option allows you to discard the selections you to load the default values for each of the options from the legend bar to exit. After selecting this menu. ASUS P5Q Deluxe 3-43 Select Screen Select Item Enter Go to ... system setup after saving the changes. Select one of the parameters on even when the PC is turned off. An onboard backup battery sustains the CMOS RAM so it stays on the Setup menus. If you press , a confirmation window appears. Select Ok to Sub Screen F1 General Help F10 ...


