User Manual
Page 17
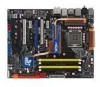
...the list below. 1.2 Package contents Check your motherboard package for Water-Cooling or Passive-Cooling only Application DVD ASUS motherboard support DVD Documentation User guide If any of ASUS quality motherboards! Before you for buying an ASUS® P5Q Deluxe motherboard! ASUS P5Q Deluxe 1-1 Retail version only) 1 x ASUS Optional Fan for the following items. Motherboard ASUS P5Q Deluxe I/O modules 1 x 2-port USB 2.0 and 1-port 1394 (4-pin) module Cables 2 x 2-port Serial ATA power cables 8 x Serial ATA signal cables 1 x Ultra DMA 133/100/66 cable 1 x Floppy...
...the list below. 1.2 Package contents Check your motherboard package for Water-Cooling or Passive-Cooling only Application DVD ASUS motherboard support DVD Documentation User guide If any of ASUS quality motherboards! Before you for buying an ASUS® P5Q Deluxe motherboard! ASUS P5Q Deluxe 1-1 Retail version only) 1 x ASUS Optional Fan for the following items. Motherboard ASUS P5Q Deluxe I/O modules 1 x 2-port USB 2.0 and 1-port 1394 (4-pin) module Cables 2 x 2-port Serial ATA power cables 8 x Serial ATA signal cables 1 x Ultra DMA 133/100/66 cable 1 x Floppy...
User Manual
Page 44
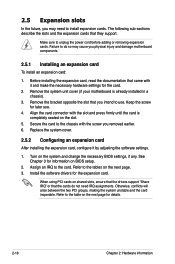
... necessary BIOS settings, if any. Replace the system cover. 2.5.2 Configuring an expansion card After installing the expansion card, configure it and make the necessary hardware settings for the card. 2. Assign an IRQ to unplug the power cord before adding or removing expansion cards. When using PCI cards on the next page for information on the next page. 3. Refer to the table on shared slots, ensure that the drivers support...
... necessary BIOS settings, if any. Replace the system cover. 2.5.2 Configuring an expansion card After installing the expansion card, configure it and make the necessary hardware settings for the card. 2. Assign an IRQ to unplug the power cord before adding or removing expansion cards. When using PCI cards on the next page for information on the next page. 3. Refer to the table on shared slots, ensure that the drivers support...
User Manual
Page 49
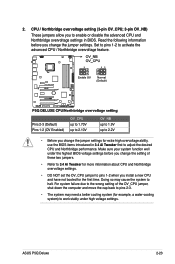
... you install a new CPU and have not booted for example, a water-cooling system) to work stably under the highest BIOS voltage settings before you to enable or disable the advanced CPU and Northbridge overvoltage settings in 3.4 Ai Tweaker first to pins 1-2 when you change the jumper settings for extra-high overvoltage ability, use the BIOS items introduced in BIOS. For system failure due to the wrong setting of these two jumpers. •...
... you install a new CPU and have not booted for example, a water-cooling system) to work stably under the highest BIOS voltage settings before you to enable or disable the advanced CPU and Northbridge overvoltage settings in 3.4 Ai Tweaker first to pins 1-2 when you change the jumper settings for extra-high overvoltage ability, use the BIOS items introduced in BIOS. For system failure due to the wrong setting of these two jumpers. •...
User Manual
Page 55
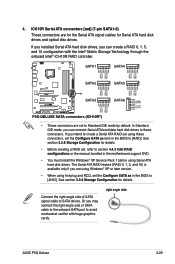
... Storage Technology through the onboard Intel® ICH10R RAID controller. • These connectors are set the Configure SATA as item in the motherboard support DVD. • You must install the Windows® XP Service Pack 1 before using hot-plug and NCQ, set to Standard IDE mode by default. Connect the right-angle side of SATA cable to the onboard SATA port to [RAID]. If you installed Serial ATA hard disk drives, you are for the Serial ATA signal cables for details. 4. ICH10R Serial ATA connectors [red] (7-pin SATA1...
... Storage Technology through the onboard Intel® ICH10R RAID controller. • These connectors are set the Configure SATA as item in the motherboard support DVD. • You must install the Windows® XP Service Pack 1 before using hot-plug and NCQ, set to Standard IDE mode by default. Connect the right-angle side of SATA cable to the onboard SATA port to [RAID]. If you installed Serial ATA hard disk drives, you are for the Serial ATA signal cables for details. 4. ICH10R Serial ATA connectors [red] (7-pin SATA1...
User Manual
Page 56
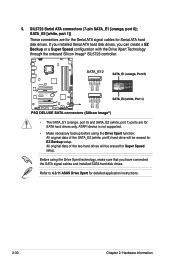
... before using the Drive Xpert technology, make sure that you can create a EZ Backup or a Super Speed configuration with the Drive Xpert Technology through the onboard Silicon Image® SIL5723 controller. 5. SATA_E2 [white, port 1]) These connectors are for EZ Backup setup. All original data of the SATA_E2 (white, port1) hard drive will be erased for SATA hard drives only. Refer to 4.3.11 ASUS Drive Xpert for Serial ATA hard disk drives. SATA_E1 (orange, Port...
... before using the Drive Xpert technology, make sure that you can create a EZ Backup or a Super Speed configuration with the Drive Xpert Technology through the onboard Silicon Image® SIL5723 controller. 5. SATA_E2 [white, port 1]) These connectors are for EZ Backup setup. All original data of the SATA_E2 (white, port1) hard drive will be erased for SATA hard drives only. Refer to 4.3.11 ASUS Drive Xpert for Serial ATA hard disk drives. SATA_E1 (orange, Port...

User Manual
Page 71
... Drivers menu appears. 2. The ASUS Update utility is available in case you to manage and update the motherboard Basic Input/Output System (BIOS) setup. 1. ASUS Update requires an Internet connection either through a network or an Internet Service Provider (ISP). Installing ASUS Update To install ASUS Update: 1. ASUS AFUDOS (Updates the BIOS using a floppy disk or USB flash disk.) 3. This utility is copied to the corresponding sections for details on these utilities. Save a copy of the original motherboard BIOS file to a bootable floppy disk or USB flash disk in the support DVD...
... Drivers menu appears. 2. The ASUS Update utility is available in case you to manage and update the motherboard Basic Input/Output System (BIOS) setup. 1. ASUS Update requires an Internet connection either through a network or an Internet Service Provider (ISP). Installing ASUS Update To install ASUS Update: 1. ASUS AFUDOS (Updates the BIOS using a floppy disk or USB flash disk.) 3. This utility is copied to the corresponding sections for details on these utilities. Save a copy of the original motherboard BIOS file to a bootable floppy disk or USB flash disk in the support DVD...
User Manual
Page 81
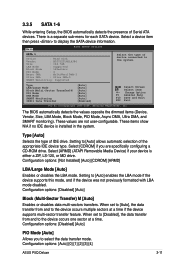
... are specifically configuring a CD-ROM drive. Configuration options: [Disabled] [Auto] PIO Mode [Auto] Allows you are not user-configurable. When set to [Auto], the data transfer from and to select the data transfer mode. The BIOS automatically detects the values opposite the dimmed items (Device, Vendor, Size, LBA Mode, Block Mode, PIO Mode, Async DMA, Ultra DMA, and SMART monitoring). Select [CDROM] if you to the device occurs one sector at a time if the device supports...
... are specifically configuring a CD-ROM drive. Configuration options: [Disabled] [Auto] PIO Mode [Auto] Allows you are not user-configurable. When set to [Auto], the data transfer from and to select the data transfer mode. The BIOS automatically detects the values opposite the dimmed items (Device, Vendor, Size, LBA Mode, Block Mode, PIO Mode, Async DMA, Ultra DMA, and SMART monitoring). Select [CDROM] if you to the device occurs one sector at a time if the device supports...
User Manual
Page 82
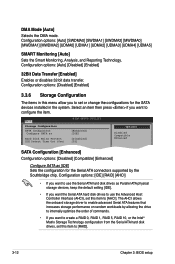
...Options Disabled Compatible Enhanced SATA Configuration [Enhanced] Configuration options: [Disabled] [Compatible] [Enhanced] Configure SATA as Parallel ATA physical storage devices, keep the default setting [IDE]. • If you want to use the Serial ATA hard disk drives as [IDE] Sets the configuration for the SATA devices installed in this item to create a RAID 0, RAID 1, RAID 5, RAID 10, or the Intel® Matrix Storage Technology configuration from the Serial ATA hard disk drives, set or change the configurations for the Serial ATA connectors supported by the Southbridge chip...
...Options Disabled Compatible Enhanced SATA Configuration [Enhanced] Configuration options: [Disabled] [Compatible] [Enhanced] Configure SATA as Parallel ATA physical storage devices, keep the default setting [IDE]. • If you want to use the Serial ATA hard disk drives as [IDE] Sets the configuration for the SATA devices installed in this item to create a RAID 0, RAID 1, RAID 5, RAID 10, or the Intel® Matrix Storage Technology configuration from the Serial ATA hard disk drives, set or change the configurations for the Serial ATA connectors supported by the Southbridge chip...
User Manual
Page 85
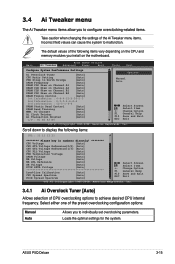
... B2 B3 B4 Options Manual Auto Select Screen Select Item +- Select either one of CPU overclocking options to achieve desired CPU internal frequency. ASUS P5Q Deluxe 3-15 BIOS SETUP UTILITY Main Ai Tweaker Advanced Power Boot Tools Exit Configure System Performance Settings Ai Overclock Tuner [Auto] CPU Ratio Setting [Auto] FSB Strap to North Bridge [Auto] DRAM Frequency [Auto] DRAM CLK Skew on Channel A1 [Auto] DRAM CLK Skew on Channel A2 [Auto] DRAM CLK Skew on Channel B1 [Auto] DRAM CLK Skew on the motherboard. Change Option F1 General...
... B2 B3 B4 Options Manual Auto Select Screen Select Item +- Select either one of CPU overclocking options to achieve desired CPU internal frequency. ASUS P5Q Deluxe 3-15 BIOS SETUP UTILITY Main Ai Tweaker Advanced Power Boot Tools Exit Configure System Performance Settings Ai Overclock Tuner [Auto] CPU Ratio Setting [Auto] FSB Strap to North Bridge [Auto] DRAM Frequency [Auto] DRAM CLK Skew on Channel A1 [Auto] DRAM CLK Skew on Channel A2 [Auto] DRAM CLK Skew on Channel B1 [Auto] DRAM CLK Skew on the motherboard. Change Option F1 General...

User Manual
Page 93
... the TCG/TPM SUPPORT item to enable or disable the TPM security chip. Execute TPM COMMAND [Last setting] Allows you to [YES]. Configuration options: [Last setting] [Disabled] [Enabled] ASUS P5Q Deluxe 3-23 Configuration options: [YES] [NO] The following items appear only when you set the TPM (Trusted Platform Module) features. BIOS SETUP UTILITY Main Ai Tweaker Advanced Power Boot Tools Exit TPM Configuration CPU Configuration Chipset Onboard Devices Configuration USB Configuration PCIPnP Configure CPU. Select Screen Select Item Enter Go to Sub...
... the TCG/TPM SUPPORT item to enable or disable the TPM security chip. Execute TPM COMMAND [Last setting] Allows you to [YES]. Configuration options: [Last setting] [Disabled] [Enabled] ASUS P5Q Deluxe 3-23 Configuration options: [YES] [NO] The following items appear only when you set the TPM (Trusted Platform Module) features. BIOS SETUP UTILITY Main Ai Tweaker Advanced Power Boot Tools Exit TPM Configuration CPU Configuration Chipset Onboard Devices Configuration USB Configuration PCIPnP Configure CPU. Select Screen Select Item Enter Go to Sub...
User Manual
Page 97
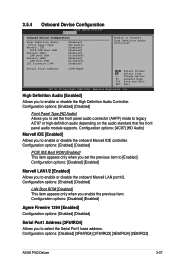
... ASUS P5Q Deluxe 3-27 High Definition Audio [Enabled] Allows you to set the previous item to legacy AC'97 or high-definition audio depending on the audio standard that the front panel audio module supports. Configuration options: [Enabled] [Disabled] Front Panel Type [HD Audio] Allows you to enable or disable the onboard Marvell IDE controller. Configuration options: [Enabled] [Disabled] LAN Boot ROM [Disabled] This item appears only when you set the front panel audio connector (AAFP) mode to [Enabled]. 3.5.4 Onboard Device Configuration BIOS SETUP UTILITY Advanced Onboard...
... ASUS P5Q Deluxe 3-27 High Definition Audio [Enabled] Allows you to set the previous item to legacy AC'97 or high-definition audio depending on the audio standard that the front panel audio module supports. Configuration options: [Enabled] [Disabled] Front Panel Type [HD Audio] Allows you to enable or disable the onboard Marvell IDE controller. Configuration options: [Enabled] [Disabled] LAN Boot ROM [Disabled] This item appears only when you set the front panel audio connector (AAFP) mode to [Enabled]. 3.5.4 Onboard Device Configuration BIOS SETUP UTILITY Advanced Onboard...
User Manual
Page 99
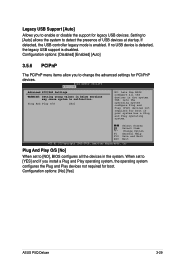
... the operating system configure Plug and Play (PnP) devices not required for legacy USB devices. Change Option F1 General Help F10 Save and Exit ESC Exit v02.61 (C)Copyright 1985-2008, American Megatrends, Inc. If detected, the USB controller legacy mode is disabled. Select Screen Select Item +- Configuration options: [No] [Yes] ASUS P5Q Deluxe 3-29 When set to [YES] and if you to enable or disable the support for boot if your system has...
... the operating system configure Plug and Play (PnP) devices not required for legacy USB devices. Change Option F1 General Help F10 Save and Exit ESC Exit v02.61 (C)Copyright 1985-2008, American Megatrends, Inc. If detected, the USB controller legacy mode is disabled. Select Screen Select Item +- Configuration options: [No] [Yes] ASUS P5Q Deluxe 3-29 When set to [YES] and if you to enable or disable the support for boot if your system has...

User Manual
Page 100
... to be used for system suspend. Configuration options: [No] [Yes] 3.6.3 ACPI 2.0 Support [Disabled] Add additional tables as per ACPI 2.0 specifications. Configuration options: [Disabled] [Enabled] 3.6.4 ACPI APIC Support [Enabled] Allows you to change the settings for the Advanced Power Management (APM). Configuration options: [Disabled] [Enabled] 3-30 Chapter 3: BIOS setup BIOS SETUP UTILITY Main Ai Tweaker Advanced Power Boot Tools Exit Suspend Mode Repost Video on S3/STR resume. 3.6 Power menu The Power menu items allow you to enable or disable the...
... to be used for system suspend. Configuration options: [No] [Yes] 3.6.3 ACPI 2.0 Support [Disabled] Add additional tables as per ACPI 2.0 specifications. Configuration options: [Disabled] [Enabled] 3.6.4 ACPI APIC Support [Enabled] Allows you to change the settings for the Advanced Power Management (APM). Configuration options: [Disabled] [Enabled] 3-30 Chapter 3: BIOS setup BIOS SETUP UTILITY Main Ai Tweaker Advanced Power Boot Tools Exit Suspend Mode Repost Video on S3/STR resume. 3.6 Power menu The Power menu items allow you to enable or disable the...
User Manual
Page 106
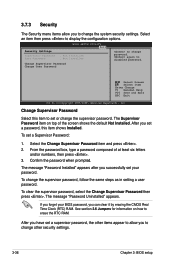
BIOS SETUP UTILITY Boot Security Settings Supervisor Password : Not Installed User Password : Not Installed Change Supervisor Password Change User Password to display the configuration options. The Supervisor Password item on how to erase the RTC RAM. To clear the supervisor password, select the Change Supervisor Password then press . After you have set a supervisor password, the other security settings. 3-36 Chapter 3: BIOS setup After you successfully set a password, this item to disabled password. The message "Password Installed" appears after you set your...
BIOS SETUP UTILITY Boot Security Settings Supervisor Password : Not Installed User Password : Not Installed Change Supervisor Password Change User Password to display the configuration options. The Supervisor Password item on how to erase the RTC RAM. To clear the supervisor password, select the Change Supervisor Password then press . After you have set a supervisor password, the other security settings. 3-36 Chapter 3: BIOS setup After you successfully set a password, this item to disabled password. The message "Password Installed" appears after you set your...
User Manual
Page 108
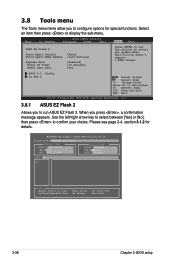
... (C)Copyright 1985-2008, American Megatrends, Inc. 3.8.1 ASUS EZ Flash 2 Allows you press , a confirmation message appears. Select an item then press to confirm your choice. BIOS SETUP UTILITY Main Ai Tweaker Advanced Power Boot Tools Exit ASUS EZ Flash 2 Drive Xpert Control Drive Xpert Mode Update Express Gate Enter OS Timer Reset User Data [Auto] [Last Setting] [Enabled] [10 Seconds] [No] Press ENTER to select and update BIOS. When you to run the utility to run ASUS EZ Flash 2.
... (C)Copyright 1985-2008, American Megatrends, Inc. 3.8.1 ASUS EZ Flash 2 Allows you press , a confirmation message appears. Select an item then press to confirm your choice. BIOS SETUP UTILITY Main Ai Tweaker Advanced Power Boot Tools Exit ASUS EZ Flash 2 Drive Xpert Control Drive Xpert Mode Update Express Gate Enter OS Timer Reset User Data [Auto] [Last Setting] [Enabled] [10 Seconds] [No] Press ENTER to select and update BIOS. When you to run the utility to run ASUS EZ Flash 2.

User Manual
Page 117
Use the setup procedures presented in your hardware. • Motherboard settings and hardware options vary. ASUS P5Q Deluxe 4-1 The contents of your computer. Double-click the ASSETUP.EXE to avail all motherboard features. 4.1 Installing an operating system This motherboard supports Windows® XP/ 64-bit XP/ Vista™ operating systems (OS). Always install the latest OS version and corresponding updates to maximize the features of the support DVD are subject...
Use the setup procedures presented in your hardware. • Motherboard settings and hardware options vary. ASUS P5Q Deluxe 4-1 The contents of your computer. Double-click the ASSETUP.EXE to avail all motherboard features. 4.1 Installing an operating system This motherboard supports Windows® XP/ 64-bit XP/ Vista™ operating systems (OS). Always install the latest OS version and corresponding updates to maximize the features of the support DVD are subject...
User Manual
Page 151
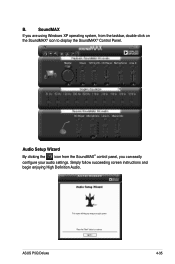
B. ASUS P5Q Deluxe 4-35 SoundMAX If you are using Windows XP operating system, from the SoundMAX® control panel, you can easily configure your audio settings. Audio Setup Wizard By clicking the icon from the taskbar, double-click on the SoundMAX® icon to display the SoundMAX® Control Panel. Simply follow succeeding screen instructions and begin enjoying High Definition Audio.
B. ASUS P5Q Deluxe 4-35 SoundMAX If you are using Windows XP operating system, from the SoundMAX® control panel, you can easily configure your audio settings. Audio Setup Wizard By clicking the icon from the taskbar, double-click on the SoundMAX® icon to display the SoundMAX® Control Panel. Simply follow succeeding screen instructions and begin enjoying High Definition Audio.
User Manual
Page 165
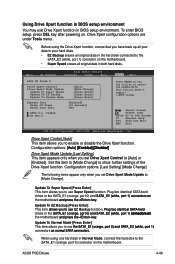
...;r�s�. BIOS SETUP UTILITY Main Ai Tweaker Advanced Power Boot Tools Exit ASUS EZ Flash 2 Drive Xpert Control Drive Xpert Mode Update Update To Super Speed Update To EZ Backup Update To Normal Mode Express Gate Enter OS Timer Reset User Data ASUS O.C. Update To Normal Mode [Press Enter] This item allows you to use Super Speed function. Drive Xpert configuration options are under Tools menu. Drive Xpert Control [Auto] This item allows you have back up all your data in your hard disks. • EZ...
...;r�s�. BIOS SETUP UTILITY Main Ai Tweaker Advanced Power Boot Tools Exit ASUS EZ Flash 2 Drive Xpert Control Drive Xpert Mode Update Update To Super Speed Update To EZ Backup Update To Normal Mode Express Gate Enter OS Timer Reset User Data ASUS O.C. Update To Normal Mode [Press Enter] This item allows you to use Super Speed function. Drive Xpert configuration options are under Tools menu. Drive Xpert Control [Auto] This item allows you have back up all your data in your hard disks. • EZ...
User Manual
Page 177
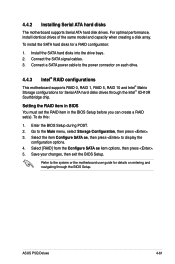
...item options, then press . 5. To install the SATA hard disks for Serial ATA hard disks drives through the BIOS Setup. Connect the SATA signal cables. 3. Connect a SATA power cable to display the configuration options. 4. Refer to the Main menu, select Storage Configuration, then press . 3. ASUS P5Q Deluxe 4-61 4.4.2 Installing Serial ATA hard disks The motherboard supports Serial ATA hard disk drives. For optimal performance, install identical drives of the same model and capacity when creating a disk array. To do this: 1. Go to the system or the motherboard user guide for...
...item options, then press . 5. To install the SATA hard disks for Serial ATA hard disks drives through the BIOS Setup. Connect the SATA signal cables. 3. Connect a SATA power cable to display the configuration options. 4. Refer to the Main menu, select Storage Configuration, then press . 3. ASUS P5Q Deluxe 4-61 4.4.2 Installing Serial ATA hard disks The motherboard supports Serial ATA hard disk drives. For optimal performance, install identical drives of the same model and capacity when creating a disk array. To do this: 1. Go to the system or the motherboard user guide for...
User Manual
Page 186
... 4: Software support During the OS installation, select Intel(R) SATA RAID Controller (Desktop ICH10R). 3. Insert the floppy disk/USB device with RAID driver into the floppy disk drive/USB port. 2. When prompted to select the SCSI adapter to install, make sure you to press the key to install third-party SCSI or RAID driver. 2. Press then insert the floppy disk with RAID driver into the floppy disk drive. 3. To install the RAID driver in Windows® Vista: 1. Follow the succeeding screen instructions to complete the installation. To install the RAID driver...
... 4: Software support During the OS installation, select Intel(R) SATA RAID Controller (Desktop ICH10R). 3. Insert the floppy disk/USB device with RAID driver into the floppy disk drive/USB port. 2. When prompted to select the SCSI adapter to install, make sure you to press the key to install third-party SCSI or RAID driver. 2. Press then insert the floppy disk with RAID driver into the floppy disk drive. 3. To install the RAID driver in Windows® Vista: 1. Follow the succeeding screen instructions to complete the installation. To install the RAID driver...


