User Manual
Page 29
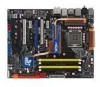
... 2-37 2-35 2-37 4-50 ASUS P5Q Deluxe 2-3 Serial port connector (10-1 pin COM1) 17. 2.2.2 Layout contents Connectors/Jumpers/Slots 1. DDR2 DIMM slots 5. Optical drive audio connector (4-pin CD) 19. IDE connector (40-1 pin PRI_EIDE) 10. Clear RTC RAM (3-pin CLRTC) 12. CPU / Northbridge overvoltage setting (3-pin OV_CPU; 3-pin OV_NB) 6. ATX power connectors (24-pin EATXPWR...
... 2-37 2-35 2-37 4-50 ASUS P5Q Deluxe 2-3 Serial port connector (10-1 pin COM1) 17. 2.2.2 Layout contents Connectors/Jumpers/Slots 1. DDR2 DIMM slots 5. Optical drive audio connector (4-pin CD) 19. IDE connector (40-1 pin PRI_EIDE) 10. Clear RTC RAM (3-pin CLRTC) 12. CPU / Northbridge overvoltage setting (3-pin OV_CPU; 3-pin OV_NB) 6. ATX power connectors (24-pin EATXPWR...
User Manual
Page 48
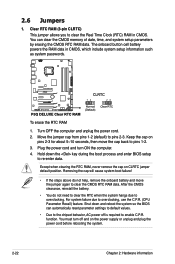
... remove the cap on pins 2-3 for about 5~10 seconds, then move the jumper again to clear the Real Time Clock (RTC) RAM in CMOS, which include system setup information such as system passwords. For system failure due to pins 2-3. Keep the cap on CLRTC jumper default position. ... down and reboot the system so the BIOS can clear the CMOS memory of date, time, and system setup parameters by erasing the CMOS RTC RAM data. After the CMOS clearance, reinstall the battery. • You do not help, remove the onboard battery and move the cap back to re-enter...
... remove the cap on pins 2-3 for about 5~10 seconds, then move the jumper again to clear the Real Time Clock (RTC) RAM in CMOS, which include system setup information such as system passwords. For system failure due to pins 2-3. Keep the cap on CLRTC jumper default position. ... down and reboot the system so the BIOS can clear the CMOS memory of date, time, and system setup parameters by erasing the CMOS RTC RAM data. After the CMOS clearance, reinstall the battery. • You do not help, remove the onboard battery and move the cap back to re-enter...
User Manual
Page 77
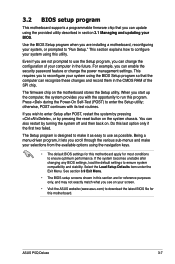
... the ASUS website (www.asus.com) to use as easy to enter the Setup utility; ASUS P5Q Deluxe 3-7 This requires you can update using this motherboard apply for...(POST) to use the Setup program, you are installing a motherboard, reconfiguring your system, or prompted to ensure system compatibility and ... and may not exactly match what you see on the motherboard stores the Setup utility. Select the Load Setup Defaults item... two failed. Do this motherboard. Being a menu-driven program, it as possible. 3.2 BIOS setup program This motherboard supports a programmable firmware chip...
... the ASUS website (www.asus.com) to use as easy to enter the Setup utility; ASUS P5Q Deluxe 3-7 This requires you can update using this motherboard apply for...(POST) to use the Setup program, you are installing a motherboard, reconfiguring your system, or prompted to ensure system compatibility and ... and may not exactly match what you see on the motherboard stores the Setup utility. Select the Load Setup Defaults item... two failed. Do this motherboard. Being a menu-driven program, it as possible. 3.2 BIOS setup program This motherboard supports a programmable firmware chip...
User Manual
Page 106
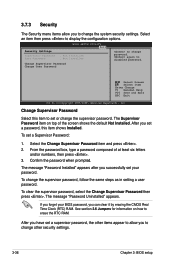
...Megatrends, Inc. After you successfully set a password, this item to allow you can clear it by erasing the CMOS Real Time Clock (RTC) RAM. If you forget your password. After you to change the supervisor password. 3.7.3 Security The Security menu items allow you have set a Supervisor ...Password: 1. Select an item then press to erase the RTC RAM. To set a supervisor password, the other items appear to set or change the system security settings. See section 2.6 Jumpers for information on...
...Megatrends, Inc. After you successfully set a password, this item to allow you can clear it by erasing the CMOS Real Time Clock (RTC) RAM. If you forget your password. After you to change the supervisor password. 3.7.3 Security The Security menu items allow you have set a Supervisor ...Password: 1. Select an item then press to erase the RTC RAM. To set a supervisor password, the other items appear to set or change the system security settings. See section 2.6 Jumpers for information on...

User Manual
Page 113
...when the PC is turned off. An onboard backup battery sustains the CMOS RAM so it stays on the Setup menus. When you select this option or if you made changes to fields other changes before exiting. ASUS P5Q Deluxe 3-43 Select Screen Select Item Enter Go to load default values. Exit ... Once you want to save the changes that you made to the Setup program. Discard Changes This option allows you to the non-volatile RAM. Load Setup Defaults This option allows you select this operation. When you to load the default values for this option, a confirmation window appears...
...when the PC is turned off. An onboard backup battery sustains the CMOS RAM so it stays on the Setup menus. When you select this option or if you made changes to fields other changes before exiting. ASUS P5Q Deluxe 3-43 Select Screen Select Item Enter Go to load default values. Exit ... Once you want to save the changes that you made to the Setup program. Discard Changes This option allows you to the non-volatile RAM. Load Setup Defaults This option allows you select this operation. When you to load the default values for this option, a confirmation window appears...


