User Manual
Page 7
5. 從 CPU PnP 6. 請確認 CPU CPU CPU PnP 保護蓋 CPU CPU CPU CPU 7 A B A B
5. 從 CPU PnP 6. 請確認 CPU CPU CPU PnP 保護蓋 CPU CPU CPU CPU 7 A B A B

User Manual
Page 3
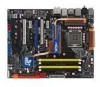
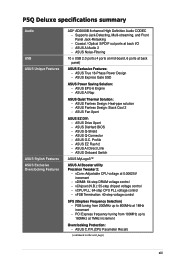
... About this guide x P5Q Deluxe specifications summary xii Chapter 1: Product introduction 1.1 Welcome 1-1 1.2 Package contents 1-1 1.3 Special features 1-2 1.3.1 Product highlights 1-2 1.3.2 ASUS unique features 1-3 1.3.3 ASUS intelligent performance and overclocking features 1-7 Chapter 2: Hardware information 2.1 Before you proceed 2-1 2.2 Motherboard overview 2-2 2.2.1 Motherboard layout 2-2 2.2.2 Layout contents 2-3 2.2.3 Placement direction 2-4 2.2.4 Screw holes 2-4 2.3 Central Processing Unit (CPU 2-5 2.3.1 Installing the CPU 2-6 2.3.2 Installing the CPU heatsink and fan...
... About this guide x P5Q Deluxe specifications summary xii Chapter 1: Product introduction 1.1 Welcome 1-1 1.2 Package contents 1-1 1.3 Special features 1-2 1.3.1 Product highlights 1-2 1.3.2 ASUS unique features 1-3 1.3.3 ASUS intelligent performance and overclocking features 1-7 Chapter 2: Hardware information 2.1 Before you proceed 2-1 2.2 Motherboard overview 2-2 2.2.1 Motherboard layout 2-2 2.2.2 Layout contents 2-3 2.2.3 Placement direction 2-4 2.2.4 Screw holes 2-4 2.3 Central Processing Unit (CPU 2-5 2.3.1 Installing the CPU 2-6 2.3.2 Installing the CPU heatsink and fan...
User Manual
Page 7
... Direct Link 4-28 4.3.10 AI Audio 2 (SoundMAX® High Definition Audio utility)... 4-30 4.3.11 ASUS Drive Xpert 4-39 4.3.12 ASUS Express Gate SSD 4-50 4.4 RAID configurations 4-60 4.4.1 RAID definitions 4-60 4.4.2 Installing Serial ATA hard disks... 4-61 4.4.3 Intel® RAID configurations 4-61 4.5 Creating a RAID driver disk 4-69 4.5.1 Creating a RAID driver disk without entering the OS.... 4-69 4.5.2 Creating a RAID driver disk in Windows 4-69 Appendix: CPU...
... Direct Link 4-28 4.3.10 AI Audio 2 (SoundMAX® High Definition Audio utility)... 4-30 4.3.11 ASUS Drive Xpert 4-39 4.3.12 ASUS Express Gate SSD 4-50 4.4 RAID configurations 4-60 4.4.1 RAID definitions 4-60 4.4.2 Installing Serial ATA hard disks... 4-61 4.4.3 Intel® RAID configurations 4-61 4.5 Creating a RAID driver disk 4-69 4.5.1 Creating a RAID driver disk without entering the OS.... 4-69 4.5.2 Creating a RAID driver disk in Windows 4-69 Appendix: CPU...
User Manual
Page 10
... DVD that comes with the motherboard package and the software. • Appendix: CPU features The Appendix describes the CPU features and technologies that you need when installing and configuring the motherboard. Refer to change system settings through the BIOS Setup menus. ASUS websites The ASUS website provides updated information on the motherboard. • Chapter 3: BIOS setup This...
... DVD that comes with the motherboard package and the software. • Appendix: CPU features The Appendix describes the CPU features and technologies that you need when installing and configuring the motherboard. Refer to change system settings through the BIOS Setup menus. ASUS websites The ASUS website provides updated information on the motherboard. • Chapter 3: BIOS setup This...
User Manual
Page 12
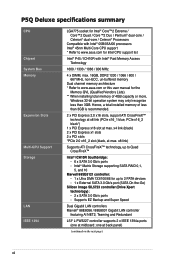
...1 x External SATA 3.0 Gb/s port (SATA On-the-Go) Silicon Image SIL5723 controller (Drive Xpert technology): - 2 x SATA 3.0 Gb/s ports - P5Q Deluxe specifications summary CPU Chipset System Bus Memory Expansion Slots Multi-GPU Support Storage LAN IEEE 1394 LGA775 socket for Intel® Core™2 Extreme / Core™2 Quad...® dual-core / Celeron® Processors Compatible with Intel® 05B/05A/06 processors Intel® 45nm Multi-Core CPU support * Refer to www.asus.com for the Memory QVL (Qualified Vendors Lists). ** When installing total memory of less than 3GB. Hence, a total ...
...1 x External SATA 3.0 Gb/s port (SATA On-the-Go) Silicon Image SIL5723 controller (Drive Xpert technology): - 2 x SATA 3.0 Gb/s ports - P5Q Deluxe specifications summary CPU Chipset System Bus Memory Expansion Slots Multi-GPU Support Storage LAN IEEE 1394 LGA775 socket for Intel® Core™2 Extreme / Core™2 Quad...® dual-core / Celeron® Processors Compatible with Intel® 05B/05A/06 processors Intel® 45nm Multi-Core CPU support * Refer to www.asus.com for the Memory QVL (Qualified Vendors Lists). ** When installing total memory of less than 3GB. Hence, a total ...
User Manual
Page 13
... control - vFSB Termination: 40-step voltage control SFS (Stepless Frequency Selection) - ASUS Q-Shield - ASUS O.C. vCore: Adjustable CPU voltage at back panel) ASUS Exclusive Features: - P5Q Deluxe specifications summary Audio USB ASUS Unique Features ASUS Stylish Features ASUS Exclusive Overclocking Features ADI® AD2000B 8-channel High Definition Audio CODEC - ASUS DieHard BIOS - FSB tuning from 100MHz up to 180MHz at 1MHz...
... control - vFSB Termination: 40-step voltage control SFS (Stepless Frequency Selection) - ASUS Q-Shield - ASUS O.C. vCore: Adjustable CPU voltage at back panel) ASUS Exclusive Features: - P5Q Deluxe specifications summary Audio USB ASUS Unique Features ASUS Stylish Features ASUS Exclusive Overclocking Features ADI® AD2000B 8-channel High Definition Audio CODEC - ASUS DieHard BIOS - FSB tuning from 100MHz up to 180MHz at 1MHz...

User Manual
Page 14
P5Q Deluxe specifications summary Back Panel I/O Ports 1 x PS/2 Keyboard / Mouse combo port 1 x S/PDIF Out (Coaxial + Optical) port 1 x External SATA port 1 x IEEE1394a port 2 x RJ45 ports 6 x USB 2.0/1.1 ports 8-channel Audio I/O ports Internal I/O Connectors 2 x USB connectors support additional 4 USB ports 1 x Floppy disk drive connector 1 x COM connector 1 x IDE connector 6 x SATA connectors (Red) 1 x CPU... Intrusion Support DVD Contents Drivers ASUS PC Probe II ASUS Update ASUS AI Suite Image-Editing Suite Anti-virus software (OEM version) Form Factor ATX Form Factor, 12"x 9.6" ...
P5Q Deluxe specifications summary Back Panel I/O Ports 1 x PS/2 Keyboard / Mouse combo port 1 x S/PDIF Out (Coaxial + Optical) port 1 x External SATA port 1 x IEEE1394a port 2 x RJ45 ports 6 x USB 2.0/1.1 ports 8-channel Audio I/O ports Internal I/O Connectors 2 x USB connectors support additional 4 USB ports 1 x Floppy disk drive connector 1 x COM connector 1 x IDE connector 6 x SATA connectors (Red) 1 x CPU... Intrusion Support DVD Contents Drivers ASUS PC Probe II ASUS Update ASUS AI Suite Image-Editing Suite Anti-virus software (OEM version) Form Factor ATX Form Factor, 12"x 9.6" ...

User Manual
Page 19
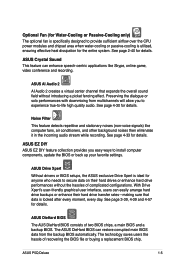
... CPU cooler / system fans), the EPU automatically provides the most popular Instant Messengers (IM) like MSN, Skype, Google talk, QQ, and Yahoo! ASUS P5Q Deluxe 1-3 With auto phase switching for managing traffic between two separate networks. ASUS True 16-Phase Power Design The breakthrough technology of data from bootup, Express Gate is bringing to the ASUS motherboards...
... CPU cooler / system fans), the EPU automatically provides the most popular Instant Messengers (IM) like MSN, Skype, Google talk, QQ, and Yahoo! ASUS P5Q Deluxe 1-3 With auto phase switching for managing traffic between two separate networks. ASUS True 16-Phase Power Design The breakthrough technology of data from bootup, Express Gate is bringing to the ASUS motherboards...
User Manual
Page 20
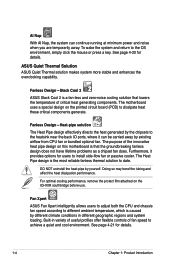
...so may bend the tubing and affect the heat dissipation performance. Fan Xpert ASUS Fan Xpert intelligently allows users to adjust both the CPU and chassis fan speed according to date. Fanless Design-Stack Cool 2 ASUS Stack Cool 2 is the most reliable fanless thermal solution to different ambient... running at minimum power and noise when you are temporarily away. For optimal cooling performance, remove the protect film attached on this motherboard is caused by yourself. The Heat Pipe design is a fan-less and zero-noise cooling solution that the groundbreaking fanless design does...
...so may bend the tubing and affect the heat dissipation performance. Fan Xpert ASUS Fan Xpert intelligently allows users to adjust both the CPU and chassis fan speed according to date. Fanless Design-Stack Cool 2 ASUS Stack Cool 2 is the most reliable fanless thermal solution to different ambient... running at minimum power and noise when you are temporarily away. For optimal cooling performance, remove the protect film attached on this motherboard is caused by yourself. The Heat Pipe design is a fan-less and zero-noise cooling solution that the groundbreaking fanless design does...
User Manual
Page 21
...BIOS can easily arrange hard drive backups or enhance their hard drives or enhance hard drive performances without introducing a picket fencing effect. ASUS P5Q Deluxe 1-5 Preserving the dialogue or solo performances with downmixing from the backup BIOS automatically. See page 4-30 for details. See page ... can restore corrupted main BIOS data from multichannels will allow you easy ways to provide sufficient airflow over the CPU power modules and chipset area when water-cooling or passive-cooling is utilized, ensuring effective heat dissipation for the entire system...
...BIOS can easily arrange hard drive backups or enhance their hard drives or enhance hard drive performances without introducing a picket fencing effect. ASUS P5Q Deluxe 1-5 Preserving the dialogue or solo performances with downmixing from the backup BIOS automatically. See page 4-30 for details. See page ... can restore corrupted main BIOS data from multichannels will allow you easy ways to provide sufficient airflow over the CPU power modules and chipset area when water-cooling or passive-cooling is utilized, ensuring effective heat dissipation for the entire system...
User Manual
Page 23
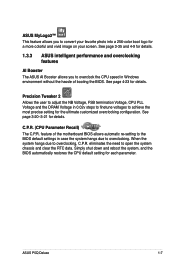
...Voltage in case the system hangs due to overclocking. C.P.R. (CPU Parameter Recall) The C.P.R. ASUS MyLogo3™ This feature allows you to overclock the CPU speed in Windows environment without the hassle of the motherboard BIOS allows automatic re-setting to the BIOS default settings in ... configuration. eliminates the need to overclocking, C.P.R. When the system hangs due to open the system chassis and clear the RTC data. ASUS P5Q Deluxe 1-7 See page 3-35 and 4-9 for details. feature of booting the BIOS. See page 4-23 for each parameter. Simply shut down...
...Voltage in case the system hangs due to overclocking. C.P.R. (CPU Parameter Recall) The C.P.R. ASUS MyLogo3™ This feature allows you to overclock the CPU speed in Windows environment without the hassle of the motherboard BIOS allows automatic re-setting to the BIOS default settings in ... configuration. eliminates the need to overclocking, C.P.R. When the system hangs due to open the system chassis and clear the RTC data. ASUS P5Q Deluxe 1-7 See page 3-35 and 4-9 for details. feature of booting the BIOS. See page 4-23 for each parameter. Simply shut down...
User Manual
Page 26
Chapter summary 2 2.1 Before you proceed 2-1 2.2 Motherboard overview 2-2 2.3 Central Processing Unit (CPU 2-5 2.4 System memory 2-11 2.5 Expansion slots 2-18 2.6 Jumper 2-22 2.7 Onboard switches 2-24 2.8 Connectors 2-25 2.9 Starting up for the first time 2-41 2.10 Turning off the computer 2-42 ASUS P5Q Deluxe
Chapter summary 2 2.1 Before you proceed 2-1 2.2 Motherboard overview 2-2 2.3 Central Processing Unit (CPU 2-5 2.4 System memory 2-11 2.5 Expansion slots 2-18 2.6 Jumper 2-22 2.7 Onboard switches 2-24 2.8 Connectors 2-25 2.9 Starting up for the first time 2-41 2.10 Turning off the computer 2-42 ASUS P5Q Deluxe
User Manual
Page 29
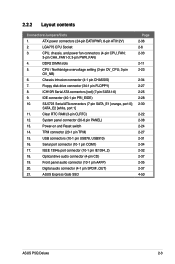
ATX power connectors (24-pin EATXPWR, 8-pin ATX12V) 2. DDR2 DIMM slots 5. Floppy disk drive connector (34-1 pin FLOPPY) 8. Power-on and Reset switch 14. Serial port ...) 7. 2.2.2 Layout contents Connectors/Jumpers/Slots 1. IEEE 1394a port connector (10-1 pin IE1394_2) 18. ASUS Express Gate SSD Page 2-36 2-6 2-33 2-11 2-23 2-34 2-27 2-25 2-28 2-30 2-22 2-38 2-24 2-27 2-31 2-34 2-32 2-37 2-35 2-37 4-50 ASUS P5Q Deluxe 2-3 CPU / Northbridge overvoltage setting (3-pin OV_CPU; 3-pin OV_NB) 6. Optical drive audio connector (4-pin CD...
ATX power connectors (24-pin EATXPWR, 8-pin ATX12V) 2. DDR2 DIMM slots 5. Floppy disk drive connector (34-1 pin FLOPPY) 8. Power-on and Reset switch 14. Serial port ...) 7. 2.2.2 Layout contents Connectors/Jumpers/Slots 1. IEEE 1394a port connector (10-1 pin IE1394_2) 18. ASUS Express Gate SSD Page 2-36 2-6 2-33 2-11 2-23 2-34 2-27 2-25 2-28 2-30 2-22 2-38 2-24 2-27 2-31 2-34 2-32 2-37 2-35 2-37 4-50 ASUS P5Q Deluxe 2-3 CPU / Northbridge overvoltage setting (3-pin OV_CPU; 3-pin OV_NB) 6. Optical drive audio connector (4-pin CD...

User Manual
Page 31
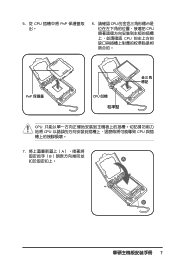
... damage is missing, or if you use FSB 800MHz CPU or above. • Upon purchase of the PnP cap. ASUS P5Q Deluxe 2-5 Contact your retailer immediately if the PnP cap is shipment/transit-related. • Keep the cap after installing the motherboard. 2.3 Central Processing Unit (CPU) The motherboard comes with the cap on the socket and the...
... damage is missing, or if you use FSB 800MHz CPU or above. • Upon purchase of the PnP cap. ASUS P5Q Deluxe 2-5 Contact your retailer immediately if the PnP cap is shipment/transit-related. • Keep the cap after installing the motherboard. 2.3 Central Processing Unit (CPU) The motherboard comes with the cap on the socket and the...
User Manual
Page 32
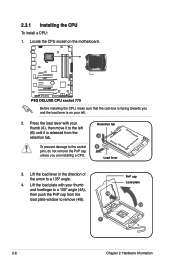
...pins, do not remove the PnP cap unless you and the load lever is on the motherboard. Press the load lever with your thumb (A), then move it is facing towards you are installing a CPU. Lift the load plate with your thumb and forefinger to the left . 2. Locate the... it to a 100º angle (4A), then push the PnP cap from the retention tab. Retention tab A B Load lever 3. 2.3.1 Installing the CPU To install a CPU: 1. Lift the load lever in the direction of the arrow to remove (4B). 3 PnP cap Load plate 4A 2-6 Chapter 2: Hardware information Before installing...
...pins, do not remove the PnP cap unless you and the load lever is on the motherboard. Press the load lever with your thumb (A), then move it is facing towards you are installing a CPU. Lift the load plate with your thumb and forefinger to the left . 2. Locate the... it to a 100º angle (4A), then push the PnP cap from the retention tab. Retention tab A B Load lever 3. 2.3.1 Installing the CPU To install a CPU: 1. Lift the load lever in the direction of the arrow to remove (4B). 3 PnP cap Load plate 4A 2-6 Chapter 2: Hardware information Before installing...

User Manual
Page 33
... the socket, making sure that the gold triangle is on the socket and damaging the CPU! Gold triangle mark The Thermal Interface Material is spread in an even thin layer. The CPU fits in contact with, ensuring that the heatsink will be in only one correct orientation. If ...bending the connectors on the bottom‑left corner of the CPU that it off immediately, and seek professional medical help. If so, skip this step. Apply several drops of thermal paste to wash it is toxic and inedible. ASUS P5Q Deluxe 2-7 Some heatsinks come with your skin, ensure to the ...
... the socket, making sure that the gold triangle is on the socket and damaging the CPU! Gold triangle mark The Thermal Interface Material is spread in an even thin layer. The CPU fits in contact with, ensuring that the heatsink will be in only one correct orientation. If ...bending the connectors on the bottom‑left corner of the CPU that it off immediately, and seek professional medical help. If so, skip this step. Apply several drops of thermal paste to wash it is toxic and inedible. ASUS P5Q Deluxe 2-7 Some heatsinks come with your skin, ensure to the ...
User Manual
Page 34
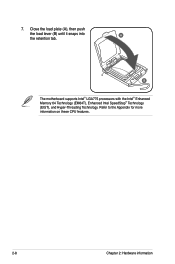
Refer to the Appendix for more information on these CPU features. 2-8 Chapter 2: Hardware information Close the load plate (A), then push the load lever (B) until it snaps into A the retention tab. 7. B The motherboard supports Intel® LGA775 processors with the Intel® Enhanced Memory 64 Technology (EM64T), Enhanced Intel SpeedStep® Technology (EIST), and Hyper-Threading Technology.
Refer to the Appendix for more information on these CPU features. 2-8 Chapter 2: Hardware information Close the load plate (A), then push the load lever (B) until it snaps into A the retention tab. 7. B The motherboard supports Intel® LGA775 processors with the Intel® Enhanced Memory 64 Technology (EM64T), Enhanced Intel SpeedStep® Technology (EIST), and Hyper-Threading Technology.
User Manual
Page 35
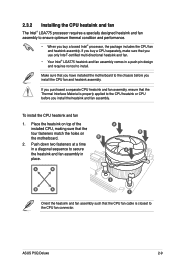
... the Thermal Interface Material is closest to the CPU fan connector. Place the heatsink on the motherboard. To install the CPU heatsink and fan 1. Make sure that the CPU fan cable is properly applied to the CPU heatsink or CPU before you install the CPU fan and heatsink assembly. B 2. ASUS P5Q Deluxe 2-9 A B A B A B A 1 1 Orient the heatsink and fan assembly such that...
... the Thermal Interface Material is closest to the CPU fan connector. Place the heatsink on the motherboard. To install the CPU heatsink and fan 1. Make sure that the CPU fan cable is properly applied to the CPU heatsink or CPU before you install the CPU fan and heatsink assembly. B 2. ASUS P5Q Deluxe 2-9 A B A B A B A 1 1 Orient the heatsink and fan assembly such that...

User Manual
Page 36
.... B 3. Hardware monitoring errors can occur if you fail to connect the CPU fan connector! A B A A B B A 4. Disconnect the CPU fan cable from the connector on the motherboard labeled CPU_FAN. DO NOT forget to plug this connector. 2.3.3 Uninstalling the CPU heatsink and fan To uninstall the CPU heatsink and fan 1. Pull up two fasteners at a time in a diagonal...
.... B 3. Hardware monitoring errors can occur if you fail to connect the CPU fan connector! A B A A B B A 4. Disconnect the CPU fan cable from the connector on the motherboard labeled CPU_FAN. DO NOT forget to plug this connector. 2.3.3 Uninstalling the CPU heatsink and fan To uninstall the CPU heatsink and fan 1. Pull up two fasteners at a time in a diagonal...
User Manual
Page 48
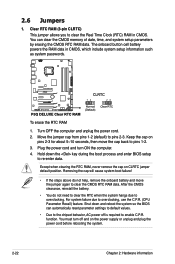
To erase the RTC RAM 1. Move the jumper cap from pins 1-2 (default) to overclocking, use the C.P.R. (CPU Parameter Recall) feature. For system failure due to pins 2-3. You must turn ON the computer. 4. You can automatically reset parameter settings to default values. • ...
To erase the RTC RAM 1. Move the jumper cap from pins 1-2 (default) to overclocking, use the C.P.R. (CPU Parameter Recall) feature. For system failure due to pins 2-3. You must turn ON the computer. 4. You can automatically reset parameter settings to default values. • ...


