Motherboard DIY Troubleshooting Guide
Page 71
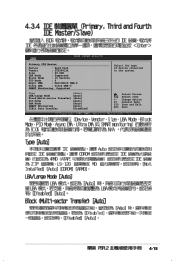
Change Option F1 General Help F10 Save and Exit ESC Exit 4-15 Select Screen Select Item +- Primary IDE Master Device : Hard Disk Vendor : ST320413A Size : 20.0GB LBA Mode : Supported Block Mode : 16 Sectors PIO Mode : 4 Async DMA : MultiWord DMA-2 Ultra DMA : Ultra DMA-5 SMART Monitoring: Supported Type [Auto] LBA/Large Mode [Auto] Block(Multi-sector Transfer) [Auto] PIO Mode [Auto] DMA Mode [Auto] SMART Monitoring [Auto] 32Bit Data Transfer [Disabled] Select the type of device connected to the system.
Change Option F1 General Help F10 Save and Exit ESC Exit 4-15 Select Screen Select Item +- Primary IDE Master Device : Hard Disk Vendor : ST320413A Size : 20.0GB LBA Mode : Supported Block Mode : 16 Sectors PIO Mode : 4 Async DMA : MultiWord DMA-2 Ultra DMA : Ultra DMA-5 SMART Monitoring: Supported Type [Auto] LBA/Large Mode [Auto] Block(Multi-sector Transfer) [Auto] PIO Mode [Auto] DMA Mode [Auto] SMART Monitoring [Auto] 32Bit Data Transfer [Disabled] Select the type of device connected to the system.
Motherboard DIY Troubleshooting Guide
Page 72
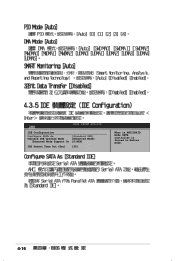
IDE Configuration Configure SATA As Onboard IDE Operate Mode Enhanced Mode Support On [Standard IDE] [Enhanced Mode] [S-ATA] IDE Detect Time Out (Sec) [35] When in AHCI/RAID mode SATA controller is forced to Native mode. 4-16
IDE Configuration Configure SATA As Onboard IDE Operate Mode Enhanced Mode Support On [Standard IDE] [Enhanced Mode] [S-ATA] IDE Detect Time Out (Sec) [35] When in AHCI/RAID mode SATA controller is forced to Native mode. 4-16
Motherboard DIY Troubleshooting Guide
Page 82
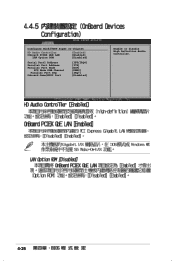
Configure Win627EHF Super IO Chipset HD Audio Controller Onboard PCIEX GbE LAN LAN Option ROM [Enabled] [Enabled] [Disabled] Serial Port1 Address Parallel Port Address Parallel Port Mode ECP Mode DMA Channel Parallel Port IRQ Onboard Game/MIDI Port [3F8/IRQ4] [378] [ECP] [DMA3] [IRQ7] [Disabled] Enable or disable High Definition Audio Controller. 4-26
Configure Win627EHF Super IO Chipset HD Audio Controller Onboard PCIEX GbE LAN LAN Option ROM [Enabled] [Enabled] [Disabled] Serial Port1 Address Parallel Port Address Parallel Port Mode ECP Mode DMA Channel Parallel Port IRQ Onboard Game/MIDI Port [3F8/IRQ4] [378] [ECP] [DMA3] [IRQ7] [Disabled] Enable or disable High Definition Audio Controller. 4-26
P5PL2 User's Manual for English Edition
Page 15
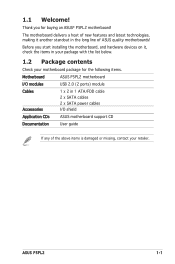
... you start installing the motherboard, and hardware devices on it another standout in 1 ATA/FDD cable 2 x SATA cables 2 x SATA power cables I /O modules USB 2.0 (2 ports) module Cables Accessories 1 x 2 in the long line of the above items is damaged or missing, contact your motherboard package for buying an ASUS® P5PL2 motherboard! ASUS P5PL2 1-1 1.1 Welcome! Before you for the following items. Motherboard ASUS P5PL2 motherboard I /O shield Application CDs ASUS motherboard support CD Documentation User guide If any of ASUS quality motherboards! The motherboard...
... you start installing the motherboard, and hardware devices on it another standout in 1 ATA/FDD cable 2 x SATA cables 2 x SATA power cables I /O modules USB 2.0 (2 ports) module Cables Accessories 1 x 2 in the long line of the above items is damaged or missing, contact your motherboard package for buying an ASUS® P5PL2 motherboard! ASUS P5PL2 1-1 1.1 Welcome! Before you for the following items. Motherboard ASUS P5PL2 motherboard I /O shield Application CDs ASUS motherboard support CD Documentation User guide If any of ASUS quality motherboards! The motherboard...
P5PL2 User's Manual for English Edition
Page 17
... the system chassis and clear the RTC data. This high speed interface is software compatible with customizable boot logos. ASUS Q-Fan technology The ASUS Q-Fan technology smartly adjusts the fan speeds according to the system loading to your system with existing PCI specifications. ASUS MyLogo™ This new feature present in case when the BIOS codes and data are corrupted. PCI Express™ interface The motherboard fully supports PCI Express, the latest I /O Port This motherboard provides convenient connectivity to...
... the system chassis and clear the RTC data. This high speed interface is software compatible with customizable boot logos. ASUS Q-Fan technology The ASUS Q-Fan technology smartly adjusts the fan speeds according to the system loading to your system with existing PCI specifications. ASUS MyLogo™ This new feature present in case when the BIOS codes and data are corrupted. PCI Express™ interface The motherboard fully supports PCI Express, the latest I /O Port This motherboard provides convenient connectivity to...
P5PL2 User's Manual for English Edition
Page 36
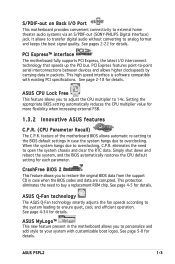
... cause you intend to use . 4. Secure the card to the chassis with it by adjusting the software settings. 1. Remove the bracket opposite the slot that they support. See Chapter 4 for the expansion card. When using PCI cards on the slot. 5. Failure to install expansion cards. Turn on the next page. 3. Refer to the table on BIOS setup. 2. Replace the system cover. 2.5.2 Configuring an expansion card After installing the expansion card, configure the...
... cause you intend to use . 4. Secure the card to the chassis with it by adjusting the software settings. 1. Remove the bracket opposite the slot that they support. See Chapter 4 for the expansion card. When using PCI cards on the slot. 5. Failure to install expansion cards. Turn on the next page. 3. Refer to the table on BIOS setup. 2. Replace the system cover. 2.5.2 Configuring an expansion card After installing the expansion card, configure the...
P5PL2 User's Manual for English Edition
Page 58
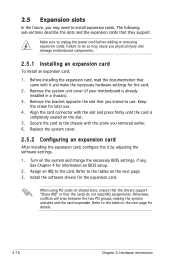
... a set of boot disks for the extension name. d. In the Open field, type D:\bootdisk\makeboot a: assuming that D is any user-assigned filename not more than eight alphanumeric characters for the main filename and three alphanumeric characters for Windows® 2000: a. Copy the original or the latest motherboard BIOS file to the bootable floppy disk. 4.1.2 AFUDOS utility...
... a set of boot disks for the extension name. d. In the Open field, type D:\bootdisk\makeboot a: assuming that D is any user-assigned filename not more than eight alphanumeric characters for the main filename and three alphanumeric characters for Windows® 2000: a. Copy the original or the latest motherboard BIOS file to the bootable floppy disk. 4.1.2 AFUDOS utility...
P5PL2 User's Manual for English Edition
Page 64
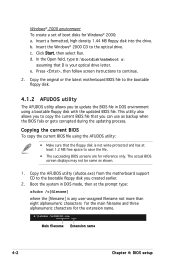
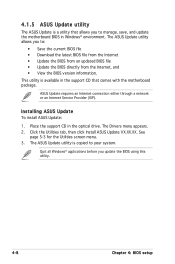
The Drivers menu appears. 2. The ASUS Update utility allows you to manage, save, and update the motherboard BIOS in Windows® environment. Click the Utilities tab, then click Install ASUS Update VX.XX.XX. The ASUS Update utility is available in the optical drive. Place the support CD in the support CD that allows you update the BIOS using this utility. 4-8 Chapter 4: BIOS setup Installing ASUS Update To install ASUS Update: 1. See page 5-3 for the Utilities screen menu. 3. This utility is copied to your system. Quit...
The Drivers menu appears. 2. The ASUS Update utility allows you to manage, save, and update the motherboard BIOS in Windows® environment. Click the Utilities tab, then click Install ASUS Update VX.XX.XX. The ASUS Update utility is available in the optical drive. Place the support CD in the support CD that allows you update the BIOS using this utility. 4-8 Chapter 4: BIOS setup Installing ASUS Update To install ASUS Update: 1. See page 5-3 for the Utilities screen menu. 3. This utility is copied to your system. Quit...
P5PL2 User's Manual for English Edition
Page 69
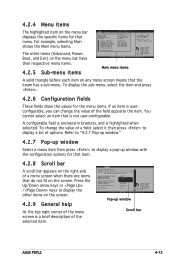
..., you can change the value of the field opposite the item. Configure DRAM Timing by SPD Memory Acceleration Mode DRAM Idle Timer DRAm Refresh Rate [Enabled] [Auto] [Auto] [Auto] Graphic Adapter Priority Graphics Aperture Size Spread Spectrum [AGP/PCI] [ 64 MB] [Enabled] ICH Delayed Transaction [Enabled] MPS Revision [1.4] Select Screen Select Item +- For example, selecting Main shows the Main menu items. The other items on the screen. To display the sub-menu, select...
..., you can change the value of the field opposite the item. Configure DRAM Timing by SPD Memory Acceleration Mode DRAM Idle Timer DRAm Refresh Rate [Enabled] [Auto] [Auto] [Auto] Graphic Adapter Priority Graphics Aperture Size Spread Spectrum [AGP/PCI] [ 64 MB] [Enabled] ICH Delayed Transaction [Enabled] MPS Revision [1.4] Select Screen Select Item +- For example, selecting Main shows the Main menu items. The other items on the screen. To display the sub-menu, select...

P5PL2 User's Manual for English Edition
Page 71
...mode disabled. Setting to the system. Configuration options: [Not Installed] [Auto] [CDROM] [ARMD] LBA/Large Mode [Auto] Enables or disables the LBA mode. Configuration options: [Disabled] [Auto] ASUS P5PL2 4-15 Configuration options: [Disabled] [Auto] Block (Multi-sector Transfer) [Auto] Enables or disables data multi-sectors transfers. Primary IDE Master Device : Hard Disk Vendor : ST320413A Size : 20.0GB LBA Mode : Supported Block Mode : 16 Sectors PIO Mode : 4 Async DMA : MultiWord DMA-2 Ultra DMA : Ultra DMA-5 SMART Monitoring: Supported Type...
...mode disabled. Setting to the system. Configuration options: [Not Installed] [Auto] [CDROM] [ARMD] LBA/Large Mode [Auto] Enables or disables the LBA mode. Configuration options: [Disabled] [Auto] ASUS P5PL2 4-15 Configuration options: [Disabled] [Auto] Block (Multi-sector Transfer) [Auto] Enables or disables data multi-sectors transfers. Primary IDE Master Device : Hard Disk Vendor : ST320413A Size : 20.0GB LBA Mode : Supported Block Mode : 16 Sectors PIO Mode : 4 Async DMA : MultiWord DMA-2 Ultra DMA : Ultra DMA-5 SMART Monitoring: Supported Type...

P5PL2 User's Manual for English Edition
Page 72
...;guration options: [Disabled] [Enabled] 4.3.5 IDE Configuration The items in this item to set or change the configurations for the Serial ATA connectors supported by the Southbridge chip. If you want to use the Serial ATA hard disk drives as Parallel ATA physical storage devices, set this menu allow you wish to Native mode. Configuration options: [Auto] [SWDMA0] [SWDMA1] [SWDMA2] [MWDMA0] [MWDMA1] [MWDMA2] [UDMA0] [UDMA1] [UDMA2] [UDMA3] [UDMA4] [UDMA5] SMART Monitoring [Auto] Sets the Smart Monitoring...
...;guration options: [Disabled] [Enabled] 4.3.5 IDE Configuration The items in this item to set or change the configurations for the Serial ATA connectors supported by the Southbridge chip. If you want to use the Serial ATA hard disk drives as Parallel ATA physical storage devices, set this menu allow you wish to Native mode. Configuration options: [Auto] [SWDMA0] [SWDMA1] [SWDMA2] [MWDMA0] [MWDMA1] [MWDMA2] [UDMA0] [UDMA1] [UDMA2] [UDMA3] [UDMA4] [UDMA5] SMART Monitoring [Auto] Sets the Smart Monitoring...

P5PL2 User's Manual for English Edition
Page 78
...;guration options: [Disabled] [Enabled] Legacy USB Support [Auto] Allows you to [Disable] disables the USB device detection function. Configuration options: [Enabled] [Disabled] 4-22 Chapter 4: BIOS setup If no USB device is detected, the legacy USB support is enabled. Setting this menu allows you to change the USB-related features. Configuration options: [Disabled] [Enabled] [Auto] USB 2.0 Controller [Disabled] Allows you to display the configuration options. 4.4.2 USB Configuration The items in your system. The Module Version and USB Devices Enabled items...
...;guration options: [Disabled] [Enabled] Legacy USB Support [Auto] Allows you to [Disable] disables the USB device detection function. Configuration options: [Enabled] [Disabled] 4-22 Chapter 4: BIOS setup If no USB device is detected, the legacy USB support is enabled. Setting this menu allows you to change the USB-related features. Configuration options: [Disabled] [Enabled] [Auto] USB 2.0 Controller [Disabled] Allows you to display the configuration options. 4.4.2 USB Configuration The items in your system. The Module Version and USB Devices Enabled items...

P5PL2 User's Manual for English Edition
Page 80
... Advanced Chipset Settings Configure DRAM Timing by SPD Hyper Path 3 DRAM Throttling Threshold [Enabled] [Auto] [Auto] Booting Graphic Adapter Priority [PCI Express/PCI] PEG Buffer Length Link Latency PEG Root Control PEG Link Mode Slot Power High Priority Port Select [Auto] [Auto] [Auto] [Auto] [Auto] [Disabled] Enable or disable Configure DRAM Timing by SPD [Enabled] When this item is enabled, the DRAM timing parameters are set according to the DRAM SPD (Serial Presence Detect). Configuration options: [2 Clocks] [3 Clocks] [4 Clocks] [5 Clocks] [6 Clocks] DRAM RAS...
... Advanced Chipset Settings Configure DRAM Timing by SPD Hyper Path 3 DRAM Throttling Threshold [Enabled] [Auto] [Auto] Booting Graphic Adapter Priority [PCI Express/PCI] PEG Buffer Length Link Latency PEG Root Control PEG Link Mode Slot Power High Priority Port Select [Auto] [Auto] [Auto] [Auto] [Auto] [Disabled] Enable or disable Configure DRAM Timing by SPD [Enabled] When this item is enabled, the DRAM timing parameters are set according to the DRAM SPD (Serial Presence Detect). Configuration options: [2 Clocks] [3 Clocks] [4 Clocks] [5 Clocks] [6 Clocks] DRAM RAS...

P5PL2 User's Manual for English Edition
Page 81
... Link Mode. Configuration options: [PCI Express/PCI] [PCI/PCI Express] PEG Buffer Length [Auto] Sets the length of the graphics controller to use as primary boot device. Configuration options: [Auto] [Light] [Normal] [Heavy] [Heavier] High Priority Port Select [Disabled] Allows you to enable or disable the ASUS Hyper Path 3 feature. Hyper Path 3 [Auto] Allows you to disable or select the high priority port. Configuration options: [Disabled] [PCI Express Port 4] ASUS P5PL2 4-25 Configuration options: [Auto] [Long] [Short] Link Latency [Auto] Sets the PCI...
... Link Mode. Configuration options: [PCI Express/PCI] [PCI/PCI Express] PEG Buffer Length [Auto] Sets the length of the graphics controller to use as primary boot device. Configuration options: [Auto] [Light] [Normal] [Heavy] [Heavier] High Priority Port Select [Disabled] Allows you to enable or disable the ASUS Hyper Path 3 feature. Hyper Path 3 [Auto] Allows you to disable or select the high priority port. Configuration options: [Disabled] [PCI Express Port 4] ASUS P5PL2 4-25 Configuration options: [Auto] [Long] [Short] Link Latency [Auto] Sets the PCI...
P5PL2 User's Manual for English Edition
Page 82
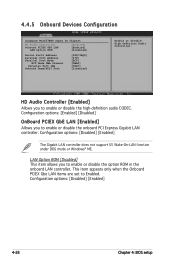
... the option ROM in the onboard LAN controller. LAN Option ROM [Disabled] This item allows you to Enabled. 4.4.5 Onboard Devices Configuration Configure Win627EHG Super IO Chipset HD Audio Controller Onboard PCIEX GbE LAN LAN Option ROM [Enabled] [Enabled] [Disabled] Serial Port1 Address Parallel Port Address Parallel Port Mode ECP Mode DMA Channel Parallel Port IRQ Onboard Game/MIDI Port [3F8/IRQ4] [378] [ECP] [DMA3] [IRQ7] [Disabled] Enable or disable High Definition Audio Controller. Configuration options: [Disabled] [Enabled] 4-26 Chapter 4: BIOS setup HD...
... the option ROM in the onboard LAN controller. LAN Option ROM [Disabled] This item allows you to Enabled. 4.4.5 Onboard Devices Configuration Configure Win627EHG Super IO Chipset HD Audio Controller Onboard PCIEX GbE LAN LAN Option ROM [Enabled] [Enabled] [Disabled] Serial Port1 Address Parallel Port Address Parallel Port Mode ECP Mode DMA Channel Parallel Port IRQ Onboard Game/MIDI Port [3F8/IRQ4] [378] [ECP] [DMA3] [IRQ7] [Disabled] Enable or disable High Definition Audio Controller. Configuration options: [Disabled] [Enabled] 4-26 Chapter 4: BIOS setup HD...
P5PL2 User's Manual for English Edition
Page 86
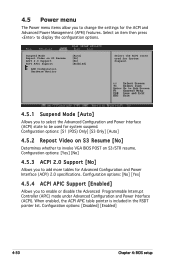
... change the settings for Advanced Configuration and Power Interface (ACPI) 2.0 specifications. Select an item then press to invoke VGA BIOS POST on S3 Resume ACPI 2.0 Support ACPI APIC Support APM Configuration Hardware Monitor [Auto] [No] [No] [Enabled] Select the ACPI state used for system suspend. Configuration options: [Yes] [No] 4.5.3 ACPI 2.0 Support [No] Allows you to enable or disable the Advanced Programmable Interrupt Controller (APIC) mode...
... change the settings for Advanced Configuration and Power Interface (ACPI) 2.0 specifications. Select an item then press to invoke VGA BIOS POST on S3 Resume ACPI 2.0 Support ACPI APIC Support APM Configuration Hardware Monitor [Auto] [No] [No] [Enabled] Select the ACPI state used for system suspend. Configuration options: [Yes] [No] 4.5.3 ACPI 2.0 Support [No] Allows you to enable or disable the Advanced Programmable Interrupt Controller (APIC) mode...
P5PL2 User's Manual for English Edition
Page 89
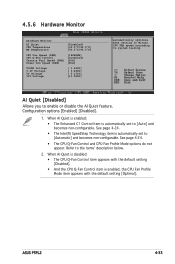
... options [Enabled] [Disabled]. 1. See page 4-24. • The CPU Q-Fan Control and CPU Fan Profile Mode options do not appear. ASUS P5PL2 4-33 4.5.6 Hardware Monitor Hardware Monitor AI Quiet CPU Temperature MB Temperature [Disabled] [32.5ºC/90.5ºF] [36.0ºC/96.5ºF] CPU Fan Speed (RPM) CPU Q-Fan Control Chassis Fan1 Speed (RPM) Power Fan Speed (RPM) [1864RPM] [Disabled] [N/A] [N/A] VCORE Voltage 3.3V Voltage 5V Voltage 12V Voltage [ 1.320V] [ 3.264V] [ 5.171V] [11.985V] Automatically optimize BIOS setting to Minimi CPU FAN speed according to enable or disable...
... options [Enabled] [Disabled]. 1. See page 4-24. • The CPU Q-Fan Control and CPU Fan Profile Mode options do not appear. ASUS P5PL2 4-33 4.5.6 Hardware Monitor Hardware Monitor AI Quiet CPU Temperature MB Temperature [Disabled] [32.5ºC/90.5ºF] [36.0ºC/96.5ºF] CPU Fan Speed (RPM) CPU Q-Fan Control Chassis Fan1 Speed (RPM) Power Fan Speed (RPM) [1864RPM] [Disabled] [N/A] [N/A] VCORE Voltage 3.3V Voltage 5V Voltage 12V Voltage [ 1.320V] [ 3.264V] [ 5.171V] [11.985V] Automatically optimize BIOS setting to Minimi CPU FAN speed according to enable or disable...
P5PL2 User's Manual for English Edition
Page 93
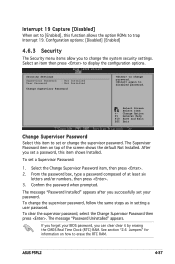
... to change password. After you can clear clear it by erasing the CMOS Real Time Clock (RTC) RAM. If you forget your password. Security Settings Supervisor Password User Password : Not Installed : Not Installed Change Supervisor Password to display the configuration options. again to set or change the supervisor password. Select the Change Supervisor Password item, then press . 2. Confirm the password when prompted. The message "Password Uninstalled" appears. ASUS P5PL2 4-37 Select Screen Select Item +- Change Option...
... to change password. After you can clear clear it by erasing the CMOS Real Time Clock (RTC) RAM. If you forget your password. Security Settings Supervisor Password User Password : Not Installed : Not Installed Change Supervisor Password to display the configuration options. again to set or change the supervisor password. Select the Change Supervisor Password item, then press . 2. Confirm the password when prompted. The message "Password Uninstalled" appears. ASUS P5PL2 4-37 Select Screen Select Item +- Change Option...
P5PL2 User's Manual for English Edition
Page 94
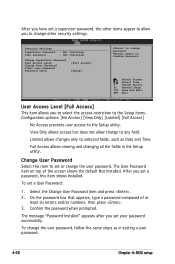
... Change User Password Clear User Password Password Check [Full Access] [Setup] to set a User Password: 1. Change Option F1 General Help F10 Save and Exit ESC Exit User Access Level [Full Access] This item allows you to change to selected fields, such as in the Setup utility. Change User Password Select this item shows Installed. To change password. again to the Setup utility. The User Password item on top of at least six letters and/or numbers, then press . 3. Select Screen...
... Change User Password Clear User Password Password Check [Full Access] [Setup] to set a User Password: 1. Change Option F1 General Help F10 Save and Exit ESC Exit User Access Level [Full Access] This item allows you to change to selected fields, such as in the Setup utility. Change User Password Select this item shows Installed. To change password. again to the Setup utility. The User Password item on top of at least six letters and/or numbers, then press . 3. Select Screen...
P5PL2 User's Manual for English Edition
Page 101
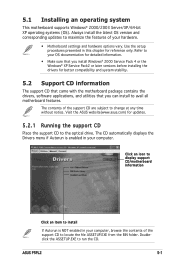
The CD automatically displays the Drivers menu if Autorun is NOT enabled in your hardware. • Motherboard settings and hardware options vary. ASUS P5PL2 5-1 The contents of your computer, browse the contents of the support CD to change at any time without notice. Doubleclick the ASSETUP.EXE to the optical drive. 5.1 Installing an operating system This motherboard supports Windows® 2000/2003 Server/XP/64-bit XP operating...
The CD automatically displays the Drivers menu if Autorun is NOT enabled in your hardware. • Motherboard settings and hardware options vary. ASUS P5PL2 5-1 The contents of your computer, browse the contents of the support CD to change at any time without notice. Doubleclick the ASSETUP.EXE to the optical drive. 5.1 Installing an operating system This motherboard supports Windows® 2000/2003 Server/XP/64-bit XP operating...


