
User Manual
Page 65
Chapter 3: Powerin3g up This chapter describes the power up sequence, the vocal POST messages, and ways of shutting down the system.
Chapter 3: Powerin3g up This chapter describes the power up sequence, the vocal POST messages, and ways of shutting down the system.
User Manual
Page 67
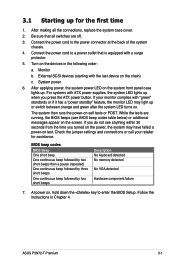
...retailer for the first time 1. If you do not see BIOS beep codes table below) or additional messages appear on self tests or POST. Follow the instructions in the following order: a. 3.1 Starting up or switch between orange and green after the system LED turns on. ... power-on the screen. External SCSI devices (starting with a surge protector. 5. At power on the power, the system may light up for assistance. ASUS P5N72-T Premium 3-1 While the tests are off. 3. For systems with "green" standards or if it has a "power standby" feature, the monitor LED may have...
...retailer for the first time 1. If you do not see BIOS beep codes table below) or additional messages appear on self tests or POST. Follow the instructions in the following order: a. 3.1 Starting up or switch between orange and green after the system LED turns on. ... power-on the screen. External SCSI devices (starting with a surge protector. 5. At power on the power, the system may light up for assistance. ASUS P5N72-T Premium 3-1 While the tests are off. 3. For systems with "green" standards or if it has a "power standby" feature, the monitor LED may have...
User Manual
Page 74
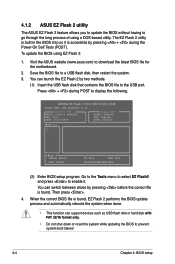
... 2 utility The ASUS EZ Flash 2 feature allows you to update the BIOS without having to download the latest BIOS file for the motherboard. 2. ASUSTek EZ Flash 2 BIOS ROM Utility B328 FLASH TYPE: SST 49LF080A /3.3V Current ROM BOARD: P5N72-T PREMIUM VER: 0103 DATE: 04/21/2008 Update ROM BOARD: Unknown VER:...disk, then restart the system. 3. To update the BIOS using a DOS‑based utility. Then press . 4. Press + during the Power-On Self Tests (POST). Save the BIOS file to the USB port. When the correct BIOS file is built-in the BIOS chip so it . The EZ Flash 2 utility...
... 2 utility The ASUS EZ Flash 2 feature allows you to update the BIOS without having to download the latest BIOS file for the motherboard. 2. ASUSTek EZ Flash 2 BIOS ROM Utility B328 FLASH TYPE: SST 49LF080A /3.3V Current ROM BOARD: P5N72-T PREMIUM VER: 0103 DATE: 04/21/2008 Update ROM BOARD: Unknown VER:...disk, then restart the system. 3. To update the BIOS using a DOS‑based utility. Then press . 4. Press + during the Power-On Self Tests (POST). Save the BIOS file to the USB port. When the correct BIOS file is built-in the BIOS chip so it . The EZ Flash 2 utility...
User Manual
Page 79
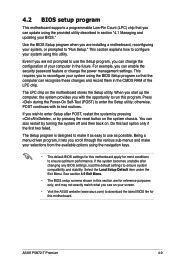
...the power management settings. Do this utility. See section 4.9 Exit Menu. • The BIOS setup screens shown in the future. otherwise, POST continues with the opportunity to ensure system compatibility and stability. When you start up the computer, the system provides you with its test routines. ... as easy to enter the Setup utility; This requires you can also restart by pressing the reset button on the motherboard stores the Setup utility. ASUS P5N72-T Premium 4-9 You can enable the security password feature or change the configuration of the LPC chip.
...the power management settings. Do this utility. See section 4.9 Exit Menu. • The BIOS setup screens shown in the future. otherwise, POST continues with the opportunity to ensure system compatibility and stability. When you start up the computer, the system provides you with its test routines. ... as easy to enter the Setup utility; This requires you can also restart by pressing the reset button on the motherboard stores the Setup utility. ASUS P5N72-T Premium 4-9 You can enable the security password feature or change the configuration of the LPC chip.
User Manual
Page 97
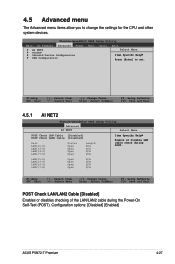
... Status Open Open Open Open Length N/A N/A N/A N/A Item Specific Help Enable or Disable LAN cable check during the Power-On Self‑Test (POST). LAN2(1-2) LAN2(3-6) LAN2(4-5) LAN2(7-8) Open N/A Open N/A Open N/A Open N/A F1:Help ESC: Exit ↑↓ : Select Item →←... Select SubMenu F5: Setup Defaults F10: Save and Exit POST Check LAN/LAN2 Cable [Disabled] Enables or disables checking of the LAN/LAN2 cable during POST. Configuration options: [Disabled] [Enabled] ASUS P5N72-T Premium 4-27 Phoenix-AwardBIOS CMOS Setup Utility Main AI Tweaker Advanced ...
... Status Open Open Open Open Length N/A N/A N/A N/A Item Specific Help Enable or Disable LAN cable check during the Power-On Self‑Test (POST). LAN2(1-2) LAN2(3-6) LAN2(4-5) LAN2(7-8) Open N/A Open N/A Open N/A Open N/A F1:Help ESC: Exit ↑↓ : Select Item →←... Select SubMenu F5: Setup Defaults F10: Save and Exit POST Check LAN/LAN2 Cable [Disabled] Enables or disables checking of the LAN/LAN2 cable during POST. Configuration options: [Disabled] [Enabled] ASUS P5N72-T Premium 4-27 Phoenix-AwardBIOS CMOS Setup Utility Main AI Tweaker Advanced ...
User Manual
Page 127
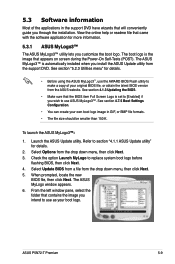
... "5.2.3 Utilities menu" for details. • Before using the ASUS MyLogo3™, use the AWARD BIOS Flash utility to [Enabled] if you install the ASUS Update utility from the support DVD. ASUS P5N72-T Premium 5-9 To launch the ASUS MyLogo3 1. Check the option Launch MyLogo to use as your ...own boot logo image in the support DVD have wizards that appears on screen during the Power‑On Self-Tests (POST). ...
... "5.2.3 Utilities menu" for details. • Before using the ASUS MyLogo3™, use the AWARD BIOS Flash utility to [Enabled] if you install the ASUS Update utility from the support DVD. ASUS P5N72-T Premium 5-9 To launch the ASUS MyLogo3 1. Check the option Launch MyLogo to use as your ...own boot logo image in the support DVD have wizards that appears on screen during the Power‑On Self-Tests (POST). ...

User Manual
Page 128
When the logo images appear on the right window pane, select an image to your desired size by clicking on the Ratio box. 9. When the screen returns to the ASUS Update utility, flash the original BIOS to display the new boot logo during POST. 5-10 Chapter 5: Software support Adjust the boot image to enlarge by selecting a value on it. 8. 7. After flashing the BIOS, restart the computer to load the new boot logo. 10.
When the logo images appear on the right window pane, select an image to your desired size by clicking on the Ratio box. 9. When the screen returns to the ASUS Update utility, flash the original BIOS to display the new boot logo during POST. 5-10 Chapter 5: Software support Adjust the boot image to enlarge by selecting a value on it. 8. 7. After flashing the BIOS, restart the computer to load the new boot logo. 10.
User Manual
Page 129
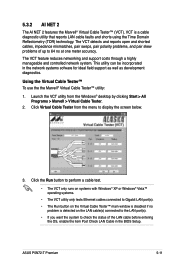
... LAN cable before entering the OS, enable the item Post Check LAN Cable in the network systems sofware for ideal field support as well as development diagnostics. The VCT feature reduces networking and support costs through a highly manageable and controlled network system. ASUS P5N72-T Premium 5-11 Click Virtual Cable Tester from the Windows®...
... LAN cable before entering the OS, enable the item Post Check LAN Cable in the network systems sofware for ideal field support as well as development diagnostics. The VCT feature reduces networking and support costs through a highly manageable and controlled network system. ASUS P5N72-T Premium 5-11 Click Virtual Cable Tester from the Windows®...
User Manual
Page 153
...configurations The motherboard includes a high performance SATA RAID controller integrated in the BIOS. Connect a SATA power cable to the RAID controllers user manual in the BIOS before setting your changes and Exit Setup. ASUS P5N72-T Premium 5-35...motherboard support DVD for detailed information on each drive. See section "4.5.3 Onboard Device Configuration > Serial-ATA Configuration" for details. 3. For optimal performance, install identical drives of the same model and capacity when creating a disk array. Boot the system and press during the Power-On Self-Test (POST...
...configurations The motherboard includes a high performance SATA RAID controller integrated in the BIOS. Connect a SATA power cable to the RAID controllers user manual in the BIOS before setting your changes and Exit Setup. ASUS P5N72-T Premium 5-35...motherboard support DVD for detailed information on each drive. See section "4.5.3 Onboard Device Configuration > Serial-ATA Configuration" for details. 3. For optimal performance, install identical drives of the same model and capacity when creating a disk array. Boot the system and press during the Power-On Self-Test (POST...

User Manual
Page 154
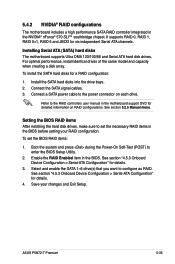
...- These keys allow you to re-enter your NVRAID settings after the CMOS is cleared; Define a New Array - For detailed descriptions on your motherboard support DVD. Boot up your RAID setup. RAID Mode: Striping Striping Block: Optimal Free Disks Loc Disk Model Name 1.0.M XXXXXXXXXXXXXXXXXX 1.1.M XXXXXXXXXXXXXXXXXX 2.0.M ... options. 5-36 Chapter 5: Software support Entering the NVIDIA® RAID utility To enter the NVIDIA® RAID utility: 1. During POST, press to the NVIDIA RAID User Guide found in this section are for reference only, and may not exactly match the items on...
...- These keys allow you to re-enter your NVRAID settings after the CMOS is cleared; Define a New Array - For detailed descriptions on your motherboard support DVD. Boot up your RAID setup. RAID Mode: Striping Striping Block: Optimal Free Disks Loc Disk Model Name 1.0.M XXXXXXXXXXXXXXXXXX 1.1.M XXXXXXXXXXXXXXXXXX 2.0.M ... options. 5-36 Chapter 5: Software support Entering the NVIDIA® RAID utility To enter the NVIDIA® RAID utility: 1. During POST, press to the NVIDIA RAID User Guide found in this section are for reference only, and may not exactly match the items on...
User Manual
Page 160
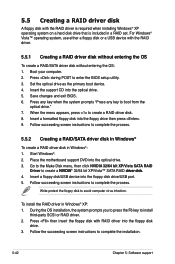
...4. 5.5 Creating a RAID driver disk A floppy disk with RAID driver into the floppy disk drive. 3. Start Windows®. 2. Place the motherboard support DVD into the floppy disk drive/USB port. 5. Write-protect the floppy disk to boot from the optical drive." 7. During the OS... a RAID/SATA driver disk without entering the OS: 1. Insert the support CD into the floppy drive then press . 9. Press during POST to complete the installation. 5-42 Chapter 5: Software support Insert a formatted floppy disk into the optical drive. 5. Follow succeeding screen instructions to...
...4. 5.5 Creating a RAID driver disk A floppy disk with RAID driver into the floppy disk drive. 3. Start Windows®. 2. Place the motherboard support DVD into the floppy disk drive/USB port. 5. Write-protect the floppy disk to boot from the optical drive." 7. During the OS... a RAID/SATA driver disk without entering the OS: 1. Insert the support CD into the floppy drive then press . 9. Press during POST to complete the installation. 5-42 Chapter 5: Software support Insert a formatted floppy disk into the optical drive. 5. Follow succeeding screen instructions to...


