
User Manual
Page 6
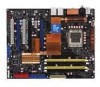
...5.3.7 ASUS AI Nap 5-31 5.3.8 ASUS Q-Fan 2 5-32 5.3.9 ASUS AI Booster 5-33 5.4 RAID configurations 5-34 5.4.1 RAID definitions 5-34 5.4.2 NVIDIA® RAID configurations 5-35 5.5 Creating a RAID driver disk 5-42 5.5.1 Creating a RAID driver disk without entering the OS.... 5-42 5.5.2 Creating a RAID/SATA driver disk in Windows 5-42 Chapter 6: NVIDIA® SLI™ technology support 6.1 Overview 6-1 Requirements 6-1 6.2 Graphics card setup 6-2 6.2.1 Installing three SLI-ready graphics cards 6-2 6.2.2 Installing two SLI-ready graphics cards 6-5 6.2.3 Installing the device drivers...
...5.3.7 ASUS AI Nap 5-31 5.3.8 ASUS Q-Fan 2 5-32 5.3.9 ASUS AI Booster 5-33 5.4 RAID configurations 5-34 5.4.1 RAID definitions 5-34 5.4.2 NVIDIA® RAID configurations 5-35 5.5 Creating a RAID driver disk 5-42 5.5.1 Creating a RAID driver disk without entering the OS.... 5-42 5.5.2 Creating a RAID/SATA driver disk in Windows 5-42 Chapter 6: NVIDIA® SLI™ technology support 6.1 Overview 6-1 Requirements 6-1 6.2 Graphics card setup 6-2 6.2.1 Installing three SLI-ready graphics cards 6-2 6.2.2 Installing two SLI-ready graphics cards 6-5 6.2.3 Installing the device drivers...
User Manual
Page 21
... passive cooler. The purpose of connecting the system panel cables one at a time and avoiding wrong cable connections. Doing so may bend the tubing and affect the heat dissipation performance. ASUS Q-Shield The specially designed ASUS Q-Shield provides conductivity to install computer components, update the BIOS or back up your motherboard against static electricity damage and shields it provides options for details. ASUS P5N72-T Premium 1-5
... passive cooler. The purpose of connecting the system panel cables one at a time and avoiding wrong cable connections. Doing so may bend the tubing and affect the heat dissipation performance. ASUS Q-Shield The specially designed ASUS Q-Shield provides conductivity to install computer components, update the BIOS or back up your motherboard against static electricity damage and shields it provides options for details. ASUS P5N72-T Premium 1-5
User Manual
Page 23
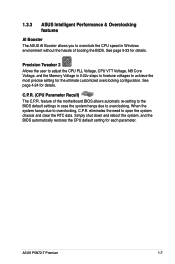
... overclock the CPU speed in case the system hangs due to overclocking. See page 4-24 for the ultimate customized overclocking configuration. feature of the motherboard BIOS allows automatic re-setting to achieve the most precise setting for details. C.P.R. (CPU Parameter Recall) The C.P.R. ASUS P5N72-T Premium 1-7 Precision Tweaker 2 Allows the user to adjust the CPU PLL Voltage, CPU VTT Voltage, NB Core Voltage, and the Memory Voltage in 0.02v steps to finetune voltages to the BIOS default settings in Windows...
... overclock the CPU speed in case the system hangs due to overclocking. See page 4-24 for the ultimate customized overclocking configuration. feature of the motherboard BIOS allows automatic re-setting to achieve the most precise setting for details. C.P.R. (CPU Parameter Recall) The C.P.R. ASUS P5N72-T Premium 1-7 Precision Tweaker 2 Allows the user to adjust the CPU PLL Voltage, CPU VTT Voltage, NB Core Voltage, and the Memory Voltage in 0.02v steps to finetune voltages to the BIOS default settings in Windows...
User Manual
Page 41
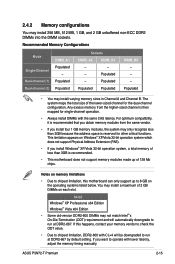
...-sized channel for the dual-channel configuration. You may not match Intel®'s On‑Die‑Termination (ODT) requirement and will be downgraded to 8 GB on each slot. 64-bit Windows® XP Professional x64 Edition Windows® Vista x64 Edition • Some old-version DDR2-800 DIMMs may install a maximum of 2 GB DIMMs on the operating systems listed below. Populated - ASUS P5N72-T Premium...
...-sized channel for the dual-channel configuration. You may not match Intel®'s On‑Die‑Termination (ODT) requirement and will be downgraded to 8 GB on each slot. 64-bit Windows® XP Professional x64 Edition Windows® Vista x64 Edition • Some old-version DDR2-800 DIMMs may install a maximum of 2 GB DIMMs on the operating systems listed below. Populated - ASUS P5N72-T Premium...
User Manual
Page 57
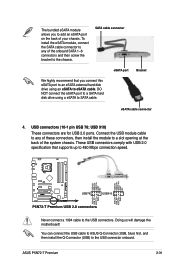
Doing so will damage the motherboard! SATA cable connector eSATA port Bracket We highly recommend that supports up to the chassis. DO NOT connect the eSATA port to a SATA hard disk drive using an eSATA to SATA cable. eSATA cable connector 4. Never connect a 1394 cable to the USB connector onboard. You can connect the USB cable to ASUS Q-Connector (USB, blue) first, and then install the Q-Connector (USB) to the USB connectors. USB connectors (10-1 pin USB 78; These USB connectors comply with USB 2.0 specification that you to a slot opening at the back of...
Doing so will damage the motherboard! SATA cable connector eSATA port Bracket We highly recommend that supports up to the chassis. DO NOT connect the eSATA port to a SATA hard disk drive using an eSATA to SATA cable. eSATA cable connector 4. Never connect a 1394 cable to the USB connector onboard. You can connect the USB cable to ASUS Q-Connector (USB, blue) first, and then install the Q-Connector (USB) to the USB connectors. USB connectors (10-1 pin USB 78; These USB connectors comply with USB 2.0 specification that you to a slot opening at the back of...
User Manual
Page 61
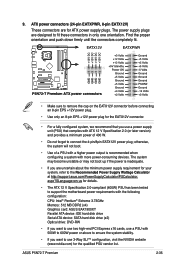
... configuring a system with the following configuration: CPU: Intel® Pentium® Extreme 3.73GHz Memory: 512 MB DDR2 (x4) Graphics card: ASUS EAX1900XT Parallel ATA device: IDE hard disk drive Serial ATA device: SATA hard disk drive (x2) Optical drive: DVD-RW • If you want to connect the 4-pin/8pin EATX12V power plug; The system may become unstable or may not boot up if the power is inadequate. • If you want to use two high-end PCI Express x16 cards, use a power supply...
... configuring a system with the following configuration: CPU: Intel® Pentium® Extreme 3.73GHz Memory: 512 MB DDR2 (x4) Graphics card: ASUS EAX1900XT Parallel ATA device: IDE hard disk drive Serial ATA device: SATA hard disk drive (x2) Optical drive: DVD-RW • If you want to connect the 4-pin/8pin EATX12V power plug; The system may become unstable or may not boot up if the power is inadequate. • If you want to use two high-end PCI Express x16 cards, use a power supply...
User Manual
Page 71
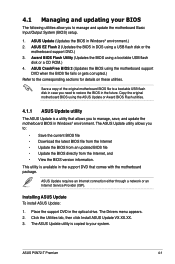
... BIOS version information. Click the Utilities tab, then click Install ASUS Update VX.XX.XX. 3. Award BIOS Flash Utility (Updates the BIOS using a USB flash disk or the motherboard support DVD.) 3. ASUS P5N72-T Premium 4-1 ASUS Update requires an Internet connection either through a network or an Internet Service Provider (ISP). The ASUS Update utility allows you need to restore the BIOS in the future. The Drivers menu appears. 2. The ASUS Update utility is available in the support DVD that allows you to manage and update the motherboard Basic Input/Output System (BIOS) setup...
... BIOS version information. Click the Utilities tab, then click Install ASUS Update VX.XX.XX. 3. Award BIOS Flash Utility (Updates the BIOS using a USB flash disk or the motherboard support DVD.) 3. ASUS P5N72-T Premium 4-1 ASUS Update requires an Internet connection either through a network or an Internet Service Provider (ISP). The ASUS Update utility allows you need to restore the BIOS in the future. The Drivers menu appears. 2. The ASUS Update utility is available in the support DVD that allows you to manage and update the motherboard Basic Input/Output System (BIOS) setup...
User Manual
Page 82
... [ ] SATA 1 720K , 3.[5Noinne.] ..... [ ] SATA 2 1.44M, 3.[5Noinne.] ..... [ ] SATA 3 [None] SATA 4 [None] SATA 5 [None] SATA 6 [None] HDD SMART Monitoring [Disabled] Installed Memory ↑↓ :Move102E4NMTBER:Accept ESC:Abort Usable Memory 1023MB System Information F1:Help ESC: Exit ↑↓ : Select Item →←: Select Menu -/+: Change Value Enter: Select SubMenu F5: Setup Defaults F10: Save and Exit Pop-up window with the configuration options for that item. Phoenix-AwardBIOS CMOS Setup Utility Main AI Tweaker Advanced Power Boot...
... [ ] SATA 1 720K , 3.[5Noinne.] ..... [ ] SATA 2 1.44M, 3.[5Noinne.] ..... [ ] SATA 3 [None] SATA 4 [None] SATA 5 [None] SATA 6 [None] HDD SMART Monitoring [Disabled] Installed Memory ↑↓ :Move102E4NMTBER:Accept ESC:Abort Usable Memory 1023MB System Information F1:Help ESC: Exit ↑↓ : Select Item →←: Select Menu -/+: Change Value Enter: Select SubMenu F5: Setup Defaults F10: Save and Exit Pop-up window with the configuration options for that item. Phoenix-AwardBIOS CMOS Setup Utility Main AI Tweaker Advanced Power Boot...
User Manual
Page 86
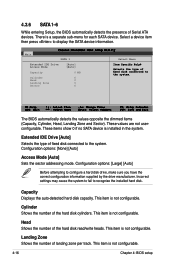
... CMOS Setup Utility SATA 1 Select Menu Extended IDE Drive Access Mode Capacity Cylinder Head Landing Zone Sector [Auto] [Auto] 0 MB 0 0 0 0 Item Specific Help Selects the type of the hard disk cylinders. These values are not userconfigurable. Configuration options: [Large] [Auto] Before attempting to the system. This item is not configurable. Landing Zone Shows the number of Serial ATA devices. F1:Help ESC: Exit ↑↓ : Select Item →←: Select Menu -/+: Change Value Enter...
... CMOS Setup Utility SATA 1 Select Menu Extended IDE Drive Access Mode Capacity Cylinder Head Landing Zone Sector [Auto] [Auto] 0 MB 0 0 0 0 Item Specific Help Selects the type of the hard disk cylinders. These values are not userconfigurable. Configuration options: [Large] [Auto] Before attempting to the system. This item is not configurable. Landing Zone Shows the number of Serial ATA devices. F1:Help ESC: Exit ↑↓ : Select Item →←: Select Menu -/+: Change Value Enter...
User Manual
Page 88
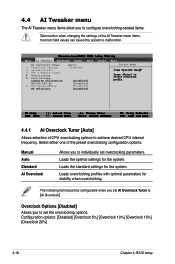
... menu items allow you to set the overclocking options. Phoenix-AwardBIOS CMOS Setup Utility Main��� AI Tweaker Advanced Power Boot AI Overclock Tuner [Auto] x Overclock Options Disabled x System Clocks x FSB & Memory Config Overclocking Over Voltage ��L�o�a�d�li�n�e��C�al�i�b�r�a�ti�o�n D�i�sa�b�l�e�d�] NVIDIA GPU Ex [Disabled] x SLI...
... menu items allow you to set the overclocking options. Phoenix-AwardBIOS CMOS Setup Utility Main��� AI Tweaker Advanced Power Boot AI Overclock Tuner [Auto] x Overclock Options Disabled x System Clocks x FSB & Memory Config Overclocking Over Voltage ��L�o�a�d�li�n�e��C�al�i�b�r�a�ti�o�n D�i�sa�b�l�e�d�] NVIDIA GPU Ex [Disabled] x SLI...

User Manual
Page 100
... you to enable or disable the USB 2.0 controller. Configuration options: [Auto] [Disabled] Front Panel Support Type [HD Audio] Allows you to set the High-Definition audio function. Configuration options: [Enabled] [Disabled] Onboard 1394 [Enabled] Allows you to disable or enable the onboard 1394 device support. Configuration options: [Disabled] [Enabled] 4-30 Chapter 4: BIOS setup Select an item then press to sixth SATA drives. Configuration options: [Disabled] [Enabled] OnBoard LAN Boot ROM [Disabled] Allows you to enable or disable the onboard LAN boot ROM.
... you to enable or disable the USB 2.0 controller. Configuration options: [Auto] [Disabled] Front Panel Support Type [HD Audio] Allows you to set the High-Definition audio function. Configuration options: [Enabled] [Disabled] Onboard 1394 [Enabled] Allows you to disable or enable the onboard 1394 device support. Configuration options: [Disabled] [Enabled] 4-30 Chapter 4: BIOS setup Select an item then press to sixth SATA drives. Configuration options: [Disabled] [Enabled] OnBoard LAN Boot ROM [Disabled] Allows you to enable or disable the onboard LAN boot ROM.
User Manual
Page 101
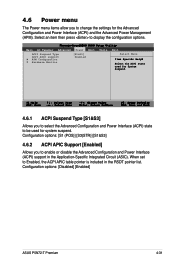
... CMOS Setup Utility Main AI Tweaker Advanced Power Boot ACPI Suspend Type ACPI APIC support APM Configuration Hardware Monitor [S1&S3] Enabled Tools Exit Select Menu Item Specific Help Select the ACPI state used for System Suspend. Configuration options: [Disabled] [Enabled] ASUS P5N72-T Premium 4-31 F1:Help ESC: Exit ↑↓ : Select Item →←: Select Menu -/+: Change Value Enter: Select SubMenu F5: Setup Defaults F10: Save and Exit 4.6.1 ACPI Suspend Type [S1&S3] Allows you to select the Advanced Configuration and Power...
... CMOS Setup Utility Main AI Tweaker Advanced Power Boot ACPI Suspend Type ACPI APIC support APM Configuration Hardware Monitor [S1&S3] Enabled Tools Exit Select Menu Item Specific Help Select the ACPI state used for System Suspend. Configuration options: [Disabled] [Enabled] ASUS P5N72-T Premium 4-31 F1:Help ESC: Exit ↑↓ : Select Item →←: Select Menu -/+: Change Value Enter: Select SubMenu F5: Setup Defaults F10: Save and Exit 4.6.1 ACPI Suspend Type [S1&S3] Allows you to select the Advanced Configuration and Power...
User Manual
Page 107
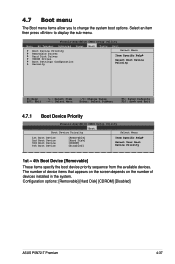
...-AwardBIOS CMOS Setup Utility AI Tweaker Advanced Power Boot Tools Exit Boot Device Priority Select Menu 1st Boot Device 2nd Boot Device 3rd Boot Device 4th Boot Device [Removable] [Hard Disk] [CDROM] [Disabled] Item Specific Help Select Your Boot Device Priority 1st ~ 4th Boot Device [Removable] These items specify the boot device priority sequence from the available devices. The number of device items that appears on the screen depends on the number of devices installed in the system. Configuration options: [Removable] [Hard Disk] [CDROM] [Disabled] ASUS P5N72-T Premium 4-37...
...-AwardBIOS CMOS Setup Utility AI Tweaker Advanced Power Boot Tools Exit Boot Device Priority Select Menu 1st Boot Device 2nd Boot Device 3rd Boot Device 4th Boot Device [Removable] [Hard Disk] [CDROM] [Disabled] Item Specific Help Select Your Boot Device Priority 1st ~ 4th Boot Device [Removable] These items specify the boot device priority sequence from the available devices. The number of device items that appears on the screen depends on the number of devices installed in the system. Configuration options: [Removable] [Hard Disk] [CDROM] [Disabled] ASUS P5N72-T Premium 4-37...
User Manual
Page 109
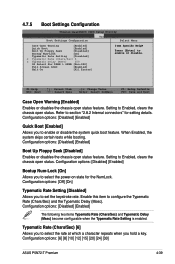
... CMOS Setup Utility AI Tweaker Advanced Power Boot Tools Exit Boot Settings Configuration Select Menu Case Open Warning [Enabled] Quick Boot [Enabled] Boot Up Floppy Seek [Disabled] Bootup Num-Lock [On] Typematic Rate Setting [Disabled] x Typematic Rate (Chars/Sec) 6 x Typematic Delay (Msec) 250 OS Select For DRAM > 64MB [Non-OS2] Full Screen LOGO [Enabled] Halt On [All Errors] Item Specific Help Press [Enter] to configure the Typematic Rate (Chars/Sec) and the Typematic Delay (Msec). Configuration options: [Disabled] [Enabled...
... CMOS Setup Utility AI Tweaker Advanced Power Boot Tools Exit Boot Settings Configuration Select Menu Case Open Warning [Enabled] Quick Boot [Enabled] Boot Up Floppy Seek [Disabled] Bootup Num-Lock [On] Typematic Rate Setting [Disabled] x Typematic Rate (Chars/Sec) 6 x Typematic Delay (Msec) 250 OS Select For DRAM > 64MB [Non-OS2] Full Screen LOGO [Enabled] Halt On [All Errors] Item Specific Help Press [Enter] to configure the Typematic Rate (Chars/Sec) and the Typematic Delay (Msec). Configuration options: [Disabled] [Enabled...
User Manual
Page 110
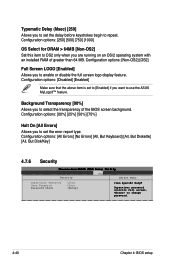
... Screen LOGO [Enabled] Allows you to set the error report type. Configuration options: [All Errors] [No Errors] [All, But Keyboard] [All, But Diskette] [All, But Disk/Key] 4.7.6 Security Main AI Tweaker Phoenix-AwardBIOS CMOS Setup Utility Advanced Power Boot Tools Exit Security Select Menu Supervisor Password User Password Password Check Clear Clear [Setup] Item Specific Help Supervisor password controls full access, to select the transparency of greater than 64 MB. Configuration options: [250] [500] [750] [1000] OS Select for DRAM > 64MB [Non-OS2] Set...
... Screen LOGO [Enabled] Allows you to set the error report type. Configuration options: [All Errors] [No Errors] [All, But Keyboard] [All, But Diskette] [All, But Disk/Key] 4.7.6 Security Main AI Tweaker Phoenix-AwardBIOS CMOS Setup Utility Advanced Power Boot Tools Exit Security Select Menu Supervisor Password User Password Password Check Clear Clear [Setup] Item Specific Help Supervisor password controls full access, to select the transparency of greater than 64 MB. Configuration options: [250] [500] [750] [1000] OS Select for DRAM > 64MB [Non-OS2] Set...
User Manual
Page 152
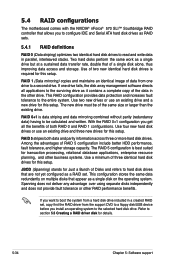
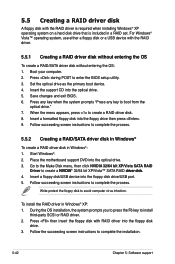
... as a RAID set , copy first the RAID driver from one drive fails, the disk array management software directs all the benefits of both data and parity information across three or more hard disk drives. Spanning does not deliver any advantage over using separate disks independently and does not provide fault tolerance or other business systems. Use a minimum of data from the support DVD to a floppy disk/USB device before...
... as a RAID set , copy first the RAID driver from one drive fails, the disk array management software directs all the benefits of both data and parity information across three or more hard disk drives. Spanning does not deliver any advantage over using separate disks independently and does not provide fault tolerance or other business systems. Use a minimum of data from the support DVD to a floppy disk/USB device before...
User Manual
Page 153
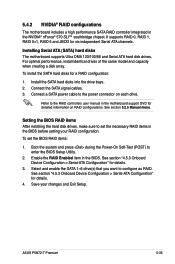
...ASUS P5N72-T Premium 5-35 Setting the BIOS RAID items After installing the hard disk drives, make sure to the RAID controllers user manual in the BIOS before setting your changes and Exit Setup. Connect the SATA signal cables. 3. Boot the system and press during the Power-On Self-Test (POST) to configure as RAID. To set the necessary RAID items in the motherboard support DVD for detailed information on each drive. Install the SATA hard disks into the drive bays. 2. See section 5.2.5 Manual menu. See section "4.5.3 Onboard Device Configuration > Serial-ATA Configuration...
...ASUS P5N72-T Premium 5-35 Setting the BIOS RAID items After installing the hard disk drives, make sure to the RAID controllers user manual in the BIOS before setting your changes and Exit Setup. Connect the SATA signal cables. 3. Boot the system and press during the Power-On Self-Test (POST) to configure as RAID. To set the necessary RAID items in the motherboard support DVD for detailed information on each drive. Install the SATA hard disks into the drive bays. 2. See section 5.2.5 Manual menu. See section "4.5.3 Onboard Device Configuration > Serial-ATA Configuration...
User Manual
Page 160
... install the RAID driver in Windows®: 1. Save changes and exit BIOS. 6. Start Windows®. 2. Insert a floppy disk/USB device into the optical drive. 3. Write-protect the floppy disk to create a N��V�ID��IA�® 32/64 bit XP/Vista™ SATA RAID �d�r�iv��e�r�d��is included in a RAID set. Follow the succeeding screen instructions to enter the BIOS setup utility. 3. Place the motherboard support DVD...
... install the RAID driver in Windows®: 1. Save changes and exit BIOS. 6. Start Windows®. 2. Insert a floppy disk/USB device into the optical drive. 3. Write-protect the floppy disk to create a N��V�ID��IA�® 32/64 bit XP/Vista™ SATA RAID �d�r�iv��e�r�d��is included in a RAID set. Follow the succeeding screen instructions to enter the BIOS setup utility. 3. Place the motherboard support DVD...
User Manual
Page 161
Insert the floppy disk/USB device with RAID driver into the floppy disk drive/USB port. 2. ASUS P5N72-T Premium 5-43 Follow the succeeding screen instructions to chipset limitation, the Serial ATA ports supported by the NVIDIA chipset doesn't support Serial Optical Disk Drives (Serial ODD) under DOS. Due to complete the installation. To install the RAID driver in Windows® Vista™: 1.
Insert the floppy disk/USB device with RAID driver into the floppy disk drive/USB port. 2. ASUS P5N72-T Premium 5-43 Follow the succeeding screen instructions to chipset limitation, the Serial ATA ports supported by the NVIDIA chipset doesn't support Serial Optical Disk Drives (Serial ODD) under DOS. Due to complete the installation. To install the RAID driver in Windows® Vista™: 1.
User Manual
Page 170
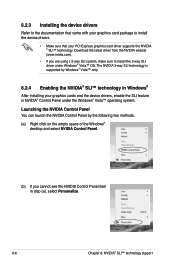
... using s 3-way SLI system, make sure to install the device drivers. • Make sure that your PCI Express graphics card driver supports the NVIDIA ® SLI™ technology. Launching the NVIDIA Control Panel You can launch the NVIDIA Control Panel by Windows® Vista™ only. 6.2.4 Enabling the NVIDIA® SLI™ technology in Windows® After installing your graphics cards and the device drivers, enable the SLI feature in step (a), select Personalize. 6-6 Chapter 6: NVIDIA® SLI™ technology support Download the latest driver...
... using s 3-way SLI system, make sure to install the device drivers. • Make sure that your PCI Express graphics card driver supports the NVIDIA ® SLI™ technology. Launching the NVIDIA Control Panel You can launch the NVIDIA Control Panel by Windows® Vista™ only. 6.2.4 Enabling the NVIDIA® SLI™ technology in Windows® After installing your graphics cards and the device drivers, enable the SLI feature in step (a), select Personalize. 6-6 Chapter 6: NVIDIA® SLI™ technology support Download the latest driver...


