
User Manual
Page 65
Chapter 3: Powerin3g up This chapter describes the power up sequence, the vocal POST messages, and ways of shutting down the system.
Chapter 3: Powerin3g up This chapter describes the power up sequence, the vocal POST messages, and ways of shutting down the system.
User Manual
Page 67
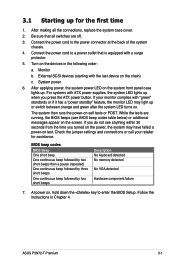
...Follow the instructions in the following order: a. Check the jumper settings and connections or call your monitor complies with the last device on . ASUS P5N72-T Premium 3-1 Connect the power cord to a power outlet that all the connections, replace the system case cover. 2. BIOS beep codes BIOS Beep... with "green" standards or if it has a "power standby" feature, the monitor LED may have failed a power-on self tests or POST. If your retailer for the first time 1. After making all switches are running, the BIOS beeps (see anything within 30 seconds from the ...
...Follow the instructions in the following order: a. Check the jumper settings and connections or call your monitor complies with the last device on . ASUS P5N72-T Premium 3-1 Connect the power cord to a power outlet that all the connections, replace the system case cover. 2. BIOS beep codes BIOS Beep... with "green" standards or if it has a "power standby" feature, the monitor LED may have failed a power-on self tests or POST. If your retailer for the first time 1. After making all switches are running, the BIOS beeps (see anything within 30 seconds from the ...
User Manual
Page 74
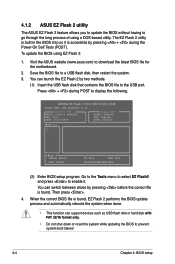
... BOARD: P5N72-T PREMIUM VER: 0103 DATE: 04/21/2008 Update ROM BOARD: Unknown VER: Unknown DATE: Unknown PATH: A:\ A: Note [Enter] Select [Tab] Switch [S] Save [ESC] Exit [Up/Down/Home/End] Move (2) Enter BIOS setup program. Save the BIOS file to download the latest BIOS file for the motherboard. 2....POST to display the following. The EZ Flash 2 utility is built-in the BIOS chip so it is accessible by pressing before the correct file is found . Go to the Tools menu to select EZ Flash2 and press to the USB port. To update the BIOS using a DOS‑based utility. 4.1.2 ASUS...
... BOARD: P5N72-T PREMIUM VER: 0103 DATE: 04/21/2008 Update ROM BOARD: Unknown VER: Unknown DATE: Unknown PATH: A:\ A: Note [Enter] Select [Tab] Switch [S] Save [ESC] Exit [Up/Down/Home/End] Move (2) Enter BIOS setup program. Save the BIOS file to download the latest BIOS file for the motherboard. 2....POST to display the following. The EZ Flash 2 utility is built-in the BIOS chip so it is accessible by pressing before the correct file is found . Go to the Tools menu to select EZ Flash2 and press to the USB port. To update the BIOS using a DOS‑based utility. 4.1.2 ASUS...
User Manual
Page 79
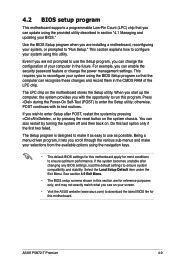
... during the Power-On Self-Test (POST) to "Run Setup." If the system becomes unstable after POST, restart the system by pressing , or by turning the system off and then back on the motherboard stores the Setup utility. ASUS P5N72-T Premium 4-9 When you start up the computer... change the power management settings. Do this utility. The LPC chip on . If you are installing a motherboard, reconfiguring your screen. • Visit the ASUS website (www.asus.com) to download the latest BIOS file for most conditions to ensure system compatibility and stability. Being a...
... during the Power-On Self-Test (POST) to "Run Setup." If the system becomes unstable after POST, restart the system by pressing , or by turning the system off and then back on the motherboard stores the Setup utility. ASUS P5N72-T Premium 4-9 When you start up the computer... change the power management settings. Do this utility. The LPC chip on . If you are installing a motherboard, reconfiguring your screen. • Visit the ASUS website (www.asus.com) to download the latest BIOS file for most conditions to ensure system compatibility and stability. Being a...
User Manual
Page 97
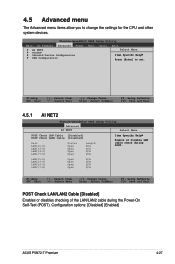
...(4-5) LAN1(7-8) Status Open Open Open Open Length N/A N/A N/A N/A Item Specific Help Enable or Disable LAN cable check during the Power-On Self‑Test (POST). Configuration options: [Disabled] [Enabled] ASUS P5N72-T Premium 4-27 4.5 Advanced menu The Advanced menu items allow you to set. LAN2(1-2) LAN2(3-6) LAN2(4-5) LAN2(7-8) Open N/A Open N/A Open N/A Open N/A F1:Help ESC: Exit...
...(4-5) LAN1(7-8) Status Open Open Open Open Length N/A N/A N/A N/A Item Specific Help Enable or Disable LAN cable check during the Power-On Self‑Test (POST). Configuration options: [Disabled] [Enabled] ASUS P5N72-T Premium 4-27 4.5 Advanced menu The Advanced menu items allow you to set. LAN2(1-2) LAN2(3-6) LAN2(4-5) LAN2(7-8) Open N/A Open N/A Open N/A Open N/A F1:Help ESC: Exit...
User Manual
Page 127
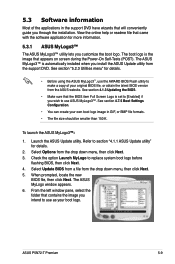
... your original BIOS file, or obtain the latest BIOS version from the ASUS website. To launch the ASUS MyLogo3 1. ASUS P5N72-T Premium 5-9 Select Update BIOS from a file from the drop down menu, then click Next. 5. Launch the ASUS Update utility. Check the option Launch MyLogo to use as your own...the online help or readme file that appears on screen during the Power‑On Self-Tests (POST). Refer to section "4.1.1 ASUS Update utility" for details. • Before using the ASUS MyLogo3™, use the AWARD BIOS Flash utility to make a copy of the applications in the ...
... your original BIOS file, or obtain the latest BIOS version from the ASUS website. To launch the ASUS MyLogo3 1. ASUS P5N72-T Premium 5-9 Select Update BIOS from a file from the drop down menu, then click Next. 5. Launch the ASUS Update utility. Check the option Launch MyLogo to use as your own...the online help or readme file that appears on screen during the Power‑On Self-Tests (POST). Refer to section "4.1.1 ASUS Update utility" for details. • Before using the ASUS MyLogo3™, use the AWARD BIOS Flash utility to make a copy of the applications in the ...

User Manual
Page 128
When the screen returns to the ASUS Update utility, flash the original BIOS to display the new boot logo during POST. 5-10 Chapter 5: Software support After flashing the BIOS, restart the computer to load the new boot logo. 10. 7. Adjust the boot image to enlarge by selecting a value on it. 8. When the logo images appear on the right window pane, select an image to your desired size by clicking on the Ratio box. 9.
When the screen returns to the ASUS Update utility, flash the original BIOS to display the new boot logo during POST. 5-10 Chapter 5: Software support After flashing the BIOS, restart the computer to load the new boot logo. 10. 7. Adjust the boot image to enlarge by selecting a value on it. 8. When the logo images appear on the right window pane, select an image to your desired size by clicking on the Ratio box. 9.
User Manual
Page 129
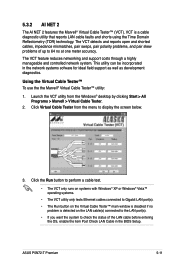
... polarity problems, and pair skew problems of the LAN cable before entering the OS, enable the item Post Check LAN Cable in the network systems sofware for ideal field support as well as development diagnostics. ASUS P5N72-T Premium 5-11 Launch the VCT utility from the menu to display the screen below. 3. The VCT feature...
... polarity problems, and pair skew problems of the LAN cable before entering the OS, enable the item Post Check LAN Cable in the network systems sofware for ideal field support as well as development diagnostics. ASUS P5N72-T Premium 5-11 Launch the VCT utility from the menu to display the screen below. 3. The VCT feature...
User Manual
Page 153
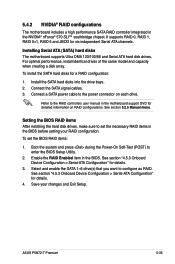
...set the BIOS RAID items: 1. ASUS P5N72-T Premium 5-35 Select and enable the SATA 1~6 drive(s) that you want to enter the BIOS Setup Utility. 2. 5.4.2 NVIDIA® RAID configurations The motherboard includes a high performance SATA RAID... controller integrated in the BIOS. Installing Serial ATA (SATA) hard disks The motherboard supports Ultra DMA 133/100/66 and Serial... RAID items in the motherboard support DVD for details. 4. Boot the system and press during the Power-On Self-Test...
...set the BIOS RAID items: 1. ASUS P5N72-T Premium 5-35 Select and enable the SATA 1~6 drive(s) that you want to enter the BIOS Setup Utility. 2. 5.4.2 NVIDIA® RAID configurations The motherboard includes a high performance SATA RAID... controller integrated in the BIOS. Installing Serial ATA (SATA) hard disks The motherboard supports Ultra DMA 133/100/66 and Serial... RAID items in the motherboard support DVD for details. 4. Boot the system and press during the Power-On Self-Test...

User Manual
Page 154
... NVRAID settings after the CMOS is cleared; For detailed descriptions on your screen. NVIDIA RAID Utility Oct 5 2004 - otherwise, the system will not recognize your motherboard support DVD. During POST, press to move through and select menu options. 5-36 Chapter 5: Software support Define a New Array -
... NVRAID settings after the CMOS is cleared; For detailed descriptions on your screen. NVIDIA RAID Utility Oct 5 2004 - otherwise, the system will not recognize your motherboard support DVD. During POST, press to move through and select menu options. 5-36 Chapter 5: Software support Define a New Array -
User Manual
Page 160
Boot your computer. 2. Press during POST to avoid computer virus infection. Write-protect the floppy disk to enter the BIOS setup utility. 3. During the OS installation, the system prompts you to ... either a floppy disk or a USB device with RAID driver into the floppy disk drive. 3. Set the optical drive as the primary boot device. 4. Place the motherboard support DVD into the floppy drive then press . 9. Save changes and exit BIOS. 6. When the menu appears, press to install third-party SCSI or RAID...
Boot your computer. 2. Press during POST to avoid computer virus infection. Write-protect the floppy disk to enter the BIOS setup utility. 3. During the OS installation, the system prompts you to ... either a floppy disk or a USB device with RAID driver into the floppy disk drive. 3. Set the optical drive as the primary boot device. 4. Place the motherboard support DVD into the floppy drive then press . 9. Save changes and exit BIOS. 6. When the menu appears, press to install third-party SCSI or RAID...


