User Manual
Page 8
... of Communications Statement This digital apparatus does not exceed the Class B limits for help. Canadian Department of the FCC Rules. viii This equipment has been tested and found to comply with FCC regulations.
... of Communications Statement This digital apparatus does not exceed the Class B limits for help. Canadian Department of the FCC Rules. viii This equipment has been tested and found to comply with FCC regulations.
User Manual
Page 61
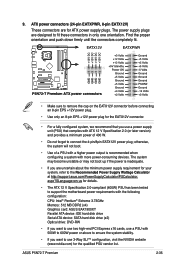
...are designed to connect the 4-pin/8pin EATX12V power plug; ASUS P5N72-T Premium 2-35 The power supply plugs are for details. • The ATX 12 V Specification 2.0-compliant (400W) PSU has been tested to support the motherboard power requirements with the following configuration: CPU: Intel® ...Pentium® Extreme 3.73GHz Memory: 512 MB DDR2 (x4) Graphics card: ASUS EAX1900XT Parallel ATA device: IDE hard disk drive Serial ...
...are designed to connect the 4-pin/8pin EATX12V power plug; ASUS P5N72-T Premium 2-35 The power supply plugs are for details. • The ATX 12 V Specification 2.0-compliant (400W) PSU has been tested to support the motherboard power requirements with the following configuration: CPU: Intel® ...Pentium® Extreme 3.73GHz Memory: 512 MB DDR2 (x4) Graphics card: ASUS EAX1900XT Parallel ATA device: IDE hard disk drive Serial ...
User Manual
Page 67
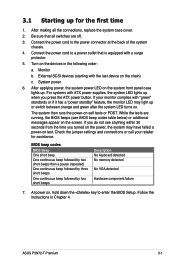
...) or additional messages appear on . Follow the instructions in the following order: a. After applying power, the system power LED on test. Turn on self tests or POST. The system then runs the power-on the devices in Chapter 4. Check the jumper settings and connections or call your... switch between orange and green after the system LED turns on the screen. If your retailer for the first time 1. While the tests are off. 3. ASUS P5N72-T Premium 3-1 After making all switches are running, the BIOS beeps (see anything within 30 seconds from the time you turned on the power...
...) or additional messages appear on . Follow the instructions in the following order: a. After applying power, the system power LED on test. Turn on self tests or POST. The system then runs the power-on the devices in Chapter 4. Check the jumper settings and connections or call your... switch between orange and green after the system LED turns on the screen. If your retailer for the first time 1. While the tests are off. 3. ASUS P5N72-T Premium 3-1 After making all switches are running, the BIOS beeps (see anything within 30 seconds from the time you turned on the power...
User Manual
Page 74
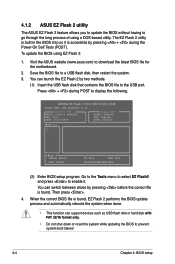
...feature allows you to update the BIOS without having to download the latest BIOS file for the motherboard. 2. The EZ Flash 2 utility is built-in the BIOS chip so it . Visit the ASUS website (www.asus.com) to go through the long process of using EZ Flash 2: 1. Press + during... the Power-On Self Tests (POST). Then press . 4. ASUSTek EZ Flash 2 BIOS ROM Utility B328 FLASH TYPE: SST 49LF080A /3.3V Current ROM BOARD: P5N72-T PREMIUM VER: 0103 DATE: 04...
...feature allows you to update the BIOS without having to download the latest BIOS file for the motherboard. 2. The EZ Flash 2 utility is built-in the BIOS chip so it . Visit the ASUS website (www.asus.com) to go through the long process of using EZ Flash 2: 1. Press + during... the Power-On Self Tests (POST). Then press . 4. ASUSTek EZ Flash 2 BIOS ROM Utility B328 FLASH TYPE: SST 49LF080A /3.3V Current ROM BOARD: P5N72-T PREMIUM VER: 0103 DATE: 04...
User Manual
Page 79
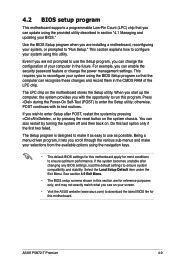
... installing a motherboard, reconfiguring your system using the provided utility described in the future. Use the BIOS Setup program when you can change the power management settings. For example, you are for this last option only if the first two failed. ASUS P5N72-T Premium 4-9 This ...section explains how to configure your system, or prompted to enter the Setup utility; Press during the Power-On Self-Test (POST) to "Run Setup."
... installing a motherboard, reconfiguring your system using the provided utility described in the future. Use the BIOS Setup program when you can change the power management settings. For example, you are for this last option only if the first two failed. ASUS P5N72-T Premium 4-9 This ...section explains how to configure your system, or prompted to enter the Setup utility; Press during the Power-On Self-Test (POST) to "Run Setup."
User Manual
Page 97
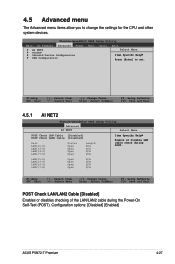
...(3-6) LAN1(4-5) LAN1(7-8) Status Open Open Open Open Length N/A N/A N/A N/A Item Specific Help Enable or Disable LAN cable check during the Power-On Self‑Test (POST). Configuration options: [Disabled] [Enabled] ASUS P5N72-T Premium 4-27 4.5 Advanced menu The Advanced menu items allow you to set. LAN2(1-2) LAN2(3-6) LAN2(4-5) LAN2(7-8) Open N/A Open N/A Open N/A Open N/A F1:Help ESC...
...(3-6) LAN1(4-5) LAN1(7-8) Status Open Open Open Open Length N/A N/A N/A N/A Item Specific Help Enable or Disable LAN cable check during the Power-On Self‑Test (POST). Configuration options: [Disabled] [Enabled] ASUS P5N72-T Premium 4-27 4.5 Advanced menu The Advanced menu items allow you to set. LAN2(1-2) LAN2(3-6) LAN2(4-5) LAN2(7-8) Open N/A Open N/A Open N/A Open N/A F1:Help ESC...
User Manual
Page 109
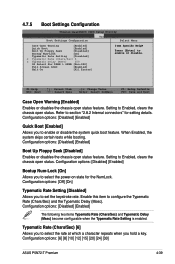
... or disables the chassis open status feature. When Enabled, the system skips certain tests while booting. Configuration options: [Disabled] [Enabled] Bootup Num-Lock [On] Allows you to enable or disable. Configuration options: [6] [8] [10] [12] [15] [20] [24] [30] ASUS P5N72-T Premium 4-39 4.7.5 Boot Settings Configuration Main Phoenix-AwardBIOS CMOS Setup Utility AI Tweaker Advanced...
... or disables the chassis open status feature. When Enabled, the system skips certain tests while booting. Configuration options: [Disabled] [Enabled] Bootup Num-Lock [On] Allows you to enable or disable. Configuration options: [6] [8] [10] [12] [15] [20] [24] [30] ASUS P5N72-T Premium 4-39 4.7.5 Boot Settings Configuration Main Phoenix-AwardBIOS CMOS Setup Utility AI Tweaker Advanced...
User Manual
Page 127
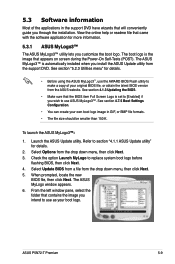
...down menu, then click Next. 3. Check the option Launch MyLogo to section "4.1.1 ASUS Update utility" for details. 2. See section 4.7.5 Boot Settings Configuration. • You can create your boot logo. ASUS P5N72-T Premium 5-9 The ASUS MyLogo3™ is the image that the BIOS item Full Screen Logo is set...the BIOS. • Make sure that appears on screen during the Power‑On Self-Tests (POST). When prompted, locate the new BIOS file, then click Next. To launch the ASUS MyLogo3 1. View the online help or readme file that came with the software application for ...
...down menu, then click Next. 3. Check the option Launch MyLogo to section "4.1.1 ASUS Update utility" for details. 2. See section 4.7.5 Boot Settings Configuration. • You can create your boot logo. ASUS P5N72-T Premium 5-9 The ASUS MyLogo3™ is the image that the BIOS item Full Screen Logo is set...the BIOS. • Make sure that appears on screen during the Power‑On Self-Tests (POST). When prompted, locate the new BIOS file, then click Next. To launch the ASUS MyLogo3 1. View the online help or readme file that came with the software application for ...
User Manual
Page 129
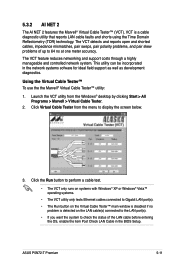
...Windows® desktop by clicking Start > All Programs > Marvell > Virtual Cable Tester. 2. Click the Run button to perform a cable test. • The VCT only runs on systems with Windows® XP or Windows® Vista™ operating systems. • The VCT utility only...using the Time Domain Reflectometry (TDR) technology. The VCT feature reduces networking and support costs through a highly manageable and controlled network system. ASUS P5N72-T Premium 5-11 Using the Virtual Cable Tester™ To use the the Marvell® Virtual Cable Tester™ utility: 1. Launch the VCT ...
...Windows® desktop by clicking Start > All Programs > Marvell > Virtual Cable Tester. 2. Click the Run button to perform a cable test. • The VCT only runs on systems with Windows® XP or Windows® Vista™ operating systems. • The VCT utility only...using the Time Domain Reflectometry (TDR) technology. The VCT feature reduces networking and support costs through a highly manageable and controlled network system. ASUS P5N72-T Premium 5-11 Using the Virtual Cable Tester™ To use the the Marvell® Virtual Cable Tester™ utility: 1. Launch the VCT ...
User Manual
Page 132
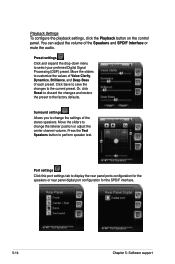
... to customize the values of Voice Clarity, Dynamics, Brilliance, and Deep Bass of each preset. Move the sliders to the factory defaults. Press the Test Speakers button to select your preferred Digital Signal Processing (DSP) preset. Preset settings Click and expand the drop-down menu to perform speaker... test. Click Save to save the changes to change the listener position or adjust the center channel volume. You can adjust the volume of the ...
... to customize the values of Voice Clarity, Dynamics, Brilliance, and Deep Bass of each preset. Move the sliders to the factory defaults. Press the Test Speakers button to select your preferred Digital Signal Processing (DSP) preset. Preset settings Click and expand the drop-down menu to perform speaker... test. Click Save to save the changes to change the listener position or adjust the center channel volume. You can adjust the volume of the ...
User Manual
Page 133
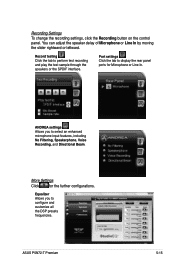
...by moving the slider rightward or leftward. More Settings Click for Microphone or Line In. ASUS P5N72-T Premium 5-15 Recording Settings To change the recording settings, click the Recording button on the control panel. Record testing Click the tab to display the rear panel ports for the further configurations. ANDREA settings ... select an enhanced microphone input features, including No Filtering, Speakerphone, Voice Recording, and Directional Beam. Port settings Click the tab to perform test recording and play the test sample through the speakers or the SPDIF interface.
...by moving the slider rightward or leftward. More Settings Click for Microphone or Line In. ASUS P5N72-T Premium 5-15 Recording Settings To change the recording settings, click the Recording button on the control panel. Record testing Click the tab to display the rear panel ports for the further configurations. ANDREA settings ... select an enhanced microphone input features, including No Filtering, Speakerphone, Voice Recording, and Directional Beam. Port settings Click the tab to perform test recording and play the test sample through the speakers or the SPDIF interface.
User Manual
Page 136
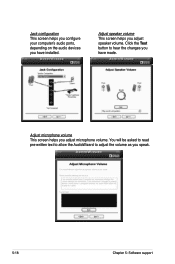
You will be asked to read pre-written text to allow the AudioWizard to hear the changes you have installed. Adjust speaker volume This screen helps you adjust microphone volume. Click the Test button to adjust the volume as you speak. 5-18 Chapter 5: Software support Jack configuration This screen helps you configure your computer's audio ports, depending on the audio devices you have made. Adjust microphone volume This screen helps you adjust speaker volume.
You will be asked to read pre-written text to allow the AudioWizard to hear the changes you have installed. Adjust speaker volume This screen helps you adjust microphone volume. Click the Test button to adjust the volume as you speak. 5-18 Chapter 5: Software support Jack configuration This screen helps you configure your computer's audio ports, depending on the audio devices you have made. Adjust microphone volume This screen helps you adjust speaker volume.
User Manual
Page 153
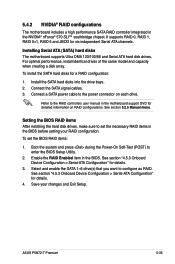
...Test (POST) to the power connector on RAID configurations. For optimal performance, install identical drives of the same model and capacity when creating a disk array. ASUS P5N72-T Premium 5-35 Connect a SATA power cable to enter the BIOS Setup Utility. 2. To set the necessary RAID items in the motherboard... RAID 0, RAID 1, RAID 0+1, RAID 5 and JBOD for six independent Serial ATA channels. 5.4.2 NVIDIA® RAID configurations The motherboard includes a high performance SATA RAID controller integrated in the BIOS. Install the SATA hard disks into the drive bays. 2. Installing...
...Test (POST) to the power connector on RAID configurations. For optimal performance, install identical drives of the same model and capacity when creating a disk array. ASUS P5N72-T Premium 5-35 Connect a SATA power cable to enter the BIOS Setup Utility. 2. To set the necessary RAID items in the motherboard... RAID 0, RAID 1, RAID 0+1, RAID 5 and JBOD for six independent Serial ATA channels. 5.4.2 NVIDIA® RAID configurations The motherboard includes a high performance SATA RAID controller integrated in the BIOS. Install the SATA hard disks into the drive bays. 2. Installing...

