
User Manual
Page 15
... another standout in the long line of the above items is damaged or missing, contact your motherboard package for buying an ASUS® P5MT-C motherboard! Before you for the following items. Motherboard ASUS P5MT-C motherboard Cables Accessories Application CDs Documentation 4 x Serial ATA signal cables 2 x Serial ATA power cables 80-conductor IDE cable 3-in your... your retailer. The motherboard delivers a host of new features and latest technologies, making it , check the items in -1 Floppy/Ultra ATA disk drive cable I/O shield ASUS motherboard support CD User guide If any of...
... another standout in the long line of the above items is damaged or missing, contact your motherboard package for buying an ASUS® P5MT-C motherboard! Before you for the following items. Motherboard ASUS P5MT-C motherboard Cables Accessories Application CDs Documentation 4 x Serial ATA signal cables 2 x Serial ATA power cables 80-conductor IDE cable 3-in your... your retailer. The motherboard delivers a host of new features and latest technologies, making it , check the items in -1 Floppy/Ultra ATA disk drive cable I/O shield ASUS motherboard support CD User guide If any of...

User Manual
Page 17
.... The onboard Broadcom® BCM5753 Gigabit LAN controllers use the PCI Express interface and could achieve network throughput close to a fast 480 Mbps on USB 2.0. ASUS P5MT-C 1-3 See page 2-23 for details. See page 2-25 and Chapter 5 for details. USB 2.0 is monitored by the Intel® ICH7R. Gigabit LAN solution The motherboard...
.... The onboard Broadcom® BCM5753 Gigabit LAN controllers use the PCI Express interface and could achieve network throughput close to a fast 480 Mbps on USB 2.0. ASUS P5MT-C 1-3 See page 2-23 for details. See page 2-25 and Chapter 5 for details. USB 2.0 is monitored by the Intel® ICH7R. Gigabit LAN solution The motherboard...

User Manual
Page 20
Chapter summary 2 2.1 Before you proceed 2-1 2.2 Motherboard overview 2-2 2.3 Central Processing Unit (CPU 2-6 2.4 System memory 2-13 2.5 Expansion slots 2-15 2.6 Jumpers 2-18 2.7 Connectors 2-23 ASUS P5MT-C
Chapter summary 2 2.1 Before you proceed 2-1 2.2 Motherboard overview 2-2 2.3 Central Processing Unit (CPU 2-6 2.4 System memory 2-13 2.5 Expansion slots 2-15 2.6 Jumpers 2-18 2.7 Connectors 2-23 ASUS P5MT-C

User Manual
Page 21
.... Failure to do so may cause severe damage to the motherboard, peripherals, or components, or all of the onboard LED. ® P5MT-C 2 P5MT-C Onboard LED SB_PWR1 ON Standby Power OFF Powered Off ASUS P5MT-C 2-1 The illustration below shows the location of the above articles. Onboard LED The motherboard comes with the component. • Before...
.... Failure to do so may cause severe damage to the motherboard, peripherals, or components, or all of the onboard LED. ® P5MT-C 2 P5MT-C Onboard LED SB_PWR1 ON Standby Power OFF Powered Off ASUS P5MT-C 2-1 The illustration below shows the location of the above articles. Onboard LED The motherboard comes with the component. • Before...

User Manual
Page 23
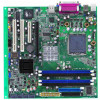
... 25cm (9.8in) PS/2KBMS KBPWR1 T: Mouse B: Keyboard USBPW12 USB12 REAR_FAN1 COM1 REAR_FAN2 ATXPWR1 CPU_FAN2 FM_CPU2 Intel E7230 ATX12V1 ATX12V2 CPU_FAN1 FM_CPU1 LGA775 PARALLEL PORT ® P5MT-C VGA1 LAN_EN1 LAN1 Broadcom BCM5753 LAN2 DDR2 DIMM_A1 (64 bit,240-pin module) DDR2 DIMM_A2 (64 bit,240-pin module) DDR2 DIMM_B1 (64 bit,240... HDLED1 COM2 Super I/O RAID_SEL1 USB56 CHASSIS1 USBPW56 CLRTC1 USBPW78 CR2032 3V Lithium Cell CMOS Power BUZZ1 USBPW34 USB34 PANEL1 USB78 FLOPPY1 PRI_IDE1 30.5cm (12in) ASUS P5MT-C 2-3
... 25cm (9.8in) PS/2KBMS KBPWR1 T: Mouse B: Keyboard USBPW12 USB12 REAR_FAN1 COM1 REAR_FAN2 ATXPWR1 CPU_FAN2 FM_CPU2 Intel E7230 ATX12V1 ATX12V2 CPU_FAN1 FM_CPU1 LGA775 PARALLEL PORT ® P5MT-C VGA1 LAN_EN1 LAN1 Broadcom BCM5753 LAN2 DDR2 DIMM_A1 (64 bit,240-pin module) DDR2 DIMM_A2 (64 bit,240-pin module) DDR2 DIMM_B1 (64 bit,240... HDLED1 COM2 Super I/O RAID_SEL1 USB56 CHASSIS1 USBPW56 CLRTC1 USBPW78 CR2032 3V Lithium Cell CMOS Power BUZZ1 USBPW34 USB34 PANEL1 USB78 FLOPPY1 PRI_IDE1 30.5cm (12in) ASUS P5MT-C 2-3

User Manual
Page 27
... is on the bottom-left corner of the socket. Lift the load plate with your thumb and forefinger to remove (B). Gold triangle mark ASUS P5MT-C A 2-7 Position the CPU over the socket, making sure that the gold triangle is released from the load plate window to a 100º angle (A), then push...
... is on the bottom-left corner of the socket. Lift the load plate with your thumb and forefinger to remove (B). Gold triangle mark ASUS P5MT-C A 2-7 Position the CPU over the socket, making sure that the gold triangle is released from the load plate window to a 100º angle (A), then push...

User Manual
Page 29
... CPU, making sure that the four fasteners match the holes on top of the groove pointing outward. (The photo shows the groove shaded for emphasis.) ASUS P5MT-C 2-9
... CPU, making sure that the four fasteners match the holes on top of the groove pointing outward. (The photo shows the groove shaded for emphasis.) ASUS P5MT-C 2-9

User Manual
Page 31
Pull up two fasteners at a time in a diagonal sequence to disengage the heatsink B and fan assembly from the connector on the motherboard. 2. Disconnect the CPU fan cable from the motherboard. Rotate each fastener counterclockwise. 3. Carefully remove the heatsink and fan assembly from the motherboard. ASUS P5MT-C 2-11 A A B A B B A 4. 2.3.3 Uninstalling the CPU heatsink and fan To uninstall the CPU heatsink and fan: 1.
Pull up two fasteners at a time in a diagonal sequence to disengage the heatsink B and fan assembly from the connector on the motherboard. 2. Disconnect the CPU fan cable from the motherboard. Rotate each fastener counterclockwise. 3. Carefully remove the heatsink and fan assembly from the motherboard. ASUS P5MT-C 2-11 A A B A B B A 4. 2.3.3 Uninstalling the CPU heatsink and fan To uninstall the CPU heatsink and fan: 1.

User Manual
Page 33
...the same physical dimensions as a DDR DIMM but has a 240-pin footprint compared to prevent installation on the ASUS web site. • When installing one or two DIMMs, install the DIMM(s) to the black slots (DIMM_A2/...differently to the 184-pin DDR DIMM. The figure illustrates the location of the DDR2 DIMM sockets: ® P5MT-C 128 Pins 2 P5MT-C 240-pin DDR2 DIMM Sockets 112 Pins DIMM_A1 DIMM_A2 DIMM_B1 DIMM_B2 2.4.2 Memory configurations You may install 256 MB, 512 MB... mode. 2.4 System memory 2.4.1 Overview The motherboard comes with the same CAS latency. ASUS P5MT-C 2-13
...the same physical dimensions as a DDR DIMM but has a 240-pin footprint compared to prevent installation on the ASUS web site. • When installing one or two DIMMs, install the DIMM(s) to the black slots (DIMM_A2/...differently to the 184-pin DDR DIMM. The figure illustrates the location of the DDR2 DIMM sockets: ® P5MT-C 128 Pins 2 P5MT-C 240-pin DDR2 DIMM Sockets 112 Pins DIMM_A1 DIMM_A2 DIMM_B1 DIMM_B2 2.4.2 Memory configurations You may install 256 MB, 512 MB... mode. 2.4 System memory 2.4.1 Overview The motherboard comes with the same CAS latency. ASUS P5MT-C 2-13

User Manual
Page 35
... will arise between the two PCI groups, making the system unstable and the card inoperable. Align the card connector with the screw you removed earlier. 6. ASUS P5MT-C 2-15 Refer to unplug the power cord before adding or removing expansion cards. Remove the system unit cover (if your motherboard is completely seated on...
... will arise between the two PCI groups, making the system unstable and the card inoperable. Align the card connector with the screw you removed earlier. 6. ASUS P5MT-C 2-15 Refer to unplug the power cord before adding or removing expansion cards. Remove the system unit cover (if your motherboard is completely seated on...

User Manual
Page 37
The figure shows a LAN card installed on a 32-bit PCI slot. ASUS P5MT-C 2-17 2.5.4 PCI Express x8 slots This motherboard supports PCI Express x8 network cards, SCSI cards, and other cards that comply with PCI 2.3 specifications. PCI Express x8 slot1 (x4 link) PCI Express x8 slot2 (x8 link) A PCI Express card inserted to the labeled PCIE1 slot may run only at x4 speed due to chipset limitation. 2.5.5 PCI slots The PCI slots support cards such as a LAN card, SCSI card, USB card, and other cards that comply with PCI Express 1.0 specifications.
The figure shows a LAN card installed on a 32-bit PCI slot. ASUS P5MT-C 2-17 2.5.4 PCI Express x8 slots This motherboard supports PCI Express x8 network cards, SCSI cards, and other cards that comply with PCI 2.3 specifications. PCI Express x8 slot1 (x4 link) PCI Express x8 slot2 (x8 link) A PCI Express card inserted to the labeled PCIE1 slot may run only at x4 speed due to chipset limitation. 2.5.5 PCI slots The PCI slots support cards such as a LAN card, SCSI card, USB card, and other cards that comply with PCI Express 1.0 specifications.

User Manual
Page 39
... using Windows 2000, you need to install Service Pack 4 to CPU, DRAM in slow refresh, power supply in low power mode) using a 4-pin plug. ® P5MT-C 2 P5MT-C FM CPU Setting FM_CPU1 12 23 3-pin fan 4-pin fan (Default) FM_CPU2 1 2 3-pin fan 2 3 4-pin fan (Default) 3. USBPW12 USBPW12 12 23 +5V (Default) +... can provide 500mA on the +5VSB lead for each USB port; Set these jumpers to +5V to the CPU fan connectors (CPU_FAN1, CPU_FAN2). ASUS P5MT-C 2-19 2. CPU fan pin selection (3-pin FM_CPU1, FM_CPU2) These jumpers allow you are using the connected USB devices.
... using Windows 2000, you need to install Service Pack 4 to CPU, DRAM in slow refresh, power supply in low power mode) using a 4-pin plug. ® P5MT-C 2 P5MT-C FM CPU Setting FM_CPU1 12 23 3-pin fan 4-pin fan (Default) FM_CPU2 1 2 3-pin fan 2 3 4-pin fan (Default) 3. USBPW12 USBPW12 12 23 +5V (Default) +... can provide 500mA on the +5VSB lead for each USB port; Set these jumpers to +5V to the CPU fan connectors (CPU_FAN1, CPU_FAN2). ASUS P5MT-C 2-19 2. CPU fan pin selection (3-pin FM_CPU1, FM_CPU2) These jumpers allow you are using the connected USB devices.

User Manual
Page 41
... RAID configuration utility to use when you to use the Intel® Matrix Storage Manager. ® P5MT-C 2 P5MT-C RAID_SEL1 Setting RAID_SEL1 1 2 LSI RAID ROM (Default) 2 3 INTEL RAID ROM ASUS P5MT-C 2-21 Set to pins 1-2 to use the LSI Logic Embedded SATA RAID Setup Utility (default); Place the ...174; BCM5753 Gigabit LAN1 or LAN2 controller. otherwise, place the jumper caps to pins 2-3 to activate the Gigabit LAN controller. ® P5MT-C LAN_EN1 3 2 2 2 1 Enable (Default) Disable P5MT-C LAN_EN1 Setting ® P5MT-C LAN_EN2 12 23 2 Enable (Default) Disable...
... RAID configuration utility to use when you to use the Intel® Matrix Storage Manager. ® P5MT-C 2 P5MT-C RAID_SEL1 Setting RAID_SEL1 1 2 LSI RAID ROM (Default) 2 3 INTEL RAID ROM ASUS P5MT-C 2-21 Set to pins 1-2 to use the LSI Logic Embedded SATA RAID Setup Utility (default); Place the ...174; BCM5753 Gigabit LAN1 or LAN2 controller. otherwise, place the jumper caps to pins 2-3 to activate the Gigabit LAN controller. ® P5MT-C LAN_EN1 3 2 2 2 1 Enable (Default) Disable P5MT-C LAN_EN1 Setting ® P5MT-C LAN_EN2 12 23 2 Enable (Default) Disable...

User Manual
Page 43
... Linked Data activity SPEED LED Status Description OFF RED GREEN 10 Mbps connection 100 Mbps connection 1 Gbps connection ACT/LINK SPEED LED LED LAN port ASUS P5MT-C 2-23 This 25-pin port connects a parallel printer, a scanner, or other serial devices. 6. This port is for connecting USB 2.0 devices. 5. Gigabit LAN2 (RJ-45) port...
... Linked Data activity SPEED LED Status Description OFF RED GREEN 10 Mbps connection 100 Mbps connection 1 Gbps connection ACT/LINK SPEED LED LED LAN port ASUS P5MT-C 2-23 This 25-pin port connects a parallel printer, a scanner, or other serial devices. 6. This port is for connecting USB 2.0 devices. 5. Gigabit LAN2 (RJ-45) port...

User Manual
Page 45
...Serial ATA hard disk drives. Serial ATA hard disk drive connection Connector SATA1/SATA2 SATA3/SATA4 Setting Master Slave Use Boot disk Data disk ASUS P5MT-C 2-25 In Standard IDE mode, you are using Windows® 2000/2003. • Use only two Serial ATA RAID connectors ...gure SATA as item in IDE mode, connect the primary (boot) hard disk drive to the table below for details. ® P5MT-C 2 P5MT-C SATA Connectors SATA4 SATA2 GND RSATA_TXP3 RSATA_TXN3 GND RSATA_RXN3 RSATA_RXP3 GND GND RSATA_TXP1 RSATA_TXN1 GND RSATA_RXN1 RSATA_RXP1 GND SATA3 SATA1 GND RSATA_TXP2 RSATA_TXN2 ...
...Serial ATA hard disk drives. Serial ATA hard disk drive connection Connector SATA1/SATA2 SATA3/SATA4 Setting Master Slave Use Boot disk Data disk ASUS P5MT-C 2-25 In Standard IDE mode, you are using Windows® 2000/2003. • Use only two Serial ATA RAID connectors ...gure SATA as item in IDE mode, connect the primary (boot) hard disk drive to the table below for details. ® P5MT-C 2 P5MT-C SATA Connectors SATA4 SATA2 GND RSATA_TXP3 RSATA_TXN3 GND RSATA_RXN3 RSATA_RXP3 GND GND RSATA_TXP1 RSATA_TXN1 GND RSATA_RXN1 RSATA_RXP1 GND SATA3 SATA1 GND RSATA_TXP2 RSATA_TXN2 ...

User Manual
Page 47
... connector, then install the module to a slot opening at the back of 1ºK or at 25ºC, B=3435) to this connector. ® P5MT-C SYS-THEAMAL2 GND 2 TRPWR1 P5MT-C TRPWR Connector ASUS P5MT-C 2-27 Ambient thermal sensor (2-pin TRPWR1) If you want additional thermal monitoring, connect the thermal sensor cable with thermistor (of the system...
... connector, then install the module to a slot opening at the back of 1ºK or at 25ºC, B=3435) to this connector. ® P5MT-C SYS-THEAMAL2 GND 2 TRPWR1 P5MT-C TRPWR Connector ASUS P5MT-C 2-27 Ambient thermal sensor (2-pin TRPWR1) If you want additional thermal monitoring, connect the thermal sensor cable with thermistor (of the system...

User Manual
Page 49
... -12 Volts Ground PSON# Ground Ground Ground -5 Volts +5 Volts +5 Volts +5 Volts Ground +12V DC +12V DC +12V DC +12V DC 1 P5MT-C ATX Power Connectors ASUS P5MT-C 2-29 The power supply plugs are for a fully-configured system. • By default, four ATX12V2 connector pins are covered to install additional devices. ...
... -12 Volts Ground PSON# Ground Ground Ground -5 Volts +5 Volts +5 Volts +5 Volts Ground +12V DC +12V DC +12V DC +12V DC 1 P5MT-C ATX Power Connectors ASUS P5MT-C 2-29 The power supply plugs are for a fully-configured system. • By default, four ATX12V2 connector pins are covered to install additional devices. ...

User Manual
Page 52
Chapter summary 3 3.1 Starting up for the first time 3-1 3.2 Powering off the computer 3-2 ASUS P5MT-C
Chapter summary 3 3.1 Starting up for the first time 3-1 3.2 Powering off the computer 3-2 ASUS P5MT-C

User Manual
Page 53
... you press the ATX power button. System power 6. After applying power, the system power LED on the chain) c. Follow the instructions in the following order: a. ASUS P5MT-C 3-1 3.1 Starting up for assistance. Be sure that is equipped with the last device on the system front panel case lights up. AMI BIOS beep codes...
... you press the ATX power button. System power 6. After applying power, the system power LED on the chain) c. Follow the instructions in the following order: a. ASUS P5MT-C 3-1 3.1 Starting up for assistance. Be sure that is equipped with the last device on the system front panel case lights up. AMI BIOS beep codes...

User Manual
Page 56
Chapter summary 4 4.1 Managing and updating your BIOS 4-1 4.2 BIOS setup program 4-10 4.3 Main menu 4-13 4.4 Advanced menu 4-18 4.5 Power menu 4-26 4.6 Boot menu 4-30 4.7 Exit menu 4-34 ASUS P5MT-C
Chapter summary 4 4.1 Managing and updating your BIOS 4-1 4.2 BIOS setup program 4-10 4.3 Main menu 4-13 4.4 Advanced menu 4-18 4.5 Power menu 4-26 4.6 Boot menu 4-30 4.7 Exit menu 4-34 ASUS P5MT-C


