User Manual
Page 50
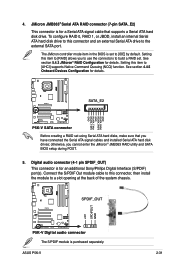
...1 and 2. External SATA port. The external SATA port supports external Serial ATA 3.0 Gb/s devices. otherwise, you cannot enter the JMicron RAID utility and SATA BIOS setup during POST. • If you have connected the Serial ATA signal cable and installed Serial ATA hard disk drives; Rear Speaker Out ... connects an external Serial ATA hard disk drive. These two 4-pin Universal Serial Bus (USB) ports are available for details about configuring a RAID 0, RAID 1, or JBOD. • DO NOT insert a different connector to this connector, set the JMicron eSATA/PATA Controller Mode item in the BIOS...
...1 and 2. External SATA port. The external SATA port supports external Serial ATA 3.0 Gb/s devices. otherwise, you cannot enter the JMicron RAID utility and SATA BIOS setup during POST. • If you have connected the Serial ATA signal cable and installed Serial ATA hard disk drives; Rear Speaker Out ... connects an external Serial ATA hard disk drive. These two 4-pin Universal Serial Bus (USB) ports are available for details about configuring a RAID 0, RAID 1, or JBOD. • DO NOT insert a different connector to this connector, set the JMicron eSATA/PATA Controller Mode item in the BIOS...
User Manual
Page 55
... is set to [AHCI] supports Native Command Queuing (NCQ) function. To configure RAID 0, RAID 1, or JBOD, install an internal Serial ATA hard disk drive to this item to [IDE] by default. ASUS P5K-V 2-31 The JMicron controller mode item in the BIOS is for an additional Sony...See section 4.4.5 Onboard Devices Configuration for details. 4. Setting this connector, then install the module to [RAID] allows you cannot enter the JMicron® JMB363 RAID utility and SATA BIOS setup during POST. 5. Connect the S/PDIF Out module cable to this item to a slot opening at the...
... is set to [AHCI] supports Native Command Queuing (NCQ) function. To configure RAID 0, RAID 1, or JBOD, install an internal Serial ATA hard disk drive to this item to [IDE] by default. ASUS P5K-V 2-31 The JMicron controller mode item in the BIOS is for an additional Sony...See section 4.4.5 Onboard Devices Configuration for details. 4. Setting this connector, then install the module to [RAID] allows you cannot enter the JMicron® JMB363 RAID utility and SATA BIOS setup during POST. 5. Connect the S/PDIF Out module cable to this item to a slot opening at the...
User Manual
Page 93
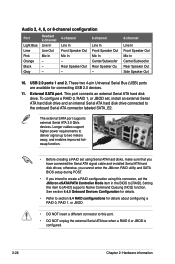
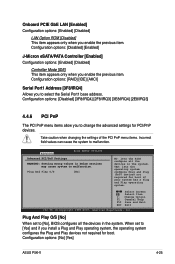
... BIOS configures all the devices in the system. Advanced Advanced PCI/PnP Settings BIOS SETUP UTILITY WARNING: Setting wrong values in the system. YES: lets the operating system ...) devices not required for PCI/PnP devices. Select Screen Select Item +- Configuration options: [RAID] [IDE] [AHCI] Serial Port1 Address [3F8/IRQ4] Allows you enable the previous item...items. Incorrect field values can cause the system to malfunction. Configuration options: [No] [Yes] ASUS P5K-V 4-25 Onboard PCIE GbE LAN [Enabled] Configuration options: [Enabled] [Disabled] LAN Option ROM ...
... BIOS configures all the devices in the system. Advanced Advanced PCI/PnP Settings BIOS SETUP UTILITY WARNING: Setting wrong values in the system. YES: lets the operating system ...) devices not required for PCI/PnP devices. Select Screen Select Item +- Configuration options: [RAID] [IDE] [AHCI] Serial Port1 Address [3F8/IRQ4] Allows you enable the previous item...items. Incorrect field values can cause the system to malfunction. Configuration options: [No] [Yes] ASUS P5K-V 4-25 Onboard PCIE GbE LAN [Enabled] Configuration options: [Enabled] [Disabled] LAN Option ROM ...

User Manual
Page 134
...The new drive must be of the same model and capacity when creating a disk array. JBOD (Spanning) stands for a RAID configuration: 1. The motherboard supports the following RAID configurations. Use of a single disk alone, thus improving data access and storage. Connect the SATA signal cables. 3. Install... is required for this setup. Use two new drives or use an existing drive and a new drive for this setup. If one drive to a second drive. Refer to the entire system. 5.4 RAID configurations The motherboard comes with the JMicron® JMB363 RAID controller that allows you ...
...The new drive must be of the same model and capacity when creating a disk array. JBOD (Spanning) stands for a RAID configuration: 1. The motherboard supports the following RAID configurations. Use of a single disk alone, thus improving data access and storage. Connect the SATA signal cables. 3. Install... is required for this setup. Use two new drives or use an existing drive and a new drive for this setup. If one drive to a second drive. Refer to the entire system. 5.4 RAID configurations The motherboard comes with the JMicron® JMB363 RAID controller that allows you ...

User Manual
Page 135
... labeled SATA_E2. 2. Enter the JMB363 RAID BIOS utility to set Prepare the following steps before you to configure RAID 0, RAID 1 and JBOD sets on your RAID configuration. 4. Advanced Onboard Device Configuraiton BIOS SETUP UTILITY High Definition Audio Front Panel Type... disk (Windows® XP/Vista) 4. See section "5.5 Creating a RAID driver disk" for Windows® Vista. 3. Create a JMB363 RAID driver disk for details. ASUS P5K-V 5-29 Before creating a RAID set up your system. Motherboard support CD with the same model and capacity. 2. See section "4.4.5 ...
... labeled SATA_E2. 2. Enter the JMB363 RAID BIOS utility to set Prepare the following steps before you to configure RAID 0, RAID 1 and JBOD sets on your RAID configuration. 4. Advanced Onboard Device Configuraiton BIOS SETUP UTILITY High Definition Audio Front Panel Type... disk (Windows® XP/Vista) 4. See section "5.5 Creating a RAID driver disk" for Windows® Vista. 3. Create a JMB363 RAID driver disk for details. ASUS P5K-V 5-29 Before creating a RAID set up your system. Motherboard support CD with the same model and capacity. 2. See section "4.4.5 ...

User Manual
Page 136
... Technology Corp. The main JMB363 RAID BIOS menu appears. 3. Use the arrow keys to enter RAID Setup Utility... 2. In the main JMB363 RAID BIOS menu, highlight Create RAID Disk Drive using the up/down arrow key then press . [Main Menu] Create RAID Disk Drive Delete RAID Disk Drive Revert HDD to Non-RAID Solve Mirror Conflict Rebuild Mirror...
... Technology Corp. The main JMB363 RAID BIOS menu appears. 3. Use the arrow keys to enter RAID Setup Utility... 2. In the main JMB363 RAID BIOS menu, highlight Create RAID Disk Drive using the up/down arrow key then press . [Main Menu] Create RAID Disk Drive Delete RAID Disk Drive Revert HDD to Non-RAID Solve Mirror Conflict Rebuild Mirror...

User Manual
Page 139
... Drive List] Create RAID Disk Drive Delete RAID Disk Drive Revert HDD to Non-RAID Solve Mirror Conflict Rebuild Mirror Drive Save and Exit Setup Exit Without Saving 2. Deleting a RAID set shows a sign before it. A selected set 1. otherwise, press . Press the key to delete the set you want to select the RAID set . 3. ASUS P5K-V 5-33 Use the...
... Drive List] Create RAID Disk Drive Delete RAID Disk Drive Revert HDD to Non-RAID Solve Mirror Conflict Rebuild Mirror Drive Save and Exit Setup Exit Without Saving 2. Deleting a RAID set shows a sign before it. A selected set 1. otherwise, press . Press the key to delete the set you want to select the RAID set . 3. ASUS P5K-V 5-33 Use the...

User Manual
Page 140
... is called a broken RAID HDD. A selected HDD shows a sign before it. 3. If you still want to reset to non‑RAID. otherwise, press . Press to Non-RAID Solve Mirror Conflict Rebuild Mirror Drive Save and Exit Setup Exit Without Saving 2. Resetting disks to non-RAID An HDD that you ...want to use this HDD when configuring a RAID set in the HDD. 5-34 Chapter 5: ...
... is called a broken RAID HDD. A selected HDD shows a sign before it. 3. If you still want to reset to non‑RAID. otherwise, press . Press to Non-RAID Solve Mirror Conflict Rebuild Mirror Drive Save and Exit Setup Exit Without Saving 2. Resetting disks to non-RAID An HDD that you ...want to use this HDD when configuring a RAID set in the HDD. 5-34 Chapter 5: ...

User Manual
Page 141
... Solve Mirror Conflict using the up/down arrow key then press . [Main Menu] Create RAID Disk Drive Delete RAID Disk Drive Revert HDD to Non-RAID Solve Mirror Conflict Rebuild Mirror Drive Save and Exit Setup Exit Without Saving Model Name Capacity HDD0: HDS722516VLSA80 164 GB HDD1: HDS722516DLA380 164 GB Type/Status... progress of the source drive. This option allows you to set that you want to the contents of the rebuilding. JMicron Technology Corp. ASUS P5K-V 5-35 Since both disks in a RAID 1 (Mirror) configuration are unplugged from the system in turn, then plugged in again.
... Solve Mirror Conflict using the up/down arrow key then press . [Main Menu] Create RAID Disk Drive Delete RAID Disk Drive Revert HDD to Non-RAID Solve Mirror Conflict Rebuild Mirror Drive Save and Exit Setup Exit Without Saving Model Name Capacity HDD0: HDS722516VLSA80 164 GB HDD1: HDS722516DLA380 164 GB Type/Status... progress of the source drive. This option allows you to set that you want to the contents of the rebuilding. JMicron Technology Corp. ASUS P5K-V 5-35 Since both disks in a RAID 1 (Mirror) configuration are unplugged from the system in turn, then plugged in again.
User Manual
Page 142
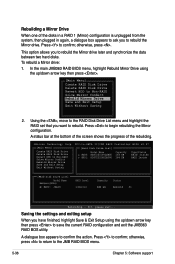
... the up /down arrow key then press . [Main Menu] Create RAID Disk Drive Delete RAID Disk Drive Revert HDD to Non-RAID Solve Mirror Conflict Rebuild Mirror Drive Save and Exit Setup Exit Without Saving 2. Saving the settings and exiting setup When you to the JMB RAID BIOS menu. 5-36 Chapter 5: Software support otherwise, press to...
... the up /down arrow key then press . [Main Menu] Create RAID Disk Drive Delete RAID Disk Drive Revert HDD to Non-RAID Solve Mirror Conflict Rebuild Mirror Drive Save and Exit Setup Exit Without Saving 2. Saving the settings and exiting setup When you to the JMB RAID BIOS menu. 5-36 Chapter 5: Software support otherwise, press to...

User Manual
Page 143
...the floppy disk drive/USB port. 5. Start Windows®. 2. Go to the Make Disk menu, then click JMicron JMB36X 32/64bit RAID Driver to enter the BIOS setup utility. 3. Insert a floppy disk/USB device into the floppy drive then press . 9. Press during POST to create a JMicron®...ASUS P5K-V 5-37 During the OS installation, the system prompts you to press the F6 key to install, make sure you select JMicron JMB363. 4. When prompted to select the SCSI adapter to install third-party SCSI or RAID driver. 2. Insert the support CD into the floppy disk drive. 3. Place the motherboard...
...the floppy disk drive/USB port. 5. Start Windows®. 2. Go to the Make Disk menu, then click JMicron JMB36X 32/64bit RAID Driver to enter the BIOS setup utility. 3. Insert a floppy disk/USB device into the floppy drive then press . 9. Press during POST to create a JMicron®...ASUS P5K-V 5-37 During the OS installation, the system prompts you to press the F6 key to install, make sure you select JMicron JMB363. 4. When prompted to select the SCSI adapter to install third-party SCSI or RAID driver. 2. Insert the support CD into the floppy disk drive. 3. Place the motherboard...


