
User Manual
Page 5
... 4-32 4.5.5 Hardware Monitor 4-34 4.6 Boot menu 4-36 4.6.1 Boot Device Priority 4-36 4.6.2 Boot Settings Configuration 4-37 4.6.3 Security 4-38 4.7 Exit menu 4-40 Chapter 5: Software support 5.1 Installing an operating system 5-1 5.2 Support CD information 5-1 5.2.1 Running the support CD 5-1 5.2.2 Drivers menu 5-2 5.2.3 Utilities menu 5-3 5.2.4 Manuals menu 5-5 5.2.5 ASUS Contact information 5-6 5.2.6 Other information 5-6 5.3 Software information 5-8 5.3.1 ASUS MyLogo 5-8 5.3.2 AI Net 2 5-10 5.3.3 C-Media 3D audio configuration 5-11 v
... 4-32 4.5.5 Hardware Monitor 4-34 4.6 Boot menu 4-36 4.6.1 Boot Device Priority 4-36 4.6.2 Boot Settings Configuration 4-37 4.6.3 Security 4-38 4.7 Exit menu 4-40 Chapter 5: Software support 5.1 Installing an operating system 5-1 5.2 Support CD information 5-1 5.2.1 Running the support CD 5-1 5.2.2 Drivers menu 5-2 5.2.3 Utilities menu 5-3 5.2.4 Manuals menu 5-5 5.2.5 ASUS Contact information 5-6 5.2.6 Other information 5-6 5.3 Software information 5-8 5.3.1 ASUS MyLogo 5-8 5.3.2 AI Net 2 5-10 5.3.3 C-Media 3D audio configuration 5-11 v

User Manual
Page 10
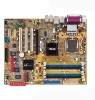
P5GDC Deluxe specifications summary Overclocking features Special features Rear panel Internal connectors Support CD contents Form factor ASUS AI NOS™ (Non-delay Overclocking System) ASUS AI Overclocking ASUS C.P.R. (CPU Parameter Recall) ASUS AI Booster Adjustable CPU, memory, and PCI Express voltages Stepless Frequency Selection (SFS) from 100 MHz up to 400 MHz at 1 MHz increment Adjustable FSB/...
P5GDC Deluxe specifications summary Overclocking features Special features Rear panel Internal connectors Support CD contents Form factor ASUS AI NOS™ (Non-delay Overclocking System) ASUS AI Overclocking ASUS C.P.R. (CPU Parameter Recall) ASUS AI Booster Adjustable CPU, memory, and PCI Express voltages Stepless Frequency Selection (SFS) from 100 MHz up to 400 MHz at 1 MHz increment Adjustable FSB/...

User Manual
Page 13
..., contact your retailer. ASUS P5GDC Deluxe 1-1 Before you for the following items. Motherboard ASUS P5GDC Deluxe motherboard I/O module 1 x IEEE 1394a port module 1 x 2-port USB 2.0/GAME module 1 x Serial port module Cables 4 x Serial ATA signal cables 2 x 2-port Serial ATA power cable 2 x Ultra DMA 133/100/66 cable 1 x IDE cable 1 x FDD cable Accessory I/O shield A p p l i c a t i o n C D s ASUS motherboard support CD InterVideo® WinDVD Suite...
..., contact your retailer. ASUS P5GDC Deluxe 1-1 Before you for the following items. Motherboard ASUS P5GDC Deluxe motherboard I/O module 1 x IEEE 1394a port module 1 x 2-port USB 2.0/GAME module 1 x Serial port module Cables 4 x Serial ATA signal cables 2 x 2-port Serial ATA power cable 2 x Ultra DMA 133/100/66 cable 1 x IDE cable 1 x FDD cable Accessory I/O shield A p p l i c a t i o n C D s ASUS motherboard support CD InterVideo® WinDVD Suite...

User Manual
Page 18
... operating system. This protection eliminates the need to restore the original BIOS data from a floppy disk. ASUS CrashFree BIOS 2 This feature allows you to use a DOS-based utility or boot from the support CD in case when the BIOS codes and data are corrupted. See page 4-26 for details. See page... 4-2 for details. See page 4-5 for details. ASUS EZ Flash BIOS With the ASUS EZ Flash, you to personalize and add style to ensure...
... operating system. This protection eliminates the need to restore the original BIOS data from a floppy disk. ASUS CrashFree BIOS 2 This feature allows you to use a DOS-based utility or boot from the support CD in case when the BIOS codes and data are corrupted. See page 4-26 for details. See page... 4-2 for details. See page 4-5 for details. ASUS EZ Flash BIOS With the ASUS EZ Flash, you to personalize and add style to ensure...

User Manual
Page 65
... BIOS using a bootable floppy disk or the motherboard support CD when the BIOS file fails or gets corrupted.) 4. b. At the DOS prompt, type format A:/S then press . Windows® XP environment a. A F o r m a t 3 1 / 2 F l o p p y D i s k window appears. D O S s t a r t u p d i s k from the Windows® desktop, then select M y C o m p u t e r. b. ASUS P5GDC Deluxe 4-1 A S U S C r a s h F r e e B I O S 2 (Updates the BIOS using the ASUS Update or AFUDOS utilities. 4.1.1 Creating a bootable floppy disk...
... BIOS using a bootable floppy disk or the motherboard support CD when the BIOS file fails or gets corrupted.) 4. b. At the DOS prompt, type format A:/S then press . Windows® XP environment a. A F o r m a t 3 1 / 2 F l o p p y D i s k window appears. D O S s t a r t u p d i s k from the Windows® desktop, then select M y C o m p u t e r. b. ASUS P5GDC Deluxe 4-1 A S U S C r a s h F r e e B I O S 2 (Updates the BIOS using the ASUS Update or AFUDOS utilities. 4.1.1 Creating a bootable floppy disk...

User Manual
Page 67
Copy the AFUDOS utility (afudos.exe) from the motherboard support CD to the DOS prompt after copying the current BIOS file. Boot the system in DOS environment using the AFUDOS utility: • Make sure that you ... file. Press . Reading flash ..... The utility copies the current BIOS file to save the file. • The succeeding BIOS screens are for the extension name. ASUS P5GDC Deluxe 4-3 A:\>afudos /oOLDBIOS1.ROM Main filename Extension name 3. All rights reserved.
Copy the AFUDOS utility (afudos.exe) from the motherboard support CD to the DOS prompt after copying the current BIOS file. Boot the system in DOS environment using the AFUDOS utility: • Make sure that you ... file. Press . Reading flash ..... The utility copies the current BIOS file to save the file. • The succeeding BIOS screens are for the extension name. ASUS P5GDC Deluxe 4-3 A:\>afudos /oOLDBIOS1.ROM Main filename Extension name 3. All rights reserved.

User Manual
Page 68
... using the AFUDOS utility: 1. The utility reads the file and starts updating the BIOS. Erasing flash .... Copy the AFUDOS utility (afudos.exe) from the motherboard support CD to type the exact BIOS filename at the prompt type: afudos /i[filename] where [filename] is the latest or the original BIOS file on a piece of... paper. You need to the bootable floppy disk you created earlier. 3. done Reading flash .... Visit the ASUS website (www.asus.com) and download the latest BIOS file for the motherboard. Version 1.19...
... using the AFUDOS utility: 1. The utility reads the file and starts updating the BIOS. Erasing flash .... Copy the AFUDOS utility (afudos.exe) from the motherboard support CD to type the exact BIOS filename at the prompt type: afudos /i[filename] where [filename] is the latest or the original BIOS file on a piece of... paper. You need to the bootable floppy disk you created earlier. 3. done Reading flash .... Visit the ASUS website (www.asus.com) and download the latest BIOS file for the motherboard. Version 1.19...

User Manual
Page 69
done Writing flash ..... You can update a corrupted BIOS file using the motherboard support CD or the floppy disk that contains the updated BIOS file. • Prepare the motherboard support CD or the floppy disk containing the updated motherboard BIOS before using this utility. • Make ... gets corrupted during flash BIOS Reading file ..... A:\>afudos /iP5GDCD.ROM AMI Firmware Update Utility - Version 1.19(ASUS V2.07(03.11.24BB)) Copyright (C) 2003 American Megatrends, Inc. WARNING!! done Reading flash .... 5. Reboot the system from a floppy disk: 1. ASUS P5GDC Deluxe 4-5
done Writing flash ..... You can update a corrupted BIOS file using the motherboard support CD or the floppy disk that contains the updated BIOS file. • Prepare the motherboard support CD or the floppy disk containing the updated motherboard BIOS before using this utility. • Make ... gets corrupted during flash BIOS Reading file ..... A:\>afudos /iP5GDCD.ROM AMI Firmware Update Utility - Version 1.19(ASUS V2.07(03.11.24BB)) Copyright (C) 2003 American Megatrends, Inc. WARNING!! done Reading flash .... 5. Reboot the system from a floppy disk: 1. ASUS P5GDC Deluxe 4-5

User Manual
Page 70
... optical drive for the original or updated BIOS file. CD-ROM found ! Start flashing... 4-6 Chapter 4: BIOS setup Completed. Starting BIOS recovery... Starting BIOS recovery... Checking for floppy... Recovering the BIOS from the support CD To recover the BIOS from the floppy disk drive, ... BIOS file. When found ! Reading file "P5GDCD.ROM". Completed. Bad BIOS checksum. Start flashing... Remove any floppy disk from the support CD: 1. Bad BIOS checksum. Bad BIOS checksum. Floppy not found , the utility reads the BIOS file and starts flashing the corrupted BIOS...
... optical drive for the original or updated BIOS file. CD-ROM found ! Start flashing... 4-6 Chapter 4: BIOS setup Completed. Starting BIOS recovery... Starting BIOS recovery... Checking for floppy... Recovering the BIOS from the support CD To recover the BIOS from the floppy disk drive, ... BIOS file. When found ! Reading file "P5GDCD.ROM". Completed. Bad BIOS checksum. Start flashing... Remove any floppy disk from the support CD: 1. Bad BIOS checksum. Bad BIOS checksum. Floppy not found , the utility reads the BIOS file and starts flashing the corrupted BIOS...

User Manual
Page 71
...; Update the BIOS directly from the Internet, and • View the BIOS version information. ASUS P5GDC Deluxe 4-7 The D r i v e r s menu appears. 2. X X. The ASUS Update utility is available in the support CD that allows you to your system. Click the U t i l i t i e s tab, then click I n s t a l l A S U S U p d a t e V X . ASUS Update requires an Internet connection either through a network or an Internet Service Provider (ISP). This...
...; Update the BIOS directly from the Internet, and • View the BIOS version information. ASUS P5GDC Deluxe 4-7 The D r i v e r s menu appears. 2. X X. The ASUS Update utility is available in the support CD that allows you to your system. Click the U t i l i t i e s tab, then click I n s t a l l A S U S U p d a t e V X . ASUS Update requires an Internet connection either through a network or an Internet Service Provider (ISP). This...

User Manual
Page 78
...transfers. These items show N/A if no IDE device is either a ZIP, LS-120, or MO drive. These values are specifically configuring a CD-ROM drive. Configuration options: [Disabled] [Auto] 4-14 Chapter 4: BIOS setup Setting to Auto allows automatic selection of device connected to display the... IDE device information. Setting to Auto enables the LBA mode if the device supports this mode, and if the device was not previously formatted with LBA mode disabled. 4.3.4 Primary, Third, and Fourth IDE Master/...
...transfers. These items show N/A if no IDE device is either a ZIP, LS-120, or MO drive. These values are specifically configuring a CD-ROM drive. Configuration options: [Disabled] [Auto] 4-14 Chapter 4: BIOS setup Setting to Auto allows automatic selection of device connected to display the... IDE device information. Setting to Auto enables the LBA mode if the device supports this mode, and if the device was not previously formatted with LBA mode disabled. 4.3.4 Primary, Third, and Fourth IDE Master/...

User Manual
Page 107
This chapter describes the contents of the support CD that comes with the motherboard package. 5 Software support
This chapter describes the contents of the support CD that comes with the motherboard package. 5 Software support

User Manual
Page 108
Chapter summary 5 5.1 Installing an operating system 5-1 5.2 Support CD information 5-1 5.3 Software information 5-8 5.4 RAID configurations 5-16 5.5 Creating a RAID driver disk 5-28 ASUS P5GDC Deluxe
Chapter summary 5 5.1 Installing an operating system 5-1 5.2 Support CD information 5-1 5.3 Software information 5-8 5.4 RAID configurations 5-16 5.5 Creating a RAID driver disk 5-28 ASUS P5GDC Deluxe
User Manual
Page 109
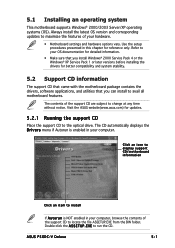
... Pack 4 or the Windows® XP Service Pack 1 or later versions before installing the drivers for updates. 5.2.1 Running the support CD Place the support CD to run the CD. ASUS P5GDC-V Deluxe 5-1 5.1 Installing an operating system This motherboard supports Windows® 2000/2003 Server/XP operating systems (OS). Always install the latest OS version and corresponding updates to maximize...
... Pack 4 or the Windows® XP Service Pack 1 or later versions before installing the drivers for updates. 5.2.1 Running the support CD Place the support CD to run the CD. ASUS P5GDC-V Deluxe 5-1 5.1 Installing an operating system This motherboard supports Windows® 2000/2003 Server/XP operating systems (OS). Always install the latest OS version and corresponding updates to maximize...
User Manual
Page 114
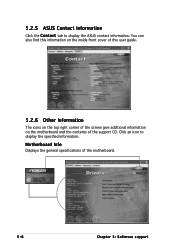
5.2.5 ASUS Contact information Click the C o n t a c t tab to display the specified information. Motherboard Info Displays the general specifications of the support CD. You can also find this information on the inside front cover of this user guide. 5.2.6 Other information The icons on the top right corner of the screen give additional information on the motherboard and the contents of the motherboard. 5-6 Chapter 5: Software support Click an icon to display the ASUS contact information.
5.2.5 ASUS Contact information Click the C o n t a c t tab to display the specified information. Motherboard Info Displays the general specifications of the support CD. You can also find this information on the inside front cover of this user guide. 5.2.6 Other information The icons on the top right corner of the screen give additional information on the motherboard and the contents of the motherboard. 5-6 Chapter 5: Software support Click an icon to display the ASUS contact information.

User Manual
Page 115
ASUS P5GDC-V Deluxe 5-7 Filelist Displays the contents of the support CD and a brief description of each in graphical format. Browse this CD Displays the support CD contents in text format. Technical support Form Displays the ASUS Technical Support Request Form that you have to fill out when requesting technical support.
ASUS P5GDC-V Deluxe 5-7 Filelist Displays the contents of the support CD and a brief description of each in graphical format. Browse this CD Displays the support CD contents in text format. Technical support Form Displays the ASUS Technical Support Request Form that you have to fill out when requesting technical support.

User Manual
Page 116
... intend to [Enabled] if you through the installation. When prompted, locate the new BIOS file, then click N e x t. The ASUS MyLogo™ is the image that contains the image you install the A S U S U p d a t e utility from the support CD. Select O p t i o n s from the drop down menu, then click N e x t. 3. Select U p d a t e B I O S, then click N e x t. 4. See section "4.1.3 AFUDOS utility." • Make...
... intend to [Enabled] if you through the installation. When prompted, locate the new BIOS file, then click N e x t. The ASUS MyLogo™ is the image that contains the image you install the A S U S U p d a t e utility from the support CD. Select O p t i o n s from the drop down menu, then click N e x t. 3. Select U p d a t e B I O S, then click N e x t. 4. See section "4.1.3 AFUDOS utility." • Make...

User Manual
Page 119
Main Setting The M a i n S e t t i n g tab allows you install the C-Media CMI9880 audio driver and application from the motherboard support CD. Tabs Audio System Status Smart Jack settings Mode Selection Speaker Tester and Audio DSP Setting A u d i o S y s t e m S t a t u s. ASUS P5GDC-V Deluxe 5-11 5.3.3 C-Media 3D audio configuration The C-Media 3D Audio Configuration utility allows easy installation and set the speaker and...
Main Setting The M a i n S e t t i n g tab allows you install the C-Media CMI9880 audio driver and application from the motherboard support CD. Tabs Audio System Status Smart Jack settings Mode Selection Speaker Tester and Audio DSP Setting A u d i o S y s t e m S t a t u s. ASUS P5GDC-V Deluxe 5-11 5.3.3 C-Media 3D audio configuration The C-Media 3D Audio Configuration utility allows easy installation and set the speaker and...

User Manual
Page 124
.... With the RAID 0+1 configuration you to configure IDE and Serial ATA hard disk drives as it contains a complete copy of data from the support CD to hard disk drives that are not yet configured as a single drive but at a sustained data transfer rate, double that of two new ... drive and a new drive for this setup. I D 0 (Data striping) optimizes two identical hard disk drives to the entire system. The motherboard supports the following RAID configurations. Two hard disks perform the same work as a RAID set using separate disks independently and does not provide fault tolerance or...
.... With the RAID 0+1 configuration you to configure IDE and Serial ATA hard disk drives as it contains a complete copy of data from the support CD to hard disk drives that are not yet configured as a single drive but at a sustained data transfer rate, double that of two new ... drive and a new drive for this setup. I D 0 (Data striping) optimizes two identical hard disk drives to the entire system. The motherboard supports the following RAID configurations. Two hard disks perform the same work as a RAID set using separate disks independently and does not provide fault tolerance or...

User Manual
Page 136
... drive. 3. When the D r i v e r s menu appears, select the RAID driver disk you are installing a third-party SCSI or RAID driver. 2. Or Browse the contents of the support CD to locate the driver disk utility: • I T E 8 2 1 2 R A I D D r i v e r D i s k: \Drivers\ITE8212\MakeDisk • I T E 8 2 1 2 D r i v e r D i s k to section "5.2.2 Drivers menu" for details. 3. Install an operating system to prevent ... driver disk, eject the floppy disk, then write-protect it to the selected hard disk drive. To create a RAID driver disk: 1. Place the motherboard support CD in a RAID set.
... drive. 3. When the D r i v e r s menu appears, select the RAID driver disk you are installing a third-party SCSI or RAID driver. 2. Or Browse the contents of the support CD to locate the driver disk utility: • I T E 8 2 1 2 R A I D D r i v e r D i s k: \Drivers\ITE8212\MakeDisk • I T E 8 2 1 2 D r i v e r D i s k to section "5.2.2 Drivers menu" for details. 3. Install an operating system to prevent ... driver disk, eject the floppy disk, then write-protect it to the selected hard disk drive. To create a RAID driver disk: 1. Place the motherboard support CD in a RAID set.


