P5GD2 Deluxe user's manual
Page 43
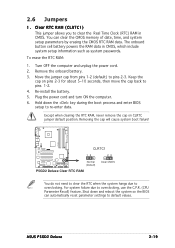
...Remove the onboard battery. 3. Except when clearing the RTC RAM, never remove the cap on pins 2-3 for about 5~10 seconds, then move the cap back to default values. To erase the RTC RAM: 1. Plug the power cord and turn ON the computer. 6. ASUS P5GD2 Deluxe 2-19 The onboard button cell battery powers the... RAM data in CMOS. Hold down and reboot the system so the BIOS can clear the CMOS...
...Remove the onboard battery. 3. Except when clearing the RTC RAM, never remove the cap on pins 2-3 for about 5~10 seconds, then move the cap back to default values. To erase the RTC RAM: 1. Plug the power cord and turn ON the computer. 6. ASUS P5GD2 Deluxe 2-19 The onboard button cell battery powers the... RAM data in CMOS. Hold down and reboot the system so the BIOS can clear the CMOS...
P5GD2 Deluxe user's manual
Page 80
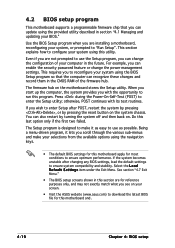
.... Select the L o a d D e f a u l t S e t t i n g s item under the Exit Menu. See section "4.7 Exit Menu." • The BIOS setup screens shown in the CMOS RAM of your computer in section "4.1 Managing and updating your system using the BIOS Setup program so that you scroll through the various sub-menus and...to enter the Setup utility; If you with its test routines. This section explains how to configure your screen. • Visit the ASUS website (www.asus.com) to use the Setup program, you can also restart by pressing the reset button on . The firmware hub on your system...
.... Select the L o a d D e f a u l t S e t t i n g s item under the Exit Menu. See section "4.7 Exit Menu." • The BIOS setup screens shown in the CMOS RAM of your computer in section "4.1 Managing and updating your system using the BIOS Setup program so that you scroll through the various sub-menus and...to enter the Setup utility; If you with its test routines. This section explains how to configure your screen. • Visit the ASUS website (www.asus.com) to use the Setup program, you can also restart by pressing the reset button on . The firmware hub on your system...

P5GD2 Deluxe user's manual
Page 108
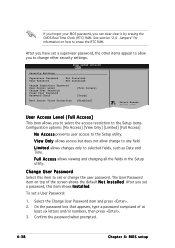
... a password, this item to any field. To set a User Password: 1. Select the Change User Password item and press . 2. L i m i t e d allows changes only to erase the RTC RAM. Confirm the password when prompted. 4-38 Chapter 4: BIOS setup Change User Password Select this item shows I n s t a l l e d. After you can clear clear it by erasing the...
... a password, this item to any field. To set a User Password: 1. Select the Change User Password item and press . 2. L i m i t e d allows changes only to erase the RTC RAM. Confirm the password when prompted. 4-38 Chapter 4: BIOS setup Change User Password Select this item shows I n s t a l l e d. After you can clear clear it by erasing the...

P5GD2 Deluxe user's manual
Page 110
... you select this option, a confirmation window appears. After selecting this option, a confirmation appears. When you made to the Setup program. Select Y e s to the non-volatile RAM. 4-40 Chapter 4: BIOS setup Select E x i t & S a v e C h a n g e s or make other than System Date, System Time, and Password, the BIOS asks .... Select Y e s to save changes and exit. An onboard backup battery sustains the CMOS RAM so it stays on the Setup menus. If you selected are saved to the CMOS RAM. Exit & Save Changes Once you are finished making your selections, choose this option from the ...
... you select this option, a confirmation window appears. After selecting this option, a confirmation appears. When you made to the Setup program. Select Y e s to the non-volatile RAM. 4-40 Chapter 4: BIOS setup Select E x i t & S a v e C h a n g e s or make other than System Date, System Time, and Password, the BIOS asks .... Select Y e s to save changes and exit. An onboard backup battery sustains the CMOS RAM so it stays on the Setup menus. If you selected are saved to the CMOS RAM. Exit & Save Changes Once you are finished making your selections, choose this option from the ...

P5GD2 Premium user''s manual
Page 43
...enter data. You can automatically reset parameter settings to default values. The onboard button cell battery powers the RAM data in CMOS. Removing the cap will cause system boot failure! ASUS P5GD2 Premium 2-19 Re-install the battery. 5. Hold down and reboot the system so the BIOS can ...clear the CMOS memory of date, time, and system setup parameters by erasing the CMOS RTC RAM data. Remove the onboard battery. 3. To...
...enter data. You can automatically reset parameter settings to default values. The onboard button cell battery powers the RAM data in CMOS. Removing the cap will cause system boot failure! ASUS P5GD2 Premium 2-19 Re-install the battery. 5. Hold down and reboot the system so the BIOS can ...clear the CMOS memory of date, time, and system setup parameters by erasing the CMOS RTC RAM data. Remove the onboard battery. 3. To...

P5GD2 Premium user''s manual
Page 80
...match what you see on the system chassis. You can also restart by pressing the reset button on your screen. • Visit the ASUS website (www.asus.com) to use as easy to "Run Setup". 4.2 BIOS setup program This motherboard supports a programmable firmware chip that the computer can ...recognize these changes and record them in the CMOS RAM of your system, or prompted to use the Setup program, you can change the power management...
...match what you see on the system chassis. You can also restart by pressing the reset button on your screen. • Visit the ASUS website (www.asus.com) to use as easy to "Run Setup". 4.2 BIOS setup program This motherboard supports a programmable firmware chip that the computer can ...recognize these changes and record them in the CMOS RAM of your system, or prompted to use the Setup program, you can change the power management...
P5GD2 Premium user''s manual
Page 108
...] Select Screen Select Item User Access Level (Full Access] This item allows you can clear clear it by erasing the CMOS Real Time Clock (RTC) RAM. F u l l A c c e s s allows viewing and changing all the fields in the Setup utility. Select the Change User Password item and press . 2. See section "2.6 ... least six letters and/or numbers, then press . 3. After you to set a User Password: 1. L i m i t e d allows changes only to erase the RTC RAM. The User Password item on how to selected fields, such as Date and Time. On the password box that appears, type a password composed of the...
...] Select Screen Select Item User Access Level (Full Access] This item allows you can clear clear it by erasing the CMOS Real Time Clock (RTC) RAM. F u l l A c c e s s allows viewing and changing all the fields in the Setup utility. Select the Change User Password item and press . 2. See section "2.6 ... least six letters and/or numbers, then press . 3. After you to set a User Password: 1. L i m i t e d allows changes only to erase the RTC RAM. The User Password item on how to selected fields, such as Date and Time. On the password box that appears, type a password composed of the...

P5GD2 Premium user''s manual
Page 110
...or if you made to the Setup program. If you made changes to fields other changes before saving the values to the non-volatile RAM. 4-40 Chapter 4: BIOS setup After selecting this option, a confirmation window appears. When you select this option from the Exit menu to... This option allows you to discard the selections you press , a confirmation window appears. Select Y e s to load default values. An onboard backup battery sustains the CMOS RAM so it stays on the Setup menus. Select E x i t & S a v e C h a n g e s or make other than System Date, System Time, and Password, the BIOS...
...or if you made to the Setup program. If you made changes to fields other changes before saving the values to the non-volatile RAM. 4-40 Chapter 4: BIOS setup After selecting this option, a confirmation window appears. When you select this option from the Exit menu to... This option allows you to discard the selections you press , a confirmation window appears. Select Y e s to load default values. An onboard backup battery sustains the CMOS RAM so it stays on the Setup menus. Select E x i t & S a v e C h a n g e s or make other than System Date, System Time, and Password, the BIOS...


