
P5GD2 Deluxe user's manual
Page 19
... details. ASUS P5GD2 Deluxe 1-3 If you are using IDE or Serial ATA devices. See pages 2-25 and 5-31 for details. With the CODEC, 8-channel audio ports, and S/PDIF interfaces, you can connect your computer's digital audio contents into real-time Dolby® Digital stream. The Intel® ICH6R allows RAID 0 and RAID 1 configuration for details. The Sil3114R controller supports four additional SATA connectors and allows RAID 0, RAID 1, RAID 10, JBOD, and a software patch...
... details. ASUS P5GD2 Deluxe 1-3 If you are using IDE or Serial ATA devices. See pages 2-25 and 5-31 for details. With the CODEC, 8-channel audio ports, and S/PDIF interfaces, you can connect your computer's digital audio contents into real-time Dolby® Digital stream. The Intel® ICH6R allows RAID 0 and RAID 1 configuration for details. The Sil3114R controller supports four additional SATA connectors and allows RAID 0, RAID 1, RAID 10, JBOD, and a software patch...
P5GD2 Deluxe user's manual
Page 40
... (if your motherboard is completely seated on BIOS setup. 2. Secure the card to install expansion cards. Turn on the next page. 3. Replace the system cover. 2.5.2 Configuring an expansion card After installing the expansion card, configure the it and make the necessary hardware settings for later use . Install the software drivers for information on the slot. 5. Failure to do so may need to the chassis with it by adjusting the software settings. 1. The following...
... (if your motherboard is completely seated on BIOS setup. 2. Secure the card to install expansion cards. Turn on the next page. 3. Replace the system cover. 2.5.2 Configuring an expansion card After installing the expansion card, configure the it and make the necessary hardware settings for later use . Install the software drivers for information on the slot. 5. Failure to do so may need to the chassis with it by adjusting the software settings. 1. The following...

P5GD2 Deluxe user's manual
Page 49
...RAID 1 configuration supports a maximum of ATAPI devices connected to IDE mode by default. Refer to Chapter 5 for details. IDE RAID connectors (40-1 pin PRI_RAID1 [red], SEC_RAID1 [red]) These connectors are set . P5GD2 Deluxe RAID connectors • Before creating a RAID set using these connectors such as boot/data hard disk drives or optical drives. In IDE mode, you intend to PIN 1. See section "4.4.6 Onboard Devices Configuration" for details on the IDE ribbon cable to create an IDE RAID set both drives either as a disk array through the onboard IDE RAID controller...
...RAID 1 configuration supports a maximum of ATAPI devices connected to IDE mode by default. Refer to Chapter 5 for details. IDE RAID connectors (40-1 pin PRI_RAID1 [red], SEC_RAID1 [red]) These connectors are set . P5GD2 Deluxe RAID connectors • Before creating a RAID set using these connectors such as boot/data hard disk drives or optical drives. In IDE mode, you intend to PIN 1. See section "4.4.6 Onboard Devices Configuration" for details on the IDE ribbon cable to create an IDE RAID set both drives either as a disk array through the onboard IDE RAID controller...

P5GD2 Deluxe user's manual
Page 72
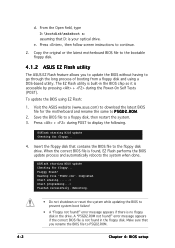
... Power-On Self Tests (POST). When the correct BIOS file is your optical drive. Visit the ASUS website (www.asus.com) to P 5 G D 2 D . EZFlash starting BIOS update Checking for the motherboard and rename the same to download the latest BIOS file for floppy... 4. error message appears if there is accessible by pressing + during POST to go through the long process of booting from a floppy disk and using EZ Flash: 1. e. The EZ Flash utility is built-in the BIOS chip...
... Power-On Self Tests (POST). When the correct BIOS file is your optical drive. Visit the ASUS website (www.asus.com) to P 5 G D 2 D . EZFlash starting BIOS update Checking for the motherboard and rename the same to download the latest BIOS file for floppy... 4. error message appears if there is accessible by pressing + during POST to go through the long process of booting from a floppy disk and using EZ Flash: 1. e. The EZ Flash utility is built-in the BIOS chip...

P5GD2 Deluxe user's manual
Page 77
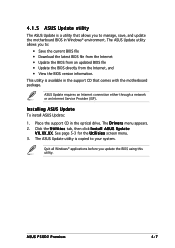
.... ASUS P5GD2 Deluxe 4-7 This utility is available in the optical drive. 4.1.5 ASUS Update utility The ASUS Update is a utility that comes with the motherboard package. The D r i v e r s menu appears. 2. X X . X X. Quit all Windows® applications before you to: • Save the current BIOS file • Download the latest BIOS file from the Internet • Update the BIOS from an updated BIOS file • Update the BIOS directly from the Internet, and • View the BIOS version information. Place the support CD...
.... ASUS P5GD2 Deluxe 4-7 This utility is available in the optical drive. 4.1.5 ASUS Update utility The ASUS Update is a utility that comes with the motherboard package. The D r i v e r s menu appears. 2. X X . X X. Quit all Windows® applications before you to: • Save the current BIOS file • Download the latest BIOS file from the Internet • Update the BIOS from an updated BIOS file • Update the BIOS directly from the Internet, and • View the BIOS version information. Place the support CD...
P5GD2 Deluxe user's manual
Page 82
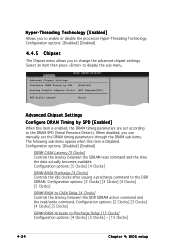
... Detected] Main menu items Use [ENTER], [TAB] or [SHIFT-TAB] to select a field. To change the value of the selected item. Refer to "4.2.7 Pop-up window." 4.2.7 Pop-up window Select a menu item then press to display the other items (Advanced, Power, Boot, and Exit) on the right side of options. Configure DRAM Timing by SPD Memory Acceleration Mode DRAM Idle Timer DRAm Refresh Rate [Enabled] [Auto] [Auto] [Auto] Graphic Adapter Priority Graphics Aperture Size Spread...
... Detected] Main menu items Use [ENTER], [TAB] or [SHIFT-TAB] to select a field. To change the value of the selected item. Refer to "4.2.7 Pop-up window." 4.2.7 Pop-up window Select a menu item then press to display the other items (Advanced, Power, Boot, and Exit) on the right side of options. Configure DRAM Timing by SPD Memory Acceleration Mode DRAM Idle Timer DRAm Refresh Rate [Enabled] [Auto] [Auto] [Auto] Graphic Adapter Priority Graphics Aperture Size Spread...

P5GD2 Deluxe user's manual
Page 84
... Mode DMA Mode Smart Monitoring 32Bit Data Transfer [Auto] [Auto] [Auto] [Auto] [Auto] [Auto] [Disabled] The BIOS automatically detects the values opposite the dimmed items (Device, Vendor, Size, LBA Mode, Block Mode, PIO Mode, Async DMA, Ultra DMA, and SMART monitoring). Setting to display the IDE device information. Select ARMD (ATAPI Removable Media Device) if your device is installed in the system. Configuration options: [Disabled] [Auto] 4-14 Chapter 4: BIOS setup Select a device item then press to Auto enables the LBA mode if the device supports this mode, and if the device...
... Mode DMA Mode Smart Monitoring 32Bit Data Transfer [Auto] [Auto] [Auto] [Auto] [Auto] [Auto] [Disabled] The BIOS automatically detects the values opposite the dimmed items (Device, Vendor, Size, LBA Mode, Block Mode, PIO Mode, Async DMA, Ultra DMA, and SMART monitoring). Setting to display the IDE device information. Select ARMD (ATAPI Removable Media Device) if your device is installed in the system. Configuration options: [Disabled] [Auto] 4-14 Chapter 4: BIOS setup Select a device item then press to Auto enables the LBA mode if the device supports this mode, and if the device...
P5GD2 Deluxe user's manual
Page 92
... Devices Enabled: None USB Function Legacy USB Support USB 2.0 Controller USB 2.0 Controller Mode [Enabled] [Auto] [Enabled] [HiSpeed] The Module Version and USB Devices Enabled items show the auto-detected values. Setting to Auto allows the system to display the configuration options. Configuration options: [HiSpeed] [Full Speed] 4-22 Chapter 4: BIOS setup USB Function [Enabled] Allows you to configure the USB 2.0 controller in this menu allows you to enable or disable support for USB devices on legacy operating systems (OS). If detected, the USB controller legacy mode...
... Devices Enabled: None USB Function Legacy USB Support USB 2.0 Controller USB 2.0 Controller Mode [Enabled] [Auto] [Enabled] [HiSpeed] The Module Version and USB Devices Enabled items show the auto-detected values. Setting to Auto allows the system to display the configuration options. Configuration options: [HiSpeed] [Full Speed] 4-22 Chapter 4: BIOS setup USB Function [Enabled] Allows you to configure the USB 2.0 controller in this menu allows you to enable or disable support for USB devices on legacy operating systems (OS). If detected, the USB controller legacy mode...
P5GD2 Deluxe user's manual
Page 93
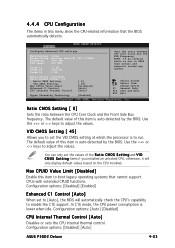
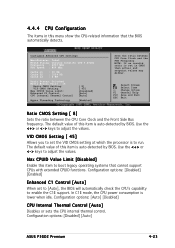
... when idle. Configuration options: [Auto] [Disabled] CPU Internal Thermal Control [Auto] Disables or sets the CPU internal thermal control. NOTE: If an invalid ratio is set the VID CMOS setting at which the processor is auto-detected by the BIOS. The default value of the R a t i o C M O S S e t t i n g and V I D C M O S S e t t i n g items if you to enable the C1E support. In C1E mode, the CPU power consumption is auto-detected by the BIOS. Configuration options: [Disabled] [Auto] ASUS P5GD2 Deluxe 4-23 VID CMOS Setting [ 45] Allows you installed an unlocked CPU, otherwise...
... when idle. Configuration options: [Auto] [Disabled] CPU Internal Thermal Control [Auto] Disables or sets the CPU internal thermal control. NOTE: If an invalid ratio is set the VID CMOS setting at which the processor is auto-detected by the BIOS. The default value of the R a t i o C M O S S e t t i n g and V I D C M O S S e t t i n g items if you to enable the C1E support. In C1E mode, the CPU power consumption is auto-detected by the BIOS. Configuration options: [Disabled] [Auto] ASUS P5GD2 Deluxe 4-23 VID CMOS Setting [ 45] Allows you installed an unlocked CPU, otherwise...
P5GD2 Deluxe user's manual
Page 94
... options: [4 Clocks] [5 Clocks] ~ [15 Clocks] 4-24 Chapter 4: BIOS setup Configuration options: [2 Clocks] [3 Clocks] [4 Clocks] [5 Clocks] DRAM RAS# Activate to the DDR SDRAM. When disabled, you can manually set according to the DRAM SPD (Serial Presence Detect). Hyper-Threading Technology [Enabled] Allows you to change the advanced chipset settings. Configuration options: [2 Clocks] [3 Clocks] [4 Clocks] [5 Clocks] DRAM RAS# to display the sub-menu. Configuration options: [Disabled] [Enabled] 4.4.5 Chipset The Chipset menu allows you to enable or disable the processor...
... options: [4 Clocks] [5 Clocks] ~ [15 Clocks] 4-24 Chapter 4: BIOS setup Configuration options: [2 Clocks] [3 Clocks] [4 Clocks] [5 Clocks] DRAM RAS# Activate to the DDR SDRAM. When disabled, you can manually set according to the DRAM SPD (Serial Presence Detect). Hyper-Threading Technology [Enabled] Allows you to change the advanced chipset settings. Configuration options: [2 Clocks] [3 Clocks] [4 Clocks] [5 Clocks] DRAM RAS# to display the sub-menu. Configuration options: [Disabled] [Enabled] 4.4.5 Chipset The Chipset menu allows you to enable or disable the processor...
P5GD2 Deluxe user's manual
Page 96
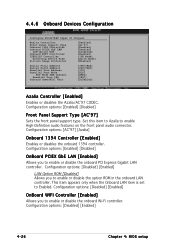
...4: BIOS setup This item appears only when the Onboard LAN item is set to enable High-Definition audio features on the front panel audio connector. 4.4.6 Onboard Devices Configuration Configure Win627EHF Super IO Chipset Azalia Controller Front Panel Support Type Onboard 1394 Controller Onboard PCIEX GbE LAN LAN Option ROM Onboard WIFI Controller ITE8212F Controller Detecting Device Time Silicon Image Controller [Enabled] [AC'97] [Enabled] [Enabled] [Disabled] [Enabled] [IDE Mode] [Quick Mode] [Enabled] Serial Port1 Address Serial Port2 Address Parallel Port Address Parallel Port...
...4: BIOS setup This item appears only when the Onboard LAN item is set to enable High-Definition audio features on the front panel audio connector. 4.4.6 Onboard Devices Configuration Configure Win627EHF Super IO Chipset Azalia Controller Front Panel Support Type Onboard 1394 Controller Onboard PCIEX GbE LAN LAN Option ROM Onboard WIFI Controller ITE8212F Controller Detecting Device Time Silicon Image Controller [Enabled] [AC'97] [Enabled] [Enabled] [Disabled] [Enabled] [IDE Mode] [Quick Mode] [Enabled] Serial Port1 Address Serial Port2 Address Parallel Port Address Parallel Port...
P5GD2 Deluxe user's manual
Page 101
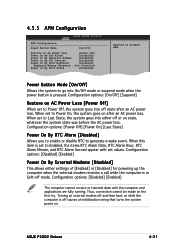
... mode. ASUS P5GD2 Deluxe 4-31 When set to generate a wake event. Configuration options: [On/Off] [Suspend] Restore on after an AC power loss. Configuration options: [Power Off] [Power On] [Last State] Power On By RTC Alarm [Disabled] Allows you to enable or disable RTC to Power On, the system goes on AC Power Loss [Power Off] When set values. Thus, connection cannot be made on AC Power Loss [Power Off] Power On By RTC Alarm [Disabled] Power...
... mode. ASUS P5GD2 Deluxe 4-31 When set to generate a wake event. Configuration options: [On/Off] [Suspend] Restore on after an AC power loss. Configuration options: [Power Off] [Power On] [Last State] Power On By RTC Alarm [Disabled] Allows you to enable or disable RTC to Power On, the system goes on AC Power Loss [Power Off] When set values. Thus, connection cannot be made on AC Power Loss [Power Off] Power On By RTC Alarm [Disabled] Power...

P5GD2 Deluxe user's manual
Page 113
... updates to install If A u t o r u n is enabled in your hardware. • Motherboard settings and hardware options vary. Visit the ASUS website(www.asus.com) for reference only. Use the setup procedures presented in your OS documentation for detailed information. • Make sure that you install Windows® 2000 Service Pack 4 or the Windows® XP Service Pack1 or later versions before installing the drivers for better compatibility and system stability. 5.2 Support...
... updates to install If A u t o r u n is enabled in your hardware. • Motherboard settings and hardware options vary. Visit the ASUS website(www.asus.com) for reference only. Use the setup procedures presented in your OS documentation for detailed information. • Make sure that you install Windows® 2000 Service Pack 4 or the Windows® XP Service Pack1 or later versions before installing the drivers for better compatibility and system stability. 5.2 Support...
P5GD2 Deluxe user's manual
Page 149
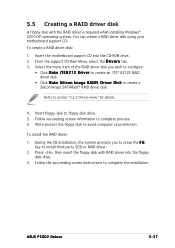
... A floppy disk with RAID driver into the CD-ROM drive. 2. Insert the motherboard support CD into the floppy disk drive. 3. Select the menu item of the RAID driver disk you to press the F 6 key to section "5.2.2 Drivers menu" for details. 4. ASUS P5GD2 Deluxe 5-37 Insert floppy disk to complete the installation. To create a RAID driver disk: 1. Follow the succeeding screen instructions to floppy disk drive. 5. Press then insert the floppy disk with the RAID driver is required when installing Windows® 2000/XP operating system. You can create a RAID driver disk using...
... A floppy disk with RAID driver into the CD-ROM drive. 2. Insert the motherboard support CD into the floppy disk drive. 3. Select the menu item of the RAID driver disk you to press the F 6 key to section "5.2.2 Drivers menu" for details. 4. ASUS P5GD2 Deluxe 5-37 Insert floppy disk to complete the installation. To create a RAID driver disk: 1. Follow the succeeding screen instructions to floppy disk drive. 5. Press then insert the floppy disk with the RAID driver is required when installing Windows® 2000/XP operating system. You can create a RAID driver disk using...

P5GD2 Premium user''s manual
Page 19
... various audio devices. See page 2-24 for details. 8-channel high definition audio Onboard is the C-Media CMI9880 7.1-channel audio CODEC. If you are using IDE or Serial ATA devices. PCI Express features point-to support RAID 5. See page 2-16 for details. See page 2-22 and 2-23 for four SATA connectors and supports the Intel® Matrix Storage Technology. ASUS P5GD2 Premium 1-3 Dolby® Digital Live™ The CMI9880 audio CODEC comes with existing PCI specifications. This high speed...
... various audio devices. See page 2-24 for details. 8-channel high definition audio Onboard is the C-Media CMI9880 7.1-channel audio CODEC. If you are using IDE or Serial ATA devices. PCI Express features point-to support RAID 5. See page 2-16 for details. See page 2-22 and 2-23 for four SATA connectors and supports the Intel® Matrix Storage Technology. ASUS P5GD2 Premium 1-3 Dolby® Digital Live™ The CMI9880 audio CODEC comes with existing PCI specifications. This high speed...
P5GD2 Premium user''s manual
Page 72
... starting BIOS update Checking for floppy... Reading file "P5GD2.rom". Rebooting. • Do not shutdown or reset the system while updating the BIOS to display the following. error message appears if the correct BIOS file is accessible by pressing + during POST to prevent system boot failure! • A "Floppy not found !" Press , then follow screen instructions to a floppy disk, then restart the system. 3. Copy the original or the latest motherboard BIOS file to the bootable floppy disk. 4.1.2 ASUS EZ Flash utility The ASUS...
... starting BIOS update Checking for floppy... Reading file "P5GD2.rom". Rebooting. • Do not shutdown or reset the system while updating the BIOS to display the following. error message appears if the correct BIOS file is accessible by pressing + during POST to prevent system boot failure! • A "Floppy not found !" Press , then follow screen instructions to a floppy disk, then restart the system. 3. Copy the original or the latest motherboard BIOS file to the bootable floppy disk. 4.1.2 ASUS EZ Flash utility The ASUS...
P5GD2 Premium user''s manual
Page 77
... page 5-3 for the U t i l i t i e s screen menu. 3. ASUS P5GD2 Premium 4-7 Place the support CD in the support CD that allows you update the BIOS using this utility. ASUS Update requires an Internet connection either through a network or an Internet Service Provider (ISP). Quit all Windows® applications before you to manage, save, and update the motherboard BIOS in Windows® environment. The ASUS Update utility is available in the optical drive. Installing ASUS Update To install ASUS Update: 1. X X. X X . The ASUS Update utility allows you to...
... page 5-3 for the U t i l i t i e s screen menu. 3. ASUS P5GD2 Premium 4-7 Place the support CD in the support CD that allows you update the BIOS using this utility. ASUS Update requires an Internet connection either through a network or an Internet Service Provider (ISP). Quit all Windows® applications before you to manage, save, and update the motherboard BIOS in Windows® environment. The ASUS Update utility is available in the optical drive. Installing ASUS Update To install ASUS Update: 1. X X. X X . The ASUS Update utility allows you to...
P5GD2 Premium user''s manual
Page 93
Max CPUID Value Limit [Disabled] Enable this item to boot legacy operating systems that the BIOS automatically detects. In C1E mode, the CPU power consumption is auto-detected by BIOS. Use the < + > or < - > keys to adjust the values. Use the < + > or < - > keys to adjust the values. Configuration options: [Disabled] [Auto] ASUS P5GD2 Premium 4-23 Change Option F1 General Help F10 Save and Exit ESC Exit Ratio CMOS Setting [ 8] Sets the ratio between CPU Core Clock and the FSB Frequency. The default value...
Max CPUID Value Limit [Disabled] Enable this item to boot legacy operating systems that the BIOS automatically detects. In C1E mode, the CPU power consumption is auto-detected by BIOS. Use the < + > or < - > keys to adjust the values. Use the < + > or < - > keys to adjust the values. Configuration options: [Disabled] [Auto] ASUS P5GD2 Premium 4-23 Change Option F1 General Help F10 Save and Exit ESC Exit Ratio CMOS Setting [ 8] Sets the ratio between CPU Core Clock and the FSB Frequency. The default value...
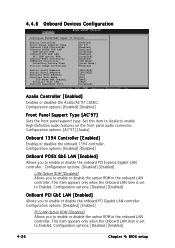
P5GD2 Premium user''s manual
Page 96
...Port Mode ECP Mode DMA Channel Parallel Port IRQ Onboard Game/MIDI Port [3F8/IRQ4] [2F8/IRQ3] [378] [ECP] [DMA3] [IRQ7] [Disabled] Azalia Controller [Enabled] Enables or disables the Azalia/AC'97 CODEC. Configuration options: [Enabled] [Disabled] Front Panel Support Type [AC'97] Sets the front panel support type. Configuration options: [Disabled] [Enabled] PCI LAN Option ROM [Disabled] Allows you to enable High-Definition audio features on the front panel audio connector. Configuration options: [Enabled] [Disabled] OnBoard PCIEX GbE LAN [Enabled] Allows you to enable or disable the option...
...Port Mode ECP Mode DMA Channel Parallel Port IRQ Onboard Game/MIDI Port [3F8/IRQ4] [2F8/IRQ3] [378] [ECP] [DMA3] [IRQ7] [Disabled] Azalia Controller [Enabled] Enables or disables the Azalia/AC'97 CODEC. Configuration options: [Enabled] [Disabled] Front Panel Support Type [AC'97] Sets the front panel support type. Configuration options: [Disabled] [Enabled] PCI LAN Option ROM [Disabled] Allows you to enable High-Definition audio features on the front panel audio connector. Configuration options: [Enabled] [Disabled] OnBoard PCIEX GbE LAN [Enabled] Allows you to enable or disable the option...
P5GD2 Premium user''s manual
Page 113
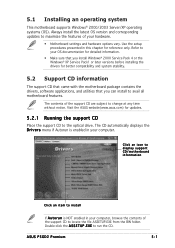
... optical drive. ASUS P5GD2 Premium 5-1 Refer to your computer. Click an icon to display support CD/motherboard information Click an item to avail all motherboard features. Use the setup procedures presented in your hardware. • Motherboard settings and hardware options vary. Visit the ASUS website(www.asus.com) for updates. 5.2.1 Running the support CD Place the support CD to run the CD. The CD automatically displays the D r i v e r s menu if...
... optical drive. ASUS P5GD2 Premium 5-1 Refer to your computer. Click an icon to display support CD/motherboard information Click an item to avail all motherboard features. Use the setup procedures presented in your hardware. • Motherboard settings and hardware options vary. Visit the ASUS website(www.asus.com) for updates. 5.2.1 Running the support CD Place the support CD to run the CD. The CD automatically displays the D r i v e r s menu if...


