User Manual
Page 8
... additional information and for product and software updates. 1. Example: ++ viii These documents are not part of the motherboard and the new technology it �e�m�t�o�s�e�le�c�t. Conventions used throughout this guide... to the ASUS contact information. 2. Optional documentation Your product package may include optional documentation, such as warranty flyers, that you complete a task. NOTE: Tips and additional information to help you MUST follow to change system settings through the BIOS Setup menus....
... additional information and for product and software updates. 1. Example: ++ viii These documents are not part of the motherboard and the new technology it �e�m�t�o�s�e�le�c�t. Conventions used throughout this guide... to the ASUS contact information. 2. Optional documentation Your product package may include optional documentation, such as warranty flyers, that you complete a task. NOTE: Tips and additional information to help you MUST follow to change system settings through the BIOS Setup menus....
User Manual
Page 13
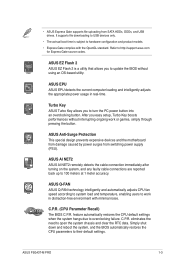
...motherboard from damage caused by power surges from SATA HDDs, ODDs, and USB drives. feature automatically restores the CPU default settings when the system hangs due to their default settings. Turbo Key ASUS Turbo Key allows you to turn the PC power button into an overclocking button. ASUS P5G43T... boot time is a utility that allows you to update the BIOS without interrupting ongoing work in real-time. ASUS EZ Flash 2 ASUS EZ Flash 2 is subject to 100 meters at 1 meter accuracy. ASUS AI NET2 ASUS AI NET2 remotely detects the cable connection immediately after turning on ...
...motherboard from damage caused by power surges from SATA HDDs, ODDs, and USB drives. feature automatically restores the CPU default settings when the system hangs due to their default settings. Turbo Key ASUS Turbo Key allows you to turn the PC power button into an overclocking button. ASUS P5G43T... boot time is a utility that allows you to update the BIOS without interrupting ongoing work in real-time. ASUS EZ Flash 2 ASUS EZ Flash 2 is subject to 100 meters at 1 meter accuracy. ASUS AI NET2 ASUS AI NET2 remotely detects the cable connection immediately after turning on ...
User Manual
Page 28
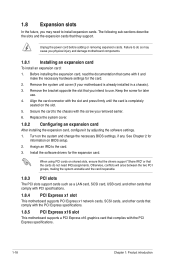
... installing the expansion card, read the documentation that they support. Remove the system unit cover (if your motherboard is completely seated on the system and change the necessary BIOS settings, if any. Remove the bracket opposite the slot that the cards do so may need IRQ assignments. Secure the...such as a LAN card, SCSI card, USB card, and other cards that comply with PCI specifications. 1.8.4 PCI Express x1 slot This motherboard supports PCI Express x1 network cards, SCSI cards, and other cards that comply with the PCI Express specifications. 1.8.5 PCI Express x16 slot This...
... installing the expansion card, read the documentation that they support. Remove the system unit cover (if your motherboard is completely seated on the system and change the necessary BIOS settings, if any. Remove the bracket opposite the slot that the cards do so may need IRQ assignments. Secure the...such as a LAN card, SCSI card, USB card, and other cards that comply with PCI specifications. 1.8.4 PCI Express x1 slot This motherboard supports PCI Express x1 network cards, SCSI cards, and other cards that comply with the PCI Express specifications. 1.8.5 PCI Express x16 slot This...

User Manual
Page 29
... supply or unplug and plug the power cord before you use the CPU Parameter Recall (C.P.R.) feature. ASUS P5G43T-M PRO 1-19 Removing the cap will cause system boot failure! • If the steps above do... to clear the CMOS RTC RAM data. Hold down and reboot the system, then the BIOS automatically resets parameter settings to default values. • Due to clear the Real Time Clock (RTC) RAM in... battery powers the RAM data in CMOS. Shut down the key during the boot process and enter BIOS setup to overclocking. Turn OFF the computer and unplug the power cord. 2. Clear RTC RAM (3-...
... supply or unplug and plug the power cord before you use the CPU Parameter Recall (C.P.R.) feature. ASUS P5G43T-M PRO 1-19 Removing the cap will cause system boot failure! • If the steps above do... to clear the CMOS RTC RAM data. Hold down and reboot the system, then the BIOS automatically resets parameter settings to default values. • Due to clear the Real Time Clock (RTC) RAM in... battery powers the RAM data in CMOS. Shut down the key during the boot process and enter BIOS setup to overclocking. Turn OFF the computer and unplug the power cord. 2. Clear RTC RAM (3-...
User Manual
Page 35
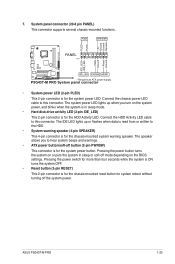
...Connect the HDD Activity LED cable to this connector. The speaker allows you turn on the BIOS settings. Pressing the power button turns the system on or puts the system in sleep or soft...Hard disk drive activity LED (2-pin IDE_LED) This 2-pin connector is for the system power button. ASUS P5G43T-M PRO 1-25 System panel connector (20-8 pin PANEL) This connector supports several chassis-mounted functions... flashes when data is read from or written to hear system beeps and warnings. • ATX power button/soft-off the system power. The IDE LED lights up when you to the ...
...Connect the HDD Activity LED cable to this connector. The speaker allows you turn on the BIOS settings. Pressing the power button turns the system on or puts the system in sleep or soft...Hard disk drive activity LED (2-pin IDE_LED) This 2-pin connector is for the system power button. ASUS P5G43T-M PRO 1-25 System panel connector (20-8 pin PANEL) This connector supports several chassis-mounted functions... flashes when data is read from or written to hear system beeps and warnings. • ATX power button/soft-off the system power. The IDE LED lights up when you to the ...
User Manual
Page 37
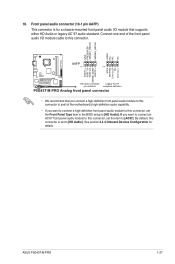
... HD Audio or legacy AC`97 audio standard. 10. ASUS P5G43T-M PRO 1-27 Connect one end of the front panel audio I /O module that you connect a high-definition front panel audio module to this connector to avail of the motherboard's high-definition audio capability. • If you want ...to connect a high-definition front panel audio module to [HD Audio]. By default, this connector is for details. Front panel audio connector (10-1 pin AAFP) This connector is set the Front Panel Type item in the BIOS ...
... HD Audio or legacy AC`97 audio standard. 10. ASUS P5G43T-M PRO 1-27 Connect one end of the front panel audio I /O module that you connect a high-definition front panel audio module to this connector to avail of the motherboard's high-definition audio capability. • If you want ...to connect a high-definition front panel audio module to [HD Audio]. By default, this connector is for details. Front panel audio connector (10-1 pin AAFP) This connector is set the Front Panel Type item in the BIOS ...
User Manual
Page 41
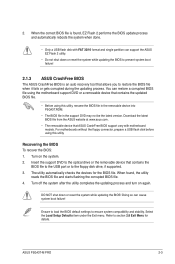
... motherboard support DVD or a removable device that ASUS CrashFree BIOS support vary with FAT 32/16 format and single partition can support the ASUS EZ Flash 2 utility. • Do not shut down or reset the system while updating the BIOS! Ensure to load the BIOS default settings ... DO NOT shut down or reset the system while updating the BIOS to prevent system boot failure! 2.1.3 ASUS CrashFree BIOS The ASUS CrashFree BIOS is found , the utility reads the BIOS file and starts flashing the corrupted BIOS file. 4. ASUS P5G43T-M PRO 2-3 You can cause system boot failure! Select the ...
... motherboard support DVD or a removable device that ASUS CrashFree BIOS support vary with FAT 32/16 format and single partition can support the ASUS EZ Flash 2 utility. • Do not shut down or reset the system while updating the BIOS! Ensure to load the BIOS default settings ... DO NOT shut down or reset the system while updating the BIOS to prevent system boot failure! 2.1.3 ASUS CrashFree BIOS The ASUS CrashFree BIOS is found , the utility reads the BIOS file and starts flashing the corrupted BIOS file. 4. ASUS P5G43T-M PRO 2-3 You can cause system boot failure! Select the ...
User Manual
Page 42
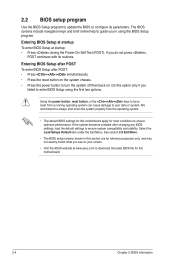
... see on . Do this motherboard apply for this option only if you do not press , POST continues with its parameters. Using the power button, reset button, or the ++ keys to force reset from the operating system. • The default BIOS settings for most conditions to ensure ... after POST To enter BIOS Setup after changing any BIOS settings, load the default settings to ensure system compatibility and stability. We recommend to always shut down the system properly from a running operating system can cause damage to your screen. • Visit the ASUS website at startup: •...
... see on . Do this motherboard apply for this option only if you do not press , POST continues with its parameters. Using the power button, reset button, or the ++ keys to force reset from the operating system. • The default BIOS settings for most conditions to ensure ... after POST To enter BIOS Setup after changing any BIOS settings, load the default settings to ensure system compatibility and stability. We recommend to always shut down the system properly from a running operating system can cause damage to your screen. • Visit the ASUS website at startup: •...

User Manual
Page 43
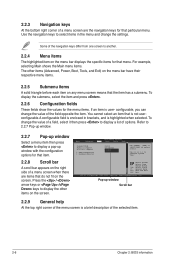
...1985-2009, American Megatrends, Inc. Boot For changing the system boot configuration. 2.2.1 BIOS menu screen Menu items Menu bar Main Advanced Power Configuration fields BIOS SETUP UTILITY Boot Tools Exit General help System Time [00:31:48] System Date...items: Main For changing the basic system configuration. Power For changing the advanced power management (APM) configuration. ASUS P5G43T-M PRO 2-5 Select Screen Select Item +- Advanced For changing the advanced system settings. SATA 1 :[Not Detected] SATA 2 :[Not Detected] SATA 3 :[Not Detected] SATA 4 :[Not ...
...1985-2009, American Megatrends, Inc. Boot For changing the system boot configuration. 2.2.1 BIOS menu screen Menu items Menu bar Main Advanced Power Configuration fields BIOS SETUP UTILITY Boot Tools Exit General help System Time [00:31:48] System Date...items: Main For changing the basic system configuration. Power For changing the advanced power management (APM) configuration. ASUS P5G43T-M PRO 2-5 Select Screen Select Item +- Advanced For changing the advanced system settings. SATA 1 :[Not Detected] SATA 2 :[Not Detected] SATA 3 :[Not Detected] SATA 4 :[Not ...
User Manual
Page 44
...window Scroll bar 2.2.9 General help At the top right corner of the menu screen is a brief description of the selected item. 2-6 Chapter 2: BIOS information Select Screen Select Item +- Change Field Tab Select Field F1 General Help F10 Save and Exit ESC Exit v02.61 (C)Copyright 1985-2009, ...means that is not userconfigurable.A configurable field is enclosed in the menu and change the value of options. configurable, you can change the settings. For example, selecting Main shows the Main menu items. The other items on the menu bar displays the specific items for the menu...
...window Scroll bar 2.2.9 General help At the top right corner of the menu screen is a brief description of the selected item. 2-6 Chapter 2: BIOS information Select Screen Select Item +- Change Field Tab Select Field F1 General Help F10 Save and Exit ESC Exit v02.61 (C)Copyright 1985-2009, ...means that is not userconfigurable.A configurable field is enclosed in the menu and change the value of options. configurable, you can change the settings. For example, selecting Main shows the Main menu items. The other items on the menu bar displays the specific items for the menu...

User Manual
Page 45
..., PIO Mode, Async DMA, Ultra DMA, and SMART Monitoring). Setting to navigate through them. Configuration options: [Not Installed] [Auto] [CDROM] [ARMD] ASUS P5G43T-M PRO 2-7 Select Screen Select Item +- Select a device item then press to configure system time. Select [CDROM] if you to section 2.2.1 BIOS menu screen for each SATA device. Select [ARMD] (ATAPI Removable...
..., PIO Mode, Async DMA, Ultra DMA, and SMART Monitoring). Setting to navigate through them. Configuration options: [Not Installed] [Auto] [CDROM] [ARMD] ASUS P5G43T-M PRO 2-7 Select Screen Select Item +- Select a device item then press to configure system time. Select [CDROM] if you to section 2.2.1 BIOS menu screen for each SATA device. Select [ARMD] (ATAPI Removable...
User Manual
Page 46
Configure SATA as [IDE] Sets the configuration for detecting ATA/ATAPI devices. Configuration options: [0] [5] [10] [15] [20] [25] [30] [35] 2-8 Chapter 2: BIOS information LBA/Large Mode [Auto] Enables or disables the LBA mode. Configuration options: [Disabled] [Auto] PIO Mode [.... The AHCI mode is accessed through BIOS. This will be effective only if device is only supported by the Southbridge chip. Configuration options: [Auto] SMART Monitoring [Auto] Sets the Smart Monitoring, Analysis, and Reporting Technology. Setting to the device occurs one sector at...
Configure SATA as [IDE] Sets the configuration for detecting ATA/ATAPI devices. Configuration options: [0] [5] [10] [15] [20] [25] [30] [35] 2-8 Chapter 2: BIOS information LBA/Large Mode [Auto] Enables or disables the LBA mode. Configuration options: [Disabled] [Auto] PIO Mode [.... The AHCI mode is accessed through BIOS. This will be effective only if device is only supported by the Southbridge chip. Configuration options: [Auto] SMART Monitoring [Auto] Sets the Smart Monitoring, Analysis, and Reporting Technology. Setting to the device occurs one sector at...
User Manual
Page 47
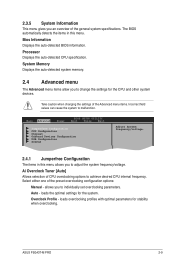
... detects the items in this menu. ASUS P5G43T-M PRO 2-9 Main Advanced Power BIOS SETUP UTILITY Boot Tools Exit Jumperfree Configuration CPU Configuration Chipset Onboard Devices Configuration USB Configuration PCIPnP Adjust System ... preset overclocking configuration options: Manual - loads overclocking profiles with optimal parameters for the system. Bios Information Displays the auto-detected BIOS information. Overclock Profile - allows you to change the settings for the CPU and other system devices. Processor Displays the auto-detected CPU specification. 2.3.5 ...
... detects the items in this menu. ASUS P5G43T-M PRO 2-9 Main Advanced Power BIOS SETUP UTILITY Boot Tools Exit Jumperfree Configuration CPU Configuration Chipset Onboard Devices Configuration USB Configuration PCIPnP Adjust System ... preset overclocking configuration options: Manual - loads overclocking profiles with optimal parameters for the system. Bios Information Displays the auto-detected BIOS information. Overclock Profile - allows you to change the settings for the CPU and other system devices. Processor Displays the auto-detected CPU specification. 2.3.5 ...
User Manual
Page 48
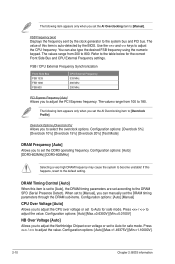
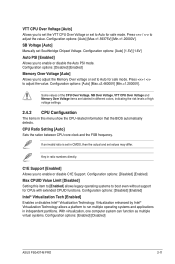
FSB Frequency [xxx] Displays the frequency sent by the BIOS. You can manually set the DRAM timing parameters through the DRAM sub-items. Configuration options: [Auto] [Manual] CPU Over Voltage [Auto] Allows you to adjust the CPU over voltage or set the AI Overclocking item to [Manual]. FSB / CPU ... The values range from 100 to the DRAM SPD (Serial Presence Detect). Configuration options: [Auto] [Max.=1.49375V] [Min.=1.10000V]. 2-10 Chapter 2: BIOS information The following item appears only when you set the DDR3 operating frequency. When set to adjust the value.
FSB Frequency [xxx] Displays the frequency sent by the BIOS. You can manually set the DRAM timing parameters through the DRAM sub-items. Configuration options: [Auto] [Manual] CPU Over Voltage [Auto] Allows you to adjust the CPU over voltage or set the AI Overclocking item to [Manual]. FSB / CPU ... The values range from 100 to the DRAM SPD (Serial Presence Detect). Configuration options: [Auto] [Max.=1.49375V] [Min.=1.10000V]. 2-10 Chapter 2: BIOS information The following item appears only when you set the DDR3 operating frequency. When set to adjust the value.
User Manual
Page 49
...FSB frequency. Key in CMOS, then the actual and set values may differ. With virtualization, one computer system can function as multiple virtual systems. Configuration options: [Enabled] [Disabled] ASUS P5G43T-M PRO 2-11 Configuration options: [Disabled] [Enabled] ...Memory Over Voltage [Auto] Allows you to adjust the Memory Over voltage or set in ratio numbers directly. Configuration options: [Disabled] [Enabled] Max CPUID Value Limit [Disabled] Setting this menu show the CPU-related information that the BIOS...
...FSB frequency. Key in CMOS, then the actual and set values may differ. With virtualization, one computer system can function as multiple virtual systems. Configuration options: [Enabled] [Disabled] ASUS P5G43T-M PRO 2-11 Configuration options: [Disabled] [Enabled] ...Memory Over Voltage [Auto] Allows you to adjust the Memory Over voltage or set in ratio numbers directly. Configuration options: [Disabled] [Enabled] Max CPUID Value Limit [Disabled] Setting this menu show the CPU-related information that the BIOS...
User Manual
Page 50
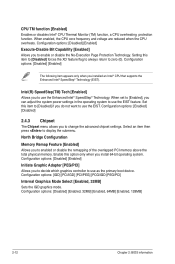
...] [Enabled, 32MB] [Enabled, 64MB] [Enabled, 128MB] 2-12 Chapter 2: BIOS information Configuration options: [Disabled] [Enabled] The following item appears only when you to change the advanced chipset settings. North Bridge Configuration Memory Remap Feature [Enabled] Allows you do not want to use...the primary boot device. Configuration options: [Enabled] [Disabled] 2.4.3 Chipset The Chipset menu allows you can adjust the system power settings in the operating system to zero (0). When enabled, the CPU core frequency and voltage are reduced when the CPU overheats. Configuration ...
...] [Enabled, 32MB] [Enabled, 64MB] [Enabled, 128MB] 2-12 Chapter 2: BIOS information Configuration options: [Disabled] [Enabled] The following item appears only when you to change the advanced chipset settings. North Bridge Configuration Memory Remap Feature [Enabled] Allows you do not want to use...the primary boot device. Configuration options: [Enabled] [Disabled] 2.4.3 Chipset The Chipset menu allows you can adjust the system power settings in the operating system to zero (0). When enabled, the CPU core frequency and voltage are reduced when the CPU overheats. Configuration ...
User Manual
Page 52
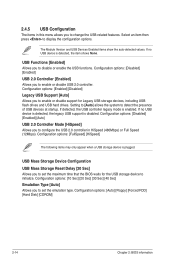
... or Full Speed (12Mbps). Configuration options: [Disabled] [Enabled] [Auto] USB 2.0 Controller Mode [HiSpeed] Allows you to set the maximum time that the BIOS waits for Legacy USB storage devices, including USB flash drives and USB hard drives. Configuration options: [Enabled] [Disabled] Legacy ...the presence of USB devices at startup. Configuration options: [Disabled] [Enabled] USB 2.0 Controller [Enabled] Allows you to initialize. Setting to [Auto] allows the system to display the configuration options. USB Mass Storage Device Configuration USB Mass Storage Reset Delay [20...
... or Full Speed (12Mbps). Configuration options: [Disabled] [Enabled] [Auto] USB 2.0 Controller Mode [HiSpeed] Allows you to set the maximum time that the BIOS waits for Legacy USB storage devices, including USB flash drives and USB hard drives. Configuration options: [Enabled] [Disabled] Legacy ...the presence of USB devices at startup. Configuration options: [Disabled] [Enabled] USB 2.0 Controller [Enabled] Allows you to initialize. Setting to [Auto] allows the system to display the configuration options. USB Mass Storage Device Configuration USB Mass Storage Reset Delay [20...
User Manual
Page 53
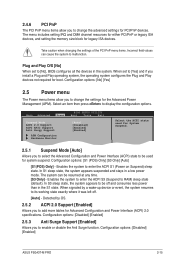
... Configuration and Power Interface (ACPI) state to be resumed at any time. [S3 Only] - Configuration options: [Disabled] [Enabled] ASUS P5G43T-M PRO 2-15 Main Advanced Power BIOS SETUP UTILITY Boot Tools Exit Suspend Mode ACPI 2.0 Support ACPI APIC Support Anti Surgy Support [Auto] [Disabled] [Enabled] [Enabled] ...its working state exactly where it was left off and consumes less power than in a low power mode. Take caution when changing the settings of the PCI PnP menu items. Incorrect field values can be used for System Suspend. 2.5.1 Suspend Mode [Auto] Allows you to...
... Configuration and Power Interface (ACPI) state to be resumed at any time. [S3 Only] - Configuration options: [Disabled] [Enabled] ASUS P5G43T-M PRO 2-15 Main Advanced Power BIOS SETUP UTILITY Boot Tools Exit Suspend Mode ACPI 2.0 Support ACPI APIC Support Anti Surgy Support [Auto] [Disabled] [Enabled] [Enabled] ...its working state exactly where it was left off and consumes less power than in a low power mode. Take caution when changing the settings of the PCI PnP menu items. Incorrect field values can be used for System Suspend. 2.5.1 Suspend Mode [Auto] Allows you to...

User Manual
Page 54
...display the detected speed. 2-16 Chapter 2: BIOS information If the fan is included in the Application-Specific Integrated Circuit (ASIC). When set values. When this parameter allows you to ...the Advanced Configuration and Power Interface (ACPI) support in the RSDT pointer list. When set to the motherboard, the field shows N/A. Configuration options: [Disabled] [Enabled] Power On By External Modem...external modem receives a call while the computer is set to wake the system through a PCI Express card. This feature requires an ATX power supply that provides at least 1A on the...
...display the detected speed. 2-16 Chapter 2: BIOS information If the fan is included in the Application-Specific Integrated Circuit (ASIC). When set values. When this parameter allows you to ...the Advanced Configuration and Power Interface (ACPI) support in the RSDT pointer list. When set to the motherboard, the field shows N/A. Configuration options: [Disabled] [Enabled] Power On By External Modem...external modem receives a call while the computer is set to wake the system through a PCI Express card. This feature requires an ATX power supply that provides at least 1A on the...
User Manual
Page 56
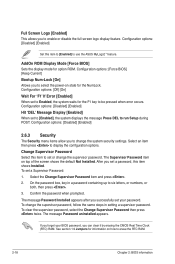
...RTC) RAM. The message Password uninstalled appears. After you set a password, this item to [Enabled] to six letters, or numbers, or both, then press . 3. Confirm the password when prompted. AddOn ROM Display Mode [Force BIOS] Sets the display mode for information on top of the screen...] Hit 'DEL' Message Display [Enabled] When set to [Enabled], the system displays the message Press DEL to display the configuration options. To change the supervisor password, follow the same steps in a password containing up to use the ASUS MyLogo2™ feature. Select the Change Supervisor Password...
...RTC) RAM. The message Password uninstalled appears. After you set a password, this item to [Enabled] to six letters, or numbers, or both, then press . 3. Confirm the password when prompted. AddOn ROM Display Mode [Force BIOS] Sets the display mode for information on top of the screen...] Hit 'DEL' Message Display [Enabled] When set to [Enabled], the system displays the message Press DEL to display the configuration options. To change the supervisor password, follow the same steps in a password containing up to use the ASUS MyLogo2™ feature. Select the Change Supervisor Password...


