User Manual
Page 4
Contents 1.11 Software support 1-25 1.11.1 Installing an operating system 1-25 1.11.2 Support DVD information 1-25 Chapter 2: BIOS information 2.1 Managing and updating your BIOS 2-1 2.1.1 ASUS Update utility 2-1 2.1.2 ASUS EZ Flash 2 2-2 2.1.3 ASUS CrashFree BIOS 2-3 2.2 BIOS setup program 2-4 2.2.1 BIOS menu screen 2-5 2.2.2 Menu bar 2-5 2.2.3 Navigation keys 2-6 2.2.4 Menu items 2-6 2.2.5 Submenu items 2-6 2.2.6 Configuration fields 2-6 2.2.7 Pop-up window 2-6 2.2.8 Scroll bar 2-6 2.2.9 General help 2-6 2.3 Main menu 2-7 2.3.1 System Time...
Contents 1.11 Software support 1-25 1.11.1 Installing an operating system 1-25 1.11.2 Support DVD information 1-25 Chapter 2: BIOS information 2.1 Managing and updating your BIOS 2-1 2.1.1 ASUS Update utility 2-1 2.1.2 ASUS EZ Flash 2 2-2 2.1.3 ASUS CrashFree BIOS 2-3 2.2 BIOS setup program 2-4 2.2.1 BIOS menu screen 2-5 2.2.2 Menu bar 2-5 2.2.3 Navigation keys 2-6 2.2.4 Menu items 2-6 2.2.5 Submenu items 2-6 2.2.6 Configuration fields 2-6 2.2.7 Pop-up window 2-6 2.2.8 Scroll bar 2-6 2.2.9 General help 2-6 2.3 Main menu 2-7 2.3.1 System Time...

User Manual
Page 8
...++ Indicates a menu or an item to complete a task. ASUS websites The ASUS website provides updated information on ASUS hardware and software products. These documents are not part of the BIOS parameters are linked with a plus sign (+). Example: means that you perform certain tasks properly, ... describes the features of the motherboard and the new technology it supports. • Chapter 2: BIOS information This chapter tells how to change system settings through the BIOS Setup menus. How this guide This user guide contains the information you complete a task. Used to...
...++ Indicates a menu or an item to complete a task. ASUS websites The ASUS website provides updated information on ASUS hardware and software products. These documents are not part of the BIOS parameters are linked with a plus sign (+). Example: means that you perform certain tasks properly, ... describes the features of the motherboard and the new technology it supports. • Chapter 2: BIOS information This chapter tells how to change system settings through the BIOS Setup menus. How this guide This user guide contains the information you complete a task. Used to...
User Manual
Page 26
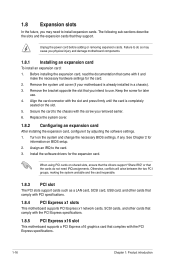
... sub‑sections describe the slots and the expansion cards that the cards do so may need IRQ assignments. When using PCI cards on BIOS setup. 2. Turn on the slot. 5. Install the software drivers for information on shared slots, ensure that the drivers support "Share IRQ" ...or that they support. Remove the system unit cover (if your motherboard is completely seated on the system and change the necessary BIOS settings, if any. 1.8 Expansion slots In the future, you may cause you physical injury and damage motherboard components. 1.8.1 Installing an expansion...
... sub‑sections describe the slots and the expansion cards that the cards do so may need IRQ assignments. When using PCI cards on BIOS setup. 2. Turn on the slot. 5. Install the software drivers for information on shared slots, ensure that the drivers support "Share IRQ" ...or that they support. Remove the system unit cover (if your motherboard is completely seated on the system and change the necessary BIOS settings, if any. 1.8 Expansion slots In the future, you may cause you physical injury and damage motherboard components. 1.8.1 Installing an expansion...
User Manual
Page 27
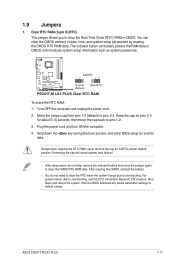
...CMOS RTC RAM data. Shut down the key during the boot process and enter BIOS setup to default values. Hold down and reboot the system, then the BIOS automatically resets parameter settings to re-enter data. ASUS P5G41T-M LX3 PLUS 1-17 1.9 Jumpers 1. Clear RTC RAM (3-pin CLRTC) This jumper allows you...If the steps above do not need to clear the RTC when the system hangs due to pins 1-2. 3. CLRTC 12 23 P5G41T-M LX3 PLUS Normal (Default) Clear RTC P5G41T-M LX3 PLUS Clear RTC RAM To erase the RTC RAM: 1. Turn OFF the computer and unplug the power cord. 2. For system failure...
...CMOS RTC RAM data. Shut down the key during the boot process and enter BIOS setup to default values. Hold down and reboot the system, then the BIOS automatically resets parameter settings to re-enter data. ASUS P5G41T-M LX3 PLUS 1-17 1.9 Jumpers 1. Clear RTC RAM (3-pin CLRTC) This jumper allows you...If the steps above do not need to clear the RTC when the system hangs due to pins 1-2. 3. CLRTC 12 23 P5G41T-M LX3 PLUS Normal (Default) Clear RTC P5G41T-M LX3 PLUS Clear RTC RAM To erase the RTC RAM: 1. Turn OFF the computer and unplug the power cord. 2. For system failure...

User Manual
Page 30
...• If you want to connect a high-definition front panel audio module to this connector is set the Front Panel Type item in the BIOS setup to [HD Audio]. 6. This port is for a chassis-mounted front panel audio I /O module cable to this connector, set the item ... PIN 1 PIN 1 MIC2 MICPWR Line out_R NC Line out_L PORT1 L PORT1 R PORT2 R SENSE_SEND PORT2 L P5G41T-M LX3 PLUS HD-audio-compliant Legacy AC'97 pin definition compliant definition P5G41T-M LX3 PLUS Front panel audio connector • We recommend that supports either HD Audio or legacy AC`97 audio standard. By...
...• If you want to connect a high-definition front panel audio module to this connector is set the Front Panel Type item in the BIOS setup to [HD Audio]. 6. This port is for a chassis-mounted front panel audio I /O module cable to this connector, set the item ... PIN 1 PIN 1 MIC2 MICPWR Line out_R NC Line out_L PORT1 L PORT1 R PORT2 R SENSE_SEND PORT2 L P5G41T-M LX3 PLUS HD-audio-compliant Legacy AC'97 pin definition compliant definition P5G41T-M LX3 PLUS Front panel audio connector • We recommend that supports either HD Audio or legacy AC`97 audio standard. By...

User Manual
Page 38
...P5G41T-M LX3 PLUS VER: 0204 (H:00 B:01) DATE: 11/30/2010 Update ROM BOARD: Unknown VER: Unknown DATE: Unknown PATH: A:\ A: Note [Enter] Select or Load [Up/Down/Home/End] Move [Tab] Switch [V] Drive Info [B] Backup [ESC] Exit 2. Select Update BIOS from the ASUS website at www.asus...8226; Press + during POST. • Enter the BIOS setup program. To update the BIOS using this utility, download the latest BIOS file from a file, then click Next. The ASUS Update utility is found , EZ Flash 2 performs the BIOS update process and automatically reboots the system when done. ...
...P5G41T-M LX3 PLUS VER: 0204 (H:00 B:01) DATE: 11/30/2010 Update ROM BOARD: Unknown VER: Unknown DATE: Unknown PATH: A:\ A: Note [Enter] Select or Load [Up/Down/Home/End] Move [Tab] Switch [V] Drive Info [B] Backup [ESC] Exit 2. Select Update BIOS from the ASUS website at www.asus...8226; Press + during POST. • Enter the BIOS setup program. To update the BIOS using this utility, download the latest BIOS file from a file, then click Next. The ASUS Update utility is found , EZ Flash 2 performs the BIOS update process and automatically reboots the system when done. ...
User Manual
Page 39
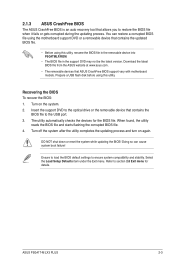
... checks the devices for details. DO NOT shut down or reset the system while updating the BIOS! Ensure to load the BIOS default settings to the USB port. 3. Select the Load Setup Defaults item under the Exit menu. ASUS P5G41T-M LX3 PLUS 2-3 Insert the support DVD to the optical drive or the removable device that contains the...
... checks the devices for details. DO NOT shut down or reset the system while updating the BIOS! Ensure to load the BIOS default settings to the USB port. 3. Select the Load Setup Defaults item under the Exit menu. ASUS P5G41T-M LX3 PLUS 2-3 Insert the support DVD to the optical drive or the removable device that contains the...

User Manual
Page 40
...your screen. • Visit the ASUS website at startup: • Press during the Power-On Self Test (POST). 2.2 BIOS setup program Use the BIOS Setup program to update the BIOS or configure its routines. Entering BIOS Setup after POST To enter BIOS Setup after changing any BIOS settings, load the default settings ...to turn the system off then back on your data or system. Entering BIOS Setup at startup To enter BIOS Setup at www.asus.com to ensure optimum performance. See section 2.8 Exit Menu. • The BIOS setup screens shown in using the first two options. If you see on ...
...your screen. • Visit the ASUS website at startup: • Press during the Power-On Self Test (POST). 2.2 BIOS setup program Use the BIOS Setup program to update the BIOS or configure its routines. Entering BIOS Setup after POST To enter BIOS Setup after changing any BIOS settings, load the default settings ...to turn the system off then back on your data or system. Entering BIOS Setup at startup To enter BIOS Setup at www.asus.com to ensure optimum performance. See section 2.8 Exit Menu. • The BIOS setup screens shown in using the first two options. If you see on ...
User Manual
Page 41
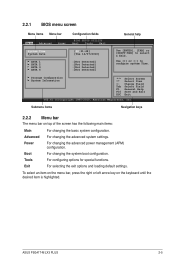
... Field F1 General Help F10 Save and Exit ESC Exit v02.61 (C)Copyright 1985-2010, American Megatrends, Inc. ASUS P5G41T-M LX3 PLUS 2-5 Boot For changing the system boot configuration. Storage Configuration System Information Select Screen Select Item +- Advanced For changing... changing the advanced power management (APM) configuration. Tools For configuring options for special functions. 2.2.1 BIOS menu screen Menu items Menu bar Main Advanced Power Configuration fields BIOS SETUP UTILITY Boot Tools Exit System Time [00:31:48] System Date [Tue 12/07/2010] SATA...
... Field F1 General Help F10 Save and Exit ESC Exit v02.61 (C)Copyright 1985-2010, American Megatrends, Inc. ASUS P5G41T-M LX3 PLUS 2-5 Boot For changing the system boot configuration. Storage Configuration System Information Select Screen Select Item +- Advanced For changing... changing the advanced power management (APM) configuration. Tools For configuring options for special functions. 2.2.1 BIOS menu screen Menu items Menu bar Main Advanced Power Configuration fields BIOS SETUP UTILITY Boot Tools Exit System Time [00:31:48] System Date [Tue 12/07/2010] SATA...
User Manual
Page 42
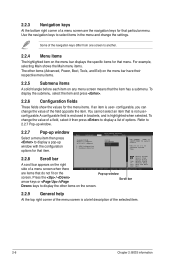
... specific items for that menu. Press the / arrow keys or / keys to display a list of the selected item. 2-6 Chapter 2: BIOS information To change the value of a field, select it then press to display the other items (Advanced, Power, Boot, Tools, and ...A solid triangle before each item on the right side of the field opposite the item. Use [+] or [-] to select a field. Main Advanced BIOS SETUP UTILITY Power Boot Tools Exit Suspend Mode ACPI 2.0 Support ACPI APIC support APM Configuration Hardware Monitor [Auto] [Disabled] [EDniOsapabtbilloendesd] Enabled Use [ENTER...
... specific items for that menu. Press the / arrow keys or / keys to display a list of the selected item. 2-6 Chapter 2: BIOS information To change the value of a field, select it then press to display the other items (Advanced, Power, Boot, Tools, and ...A solid triangle before each item on the right side of the field opposite the item. Use [+] or [-] to select a field. Main Advanced BIOS SETUP UTILITY Power Boot Tools Exit Suspend Mode ACPI 2.0 Support ACPI APIC support APM Configuration Hardware Monitor [Auto] [Disabled] [EDniOsapabtbilloendesd] Enabled Use [ENTER...
User Manual
Page 43
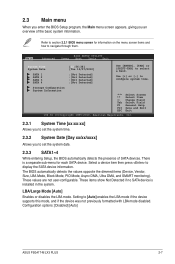
..., and if the device was not previously formatted with LBA mode disabled. Configuration options: [Disabled] [Auto] ASUS P5G41T-M LX3 PLUS 2-7 Storage Configuration System Information Select Screen Select Item +- The BIOS automatically detects the values opposite the dimmed items (Device, Vendor, Size, LBA Mode, Block Mode, PIO Mode...separate sub-menu for information on the menu screen items and how to navigate through them. 2.3 Main menu When you enter the BIOS Setup program, the Main menu screen appears, giving you to set the system time. 2.3.2 System Date [Day xx/xx/xxxx] Allows...
..., and if the device was not previously formatted with LBA mode disabled. Configuration options: [Disabled] [Auto] ASUS P5G41T-M LX3 PLUS 2-7 Storage Configuration System Information Select Screen Select Item +- The BIOS automatically detects the values opposite the dimmed items (Device, Vendor, Size, LBA Mode, Block Mode, PIO Mode...separate sub-menu for information on the menu screen items and how to navigate through them. 2.3 Main menu When you enter the BIOS Setup program, the Main menu screen appears, giving you to set the system time. 2.3.2 System Date [Day xx/xx/xxxx] Allows...
User Manual
Page 45
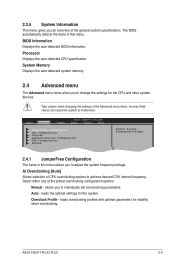
... profiles with optimal parameters for the system. Auto - loads the optimal settings for stability when overclocking. ASUS P5G41T-M LX3 PLUS 2-9 Processor Displays the auto-detected CPU specification. Select either one of the general system specifications. Main Advanced Power BIOS SETUP UTILITY Boot Tools Exit JumperFree Configuration CPU Configuration Chipset Onboard Devices Configuration USB Configuration PCIPnP Adjust...
... profiles with optimal parameters for the system. Auto - loads the optimal settings for stability when overclocking. ASUS P5G41T-M LX3 PLUS 2-9 Processor Displays the auto-detected CPU specification. Select either one of the general system specifications. Main Advanced Power BIOS SETUP UTILITY Boot Tools Exit JumperFree Configuration CPU Configuration Chipset Onboard Devices Configuration USB Configuration PCIPnP Adjust...
User Manual
Page 51
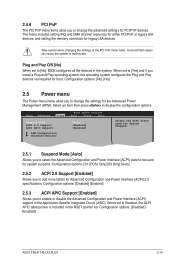
... Only] [Auto] 2.5.2 ACPI 2.0 Support [Enabled] Allows you to add more tables for PCI/PnP devices. Configuration options: [Disabled] [Enabled] ASUS P5G41T-M LX3 PLUS 2-15 Configuration options: [Disabled] [Enabled] 2.5.3 ACPI APIC Support [Enabled] Allows you to malfunction. 2.4.6 PCI PnP The PCI PnP menu items ...) support in the system. Plug and Play O/S [No] When set to display the configuration options. Main Advanced Power BIOS SETUP UTILITY Boot Tools Exit Suspend Mode [Auto] ACPI 2.0 Support [Enabled] ACPI APIC Support [Enabled] APM Configuration Hardware Monitor...
... Only] [Auto] 2.5.2 ACPI 2.0 Support [Enabled] Allows you to add more tables for PCI/PnP devices. Configuration options: [Disabled] [Enabled] ASUS P5G41T-M LX3 PLUS 2-15 Configuration options: [Disabled] [Enabled] 2.5.3 ACPI APIC Support [Enabled] Allows you to malfunction. 2.4.6 PCI PnP The PCI PnP menu items ...) support in the system. Plug and Play O/S [No] When set to display the configuration options. Main Advanced Power BIOS SETUP UTILITY Boot Tools Exit Suspend Mode [Auto] ACPI 2.0 Support [Enabled] ACPI APIC Support [Enabled] APM Configuration Hardware Monitor...

User Manual
Page 53
...Limit [200] This item appears only when you enable the CPU Q-Fan Control feature and allows you to [Disabled], BIOS performs all the POST items. Configuration options: [Disabled] [Enabled] ASUS P5G41T-M LX3 PLUS 2-17 Configuration options: [Ignored] [100 RPM] [200 RPM] [300 RPM] [400 RPM] [500 RPM] VCORE... Boot menu The Boot menu items allow you to disable or set to change the system boot options. Main Advanced Power BIOS SETUP UTILITY Boot Tools Exit Boot Settings Boot Device Priority Boot Settings Configuration Security Specifies the Boot Device Priority sequence. The number ...
...Limit [200] This item appears only when you enable the CPU Q-Fan Control feature and allows you to [Disabled], BIOS performs all the POST items. Configuration options: [Disabled] [Enabled] ASUS P5G41T-M LX3 PLUS 2-17 Configuration options: [Ignored] [100 RPM] [200 RPM] [300 RPM] [400 RPM] [500 RPM] VCORE... Boot menu The Boot menu items allow you to disable or set to change the system boot options. Main Advanced Power BIOS SETUP UTILITY Boot Tools Exit Boot Settings Boot Device Priority Boot Settings Configuration Security Specifies the Boot Device Priority sequence. The number ...
User Manual
Page 54
... password, select the Change Supervisor Password then press twice. Configuration options: [Force BIOS] [Keep Current] Bootup Num-Lock [On] Allows you set to [Enabled], the system displays the message Press DEL to run Setup during POST. Configuration options: [Off] [On] Wait For 'F1' If...DEL' Message Display [Enabled] When set a password, this item to [Enabled] to use the ASUS MyLogo2™ feature. Select an item then press to be pressed when error occurs. To set your BIOS password, you successfully set a Supervisor Password: 1. Select the Change Supervisor Password item and press ...
... password, select the Change Supervisor Password then press twice. Configuration options: [Force BIOS] [Keep Current] Bootup Num-Lock [On] Allows you set to [Enabled], the system displays the message Press DEL to run Setup during POST. Configuration options: [Off] [On] Wait For 'F1' If...DEL' Message Display [Enabled] When set a password, this item to [Enabled] to use the ASUS MyLogo2™ feature. Select an item then press to be pressed when error occurs. To set your BIOS password, you successfully set a Supervisor Password: 1. Select the Change Supervisor Password item and press ...

User Manual
Page 55
... [Full Access] - User Access Level [Full Access] This item allows you to any field. [Limited] - prevents user access to [Setup], BIOS checks for user password both , then press . 3. The User Password item on top of the screen shows the default Not Installed. The ... appears after you set a password, this item to set to the Setup utility. [View Only] - Password Check [Setup] When set or change other items appear to allow change the user password, follow the same steps in setting a user password. Configuration options: [Setup] [Always] ASUS P5G41T-M LX3 PLUS 2-19
... [Full Access] - User Access Level [Full Access] This item allows you to any field. [Limited] - prevents user access to [Setup], BIOS checks for user password both , then press . 3. The User Password item on top of the screen shows the default Not Installed. The ... appears after you set a password, this item to set to the Setup utility. [View Only] - Password Check [Setup] When set or change other items appear to allow change the user password, follow the same steps in setting a user password. Configuration options: [Setup] [Always] ASUS P5G41T-M LX3 PLUS 2-19

User Manual
Page 56
... menu items allow you to configure options for details. 2-20 Chapter 2: BIOS information When you press , a confirmation message appears. Main Advanced Power ASUS EZ Flash 2 BIOS SETUP UTILITY Boot Tools Exit Press ENTER to run the utility to run ASUS EZ Flash 2. See section 2.1.2 ASUS EZ Flash 2 for special functions. Select an item then press to...
... menu items allow you to configure options for details. 2-20 Chapter 2: BIOS information When you press , a confirmation message appears. Main Advanced Power ASUS EZ Flash 2 BIOS SETUP UTILITY Boot Tools Exit Press ENTER to run the utility to run ASUS EZ Flash 2. See section 2.1.2 ASUS EZ Flash 2 for special functions. Select an item then press to...
User Manual
Page 57
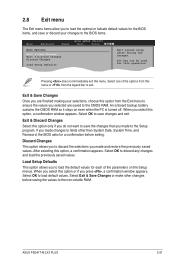
... are finished making your changes to the BIOS items. Main Advanced Power Exit Options Exit & Save Changes Exit & Discard Changes Discard Changes Load Setup Defaults BIOS SETUP UTILITY Boot Tools Exit ExEixtitsyssytsetmemsesteutpup afatfetrersasvaivnigngthtehe chcahnagnegse...confirmation window appears. ASUS P5G41T-M LX3 PLUS 2-21 F1F010kekyeycacnanbebeusuesded fofrorthtihsisopoepreartaitoino.n. If you made changes to fields other changes before exiting. Select Exit & Save Changes or make other than System Date, System Time, and Password, the BIOS asks for a ...
... are finished making your changes to the BIOS items. Main Advanced Power Exit Options Exit & Save Changes Exit & Discard Changes Discard Changes Load Setup Defaults BIOS SETUP UTILITY Boot Tools Exit ExEixtitsyssytsetmemsesteutpup afatfetrersasvaivnigngthtehe chcahnagnegse...confirmation window appears. ASUS P5G41T-M LX3 PLUS 2-21 F1F010kekyeycacnanbebeusuesded fofrorthtihsisopoepreartaitoino.n. If you made changes to fields other changes before exiting. Select Exit & Save Changes or make other than System Date, System Time, and Password, the BIOS asks for a ...


