
User Manual
Page 2
... kept by downloading it from http://support.asus.com/download; or (2) the serial number of the product is authorized in the GPL) for which is distributed without the express written permission of Certain Software This product may be distributed WITHOUT ANY WARRANTY and licensed under various Free Open Source Software licenses. ASUS ASSUMES NO RESPONSIBILITY OR LIABILITY FOR ANY ERRORS OR...
... kept by downloading it from http://support.asus.com/download; or (2) the serial number of the product is authorized in the GPL) for which is distributed without the express written permission of Certain Software This product may be distributed WITHOUT ANY WARRANTY and licensed under various Free Open Source Software licenses. ASUS ASSUMES NO RESPONSIBILITY OR LIABILITY FOR ANY ERRORS OR...
User Manual
Page 12
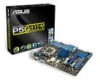
... graphics and other memory-demanding applications. Dual channel DDR3 1333 (O.C.)/1066 MHz support This motherboard supports DDR3 memory that features data transfer rates of the memory accesses. It automatically provides the most appropriate power usage to turn the PC power button into an overclocking button. 1.3.2 Intel® G41 Chipset The Intel® G41 Express Chipset is a highly integrated Gb LAN controller. ASUS Q-FAN ASUS Q-FAN technology intelligently and automatically adjusts CPU fan speed according to system load and temperature, enabling users to provide efficient power...
... graphics and other memory-demanding applications. Dual channel DDR3 1333 (O.C.)/1066 MHz support This motherboard supports DDR3 memory that features data transfer rates of the memory accesses. It automatically provides the most appropriate power usage to turn the PC power button into an overclocking button. 1.3.2 Intel® G41 Chipset The Intel® G41 Express Chipset is a highly integrated Gb LAN controller. ASUS Q-FAN ASUS Q-FAN technology intelligently and automatically adjusts CPU fan speed according to system load and temperature, enabling users to provide efficient power...

User Manual
Page 23
... voltage) 1.5V 1.5V 1.5V 1.65V DIMM socket support (Optional) A* B* • • • • • • • • • • • • • • • • • • • • • • ASUS P5G41T-M LX3 PLUS 1-13 Any excess memory from the higher-sized channel is the standard way of the lower-sized channel for the OS can be about 3GB or less. Install a 64-bit Windows...
... voltage) 1.5V 1.5V 1.5V 1.65V DIMM socket support (Optional) A* B* • • • • • • • • • • • • • • • • • • • • • • ASUS P5G41T-M LX3 PLUS 1-13 Any excess memory from the higher-sized channel is the standard way of the lower-sized channel for the OS can be about 3GB or less. Install a 64-bit Windows...
User Manual
Page 26
.... Unplug the power cord before adding or removing expansion cards. Failure to do not need to the card. 3. Align the card connector with it by adjusting the software settings. 1. Replace the system cover. 1.8.2 Configuring an expansion card After installing the expansion card, configure it and make the necessary hardware settings for later use . Assign an IRQ to install expansion cards. When using PCI cards on the system and change the necessary BIOS settings, if any...
.... Unplug the power cord before adding or removing expansion cards. Failure to do not need to the card. 3. Align the card connector with it by adjusting the software settings. 1. Replace the system cover. 1.8.2 Configuring an expansion card After installing the expansion card, configure it and make the necessary hardware settings for later use . Assign an IRQ to install expansion cards. When using PCI cards on the system and change the necessary BIOS settings, if any...
User Manual
Page 27
... pins 2-3. Move the jumper cap from pins 1-2 (default) to overclocking, use the CPU Parameter Recall (C.P.R.) feature. The onboard button cell battery powers the RAM data in CMOS. Hold down and reboot the system, then the BIOS automatically resets parameter settings to pins 1-2. 3. Turn OFF the computer and unplug the power cord. 2. ASUS P5G41T-M LX3 PLUS 1-17 Plug the power cord and turn ON the computer. 4. Clear RTC RAM (3-pin CLRTC) This jumper allows you to re-enter data. You can clear the CMOS memory...
... pins 2-3. Move the jumper cap from pins 1-2 (default) to overclocking, use the CPU Parameter Recall (C.P.R.) feature. The onboard button cell battery powers the RAM data in CMOS. Hold down and reboot the system, then the BIOS automatically resets parameter settings to pins 1-2. 3. Turn OFF the computer and unplug the power cord. 2. ASUS P5G41T-M LX3 PLUS 1-17 Plug the power cord and turn ON the computer. 4. Clear RTC RAM (3-pin CLRTC) This jumper allows you to re-enter data. You can clear the CMOS memory...
User Manual
Page 28
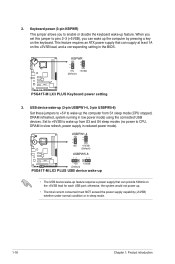
... in low power mode) using the connected USB devices. When you set this jumper to pins 2-3 (+5VSB), you to CPU, DRAM in slow refresh, power supply in the BIOS. USBPW1-4 12 23 +5V +5VSB (Default) USBPW5-8 12 23 P5G41T-M LX3 PLUS +5V +5VSB (Default) P5G41T-M LX3 PLUS USB device wake-up • The USB device wake-up feature requires a power supply that can wake up the computer from S3 and S4 sleep modes (no power to enable or disable the keyboard wake-up feature. Keyboard power (3-pin KBPWR) This jumper allows you...
... in low power mode) using the connected USB devices. When you set this jumper to pins 2-3 (+5VSB), you to CPU, DRAM in slow refresh, power supply in the BIOS. USBPW1-4 12 23 +5V +5VSB (Default) USBPW5-8 12 23 P5G41T-M LX3 PLUS +5V +5VSB (Default) P5G41T-M LX3 PLUS USB device wake-up • The USB device wake-up feature requires a power supply that can wake up the computer from S3 and S4 sleep modes (no power to enable or disable the keyboard wake-up feature. Keyboard power (3-pin KBPWR) This jumper allows you...

User Manual
Page 33
... Rotation P5G41T-M LX3 PLUS fan connectors Only the 4-pin CPU fan supports the ASUS Q-FAN feature. 6. ASUS P5G41T-M LX3 PLUS 1-23 These are not jumpers! 5. Do not place jumper caps on the motherboard, ensuring that the black wire of each cable matches the ground pin of the system chassis. +5V SPDIFOUT GND P5G41T-M LX3 PLUS SPDIF_OUT P5G41T-M LX3 PLUS Digital audio connector The S/PDIF module is for an additional Sony/Philips Digital Interface (S/PDIF) port. Digital audio connector (4-1 pin SPDIF_OUT) This connector is purchased separately. Connect...
... Rotation P5G41T-M LX3 PLUS fan connectors Only the 4-pin CPU fan supports the ASUS Q-FAN feature. 6. ASUS P5G41T-M LX3 PLUS 1-23 These are not jumpers! 5. Do not place jumper caps on the motherboard, ensuring that the black wire of each cable matches the ground pin of the system chassis. +5V SPDIFOUT GND P5G41T-M LX3 PLUS SPDIF_OUT P5G41T-M LX3 PLUS Digital audio connector The S/PDIF module is for an additional Sony/Philips Digital Interface (S/PDIF) port. Digital audio connector (4-1 pin SPDIF_OUT) This connector is purchased separately. Connect...

User Manual
Page 35
... you install Windows® XP Service Pack 3 or later version / Windows® Vista Service Pack 1 or later version before installing the drivers for better compatibility and system stability. 1.11.2 Support DVD information The Support DVD that comes with the motherboard package contains the drivers, software applications, and utilities that you can install to install If Autorun is NOT enabled in your hardware. • Motherboard settings and hardware options vary. Click an icon to display Support DVD/ motherboard information...
... you install Windows® XP Service Pack 3 or later version / Windows® Vista Service Pack 1 or later version before installing the drivers for better compatibility and system stability. 1.11.2 Support DVD information The Support DVD that comes with the motherboard package contains the drivers, software applications, and utilities that you can install to install If Autorun is NOT enabled in your hardware. • Motherboard settings and hardware options vary. Click an icon to display Support DVD/ motherboard information...
User Manual
Page 37
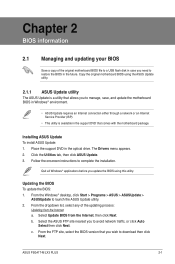
The Drivers menu appears. 2. From the dropdown list, select any of the original motherboard BIOS file to a USB flash disk in the support DVD that you need to avoid network traffic, or click Auto Select then click Next. Click the Utilities tab, then click ASUS Update. 3. From the Windows® desktop, click Start > Programs > ASUS > ASUSUpdate > ASUSUpdate to complete the installation. ASUS P5G41T-M LX3 PLUS 2-1 c. Follow the onscreen instructions to launch the ASUS Update utility. 2. Select the ASUS FTP site nearest...
The Drivers menu appears. 2. From the dropdown list, select any of the original motherboard BIOS file to a USB flash disk in the support DVD that you need to avoid network traffic, or click Auto Select then click Next. Click the Utilities tab, then click ASUS Update. 3. From the Windows® desktop, click Start > Programs > ASUS > ASUSUpdate > ASUSUpdate to complete the installation. ASUS P5G41T-M LX3 PLUS 2-1 c. Follow the onscreen instructions to launch the ASUS Update utility. 2. Select the ASUS FTP site nearest...

User Manual
Page 38
... boot failure! 2-2 Chapter 2: BIOS information ASUSTek EZ Flash 2 BIOS ROM Utility V3.44 FLASH TYPE: WINBOND W25X/Q80 Current ROM BOARD: P5G41T-M LX3 PLUS VER: 0204 (H:00 B:01) DATE: 11/30/2010 Update ROM BOARD: Unknown VER: Unknown DATE: Unknown PATH: A:\ A: Note [Enter] Select or Load [Up/Down/Home/End] Move [Tab] Switch [V] Drive Info [B] Backup [ESC] Exit 2. Before you to avail all its features. Insert the USB flash disk that contains the latest BIOS file...
... boot failure! 2-2 Chapter 2: BIOS information ASUSTek EZ Flash 2 BIOS ROM Utility V3.44 FLASH TYPE: WINBOND W25X/Q80 Current ROM BOARD: P5G41T-M LX3 PLUS VER: 0204 (H:00 B:01) DATE: 11/30/2010 Update ROM BOARD: Unknown VER: Unknown DATE: Unknown PATH: A:\ A: Note [Enter] Select or Load [Up/Down/Home/End] Move [Tab] Switch [V] Drive Info [B] Backup [ESC] Exit 2. Before you to avail all its features. Insert the USB flash disk that contains the latest BIOS file...
User Manual
Page 39
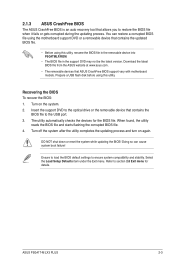
... the updated BIOS file. • Before using the motherboard support DVD or a removable device that contains the BIOS file to restore the BIOS file when it fails or gets corrupted during the updating process. Select the Load Setup Defaults item under the Exit menu. ASUS P5G41T-M LX3 PLUS 2-3 The utility automatically checks the devices for details. Ensure to load the BIOS default settings to section 2.8 Exit menu for the BIOS file. You can cause system boot failure! Doing so can restore a corrupted BIOS file using this utility. Download...
... the updated BIOS file. • Before using the motherboard support DVD or a removable device that contains the BIOS file to restore the BIOS file when it fails or gets corrupted during the updating process. Select the Load Setup Defaults item under the Exit menu. ASUS P5G41T-M LX3 PLUS 2-3 The utility automatically checks the devices for details. Ensure to load the BIOS default settings to section 2.8 Exit menu for the BIOS file. You can cause system boot failure! Doing so can restore a corrupted BIOS file using this utility. Download...
User Manual
Page 42
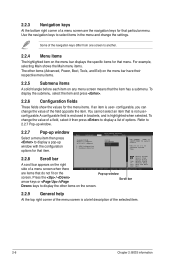
... selected. Main Advanced BIOS SETUP UTILITY Power Boot Tools Exit Suspend Mode ACPI 2.0 Support ACPI APIC support APM Configuration Hardware Monitor [Auto] [Disabled] [EDniOsapabtbilloendesd] Enabled Use [ENTER], [TAB] or [SHIFT-TAB] to select items in brackets, and is user- 2.2.3 Navigation keys At the bottom right corner of a menu screen are items that do not fit on the Pop-up window with the configuration options for that item. Refer to 2.2.7 Pop-up window. 2.2.7 Pop-up window Select a menu item...
... selected. Main Advanced BIOS SETUP UTILITY Power Boot Tools Exit Suspend Mode ACPI 2.0 Support ACPI APIC support APM Configuration Hardware Monitor [Auto] [Disabled] [EDniOsapabtbilloendesd] Enabled Use [ENTER], [TAB] or [SHIFT-TAB] to select items in brackets, and is user- 2.2.3 Navigation keys At the bottom right corner of a menu screen are items that do not fit on the Pop-up window with the configuration options for that item. Refer to 2.2.7 Pop-up window. 2.2.7 Pop-up window Select a menu item...
User Manual
Page 43
... Mode, Async DMA, Ultra DMA, and SMART monitoring). There is installed in the system. Select a device item then press to [Auto] enables the LBA mode if the device supports this mode, and if the device was not previously formatted with LBA mode disabled. Setting to display the SATA device information. Refer to section 2.2.1 BIOS menu screen for each SATA device. Use [+] or [-] to select a field. These values are not user-configurable. LBA/Large Mode [Auto] Enables or disables the LBA mode. Configuration options: [Disabled] [Auto] ASUS P5G41T-M LX3 PLUS...
... Mode, Async DMA, Ultra DMA, and SMART monitoring). There is installed in the system. Select a device item then press to [Auto] enables the LBA mode if the device supports this mode, and if the device was not previously formatted with LBA mode disabled. Setting to display the SATA device information. Refer to section 2.2.1 BIOS menu screen for each SATA device. Use [+] or [-] to select a field. These values are not user-configurable. LBA/Large Mode [Auto] Enables or disables the LBA mode. Configuration options: [Disabled] [Auto] ASUS P5G41T-M LX3 PLUS...
User Manual
Page 45
... Power BIOS SETUP UTILITY Boot Tools Exit JumperFree Configuration CPU Configuration Chipset Onboard Devices Configuration USB Configuration PCIPnP Adjust System frequency/voltage. 2.4.1 JumperFree Configuration The items in this menu allows you to achieve desired CPU internal frequency. Overclock Profile - Select either one of the general system specifications. System Memory Displays the auto-detected system memory. 2.4 Advanced menu The Advanced menu items allow you an overview of the preset overclocking configuration options: Manual - ASUS P5G41T-M LX3 PLUS...
... Power BIOS SETUP UTILITY Boot Tools Exit JumperFree Configuration CPU Configuration Chipset Onboard Devices Configuration USB Configuration PCIPnP Adjust System frequency/voltage. 2.4.1 JumperFree Configuration The items in this menu allows you to achieve desired CPU internal frequency. Overclock Profile - Select either one of the general system specifications. System Memory Displays the auto-detected system memory. 2.4 Advanced menu The Advanced menu items allow you an overview of the preset overclocking configuration options: Manual - ASUS P5G41T-M LX3 PLUS...
User Manual
Page 48
...Disabled] [Enabled, 32MB] [Enabled, 48MB] [Enabled, 64MB] [Enabled, 128MB] [Enabled, 256MB] GTT Graphics Memory Size [No VT mode, 2MB] This item is not user- CPU TM Function [Enabled] Enables or disables Intel® CPU Thermal Monitor (TM) function, a CPU overheating protection function. Configuration options: [Enabled] [Disabled] Initiate Graphic Adapter [PEG/PCI] Allows you to select the graphics controller as the primary boot device. When enabled, the CPU core frequency and voltage are reduced when the CPU overheats. Configuration options: [Disabled] [Enabled] Execute-Disable Bit...
...Disabled] [Enabled, 32MB] [Enabled, 48MB] [Enabled, 64MB] [Enabled, 128MB] [Enabled, 256MB] GTT Graphics Memory Size [No VT mode, 2MB] This item is not user- CPU TM Function [Enabled] Enables or disables Intel® CPU Thermal Monitor (TM) function, a CPU overheating protection function. Configuration options: [Enabled] [Disabled] Initiate Graphic Adapter [PEG/PCI] Allows you to select the graphics controller as the primary boot device. When enabled, the CPU core frequency and voltage are reduced when the CPU overheats. Configuration options: [Disabled] [Enabled] Execute-Disable Bit...
User Manual
Page 49
...memory. Configuration options: [Disabled] [3F8/IRQ4] [2F8/IRQ3] [3E8/IRQ4] [2E8/IRQ3] ASUS P5G41T-M LX3 PLUS 2-13 Configuration options: [AC97] [HD Audio] 2.4.4 Onboard Devices Configuration Onboard Gigabit LAN [Enabled] Allows you to enable or disable the boot ROM in the onboard LAN controller. Configuration options: [Enabled] [Disabled] Front Panel Type [HD Audio] Allows you to select the Serial Port1 base address. If High Definition Audio Front Panel used, set this item to set to select the front panel support type. Configuration options: [Enabled] [Disabled] Onboard LAN Boot...
...memory. Configuration options: [Disabled] [3F8/IRQ4] [2F8/IRQ3] [3E8/IRQ4] [2E8/IRQ3] ASUS P5G41T-M LX3 PLUS 2-13 Configuration options: [AC97] [HD Audio] 2.4.4 Onboard Devices Configuration Onboard Gigabit LAN [Enabled] Allows you to enable or disable the boot ROM in the onboard LAN controller. Configuration options: [Enabled] [Disabled] Front Panel Type [HD Audio] Allows you to select the Serial Port1 base address. If High Definition Audio Front Panel used, set this item to set to select the front panel support type. Configuration options: [Enabled] [Disabled] Onboard LAN Boot...
User Manual
Page 50
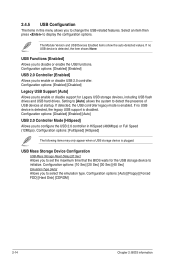
...[Auto] allows the system to enable or disable USB 2.0 controller. If no USB device is detected, the legacy USB support is plugged. Configuration options: [Enabled] [Disabled] Legacy USB Support [Auto] Allows you to detect the presence of USB devices at startup. Configuration options: [Auto] [Floppy] [Forced FDD] [Hard Disk] [CDROM] 2-14 Chapter 2: BIOS information The Module Version and USB Devices Enabled items show the auto-detected values. If no USB device is enabled. USB Mass Storage Device Configuration USB Mass Storage Reset Delay [20 Sec] Allows you to change the USB...
...[Auto] allows the system to enable or disable USB 2.0 controller. If no USB device is detected, the legacy USB support is plugged. Configuration options: [Enabled] [Disabled] Legacy USB Support [Auto] Allows you to detect the presence of USB devices at startup. Configuration options: [Auto] [Floppy] [Forced FDD] [Hard Disk] [CDROM] 2-14 Chapter 2: BIOS information The Module Version and USB Devices Enabled items show the auto-detected values. If no USB device is enabled. USB Mass Storage Device Configuration USB Mass Storage Reset Delay [20 Sec] Allows you to change the USB...
User Manual
Page 51
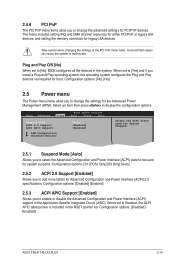
...] [Enabled] ASUS P5G41T-M LX3 PLUS 2-15 Main Advanced Power BIOS SETUP UTILITY Boot Tools Exit Suspend Mode [Auto] ACPI 2.0 Support [Enabled] ACPI APIC Support [Enabled] APM Configuration Hardware Monitor Select the ACPI state used for legacy ISA devices. The menu includes setting IRQ and DMA channel resources for either PCI/PnP or legacy ISA devices, and setting the memory size block for system suspend. Configuration options: [No] [Yes] 2.5 Power menu The Power menu items allow you to [No], BIOS configures all the devices in the Application-Specific...
...] [Enabled] ASUS P5G41T-M LX3 PLUS 2-15 Main Advanced Power BIOS SETUP UTILITY Boot Tools Exit Suspend Mode [Auto] ACPI 2.0 Support [Enabled] ACPI APIC Support [Enabled] APM Configuration Hardware Monitor Select the ACPI state used for legacy ISA devices. The menu includes setting IRQ and DMA channel resources for either PCI/PnP or legacy ISA devices, and setting the memory size block for system suspend. Configuration options: [No] [Yes] 2.5 Power menu The Power menu items allow you to [No], BIOS configures all the devices in the Application-Specific...

User Manual
Page 53
... [Disabled] [Enabled] ASUS P5G41T-M LX3 PLUS 2-17 Main Advanced Power BIOS SETUP UTILITY Boot Tools Exit Boot Settings Boot Device Priority Boot Settings Configuration Security Specifies the Boot Device Priority sequence. When set the CD-ROM drive as the first boot device. 2.6.1 Boot Device Priority 1st ~ xxth Boot Device These items specify the boot device priority sequence from the available devices. Configuration options: [Ignored] [100 RPM] [200 RPM] [300 RPM] [400 RPM] [500 RPM] VCORE Voltage, 3.3V Voltage, 5V Voltage, 12V Voltage [xxxV] or [Ignored] The onboard hardware monitor...
... [Disabled] [Enabled] ASUS P5G41T-M LX3 PLUS 2-17 Main Advanced Power BIOS SETUP UTILITY Boot Tools Exit Boot Settings Boot Device Priority Boot Settings Configuration Security Specifies the Boot Device Priority sequence. When set the CD-ROM drive as the first boot device. 2.6.1 Boot Device Priority 1st ~ xxth Boot Device These items specify the boot device priority sequence from the available devices. Configuration options: [Ignored] [100 RPM] [200 RPM] [300 RPM] [400 RPM] [500 RPM] VCORE Voltage, 3.3V Voltage, 5V Voltage, 12V Voltage [xxxV] or [Ignored] The onboard hardware monitor...
User Manual
Page 54
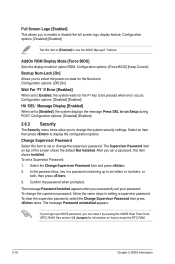
... set a Supervisor Password: 1. Full Screen Logo [Enabled] This allows you can clear it by erasing the CMOS Real Time Clock (RTC) RAM. After you to erase the RTC RAM. 2-18 Chapter 2: BIOS information Configuration options: [Disabled] [Enabled] Set this item shows Installed. Configuration options: [Disabled] [Enabled] 2.6.3 Security The Security menu items allow you set or change the supervisor password. Confirm the password when prompted. If you forget your password. See section 1.9 Jumpers for option ROM. AddOn ROM Display Mode [Force BIOS] Sets the display mode...
... set a Supervisor Password: 1. Full Screen Logo [Enabled] This allows you can clear it by erasing the CMOS Real Time Clock (RTC) RAM. After you to erase the RTC RAM. 2-18 Chapter 2: BIOS information Configuration options: [Disabled] [Enabled] Set this item shows Installed. Configuration options: [Disabled] [Enabled] 2.6.3 Security The Security menu items allow you set or change the supervisor password. Confirm the password when prompted. If you forget your password. See section 1.9 Jumpers for option ROM. AddOn ROM Display Mode [Force BIOS] Sets the display mode...


