User Manual
Page 1
Motherboard P5G41T-M LX V2 P5G41T-M LX PLUS
Motherboard P5G41T-M LX V2 P5G41T-M LX PLUS
User Manual
Page 3
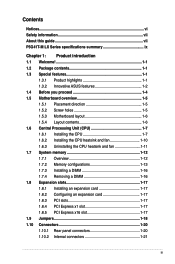
Contents Notices...vi Safety information vii About this guide vii P5G41T-M LX Series specifications summary ix Chapter 1: Product introduction 1.1 Welcome 1-1 1.2 Package contents 1-1 1.3 Special features 1-1 1.3.1 Product highlights 1-1 1.3.2 Innovative ASUS features 1-2 1.4 Before you proceed 1-4 1.5 Motherboard overview 1-5 1.5.1 Placement direction 1-5 1.5.2 Screw holes 1-5 1.5.3 Motherboard layout 1-6 1.5.4 Layout contents 1-6 1.6 Central Processing Unit (CPU 1-7 1.6.1 Installing the CPU 1-7 1.6.2 Installing the CPU heatsink and fan 1-10...
Contents Notices...vi Safety information vii About this guide vii P5G41T-M LX Series specifications summary ix Chapter 1: Product introduction 1.1 Welcome 1-1 1.2 Package contents 1-1 1.3 Special features 1-1 1.3.1 Product highlights 1-1 1.3.2 Innovative ASUS features 1-2 1.4 Before you proceed 1-4 1.5 Motherboard overview 1-5 1.5.1 Placement direction 1-5 1.5.2 Screw holes 1-5 1.5.3 Motherboard layout 1-6 1.5.4 Layout contents 1-6 1.6 Central Processing Unit (CPU 1-7 1.6.1 Installing the CPU 1-7 1.6.2 Installing the CPU heatsink and fan 1-10...

User Manual
Page 6
... is no guarantee that the product (electrical and electronic equipment) should not be placed in municipal waste. DO NOT throw the motherboard in municipal waste. Check local regulations for radio noise emissions from that the battery should not be placed in municipal waste. REACH...TV technician for a Class B digital device, pursuant to provide reasonable protection against harmful interference in our products at ASUS REACH website at http://csr.asus.com/english/REACH.htm. vi DO NOT throw the mercury-containing button cell battery in municipal waste. Operation is ...
... is no guarantee that the product (electrical and electronic equipment) should not be placed in municipal waste. DO NOT throw the motherboard in municipal waste. Check local regulations for radio noise emissions from that the battery should not be placed in municipal waste. REACH...TV technician for a Class B digital device, pursuant to provide reasonable protection against harmful interference in our products at ASUS REACH website at http://csr.asus.com/english/REACH.htm. vi DO NOT throw the mercury-containing button cell battery in municipal waste. Operation is ...

User Manual
Page 7
... all the manuals that came with the product, contact a qualified service technician or your retailer. Operation safety • Before installing the motherboard and adding devices on a stable surface. • If you encounter technical problems with the package. • Before using the product,...power supply is organized This guide contains the following parts: • Chapter 1: Product introduction This chapter describes the features of the motherboard and the new technology it by yourself. Detailed descriptions of the electrical outlet you add a device. • Before connecting or ...
... all the manuals that came with the product, contact a qualified service technician or your retailer. Operation safety • Before installing the motherboard and adding devices on a stable surface. • If you encounter technical problems with the package. • Before using the product,...power supply is organized This guide contains the following parts: • Chapter 1: Product introduction This chapter describes the features of the motherboard and the new technology it by yourself. Detailed descriptions of the electrical outlet you add a device. • Before connecting or ...
User Manual
Page 11
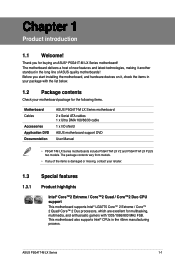
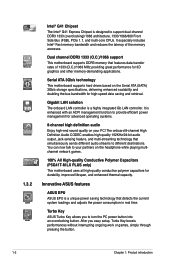
...™ 2 Quad/ Core™ 2 Duo processors, which are excellent for the following items. Motherboard Cables Accessories Application DVD Documentation ASUS P5G41T-M LX Series motherboard 2 x Serial ATA cables 1 x Ultra DMA 100/66/33 cable 1 x I/O shield ASUS motherboard support DVD User Manual • P5G41T-M LX Series motherboards include P5G41T-M LX V2 and P5G41T-M LX PLUS two models. The package contents vary from models. • If any of...
...™ 2 Quad/ Core™ 2 Duo processors, which are excellent for the following items. Motherboard Cables Accessories Application DVD Documentation ASUS P5G41T-M LX Series motherboard 2 x Serial ATA cables 1 x Ultra DMA 100/66/33 cable 1 x I/O shield ASUS motherboard support DVD User Manual • P5G41T-M LX Series motherboards include P5G41T-M LX V2 and P5G41T-M LX PLUS two models. The package contents vary from models. • If any of...
User Manual
Page 12
...based on your partners on the headphone while playing multichannel network games. 100% All High-quality Conductive Polymer Capacitors (P5G41T-M LX PLUS only) This motherboard uses all high-quality conductive polymer capacitors for high-speed data saving and retrieval. It is enhanced with an ACPI... the current system loadings and adjusts the power consumption in real time. You can now talk to different destinations. Innovative ASUS features ASUS EPU ASUS EPU is a unique power saving technology that simultaneously sends different audio streams to your PC! After you to support dual...
...based on your partners on the headphone while playing multichannel network games. 100% All High-quality Conductive Polymer Capacitors (P5G41T-M LX PLUS only) This motherboard uses all high-quality conductive polymer capacitors for high-speed data saving and retrieval. It is enhanced with an ACPI... the current system loadings and adjusts the power consumption in real time. You can now talk to different destinations. Innovative ASUS features ASUS EPU ASUS EPU is a unique power saving technology that simultaneously sends different audio streams to your PC! After you to support dual...
User Manual
Page 13
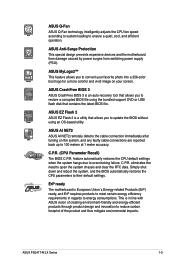
...to open the system chassis and clear the RTC data. C.P.R. ASUS EZ Flash 2 ASUS EZ Flash 2 is an auto-recovery tool that allows you to reduce carbon footprint of the product and thus mitigate environmental impacts. ErP ready The motherboard is in regards to restore a corrupted BIOS file using an... and innovation to update the BIOS without using the bundled support DVD or USB flash disk that allows you to energy consumptions. ASUS P5G41T-M LX Series 1-3 Simply shut down and reboot the system, and the BIOS automatically restores the CPU parameters to overclocking failure...
...to open the system chassis and clear the RTC data. C.P.R. ASUS EZ Flash 2 ASUS EZ Flash 2 is an auto-recovery tool that allows you to reduce carbon footprint of the product and thus mitigate environmental impacts. ErP ready The motherboard is in regards to restore a corrupted BIOS file using an... and innovation to update the BIOS without using the bundled support DVD or USB flash disk that allows you to energy consumptions. ASUS P5G41T-M LX Series 1-3 Simply shut down and reboot the system, and the BIOS automatically restores the CPU parameters to overclocking failure...
User Manual
Page 14
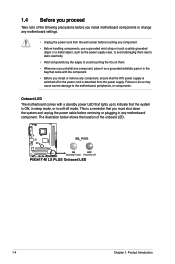
...cord is ON, in sleep mode, or in soft-off mode. 1.4 Before you install motherboard components or change any motherboard component. P5G41T-M LX PLUS Onboard LED P5G41T-M LX PLUS 1-4 Chapter 1: Product introduction Onboard LED The motherboard comes with the component. • Before you install or remove any component, ensure that..., to avoid damaging them . • Whenever you uninstall any component, place it on a grounded antistatic pad or in any motherboard settings. • Unplug the power cord from the power supply. Failure to do so may cause severe damage to avoid touching ...
...cord is ON, in sleep mode, or in soft-off mode. 1.4 Before you install motherboard components or change any motherboard component. P5G41T-M LX PLUS Onboard LED P5G41T-M LX PLUS 1-4 Chapter 1: Product introduction Onboard LED The motherboard comes with the component. • Before you install or remove any component, ensure that..., to avoid damaging them . • Whenever you uninstall any component, place it on a grounded antistatic pad or in any motherboard settings. • Unplug the power cord from the power supply. Failure to do so may cause severe damage to avoid touching ...
User Manual
Page 15
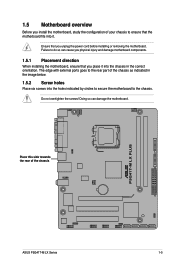
Doing so can cause you physical injury and damage motherboard components. 1.5.1 Placement direction When installing the motherboard, ensure that you place it . Place this side towards the rear of the chassis P5G41T-M LX PLUS ASUS P5G41T-M LX Series 1-5 Do not overtighten the screws! Failure to do so can damage the motherboard. The edge with external ports goes to the rear...
Doing so can cause you physical injury and damage motherboard components. 1.5.1 Placement direction When installing the motherboard, ensure that you place it . Place this side towards the rear of the chassis P5G41T-M LX PLUS ASUS P5G41T-M LX Series 1-5 Do not overtighten the screws! Failure to do so can damage the motherboard. The edge with external ports goes to the rear...
User Manual
Page 16
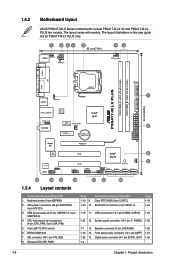
The layout illustrations in this user guide are for P5G41T-M LX PLUS only. 20.1cm(7.9in) COM1 P5G41T-M LX PLUS RTL 8111E ICS 9LRS954A4 9 15 14 13 12 11 10 1.5.4 Layout contents Connectors/Jumpers/Slots/LED 1. USB device wake-up (3-pin USBPW1-4, 3-pin ...CHA_FAN) 5. System panel connector (10-1 pin F_PANEL) 1-26 1-7 13. Keyboard power (3-pin KBPWR) 2. Front panel audio connector (10-1 pin AAFP) 1-21 1-22 15. 1.5.3 Motherboard layout ASUS P5G41T-M LX Series motherboards include P5G41T-M LX V2 and P5G41T-M LX PLUS two models. The layout varies with models. DDR3 DIMM slots 7.
The layout illustrations in this user guide are for P5G41T-M LX PLUS only. 20.1cm(7.9in) COM1 P5G41T-M LX PLUS RTL 8111E ICS 9LRS954A4 9 15 14 13 12 11 10 1.5.4 Layout contents Connectors/Jumpers/Slots/LED 1. USB device wake-up (3-pin USBPW1-4, 3-pin ...CHA_FAN) 5. System panel connector (10-1 pin F_PANEL) 1-26 1-7 13. Keyboard power (3-pin KBPWR) 2. Front panel audio connector (10-1 pin AAFP) 1-21 1-22 15. 1.5.3 Motherboard layout ASUS P5G41T-M LX Series motherboards include P5G41T-M LX V2 and P5G41T-M LX PLUS two models. The layout varies with models. DDR3 DIMM slots 7.

User Manual
Page 17
... if the PnP cap is missing, or if you see any damage to the PnP cap/socket contacts/motherboard components. ASUS will shoulder the cost of repair only if the damage is on the motherboard. ASUS P5G41T-M LX Series 1-7 P5G41T-M LX PLUS P5G41T-M LX PLUS CPU socket 775 Before installing the CPU, ensure that the PnP cap is shipment/transit-related. •...
... if the PnP cap is missing, or if you see any damage to the PnP cap/socket contacts/motherboard components. ASUS will shoulder the cost of repair only if the damage is on the motherboard. ASUS P5G41T-M LX Series 1-7 P5G41T-M LX PLUS P5G41T-M LX PLUS CPU socket 775 Before installing the CPU, ensure that the PnP cap is shipment/transit-related. •...

User Manual
Page 20
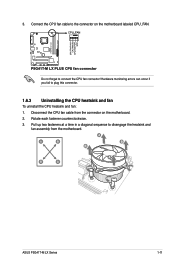
... a push-pin design and requires no tool to install. • If you purchased a separate CPU heatsink and fan assembly, ensure that you have installed the motherboard to the chassis before you install the heatsink and fan assembly. Orient the heatsink and fan assembly such that the CPU fan cable is for... the heatsink and fan assembly in a diagonal sequence to the CPU fan connector. 2. To install the CPU heatsink and fan: 1. Place the heatsink on the motherboard.
... a push-pin design and requires no tool to install. • If you purchased a separate CPU heatsink and fan assembly, ensure that you have installed the motherboard to the chassis before you install the heatsink and fan assembly. Orient the heatsink and fan assembly such that the CPU fan cable is for... the heatsink and fan assembly in a diagonal sequence to the CPU fan connector. 2. To install the CPU heatsink and fan: 1. Place the heatsink on the motherboard.
User Manual
Page 21
... each fastener counterclockwise. 3. Pull up two fasteners at a time in a diagonal sequence to the connector on the motherboard. 2. A A B B B A B A ASUS P5G41T-M LX Series 1-11 3. P5G41T-M LX PLUS P5G41T-M LX PLUS CPU fan connector Do not forget to plug this connector. 1.6.3 Uninstalling the CPU heatsink and fan To uninstall the CPU heatsink and fan: 1. Hardware monitoring ...
... each fastener counterclockwise. 3. Pull up two fasteners at a time in a diagonal sequence to the connector on the motherboard. 2. A A B B B A B A ASUS P5G41T-M LX Series 1-11 3. P5G41T-M LX PLUS P5G41T-M LX PLUS CPU fan connector Do not forget to plug this connector. 1.6.3 Uninstalling the CPU heatsink and fan To uninstall the CPU heatsink and fan: 1. Hardware monitoring ...
User Manual
Page 22
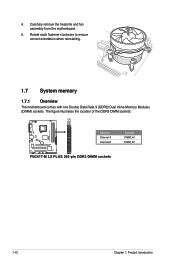
Carefully remove the heatsink and fan assembly from the motherboard. 5. Rotate each fastener clockwise to ensure correct orientation when reinstalling. 1.7 System memory 1.7.1 Overview The motherboard comes with two Double Data Rate 3 (DDR3) Dual Inline Memory Modules (DIMM) sockets. The figure illustrates the location of the DDR3 DIMM sockets: P5G41T-M LX PLUS Channel Channel A Channel B P5G41T-M LX PLUS 240-pin DDR3 DIMM sockets Sockets DIMM_A1 DIMM_B1 1-12 Chapter 1: Product introduction 4.
Carefully remove the heatsink and fan assembly from the motherboard. 5. Rotate each fastener clockwise to ensure correct orientation when reinstalling. 1.7 System memory 1.7.1 Overview The motherboard comes with two Double Data Rate 3 (DDR3) Dual Inline Memory Modules (DIMM) sockets. The figure illustrates the location of the DDR3 DIMM sockets: P5G41T-M LX PLUS Channel Channel A Channel B P5G41T-M LX PLUS 240-pin DDR3 DIMM sockets Sockets DIMM_A1 DIMM_B1 1-12 Chapter 1: Product introduction 4.
User Manual
Page 23
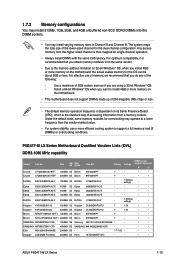
... maps the total size of the lower-sized channel for overclocking may install varying memory sizes in Channel A and Channel B. P5G41T-M LX Series Motherboard Qualified Vendors Lists (QVL) DDR3-1066 MHz capability Vendor Part No. For optimum compatibility, it is the standard way of ...-BE 2048MB DS - - 7-7-7-20 - • • Kingtiger 2GB DIMM PC3-8500 2048MB DS Hynix H5TQ1G83AFP G7C - - • • ASUS P5G41T-M LX Series 1-13 For effective use a more memory on its Serial Presence Detect (SPD), which is recommended that you do any of accessing information from a ...
... maps the total size of the lower-sized channel for overclocking may install varying memory sizes in Channel A and Channel B. P5G41T-M LX Series Motherboard Qualified Vendors Lists (QVL) DDR3-1066 MHz capability Vendor Part No. For optimum compatibility, it is the standard way of ...-BE 2048MB DS - - 7-7-7-20 - • • Kingtiger 2GB DIMM PC3-8500 2048MB DS Hynix H5TQ1G83AFP G7C - - • • ASUS P5G41T-M LX Series 1-13 For effective use a more memory on its Serial Presence Detect (SPD), which is recommended that you do any of accessing information from a ...

User Manual
Page 26
... notch 1-16 Chapter 1: Product introduction Failure to do so can cause severe damage to unlock a DIMM socket. 2. Press the retaining clips outward to both the motherboard and the components. 1. DO NOT force a DIMM into the socket until the retaining clips snap back in place 3 and the DIMM is keyed with a notch...
... notch 1-16 Chapter 1: Product introduction Failure to do so can cause severe damage to unlock a DIMM socket. 2. Press the retaining clips outward to both the motherboard and the components. 1. DO NOT force a DIMM into the socket until the retaining clips snap back in place 3 and the DIMM is keyed with a notch...
User Manual
Page 27
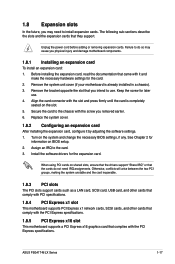
...slot. 5. 1.8 Expansion slots In the future, you removed earlier. 6. Remove the bracket opposite the slot that you physical injury and damage motherboard components. 1.8.1 Installing an expansion card To install an expansion card: 1. Otherwise, conflicts will arise between the two PCI groups, making the...on the system and change the necessary BIOS settings, if any. Remove the system unit cover (if your motherboard is completely seated on shared slots, ensure that the drivers support "Share IRQ" or that came with the screw you may need IRQ assignments. ASUS P5G41T-M LX Series 1-17
...slot. 5. 1.8 Expansion slots In the future, you removed earlier. 6. Remove the bracket opposite the slot that you physical injury and damage motherboard components. 1.8.1 Installing an expansion card To install an expansion card: 1. Otherwise, conflicts will arise between the two PCI groups, making the...on the system and change the necessary BIOS settings, if any. Remove the system unit cover (if your motherboard is completely seated on shared slots, ensure that the drivers support "Share IRQ" or that came with the screw you may need IRQ assignments. ASUS P5G41T-M LX Series 1-17
User Manual
Page 31
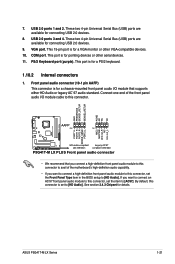
VGA port. This 15-pin port is for a VGA monitor or other serial devices. 11. P5G41T-M LX PLUS ASUS P5G41T-M LX Series 1-21 USB 2.0 ports 1 and 2. These two 4-pin Universal Serial Bus (USB) ports are available for a chassis-mounted front panel audio I /O module cable to... one end of the front panel audio I /O module that you connect a high-definition front panel audio module to this connector to avail of the motherboard's high-definition audio capability. • If you want to connect a high-definition front panel audio module to this connector, set to this connector. These...
VGA port. This 15-pin port is for a VGA monitor or other serial devices. 11. P5G41T-M LX PLUS ASUS P5G41T-M LX Series 1-21 USB 2.0 ports 1 and 2. These two 4-pin Universal Serial Bus (USB) ports are available for a chassis-mounted front panel audio I /O module cable to... one end of the front panel audio I /O module that you connect a high-definition front panel audio module to this connector to avail of the motherboard's high-definition audio capability. • If you want to connect a high-definition front panel audio module to this connector, set to this connector. These...

User Manual
Page 32
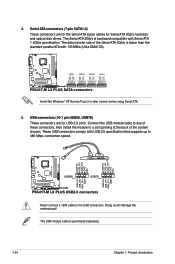
...modes to match the covered hole on each Ultra DMA 100/66/33 signal cable: blue, black, and gray. Connect the blue connector to the motherboard's IDE connector, then select one of device(s) Master Slave Master Slave Cable connector Black Black Gray Black or gray • Pin 20 on the... Use the 80-conductor IDE cable for the Ultra DMA 100/66/33 signal cable. There are three connectors on the Ultra DMA cable connector. P5G41T-M LX PLUS P5G41T-M LX PLUS IDE connector If any device jumper is for Ultra DMA 100/66/33 IDE devices. IDE connector (40-1 pin PRI_IDE) The onboard IDE connector ...
...modes to match the covered hole on each Ultra DMA 100/66/33 signal cable: blue, black, and gray. Connect the blue connector to the motherboard's IDE connector, then select one of device(s) Master Slave Master Slave Cable connector Black Black Gray Black or gray • Pin 20 on the... Use the 80-conductor IDE cable for the Ultra DMA 100/66/33 signal cable. There are three connectors on the Ultra DMA cable connector. P5G41T-M LX PLUS P5G41T-M LX PLUS IDE connector If any device jumper is for Ultra DMA 100/66/33 IDE devices. IDE connector (40-1 pin PRI_IDE) The onboard IDE connector ...
User Manual
Page 34
... the USB module cable to any of the system chassis. Doing so will damage the motherboard! USB connectors (10-1 pin USB56, USB78) These connectors are for the Serial ATA signal cables for USB 2.0 ports. P5G41T-M LX PLUS P5G41T-M LX PLUS USB2.0 connectors Never connect a 1394 cable to a slot opening at the back of these connectors, then install...
... the USB module cable to any of the system chassis. Doing so will damage the motherboard! USB connectors (10-1 pin USB56, USB78) These connectors are for the Serial ATA signal cables for USB 2.0 ports. P5G41T-M LX PLUS P5G41T-M LX PLUS USB2.0 connectors Never connect a 1394 cable to a slot opening at the back of these connectors, then install...


