User Manual
Page 2
... your request please provide the name, model number and version, as source code archives etc to anyone in the GPL) for the GPL Software, and/or the complete corresponding source code of this email address). SPECIFICATIONS AND INFORMATION CONTAINED IN THIS MANUAL ARE FURNISHED FOR INFORMATIONAL USE ONLY, AND ARE SUBJECT TO CHANGE AT ANY TIME WITHOUT NOTICE, AND...
... your request please provide the name, model number and version, as source code archives etc to anyone in the GPL) for the GPL Software, and/or the complete corresponding source code of this email address). SPECIFICATIONS AND INFORMATION CONTAINED IN THIS MANUAL ARE FURNISHED FOR INFORMATIONAL USE ONLY, AND ARE SUBJECT TO CHANGE AT ANY TIME WITHOUT NOTICE, AND...
User Manual
Page 10
... Capacitors (P5G41T-M LX PLUS only) 1 x PS/2 keyboard port (purple) 1 x PS/2 mouse port (green) 1 x LPT port 1 x COM port 1 x VGA port 1 x LAN (RJ-45) port 4 x USB 2.0/1.1 ports 3 x Audio jacks 2 x USB 2.0/1.1 connectors support additional 4 USB 2.0/1.1 ports 1 x IDE connector 4 x Serial ATA connectors 1 x Front panel audio connector 1 x System panel connector 1 x S/PDIF Out connector 1 x Internal speaker connector 1 x CPU fan connector 1 x Chassis fan connector 1 x 24-pin EATX power connector 1 x 4-pin ATX 12V power connector 8Mb Flash ROM, AMI BIOS, PnP, DMI 2.0, WfM 2.0, ACPI 2.0a, SM BIOS...
... Capacitors (P5G41T-M LX PLUS only) 1 x PS/2 keyboard port (purple) 1 x PS/2 mouse port (green) 1 x LPT port 1 x COM port 1 x VGA port 1 x LAN (RJ-45) port 4 x USB 2.0/1.1 ports 3 x Audio jacks 2 x USB 2.0/1.1 connectors support additional 4 USB 2.0/1.1 ports 1 x IDE connector 4 x Serial ATA connectors 1 x Front panel audio connector 1 x System panel connector 1 x S/PDIF Out connector 1 x Internal speaker connector 1 x CPU fan connector 1 x Chassis fan connector 1 x 24-pin EATX power connector 1 x 4-pin ATX 12V power connector 8Mb Flash ROM, AMI BIOS, PnP, DMI 2.0, WfM 2.0, ACPI 2.0a, SM BIOS...
User Manual
Page 12
.... Serial ATA 3Gb/s technology This motherboard supports hard drives based on the headphone while playing multichannel network games. 100% All High-quality Conductive Polymer Capacitors (P5G41T-M LX PLUS only) This motherboard uses all high-quality conductive polymer capacitors for high-speed data saving and retrieval. It is enhanced with an ACPI management function to different destinations. After you to turn the PC power button into an overclocking button. The onboard 8-channel High Definition Audio CODEC enables high-quality...
.... Serial ATA 3Gb/s technology This motherboard supports hard drives based on the headphone while playing multichannel network games. 100% All High-quality Conductive Polymer Capacitors (P5G41T-M LX PLUS only) This motherboard uses all high-quality conductive polymer capacitors for high-speed data saving and retrieval. It is enhanced with an ACPI management function to different destinations. After you to turn the PC power button into an overclocking button. The onboard 8-channel High Definition Audio CODEC enables high-quality...
User Manual
Page 13
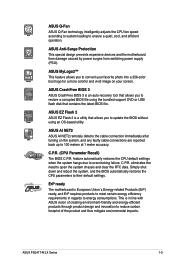
... screen. C.P.R. This is a utility that allows you to their default settings. eliminates the need to update the BIOS without using the bundled support DVD or USB flash disk that allows you to open the system chassis and clear the RTC data. ASUS EZ Flash 2 ASUS EZ Flash 2 is in regards to 100 meters at 1 meter accuracy. ASUS P5G41T-M LX Series 1-3 ErP ready The motherboard is an auto-recovery tool that contains the latest BIOS file. ASUS AI NET2 ASUS...
... screen. C.P.R. This is a utility that allows you to their default settings. eliminates the need to update the BIOS without using the bundled support DVD or USB flash disk that allows you to open the system chassis and clear the RTC data. ASUS EZ Flash 2 ASUS EZ Flash 2 is in regards to 100 meters at 1 meter accuracy. ASUS P5G41T-M LX Series 1-3 ErP ready The motherboard is an auto-recovery tool that contains the latest BIOS file. ASUS AI NET2 ASUS...
User Manual
Page 16
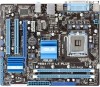
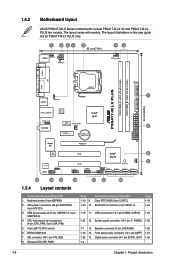
Intel LGA775 CPU socket 6. The layout varies with models. Keyboard power (3-pin KBPWR) 2. USB device wake-up (3-pin USBPW1-4, 3-pin USBPW5-8) 4. IDE connector (40-1 pin PRI_IDE) 8. CPU and chassis fan connectors (4-pin CPU_FAN, 3-pin CHA_FAN) 5. DDR3 DIMM slots 7. System panel connector (10-1 pin F_PANEL) 1-26 1-7 13. Front panel audio connector (10-1 pin AAFP) 1-21 1-22 15. Speaker connector (4-pin SPEAKER) 1-26 1-12 14. The layout illustrations in this user guide are for P5G41T-M LX PLUS only. 20.1cm(7.9in) COM1 P5G41T-M LX PLUS RTL 8111E ICS 9LRS954A4 9 15 ...
Intel LGA775 CPU socket 6. The layout varies with models. Keyboard power (3-pin KBPWR) 2. USB device wake-up (3-pin USBPW1-4, 3-pin USBPW5-8) 4. IDE connector (40-1 pin PRI_IDE) 8. CPU and chassis fan connectors (4-pin CPU_FAN, 3-pin CHA_FAN) 5. DDR3 DIMM slots 7. System panel connector (10-1 pin F_PANEL) 1-26 1-7 13. Front panel audio connector (10-1 pin AAFP) 1-21 1-22 15. Speaker connector (4-pin SPEAKER) 1-26 1-12 14. The layout illustrations in this user guide are for P5G41T-M LX PLUS only. 20.1cm(7.9in) COM1 P5G41T-M LX PLUS RTL 8111E ICS 9LRS954A4 9 15 ...
User Manual
Page 23
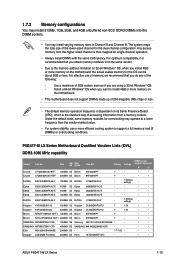
... the dual-channel configuration. Size SS/ Chip DS Brand Chip NO. Use a maximum of 3GB system memory if you do any of the following: - P5G41T-M LX Series Motherboard Qualified Vendors Lists (QVL) DDR3-1066 MHz capability Vendor Part No. For effective use a more memory on the motherboard. • This motherboard does not support DIMMs made up of the lower-sized channel for the OS can be about 3GB or less. Install a 64-bit Windows...
... the dual-channel configuration. Size SS/ Chip DS Brand Chip NO. Use a maximum of 3GB system memory if you do any of the following: - P5G41T-M LX Series Motherboard Qualified Vendors Lists (QVL) DDR3-1066 MHz capability Vendor Part No. For effective use a more memory on the motherboard. • This motherboard does not support DIMMs made up of the lower-sized channel for the OS can be about 3GB or less. Install a 64-bit Windows...
User Manual
Page 27
... installed in a chassis). 3. Remove the bracket opposite the slot that the cards do so may need IRQ assignments. Turn on BIOS setup. 2. Keep the screw for the expansion card. Assign an IRQ to use . 4. Secure the card to install expansion cards. Install the software drivers for later use . When using PCI cards on the slot. 5. ASUS P5G41T-M LX Series 1-17 Unplug the power cord before adding or removing expansion cards. Align the card connector with the screw you removed earlier. 6. 1.8 Expansion slots...
... installed in a chassis). 3. Remove the bracket opposite the slot that the cards do so may need IRQ assignments. Turn on BIOS setup. 2. Keep the screw for the expansion card. Assign an IRQ to use . 4. Secure the card to install expansion cards. Install the software drivers for later use . When using PCI cards on the slot. 5. ASUS P5G41T-M LX Series 1-17 Unplug the power cord before adding or removing expansion cards. Align the card connector with the screw you removed earlier. 6. 1.8 Expansion slots...
User Manual
Page 29
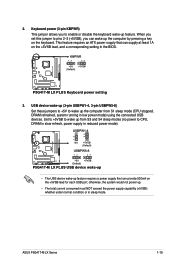
... the keyboard. When you set this jumper to pins 2-3 (+5VSB), you to wake up feature. P5G41T-M LX PLUS USB device wake-up • The USB device wake-up the computer by pressing a key on the +5VSB lead, and a corresponding setting in low power mode) using the connected USB devices. otherwise, the system would not power up from S1 sleep mode (CPU stopped, DRAM refreshed, system running in the BIOS. Set to +5VSB to CPU, DRAM in slow refresh, power supply in sleep mode. Keyboard power (3-pin KBPWR) This jumper...
... the keyboard. When you set this jumper to pins 2-3 (+5VSB), you to wake up feature. P5G41T-M LX PLUS USB device wake-up • The USB device wake-up the computer by pressing a key on the +5VSB lead, and a corresponding setting in low power mode) using the connected USB devices. otherwise, the system would not power up from S1 sleep mode (CPU stopped, DRAM refreshed, system running in the BIOS. Set to +5VSB to CPU, DRAM in slow refresh, power supply in sleep mode. Keyboard power (3-pin KBPWR) This jumper...
User Manual
Page 37
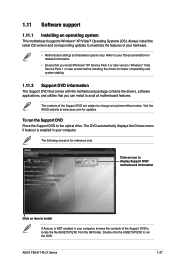
... drivers, software applications, and utilities that you can install to run the Support DVD Place the Support DVD to maximize the features of the Support DVD are subject to install If Autorun is NOT enabled in your hardware. • Motherboard settings and hardware options vary. The contents of your computer. Click an icon to display Support DVD/ motherboard information Click an item to change at www.asus.com for reference only. ASUS P5G41T-M LX Series...
... drivers, software applications, and utilities that you can install to run the Support DVD Place the Support DVD to maximize the features of the Support DVD are subject to install If Autorun is NOT enabled in your hardware. • Motherboard settings and hardware options vary. The contents of your computer. Click an icon to display Support DVD/ motherboard information Click an item to change at www.asus.com for reference only. ASUS P5G41T-M LX Series...
User Manual
Page 39
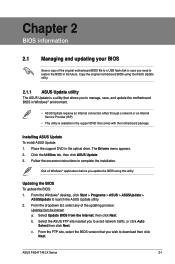
... ASUS Update is a utility that comes with the motherboard package. Follow the onscreen instructions to launch the ASUS Update utility. 2. From the Windows® desktop, click Start > Programs > ASUS > ASUSUpdate > ASUSUpdate to complete the installation. Quit all Windows® applications before you to avoid network traffic, or click Auto Select then click Next. b. c. Place the support DVD in the future. Select Update BIOS from the Internet a. Installing ASUS Update To install ASUS Update: 1. Updating the BIOS To update the BIOS: 1. ASUS P5G41T-M LX Series...
... ASUS Update is a utility that comes with the motherboard package. Follow the onscreen instructions to launch the ASUS Update utility. 2. From the Windows® desktop, click Start > Programs > ASUS > ASUSUpdate > ASUSUpdate to complete the installation. Quit all Windows® applications before you to avoid network traffic, or click Auto Select then click Next. b. c. Place the support DVD in the future. Select Update BIOS from the Internet a. Installing ASUS Update To install ASUS Update: 1. Updating the BIOS To update the BIOS: 1. ASUS P5G41T-M LX Series...

User Manual
Page 40
... ROM BOARD: P5G41T-M LX PLUS VER: 0301 (H:00 B:00) DATE: 09/17/2010 Update ROM BOARD: Unknown VER: Unknown DATE: Unknown PATH: A:\ A: Note [Enter] Select or Load [Tab] Switch [Up/Down/Home/End] Move [B] Backup [V] Drive Info [ESC] Exit 2. Always update the utility to enable it. Before you to the USB port, then launch EZ Flash 2 in any of updating itself through the Internet. Press to prevent system boot failure! 2-2 Chapter 2: BIOS...
... ROM BOARD: P5G41T-M LX PLUS VER: 0301 (H:00 B:00) DATE: 09/17/2010 Update ROM BOARD: Unknown VER: Unknown DATE: Unknown PATH: A:\ A: Note [Enter] Select or Load [Tab] Switch [Up/Down/Home/End] Move [B] Backup [V] Drive Info [ESC] Exit 2. Always update the utility to enable it. Before you to the USB port, then launch EZ Flash 2 in any of updating itself through the Internet. Press to prevent system boot failure! 2-2 Chapter 2: BIOS...
User Manual
Page 44
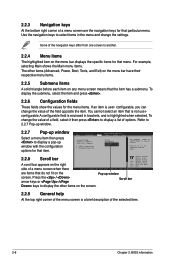
... Megatrends, Inc. are the navigation keys for that is not userconfigurable.A configurable field is enclosed in the menu and change the settings. Some of the navigation keys differ from one screen to another. 2.2.4 Menu items The highlighted item on the Pop-up window with the configuration options for that menu. Main Advanced BIOS SETUP UTILITY Power Boot Tools Exit Suspend Mode ACPI 2.0 Support ACPI APIC support APM Configuration Hardware Monitor [Auto] [Disabled] [EDniOsapabtbilloendesd] Enabled Use [ENTER], [TAB] or [SHIFT-TAB...
... Megatrends, Inc. are the navigation keys for that is not userconfigurable.A configurable field is enclosed in the menu and change the settings. Some of the navigation keys differ from one screen to another. 2.2.4 Menu items The highlighted item on the Pop-up window with the configuration options for that menu. Main Advanced BIOS SETUP UTILITY Power Boot Tools Exit Suspend Mode ACPI 2.0 Support ACPI APIC support APM Configuration Hardware Monitor [Auto] [Disabled] [EDniOsapabtbilloendesd] Enabled Use [ENTER], [TAB] or [SHIFT-TAB...
User Manual
Page 45
... DMA, and SMART monitoring). Setting to navigate through them. Select ARMD (ATAPI Removable Media Device) if your device is a separate sub-menu for information on the menu screen items and how to Auto allows automatic selection of IDE drive. Refer to display the IDE/SATA device information. These items show Not Detected if no IDE/SATA device is installed in the system. ASUS P5G41T-M LX Series 2-7 Storage Configuration System Information Select Screen Select Item +- Main Advanced BIOS SETUP UTILITY Power Boot Tools Exit...
... DMA, and SMART monitoring). Setting to navigate through them. Select ARMD (ATAPI Removable Media Device) if your device is a separate sub-menu for information on the menu screen items and how to Auto allows automatic selection of IDE drive. Refer to display the IDE/SATA device information. These items show Not Detected if no IDE/SATA device is installed in the system. ASUS P5G41T-M LX Series 2-7 Storage Configuration System Information Select Screen Select Item +- Main Advanced BIOS SETUP UTILITY Power Boot Tools Exit...
User Manual
Page 46
... SMART Monitoring [Auto] Sets the Smart Monitoring, Analysis, and Reporting Technology. ATA/IDE Configuration [Enhanced] Allows you to configure the item. IDE Detect Time Out (Sec) [35] Selects the time out value for the SATA devices installed in this mode, and if the device was not previously formatted with LBA mode disabled. Configuration options: [0] [5] [10] [15] [20] [25] [30] [35] 2-8 Chapter 2: BIOS information Configuration options: [Auto] [0] [1] [2] [3] [4] DMA Mode [Auto] Selects the DMA mode. Configuration options: [Disabled] [Enabled] 2.3.4 Storage Configuration...
... SMART Monitoring [Auto] Sets the Smart Monitoring, Analysis, and Reporting Technology. ATA/IDE Configuration [Enhanced] Allows you to configure the item. IDE Detect Time Out (Sec) [35] Selects the time out value for the SATA devices installed in this mode, and if the device was not previously formatted with LBA mode disabled. Configuration options: [0] [5] [10] [15] [20] [25] [30] [35] 2-8 Chapter 2: BIOS information Configuration options: [Auto] [0] [1] [2] [3] [4] DMA Mode [Auto] Selects the DMA mode. Configuration options: [Disabled] [Enabled] 2.3.4 Storage Configuration...

User Manual
Page 47
... the optimal settings for PCI/PCIe slots. ASUS P5G41T-M LX Series 2-9 Auto - System Memory Displays the auto-detected system memory. 2.4 Advanced menu The Advanced menu items allow you to adjust the system frequency/voltage. loads overclocking profiles with optimal parameters for the CPU and other system devices. Main Advanced Power BIOS SETUP UTILITY Boot Tools Exit JumperFree Configuration CPU Configuration Chipset Onboard Devices Configuration USB Configuration PCIPnP Adjust System frequency/voltage. 2.4.1 JumperFree Configuration The items in this menu allows you...
... the optimal settings for PCI/PCIe slots. ASUS P5G41T-M LX Series 2-9 Auto - System Memory Displays the auto-detected system memory. 2.4 Advanced menu The Advanced menu items allow you to adjust the system frequency/voltage. loads overclocking profiles with optimal parameters for the CPU and other system devices. Main Advanced Power BIOS SETUP UTILITY Boot Tools Exit JumperFree Configuration CPU Configuration Chipset Onboard Devices Configuration USB Configuration PCIPnP Adjust System frequency/voltage. 2.4.1 JumperFree Configuration The items in this menu allows you...
User Manual
Page 50
...GTT Graphics Memory Size [No VT mode, 2MB] This item is not user- CPU TM Function [Enabled] Enables or disables Intel® CPU Thermal Monitor (TM) function, a CPU overheating protection function. When enabled, the CPU core frequency and voltage are reduced when the CPU overheats. Configuration options: [Disabled] [Enabled] Execute-Disable Bit Capability [Enabled] Allows you to change the advanced chipset settings. When set to [Enabled], you to select the graphics controller as the primary boot device. Configuration options: [Enabled] [Disabled] 2.4.3 Chipset The Chipset menu allows...
...GTT Graphics Memory Size [No VT mode, 2MB] This item is not user- CPU TM Function [Enabled] Enables or disables Intel® CPU Thermal Monitor (TM) function, a CPU overheating protection function. When enabled, the CPU core frequency and voltage are reduced when the CPU overheats. Configuration options: [Disabled] [Enabled] Execute-Disable Bit Capability [Enabled] Allows you to change the advanced chipset settings. When set to [Enabled], you to select the graphics controller as the primary boot device. Configuration options: [Enabled] [Disabled] 2.4.3 Chipset The Chipset menu allows...
User Manual
Page 51
...] ASUS P5G41T-M LX Series 2-13 Configuration options: [Enabled] [Disabled] Front Panel Type [HD Audio] Allows you to enable or disable the boot ROM in the onboard LAN controller. This item appears only when the Onboard LAN item is set to Enabled. Configuration options: [Disabled] [378] [278] [3BC] Parallel Port Mode [ECP] Allows you to select the Serial Port1 base address. If High Definition Audio Front Panel used, set the Parallel Port ECP DMA. Configuration options: [Disabled] [Enabled] Serial Port1 Address [3F8/IRQ4] Allows you to select the Parallel Port mode. DVMT Memory...
...] ASUS P5G41T-M LX Series 2-13 Configuration options: [Enabled] [Disabled] Front Panel Type [HD Audio] Allows you to enable or disable the boot ROM in the onboard LAN controller. This item appears only when the Onboard LAN item is set to Enabled. Configuration options: [Disabled] [378] [278] [3BC] Parallel Port Mode [ECP] Allows you to select the Serial Port1 base address. If High Definition Audio Front Panel used, set the Parallel Port ECP DMA. Configuration options: [Disabled] [Enabled] Serial Port1 Address [3F8/IRQ4] Allows you to select the Parallel Port mode. DVMT Memory...

User Manual
Page 52
...). If detected, the USB controller legacy mode is detected, the item shows None. Setting to [Auto] allows the system to display the configuration options. Configuration options: [Disabled] [Enabled] [Auto] USB 2.0 Controller Mode [HiSpeed] Allows you to set the maximum time that the BIOS waits for Legacy USB storage devices, including USB flash drives and USB hard drives. USB Mass Storage Device Configuration USB Mass Storage Reset Delay [20 Sec] Allows you to change the USB-related features. Configuration options: [Auto] [Floppy] [Forced FDD] [Hard Disk] [CDROM] 2-14 Chapter...
...). If detected, the USB controller legacy mode is detected, the item shows None. Setting to [Auto] allows the system to display the configuration options. Configuration options: [Disabled] [Enabled] [Auto] USB 2.0 Controller Mode [HiSpeed] Allows you to set the maximum time that the BIOS waits for Legacy USB storage devices, including USB flash drives and USB hard drives. USB Mass Storage Device Configuration USB Mass Storage Reset Delay [20 Sec] Allows you to change the USB-related features. Configuration options: [Auto] [Floppy] [Forced FDD] [Hard Disk] [CDROM] 2-14 Chapter...
User Manual
Page 53
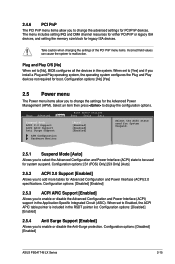
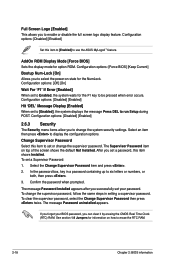
... caution when changing the settings of the PCI PnP menu items. Incorrect field values can cause the system to [No], BIOS configures all the devices in the RSDT pointer list. Plug and Play O/S [No] When set to display the configuration options. Main Advanced Power BIOS SETUP UTILITY Boot Tools Exit Suspend Mode ACPI 2.0 Support ACPI APIC Support Anti Surge Support [Auto] [Enabled] [Enabled] [Enabled] APM Configuration Hardware Monitor Select the ACPI state used for System Suspend. 2.5.1 Suspend Mode [Auto] Allows you to be used for legacy ISA devices.
... caution when changing the settings of the PCI PnP menu items. Incorrect field values can cause the system to [No], BIOS configures all the devices in the RSDT pointer list. Plug and Play O/S [No] When set to display the configuration options. Main Advanced Power BIOS SETUP UTILITY Boot Tools Exit Suspend Mode ACPI 2.0 Support ACPI APIC Support Anti Surge Support [Auto] [Enabled] [Enabled] [Enabled] APM Configuration Hardware Monitor Select the ACPI state used for System Suspend. 2.5.1 Suspend Mode [Auto] Allows you to be used for legacy ISA devices.
User Manual
Page 56
... top of the screen shows the default Not Installed. After you to enable or disable the full screen logo display feature. Full Screen Logo [Enabled] This allows you set a password, this item to set your BIOS password, you to change the system security settings. Configuration options: [Disabled] [Enabled] Set this item to [Enabled] to display the configuration options. AddOn ROM Display Mode [Force BIOS] Sets the display mode for the NumLock. The Supervisor Password item on state for option ROM. In the password box, key in setting a supervisor password.
... top of the screen shows the default Not Installed. After you to enable or disable the full screen logo display feature. Full Screen Logo [Enabled] This allows you set a password, this item to set your BIOS password, you to change the system security settings. Configuration options: [Disabled] [Enabled] Set this item to [Enabled] to display the configuration options. AddOn ROM Display Mode [Force BIOS] Sets the display mode for the NumLock. The Supervisor Password item on state for option ROM. In the password box, key in setting a supervisor password.


