User Manual
Page 11
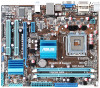
...you for the following items. Motherboard Cables Accessories Application DVD Documentation ASUS P5G41T-M LE motherboard 2 x Serial ATA cables 1 x Ultra DMA 100/66/33 cable 1 x I/O shield ASUS motherboard support DVD User Manual If any of ASUS quality motherboards! The motherboard delivers a host of new features ...the 45nm manufacturing process. This motherboard also supports Intel® CPUs in your motherboard package for buying an ASUS® P5G41T-M LE motherboard! Thank you start installing the motherboard, and hardware devices on it another standout in the long line ...
...you for the following items. Motherboard Cables Accessories Application DVD Documentation ASUS P5G41T-M LE motherboard 2 x Serial ATA cables 1 x Ultra DMA 100/66/33 cable 1 x I/O shield ASUS motherboard support DVD User Manual If any of ASUS quality motherboards! The motherboard delivers a host of new features ...the 45nm manufacturing process. This motherboard also supports Intel® CPUs in your motherboard package for buying an ASUS® P5G41T-M LE motherboard! Thank you start installing the motherboard, and hardware devices on it another standout in the long line ...
User Manual
Page 13
...depends on the system configuration. • ASUS Express Gate supports file uploading from SATA HDDs, ODDs and USB drives. feature automatically restores the CPU default settings when the system hangs due to their default settings. ASUS P5G41T-M LE 1-3 Simply shut down and reboot the ...system, and the BIOS automatically restores the CPU parameters to overclocking failure. ASUS Express Gate Express Gate is in line with the ASUS vision of Hazardous Substances (RoHS). C.P.R. (CPU...
...depends on the system configuration. • ASUS Express Gate supports file uploading from SATA HDDs, ODDs and USB drives. feature automatically restores the CPU default settings when the system hangs due to their default settings. ASUS P5G41T-M LE 1-3 Simply shut down and reboot the ...system, and the BIOS automatically restores the CPU parameters to overclocking failure. ASUS Express Gate Express Gate is in line with the ASUS vision of Hazardous Substances (RoHS). C.P.R. (CPU...
User Manual
Page 15
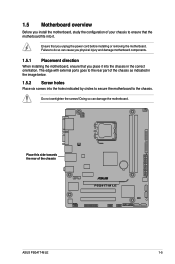
... image below. 1.5.2 Screw holes Place six screws into it into the chassis in the correct orientation. Place this side towards the rear of the chassis ASUS P5G41T-M LE 1-5 Do not overtighten the screws! Doing so can cause you physical injury and damage motherboard components. 1.5.1 Placement direction When installing the motherboard, ensure that you...
... image below. 1.5.2 Screw holes Place six screws into it into the chassis in the correct orientation. Place this side towards the rear of the chassis ASUS P5G41T-M LE 1-5 Do not overtighten the screws! Doing so can cause you physical injury and damage motherboard components. 1.5.1 Placement direction When installing the motherboard, ensure that you...
User Manual
Page 17
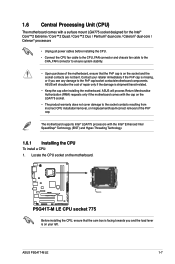
Locate the CPU socket on the LGA775 socket. • The product warranty does not cover damage to the PnP cap/socket contacts/motherboard components. ASUS P5G41T-M LE 1-7 Contact your retailer immediately if the PnP cap is missing, or if you and the load lever is on the socket and the socket contacts... are not bent. Before installing the CPU, ensure that the PnP cap is on your left. ASUS will shoulder the cost of the motherboard, ensure that the cam box is facing towards you see any damage to the socket contacts resulting from...
Locate the CPU socket on the LGA775 socket. • The product warranty does not cover damage to the PnP cap/socket contacts/motherboard components. ASUS P5G41T-M LE 1-7 Contact your retailer immediately if the PnP cap is missing, or if you and the load lever is on the socket and the socket contacts... are not bent. Before installing the CPU, ensure that the PnP cap is on your left. ASUS will shoulder the cost of the motherboard, ensure that the cam box is facing towards you see any damage to the socket contacts resulting from...

User Manual
Page 19
... push the load lever (B) until it is spread in an even thin layer. If so, skip this step. DO NOT eat the Thermal Interface Material. B ASUS P5G41T-M LE 1-9 6. If it off immediately, and seek professional medical help. To prevent contaminating the paste, DO NOT spread the paste with pre-applied thermal paste.
... push the load lever (B) until it is spread in an even thin layer. If so, skip this step. DO NOT eat the Thermal Interface Material. B ASUS P5G41T-M LE 1-9 6. If it off immediately, and seek professional medical help. To prevent contaminating the paste, DO NOT spread the paste with pre-applied thermal paste.
User Manual
Page 21
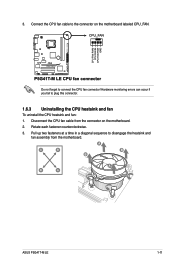
A A B B B A B A ASUS P5G41T-M LE 1-11 Hardware monitoring errors can occur if you fail to disengage the heatsink and fan assembly from the connector on the motherboard labeled CPU_FAN. Disconnect the CPU fan cable from the motherboard. Pull up two fasteners at a time in a diagonal sequence to plug this connector. 1.6.3 Uninstalling the CPU heatsink and fan To uninstall the CPU heatsink and fan: 1. Connect the CPU fan cable to connect the CPU fan connector! Do not forget to the connector on the motherboard. 2. Rotate each fastener counterclockwise. 3. 3.
A A B B B A B A ASUS P5G41T-M LE 1-11 Hardware monitoring errors can occur if you fail to disengage the heatsink and fan assembly from the connector on the motherboard labeled CPU_FAN. Disconnect the CPU fan cable from the motherboard. Pull up two fasteners at a time in a diagonal sequence to plug this connector. 1.6.3 Uninstalling the CPU heatsink and fan To uninstall the CPU heatsink and fan: 1. Connect the CPU fan cable to connect the CPU fan connector! Do not forget to the connector on the motherboard. 2. Rotate each fastener counterclockwise. 3. 3.
User Manual
Page 23
...Mb) chips or less. • The default memory operation frequency is the standard way of the following: - P5G41T-M LE Motherboard Qualified Vendors Lists (QVL) DDR3-1066 MHz capability Vendor Part No. Size SS/ DS Crucial CT12864BA1067.8FF 1024MB...8226; Micron 9HF22D9KPT 7- • • Samsung SEC 901 HCF8 K4B1G0846E - - • • SAMSUNG 846 K4B2G0846B-HCF8 -- • • ASUS P5G41T-M LE 1-13 1.7.2 Memory configurations You may operate at a lower frequency than the vendor-marked value. • For system stability, use of memory, we recommend ...
...Mb) chips or less. • The default memory operation frequency is the standard way of the following: - P5G41T-M LE Motherboard Qualified Vendors Lists (QVL) DDR3-1066 MHz capability Vendor Part No. Size SS/ DS Crucial CT12864BA1067.8FF 1024MB...8226; Micron 9HF22D9KPT 7- • • Samsung SEC 901 HCF8 K4B1G0846E - - • • SAMSUNG 846 K4B2G0846B-HCF8 -- • • ASUS P5G41T-M LE 1-13 1.7.2 Memory configurations You may operate at a lower frequency than the vendor-marked value. • For system stability, use of memory, we recommend ...

User Manual
Page 25
... 1 Unlocked retaining clip A DDR3 DIMM is properly seated. Locked Retaining Clip 1.7.4 Removing a DIMM To remove a DIMM: 1. Remove the DIMM from the socket. 2 1 DDR3 DIMM notch ASUS P5G41T-M LE 1-15 To install a DIMM: 1. The DIMM might get damaged when it fits in place 3 and the DIMM is keyed with a notch so that the notch...
... 1 Unlocked retaining clip A DDR3 DIMM is properly seated. Locked Retaining Clip 1.7.4 Removing a DIMM To remove a DIMM: 1. Remove the DIMM from the socket. 2 1 DDR3 DIMM notch ASUS P5G41T-M LE 1-15 To install a DIMM: 1. The DIMM might get damaged when it fits in place 3 and the DIMM is keyed with a notch so that the notch...
User Manual
Page 27
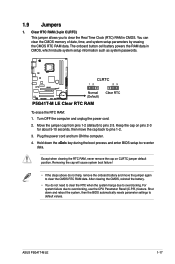
... battery and move the cap back to clear the Real Time Clock (RTC) RAM in CMOS, which include system setup information such as system passwords. ASUS P5G41T-M LE 1-17
... battery and move the cap back to clear the Real Time Clock (RTC) RAM in CMOS, which include system setup information such as system passwords. ASUS P5G41T-M LE 1-17
User Manual
Page 29
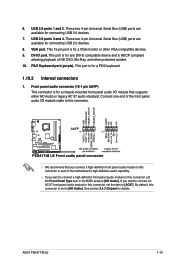
... Front Panel Type item in the BIOS setup to this connector. • We recommend that supports either HD Audio or legacy AC`97 audio standard. ASUS P5G41T-M LE 1-19 VGA port. Connect one end of the front panel audio I /O module that you connect a high-definition front panel audio module to this connector to...
... Front Panel Type item in the BIOS setup to this connector. • We recommend that supports either HD Audio or legacy AC`97 audio standard. ASUS P5G41T-M LE 1-19 VGA port. Connect one end of the front panel audio I /O module that you connect a high-definition front panel audio module to this connector to...
User Manual
Page 31
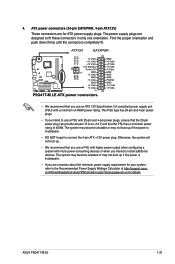
... higher power output when configuring a system with 20-pin and 4-pin power plugs, ensure that the 20-pin power plug can provide at http://support.asus. ASUS P5G41T-M LE 1-21
... higher power output when configuring a system with 20-pin and 4-pin power plugs, ensure that the 20-pin power plug can provide at http://support.asus. ASUS P5G41T-M LE 1-21
User Manual
Page 33
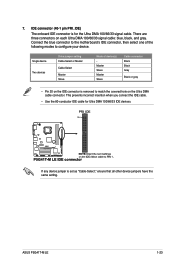
... prevents incorrect insertion when you connect the IDE cable. • Use the 80-conductor IDE cable for the Ultra DMA 100/66/33 signal cable. ASUS P5G41T-M LE 1-23 Single device Two devices Drive jumper setting Cable-Select or Master Cable-Select Master Slave Mode of the following modes to configure your device...
... prevents incorrect insertion when you connect the IDE cable. • Use the 80-conductor IDE cable for the Ultra DMA 100/66/33 signal cable. ASUS P5G41T-M LE 1-23 Single device Two devices Drive jumper setting Cable-Select or Master Cable-Select Master Slave Mode of the following modes to configure your device...

User Manual
Page 35
Connect the USB module cable to any of these connectors, then install the module to the USB connectors. Doing so will damage the motherboard! 9. ASUS P5G41T-M LE 1-25 LPT is standardized as a printer. USB connectors (10-1 pin USB56, USB78) These connectors are for USB 2.0 ports. Never connect a 1394 cable to a slot opening ...
Connect the USB module cable to any of these connectors, then install the module to the USB connectors. Doing so will damage the motherboard! 9. ASUS P5G41T-M LE 1-25 LPT is standardized as a printer. USB connectors (10-1 pin USB56, USB78) These connectors are for USB 2.0 ports. Never connect a 1394 cable to a slot opening ...
User Manual
Page 37
...support DVD in the future. Quit all Windows® applications before you update the BIOS using the ASUS Update utility. 2.1.1 ASUS Update utility The ASUS Update is a utility that allows you to manage, save, and update the motherboard BIOS in Windows&#...ASUS > ASUSUpdate > ASUSUpdate to complete the installation. Select the ASUS FTP site nearest you wish to avoid network traffic, or click Auto Select then click Next. Chapter 2 BIOS information 2.1 Managing and updating your BIOS Save a copy of the updating process: Updating from the Internet, then click Next. b. ASUS P5G41T-M LE...
...support DVD in the future. Quit all Windows® applications before you update the BIOS using the ASUS Update utility. 2.1.1 ASUS Update utility The ASUS Update is a utility that allows you to manage, save, and update the motherboard BIOS in Windows&#...ASUS > ASUSUpdate > ASUSUpdate to complete the installation. Select the ASUS FTP site nearest you wish to avoid network traffic, or click Auto Select then click Next. Chapter 2 BIOS information 2.1 Managing and updating your BIOS Save a copy of the updating process: Updating from the Internet, then click Next. b. ASUS P5G41T-M LE...
User Manual
Page 39
...file. 4. Ensure to load the BIOS default settings to restore the BIOS file when it fails or gets corrupted during the updating process. ASUS P5G41T-M LE 2-3 Recovering the BIOS To recover the BIOS: 1. The utility automatically checks the devices for details. Select the Load Setup Defaults item ...the Exit menu. Turn off the system after the utility completes the updating process and turn on the system. 2. 2.1.3 ASUS CrashFree BIOS The ASUS CrashFree BIOS is an auto recovery tool that allows you to ensure system compatibility and stability. Download the latest BIOS file from...
...file. 4. Ensure to load the BIOS default settings to restore the BIOS file when it fails or gets corrupted during the updating process. ASUS P5G41T-M LE 2-3 Recovering the BIOS To recover the BIOS: 1. The utility automatically checks the devices for details. Select the Load Setup Defaults item ...the Exit menu. Turn off the system after the utility completes the updating process and turn on the system. 2. 2.1.3 ASUS CrashFree BIOS The ASUS CrashFree BIOS is an auto recovery tool that allows you to ensure system compatibility and stability. Download the latest BIOS file from...
User Manual
Page 41
... 1985-2009, American Megatrends, Inc. Boot For changing the system boot configuration. Power For changing the advanced power management (APM) configuration. Select Screen Select Item +- ASUS P5G41T-M LE 2-5 Tools For configuring options for special functions. Exit For selecting the exit options and loading default settings. To select an item on the menu bar...
... 1985-2009, American Megatrends, Inc. Boot For changing the system boot configuration. Power For changing the advanced power management (APM) configuration. Select Screen Select Item +- ASUS P5G41T-M LE 2-5 Tools For configuring options for special functions. Exit For selecting the exit options and loading default settings. To select an item on the menu bar...
User Manual
Page 43
... detects the presence of IDE drive. Use [+] or [-] to set the system time. 2.3.2 System Date [Day xx/xx/xxxx] Allows you are not user-configurable. ASUS P5G41T-M LE 2-7 There is either a ZIP, LS-120, or MO drive. These items show Not Detected if no IDE/SATA device is installed in the system.
... detects the presence of IDE drive. Use [+] or [-] to set the system time. 2.3.2 System Date [Day xx/xx/xxxx] Allows you are not user-configurable. ASUS P5G41T-M LE 2-7 There is either a ZIP, LS-120, or MO drive. These items show Not Detected if no IDE/SATA device is installed in the system.
User Manual
Page 45
... the preset overclocking configuration options: Manual - Select either one of the general system specifications. loads the optimal settings for the CPU and other system devices. ASUS P5G41T-M LE 2-9 loads overclocking profiles with optimal parameters for stability when overclocking. Processor Displays the auto-detected CPU specification. Take caution when changing the settings of CPU...
... the preset overclocking configuration options: Manual - Select either one of the general system specifications. loads the optimal settings for the CPU and other system devices. ASUS P5G41T-M LE 2-9 loads overclocking profiles with optimal parameters for stability when overclocking. Processor Displays the auto-detected CPU specification. Take caution when changing the settings of CPU...
User Manual
Page 47
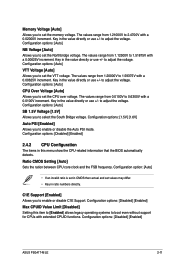
... systems to set the CPU over voltage. Configuration options: [1.5V] [1.6V] Auto PSI [Enabled] Allows you to 0.6300V with a 0.00625V increment. Configuration options: [Disabled] [Enabled] ASUS P5G41T-M LE 2-11 The values range from 1.20000V to enable or disable the Auto PSI mode. The values range from 0.0100V to set values may differ. •...
... systems to set the CPU over voltage. Configuration options: [1.5V] [1.6V] Auto PSI [Enabled] Allows you to 0.6300V with a 0.00625V increment. Configuration options: [Disabled] [Enabled] ASUS P5G41T-M LE 2-11 The values range from 1.20000V to enable or disable the Auto PSI mode. The values range from 0.0100V to set values may differ. •...
User Manual
Page 49
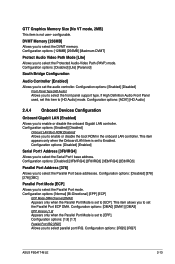
... Audio Controller [Enabled] Allows you to select the DVMT memory. This item allows you to set the Parallel Port ECP DMA. Configuration options: [IRQ5] [IRQ7] ASUS P5G41T-M LE 2-13 Configuration options: [Disabled] [Enabled] Serial Port1 Address [3F8/IRQ4] Allows you to select the Serial Port1 base address. Configuration options: [Disabled] [3F8/IRQ4] [2F8...
... Audio Controller [Enabled] Allows you to select the DVMT memory. This item allows you to set the Parallel Port ECP DMA. Configuration options: [IRQ5] [IRQ7] ASUS P5G41T-M LE 2-13 Configuration options: [Disabled] [Enabled] Serial Port1 Address [3F8/IRQ4] Allows you to select the Serial Port1 base address. Configuration options: [Disabled] [3F8/IRQ4] [2F8...


