
Motherboard Installation Guide
Page 3
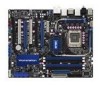
... Notices...viii Safety information ix About this guide x P5E64 WS Evolution specifications xii Chapter 1: Product introduction 1.1 Welcome 1-1 1.2 Package contents 1-1 1.3 Special features 1-2 1.3.1 Product highlights 1-2 1.3.2 ASUS special features 1-4 1.3.3 ASUS stylish features 1-7 1.3.4 ASUS intelligent overclocking features 1-7 Chapter 2: Hardware information 2.1 Before you proceed 2-1 2.2 Motherboard overview 2-2 2.2.1 Placement direction 2-2 2.2.2 Screw holes 2-2 2.2.3 Motherboard layout 2-3 2.2.4 Layout contents 2-4 2.3 Central Processing Unit (CPU 2-6 2.3.1 Installing...
... Notices...viii Safety information ix About this guide x P5E64 WS Evolution specifications xii Chapter 1: Product introduction 1.1 Welcome 1-1 1.2 Package contents 1-1 1.3 Special features 1-2 1.3.1 Product highlights 1-2 1.3.2 ASUS special features 1-4 1.3.3 ASUS stylish features 1-7 1.3.4 ASUS intelligent overclocking features 1-7 Chapter 2: Hardware information 2.1 Before you proceed 2-1 2.2 Motherboard overview 2-2 2.2.1 Placement direction 2-2 2.2.2 Screw holes 2-2 2.2.3 Motherboard layout 2-3 2.2.4 Layout contents 2-4 2.3 Central Processing Unit (CPU 2-6 2.3.1 Installing...
Motherboard Installation Guide
Page 13
... 200MHz up to 3200MHz - ASUS New Generation 8-Phase Power Design - ASUS Q-Connector - ASUS SASsaby cards support ASUS Quiet Thermal Solution: - ASUS Fanless Design: Pure Copper Heat-pipe solution - ASUS O.C. vCPU PLL: 64-step Chipset voltage control SFS (Stepless Frequency Selection) - P5E64 WS Evolution specifications AI Lifestyle Unique Features Other Features ASUS Exclusive Overclocking Features ASUS Power Saving solution: - G.P. ASUS Q-Fan 2 ASUS EZ DIY: - Memory...
... 200MHz up to 3200MHz - ASUS New Generation 8-Phase Power Design - ASUS Q-Connector - ASUS SASsaby cards support ASUS Quiet Thermal Solution: - ASUS Fanless Design: Pure Copper Heat-pipe solution - ASUS O.C. vCPU PLL: 64-step Chipset voltage control SFS (Stepless Frequency Selection) - P5E64 WS Evolution specifications AI Lifestyle Unique Features Other Features ASUS Exclusive Overclocking Features ASUS Power Saving solution: - G.P. ASUS Q-Fan 2 ASUS EZ DIY: - Memory...
Motherboard Installation Guide
Page 21
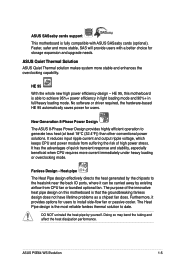
HE 95, this motherboard is fully compatible with a better choice for users. Fanless Design - ASUS P5E64 WS Evolution 1-5 Furthermore, it can be carried away by yourself. HE 95 With the whole new high power efficiency design - New Generation 8-Phase Power Design The ASUS 8-Phase Power Design ...from suffering the risk of quick transient response and stability, especially beneficial when CPU requires more stable and enhances the overclocking capability. Heat-pipe The Heat Pipe design effectively directs the heat generated by the chipsets to the heatsink near the...
HE 95, this motherboard is fully compatible with a better choice for users. Fanless Design - ASUS P5E64 WS Evolution 1-5 Furthermore, it can be carried away by yourself. HE 95 With the whole new high power efficiency design - New Generation 8-Phase Power Design The ASUS 8-Phase Power Design ...from suffering the risk of quick transient response and stability, especially beneficial when CPU requires more stable and enhances the overclocking capability. Heat-pipe The Heat Pipe design effectively directs the heat generated by the chipsets to the heatsink near the...
Motherboard Installation Guide
Page 23
... you to achieve the most precise setting for the ultimate customized overclocking configuration. Profile The motherboard features the ASUS O.C. ASUS EZ Flash 2 EZ Flash 2 is a user-friendly BIOS update utility. See page 4-5 and 4-39 for details. ASUS CrashFree BIOS 3 The ASUS CrashFree BIOS 3 allows users to conveniently store or load multiple... containing the BIOS file. Update your favorite photo into a 256-color boot logo for details. See page 4-36 for details. ASUS P5E64 WS Evolution 1-7 Simply press the predefined hotkey to share and distribute their favorite settings.
... you to achieve the most precise setting for the ultimate customized overclocking configuration. Profile The motherboard features the ASUS O.C. ASUS EZ Flash 2 EZ Flash 2 is a user-friendly BIOS update utility. See page 4-5 and 4-39 for details. ASUS CrashFree BIOS 3 The ASUS CrashFree BIOS 3 allows users to conveniently store or load multiple... containing the BIOS file. Update your favorite photo into a 256-color boot logo for details. See page 4-36 for details. ASUS P5E64 WS Evolution 1-7 Simply press the predefined hotkey to share and distribute their favorite settings.

Motherboard Installation Guide
Page 24
Simply shut down and reboot the system, and the BIOS automatically restores the CPU default setting for each parameter. Due to overclocking. feature of the motherboard BIOS allows automatic re-setting to the BIOS default settings in case the system hangs due to the chipset behavior, AC power off is required before using C.P.R. When the system hangs due to open the system chassis and clear the RTC data. eliminates the need to overclocking, C.P.R. function. 1-8 Chapter 1: Product Introduction C.P.R. (CPU Parameter Recall) The C.P.R.
Simply shut down and reboot the system, and the BIOS automatically restores the CPU default setting for each parameter. Due to overclocking. feature of the motherboard BIOS allows automatic re-setting to the BIOS default settings in case the system hangs due to the chipset behavior, AC power off is required before using C.P.R. When the system hangs due to open the system chassis and clear the RTC data. eliminates the need to overclocking, C.P.R. function. 1-8 Chapter 1: Product Introduction C.P.R. (CPU Parameter Recall) The C.P.R.

Motherboard Installation Guide
Page 49
2.6 Jumpers 1. Move the jumper cap from pins 1-2 (default) to overclocking. After the CMOS clearance, reinstall the battery. ® CLRTC P5E64 WS EVOLUTION 12 23 Normal (Default) Clear RTC P5E64 WS Evolution Clear RTC RAM • You do not help, remove the onboard battery and move the cap back to the ...power off and on the power supply or unplug and plug the power cord before reboot the system. You must turn ON the computer. 4. ASUS P5E64 WS Evolution 2-23 To erase the RTC RAM: 1. Except when clearing the RTC RAM, never remove the cap on pins 2-3 for about 5~10 ...
2.6 Jumpers 1. Move the jumper cap from pins 1-2 (default) to overclocking. After the CMOS clearance, reinstall the battery. ® CLRTC P5E64 WS EVOLUTION 12 23 Normal (Default) Clear RTC P5E64 WS Evolution Clear RTC RAM • You do not help, remove the onboard battery and move the cap back to the ...power off and on the power supply or unplug and plug the power cord before reboot the system. You must turn ON the computer. 4. ASUS P5E64 WS Evolution 2-23 To erase the RTC RAM: 1. Except when clearing the RTC RAM, never remove the cap on pins 2-3 for about 5~10 ...
Motherboard Installation Guide
Page 87
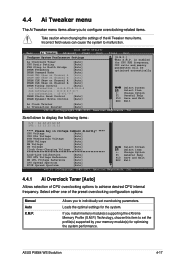
ASUS P5E64 WS Evolution 4-17 Scroll down to North Bridge [Auto] DRAM Frequency [Auto] DRAM Command ...Ai Transaction Booster [Auto] v02.61 (C)Copyright 1985-2007, American Megatrends, Inc. Allows you to configure overclocking-related items. Take caution when changing the settings of the Ai Tweaker menu items. Incorrect field values can ... system to malfunction. Main Ai Tweaker BIOS SETUP UTILITY Advanced Power Boot Tools Exit Configure System Performance Settings Ai Overclock Tuner [Auto] CPU Ratio Setting [Auto] FSB Strap to display the following items: C/P : A1 A2 ...
ASUS P5E64 WS Evolution 4-17 Scroll down to North Bridge [Auto] DRAM Frequency [Auto] DRAM Command ...Ai Transaction Booster [Auto] v02.61 (C)Copyright 1985-2007, American Megatrends, Inc. Allows you to configure overclocking-related items. Take caution when changing the settings of the Ai Tweaker menu items. Incorrect field values can ... system to malfunction. Main Ai Tweaker BIOS SETUP UTILITY Advanced Power Boot Tools Exit Configure System Performance Settings Ai Overclock Tuner [Auto] CPU Ratio Setting [Auto] FSB Strap to display the following items: C/P : A1 A2 ...

Motherboard Installation Guide
Page 88
...the table below for the following two items (FSB Frequency and PCIE Freuency) on the next page appear only when you set the Ai Overclock Tuner item to [X.M.P.]. mode supported by typing the desired values using the keyboard and press the key. Configuration options: [Disabled] [Profile... #2] To obtain the best performance of the X.M.P. 1800/1600 DIMM, install only one DIMM on the motherboard. eXtreme Memory Profile [Disabled] This item appears only when you set the Ai Overclock Tuner item to [Manual]. 4-18 Chapter 4: BIOS setup Allows you to set to select the X.M.P. DIMM...
...the table below for the following two items (FSB Frequency and PCIE Freuency) on the next page appear only when you set the Ai Overclock Tuner item to [X.M.P.]. mode supported by typing the desired values using the keyboard and press the key. Configuration options: [Disabled] [Profile... #2] To obtain the best performance of the X.M.P. 1800/1600 DIMM, install only one DIMM on the motherboard. eXtreme Memory Profile [Disabled] This item appears only when you set the Ai Overclock Tuner item to [Manual]. 4-18 Chapter 4: BIOS setup Allows you to set to select the X.M.P. DIMM...

Motherboard Installation Guide
Page 89
...] to provide possibility to accelerate DRAM performance or [2N] to enhance DRAM overclocking ability. You can also type the desired CPU frequency using the numeric keypad. Use the and keys to adjust the FSB frequency. Configuration options: [Auto] [1N] [2N] ASUS P5E64 WS Evolution 4-19 The values range from 100 to 180. 4.4.4 DRAM Frequency [Auto...
...] to provide possibility to accelerate DRAM performance or [2N] to enhance DRAM overclocking ability. You can also type the desired CPU frequency using the numeric keypad. Use the and keys to adjust the FSB frequency. Configuration options: [Auto] [1N] [2N] ASUS P5E64 WS Evolution 4-19 The values range from 100 to 180. 4.4.4 DRAM Frequency [Auto...
Motherboard Installation Guide
Page 90
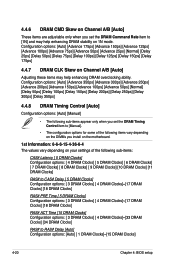
... 150ps] [Delay 175ps] 4.4.7 DRAM CLK Skew on Channel A/B [Auto] Adjusting these items may help enhancing DRAM overclocking ability. 4.4.6 DRAM CMD Skew on Channel A/B [Auto] These items are adjustable only when you install on the motherboard. 1st Information: 6-6-6-15-4-36-6-4 The values vary depending on your settings of the following sub-items: CAS...
... 150ps] [Delay 175ps] 4.4.7 DRAM CLK Skew on Channel A/B [Auto] Adjusting these items may help enhancing DRAM overclocking ability. 4.4.6 DRAM CMD Skew on Channel A/B [Auto] These items are adjustable only when you install on the motherboard. 1st Information: 6-6-6-15-4-36-6-4 The values vary depending on your settings of the following sub-items: CAS...

Motherboard Installation Guide
Page 92
... setup Configuration options: [Auto] [Disabled] [Enabled] 4.4.10 DRAM Dynamic Write Control [Auto] Adjusting this item to accelerate DRAM performance. Set this item might enhance DRAM overclocking ability. The number of CHA/B PH1/2/3/4/5 [Disabled] Set this item to [Enabled] to apply enhancement on DRAM Channel A and B, Phase 1 to REF Delay [Auto] Configuration... [Strong] or [Stronger] to a higher level for better compatibility or a lower level for better performance. Common Performance Level [05] Set this item might enhance DRAM overclocking ability.
... setup Configuration options: [Auto] [Disabled] [Enabled] 4.4.10 DRAM Dynamic Write Control [Auto] Adjusting this item to accelerate DRAM performance. Set this item might enhance DRAM overclocking ability. The number of CHA/B PH1/2/3/4/5 [Disabled] Set this item to [Enabled] to apply enhancement on DRAM Channel A and B, Phase 1 to REF Delay [Auto] Configuration... [Strong] or [Stronger] to a higher level for better compatibility or a lower level for better performance. Common Performance Level [05] Set this item might enhance DRAM overclocking ability.

Motherboard Installation Guide
Page 94
... voltage. Configuration options: [Auto] [Disabled] 4-24 Chapter 4: BIOS setup Set to [Normal] to follow Intel specifications or [Performance] to enhance PCIE overclocking ability or [Auto] for EMI control. Configuration options: [Auto] [0.67x] [0.65x] [0.63x] [0.62x] 4.4.22 NB GTL Voltage Reference [Auto] ...: [Auto] [Disabled] 4.4.24 PCIE Spread Spectrum [Auto] Set to [Disabled] to improve CPU VDroop directly. Different ratio might enhance CPU overclocking ability. The values range from 0.70V to 1.00V with a 0.15V interval. 4.4.19 Clock Over-Charging Voltage [Auto] Allows you to set...
... voltage. Configuration options: [Auto] [Disabled] 4-24 Chapter 4: BIOS setup Set to [Normal] to follow Intel specifications or [Performance] to enhance PCIE overclocking ability or [Auto] for EMI control. Configuration options: [Auto] [0.67x] [0.65x] [0.63x] [0.62x] 4.4.22 NB GTL Voltage Reference [Auto] ...: [Auto] [Disabled] 4.4.24 PCIE Spread Spectrum [Auto] Set to [Disabled] to improve CPU VDroop directly. Different ratio might enhance CPU overclocking ability. The values range from 0.70V to 1.00V with a 0.15V interval. 4.4.19 Clock Over-Charging Voltage [Auto] Allows you to set...

Motherboard Installation Guide
Page 137
...-clicking the AI Suite icon on the Windows® OS taskbar and click the AI Booster button on the taskbar allow you to overclock the CPU speed in WIndows® environment without the hassle of booting the BIOS. The options on the AI Suite main window.... ASUS P��5�E�6�4��W��S��E�v�o�lu�t�io�n� 5-23 5.3.8 ASUS AI Booster The ASUS AI Booster application allows you to use the default settings, adjust CPU/...
...-clicking the AI Suite icon on the Windows® OS taskbar and click the AI Booster button on the taskbar allow you to overclock the CPU speed in WIndows® environment without the hassle of booting the BIOS. The options on the AI Suite main window.... ASUS P��5�E�6�4��W��S��E�v�o�lu�t�io�n� 5-23 5.3.8 ASUS AI Booster The ASUS AI Booster application allows you to use the default settings, adjust CPU/...


