
P4SP-MX SE English User Manual E1676a
Page 2
... AND SHOULD NOT BE CONSTRUED AS A COMMITMENT BY ASUS. ASUS ASSUMES NO RESPONSIBILITY OR LIABILITY FOR ANY ERRORS OR INACCURACIES THAT MAY APPEAR IN THIS MANUAL, INCLUDING THE PRODUCTS AND SOFTWARE DESCRIBED IN IT. IN NO EVENT SHALL ASUS, ITS DIRECTORS, OFFICERS, EMPLOYEES OR AGENTS BE LIABLE...is defaced or missing. Products and corporate names appearing in any form or by ASUS; Product warranty or service will not be registered trademarks or copyrights of ASUSTeK COMPUTER INC. ("ASUS"). ASUS PROVIDES THIS MANUAL "AS IS" WITHOUT WARRANTY OF ANY KIND, EITHER EXPRESS OR IMPLIED, INCLUDING ...
... AND SHOULD NOT BE CONSTRUED AS A COMMITMENT BY ASUS. ASUS ASSUMES NO RESPONSIBILITY OR LIABILITY FOR ANY ERRORS OR INACCURACIES THAT MAY APPEAR IN THIS MANUAL, INCLUDING THE PRODUCTS AND SOFTWARE DESCRIBED IN IT. IN NO EVENT SHALL ASUS, ITS DIRECTORS, OFFICERS, EMPLOYEES OR AGENTS BE LIABLE...is defaced or missing. Products and corporate names appearing in any form or by ASUS; Product warranty or service will not be registered trademarks or copyrights of ASUSTeK COMPUTER INC. ("ASUS"). ASUS PROVIDES THIS MANUAL "AS IS" WITHOUT WARRANTY OF ANY KIND, EITHER EXPRESS OR IMPLIED, INCLUDING ...

P4SP-MX SE English User Manual E1676a
Page 6
... removing signal cables from the motherboard, ensure that all power cables are unplugged. • Seek professional assistance before using the product, make sure all the manuals that the power cables for the devices are unplugged before the signal cables are using, contact your local power company. • If the power supply...
... removing signal cables from the motherboard, ensure that all power cables are unplugged. • Seek professional assistance before using the product, make sure all the manuals that the power cables for the devices are unplugged before the signal cables are using, contact your local power company. • If the power supply...
P4SP-MX SE English User Manual E1676a
Page 30
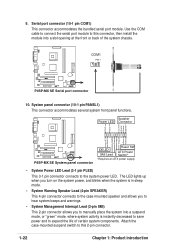
... you to manually place the system into a slot opening at the front or back of certain system components. Attach the case-mounted suspend switch to this 2-pin connector. 1-22 Chapter 1: Product introduction Speaker Power LED Connector PLED+ PLED+5V Ground Ground Speaker +5 V IDELED ExtSMI# Ground PWR Ground Reset Ground ® P4SP-MX SE P4SP-MX SE System... turn on the system power, and blinks when the system is instantly decreased to save power and to the system power LED. COM1 PIN 1 ® P4SP-MX SE P4SP-MX SE Serial port connector 10. 9.
... you to manually place the system into a slot opening at the front or back of certain system components. Attach the case-mounted suspend switch to this 2-pin connector. 1-22 Chapter 1: Product introduction Speaker Power LED Connector PLED+ PLED+5V Ground Ground Speaker +5 V IDELED ExtSMI# Ground PWR Ground Reset Ground ® P4SP-MX SE P4SP-MX SE System... turn on the system power, and blinks when the system is instantly decreased to save power and to the system power LED. COM1 PIN 1 ® P4SP-MX SE P4SP-MX SE Serial port connector 10. 9.
P4SP-MX SE English User Manual E1676a
Page 45
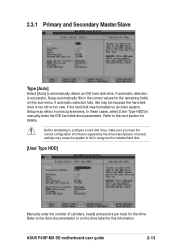
...or on the drive label for this sub-menu. Refer to the next section for the drive. Before attempting to manually enter the IDE hard disk drive parameters. ASUS P4SP-MX SE motherboard user guide 2-13 If the hard disk was formatted on this information. If automatic detection fails, this may be... may detect incorrect parameters. 2.3.1 Primary and Secondary Master/Slave Type [Auto] Select [Auto] to recognize the installed hard disk. [User Type HDD] Manually enter the number of cylinders, heads and sectors per track for details. If automatic detection is too old or too new.
...or on the drive label for this sub-menu. Refer to the next section for the drive. Before attempting to manually enter the IDE hard disk drive parameters. ASUS P4SP-MX SE motherboard user guide 2-13 If the hard disk was formatted on this information. If automatic detection fails, this may be... may detect incorrect parameters. 2.3.1 Primary and Secondary Master/Slave Type [Auto] Select [Auto] to recognize the installed hard disk. [User Type HDD] Manually enter the number of cylinders, heads and sectors per track for details. If automatic detection is too old or too new.
P4SP-MX SE English User Manual E1676a
Page 46
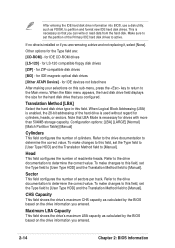
... Select the hard disk drive type in this field, set the Type field to [User Type HDD] and the Translation Method field to [Manual]. for LS-120 compatible floppy disk drives [ZIP] - When Logical Block Addressing (LBA) is enabled, the 28-bit addressing of the hard ... number of cylinders. for IDE magneto optical disk drives [Other ATAPI Device] - Configuration options: [LBA] [LARGE] [Normal] [Match Partition Table] [Manual] Cylinders This field configures the number of sectors per track. To make changes to determine the correct value. If no drive is necessary so that...
... Select the hard disk drive type in this field, set the Type field to [User Type HDD] and the Translation Method field to [Manual]. for LS-120 compatible floppy disk drives [ZIP] - When Logical Block Addressing (LBA) is enabled, the 28-bit addressing of the hard ... number of cylinders. for IDE magneto optical disk drives [Other ATAPI Device] - Configuration options: [LBA] [LARGE] [Normal] [Match Partition Table] [Manual] Cylinders This field configures the number of sectors per track. To make changes to determine the correct value. If no drive is necessary so that...
P4SP-MX SE English User Manual E1676a
Page 47
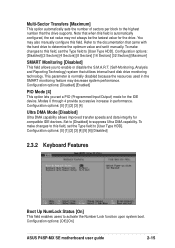
...ASUS P4SP-MX SE motherboard user guide 2-15 Note that when this field, set the Type field to determine the optimum value and set a PIO (Programmed Input/Output) mode for compatible IDE devices. Configuration options: [Disabled] [2 Sectors] [4 Sectors] [8 Sectors] [16 Sectors] [32 Sectors] [Maximum] SMART Monitoring [Disabled] This field allows you set it manually.... You may also manually configure this field, set value may decrease system performance. To make changes to this field.
...ASUS P4SP-MX SE motherboard user guide 2-15 Note that when this field, set the Type field to determine the optimum value and set a PIO (Programmed Input/Output) mode for compatible IDE devices. Configuration options: [Disabled] [2 Sectors] [4 Sectors] [8 Sectors] [16 Sectors] [32 Sectors] [Maximum] SMART Monitoring [Disabled] This field allows you set it manually.... You may also manually configure this field, set value may decrease system performance. To make changes to this field.
P4SP-MX SE English User Manual E1676a
Page 48
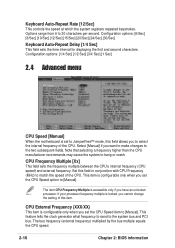
... generator what frequency to send to the two subsequent fields. Configuration options: [1/4 Sec] [1/2 Sec] [3/4 Sec] [1 Sec] 2.4 Advanced menu CPU Speed [Manual] When the motherboard is configurable only when you set to JumperFree™ mode, this field in conjunction with CPU Frequency (MHz) to select the internal... frequency of the CPU. Select [Manual] if you cannot change the setting of this item. The item CPU Frequency Multiple is locked, you want to make changes to the...
... generator what frequency to send to the two subsequent fields. Configuration options: [1/4 Sec] [1/2 Sec] [3/4 Sec] [1 Sec] 2.4 Advanced menu CPU Speed [Manual] When the motherboard is configurable only when you set to JumperFree™ mode, this field in conjunction with CPU Frequency (MHz) to select the internal... frequency of the CPU. Select [Manual] if you cannot change the setting of this item. The item CPU Frequency Multiple is locked, you want to make changes to the...


