

User Manual
Page 5
...ASUS Tablet from the Bluetooth® device 75 PlayTo...76 Launching PlayTo...76 8 Weather and Clock Weather...77 Launching the Weather app...77 Weather home screen...77 Clock...78 World Clock...78 Alarm clock...79 Stopwatch...79 Timer...80 9 Zen Everywhere Special Zen Tools...81 Calculator...81 Quick Memo......83 Sound Recorder...84 Audio Wizard...86 Splendid...87 Power Saver...89 10 Maintain your Zen Keeping your device up-to-date 91 Updating your system...91 Storage...91 Backup and reset...91 Securing your ASUS Tablet...92 5
...ASUS Tablet from the Bluetooth® device 75 PlayTo...76 Launching PlayTo...76 8 Weather and Clock Weather...77 Launching the Weather app...77 Weather home screen...77 Clock...78 World Clock...78 Alarm clock...79 Stopwatch...79 Timer...80 9 Zen Everywhere Special Zen Tools...81 Calculator...81 Quick Memo......83 Sound Recorder...84 Audio Wizard...86 Splendid...87 Power Saver...89 10 Maintain your Zen Keeping your device up-to-date 91 Updating your system...91 Storage...91 Backup and reset...91 Securing your ASUS Tablet...92 5
User Manual
Page 6
... rating. We strongly recommend not to magnetic detectors and wands. This device should only be followed to ASUS-qualified service personnel only. 6 Always obey rules and regulations when in environments with this device. Use only AC...The device screen is made of mobile devices is presented as those used in conveyor belts for long periods to ASUS-qualified service personnel. If the glass gets broken, stop using the device and do not expose the device to...sponge or chamois cloth when cleaning your device. Send device for use your ASUS Tablet data and components.
... rating. We strongly recommend not to magnetic detectors and wands. This device should only be followed to ASUS-qualified service personnel only. 6 Always obey rules and regulations when in environments with this device. Use only AC...The device screen is made of mobile devices is presented as those used in conveyor belts for long periods to ASUS-qualified service personnel. If the glass gets broken, stop using the device and do not expose the device to...sponge or chamois cloth when cleaning your device. Send device for use your ASUS Tablet data and components.
User Manual
Page 8
... is more convenient for ASUS Tablets. Camera With PixelMaster technology, capture those precious moments in or with other apps, to fit your individual needs and make your life easier while letting ... videos. Do It Later Get hold and act on your important emails, interesting websites, or other event alerts or notifications at a glance right from your ASUS Tablet. Explore the intuitive simplicity of...
... is more convenient for ASUS Tablets. Camera With PixelMaster technology, capture those precious moments in or with other apps, to fit your individual needs and make your life easier while letting ... videos. Do It Later Get hold and act on your important emails, interesting websites, or other event alerts or notifications at a glance right from your ASUS Tablet. Explore the intuitive simplicity of...

User Manual
Page 9
... your data. • Leverage Google services conveniently from anywhere. • Automatically backup all your information from anywhere. Follow the onscreen instructions to set up your ASUS Tablet on for the first time, a wizard will guide you through the setup process.
... your data. • Leverage Google services conveniently from anywhere. • Automatically backup all your information from anywhere. Follow the onscreen instructions to set up your ASUS Tablet on for the first time, a wizard will guide you through the setup process.
User Manual
Page 10
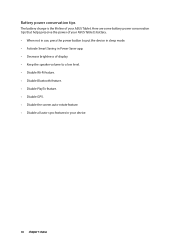
.... • Keep the speaker volume to put the device in sleep mode. • Activate Smart Saving in your ASUS Tablet. Here are some battery power conservation tips that helps preserve the power of your ASUS Tablet's battery. • When not in use, press the power button to a low level. • Disable Wi-Fi feature...
.... • Keep the speaker volume to put the device in sleep mode. • Activate Smart Saving in your ASUS Tablet. Here are some battery power conservation tips that helps preserve the power of your ASUS Tablet's battery. • When not in use, press the power button to a low level. • Disable Wi-Fi feature...
User Manual
Page 11
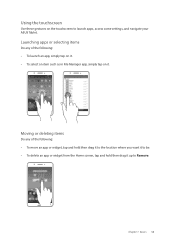
Chapter 1: Basics 11 Moving or deleting items Do any of the following : • To launch an app, simply tap on it. • To select an item such as in File Manager app, simply tap on the touchscreen to be. • To delete an app or widget from the Home screen, tap and hold then drag it . Launching apps or selecting items Do any of the following : • To move an app or widget, tap and hold then drag it to the location where you want it to launch apps, access some settings, and navigate your ASUS Tablet. Using the touchscreen Use these gestures on it up to Remove.
Chapter 1: Basics 11 Moving or deleting items Do any of the following : • To launch an app, simply tap on it. • To select an item such as in File Manager app, simply tap on the touchscreen to be. • To delete an app or widget from the Home screen, tap and hold then drag it . Launching apps or selecting items Do any of the following : • To move an app or widget, tap and hold then drag it to the location where you want it to launch apps, access some settings, and navigate your ASUS Tablet. Using the touchscreen Use these gestures on it up to Remove.
User Manual
Page 15
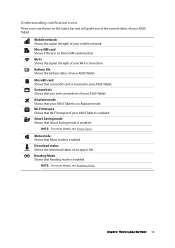
..., see Power Saver. Mute mode Shows that a microSD card is on the status bar and will guide you took screenshots of your ASUS Tablet. NOTE: For more details, see Reading Mode. MicroSD card Shows that Mute mode is enabled. Airplane mode Shows that you of the... current status of your ASUS Tablet. Download status Shows the download status of your ASUS Tablet. Micro SIM card Shows if there is enabled. Screenshots Shows that your ASUS Tablet is inserted in your ASUS Tablet. Wi-Fi Shows the signal strength of your Wi-Fi ...
..., see Power Saver. Mute mode Shows that a microSD card is on the status bar and will guide you took screenshots of your ASUS Tablet. NOTE: For more details, see Reading Mode. MicroSD card Shows that Mute mode is enabled. Airplane mode Shows that you of the... current status of your ASUS Tablet. Download status Shows the download status of your ASUS Tablet. Micro SIM card Shows if there is enabled. Screenshots Shows that your ASUS Tablet is inserted in your ASUS Tablet. Wi-Fi Shows the signal strength of your Wi-Fi ...
User Manual
Page 21
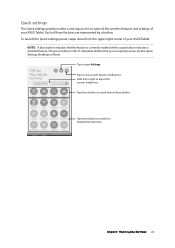
... the Quick Settings Notification Panel. Chapter 2: There's no place like Home 21 Tap these buttons to some of the wireless features and settings of your ASUS Tablet. Tap to open Settings. To launch the Quick settings panel, swipe down from the upper right corner of these utilities. Tap to view current System...
... the Quick Settings Notification Panel. Chapter 2: There's no place like Home 21 Tap these buttons to some of the wireless features and settings of your ASUS Tablet. Tap to open Settings. To launch the Quick settings panel, swipe down from the upper right corner of these utilities. Tap to view current System...

User Manual
Page 22
Tap the box beside the feature to delete all of the listed notifications. Most of your ASUS Tablet. Tap on your ASUS Tablet. NOTE: A checked box indicates that the feature's button is accessible via the ASUS Quick Settings Notification Panel while an unchecked box means the opposite. 3. System notifications From System notifications, you can see the...
Tap the box beside the feature to delete all of the listed notifications. Most of your ASUS Tablet. Tap on your ASUS Tablet. NOTE: A checked box indicates that the feature's button is accessible via the ASUS Quick Settings Notification Panel while an unchecked box means the opposite. 3. System notifications From System notifications, you can see the...

User Manual
Page 23
... the default Swipe option, refer to the following steps: 1. Scroll down the Settings screen and select Lock screen. 3. NOTE: For more details, see Securing your ASUS Tablet. Launch Quick settings then tap . 2. In the next screen, tap Screen lock. 4. Lock Screen By default, the lock screen appears after turning on your touch...
... the default Swipe option, refer to the following steps: 1. Scroll down the Settings screen and select Lock screen. 3. NOTE: For more details, see Securing your ASUS Tablet. Launch Quick settings then tap . 2. In the next screen, tap Screen lock. 4. Lock Screen By default, the lock screen appears after turning on your touch...

User Manual
Page 26
... contact to put the contact in. 4. When you don't have an email account, tap Add account then create one. 3. Setting up your profile Make your ASUS Tablet truly your own and set up my profile. 2. To view your profile info, swipe down from the top right of your screen to add more...
... contact to put the contact in. 4. When you don't have an email account, tap Add account then create one. 3. Setting up your profile Make your ASUS Tablet truly your own and set up my profile. 2. To view your profile info, swipe down from the top right of your screen to add more...

User Manual
Page 32
...from the following exporting options: a. Tick to select the contacts that you wish to import and when done, tap Import. Tap Asus > Contacts then tap > Manage contacts. 2. Tap Asus > Contacts then tap > Manage contacts. 2. Tap Import/export then select from SIM card b. Email account/s b. Device c. ...contacts from the following accounts to storage 3. SIM card 4. When done, tap Export. 32 Chapter 3: Keeping in your ASUS Tablet, email account, or a micro SIM card. 1. Importing contacts Import your contacts and their respective data from one contact source to your...
...from the following exporting options: a. Tick to select the contacts that you wish to import and when done, tap Import. Tap Asus > Contacts then tap > Manage contacts. 2. Tap Asus > Contacts then tap > Manage contacts. 2. Tap Import/export then select from SIM card b. Email account/s b. Device c. ...contacts from the following accounts to storage 3. SIM card 4. When done, tap Export. 32 Chapter 3: Keeping in your ASUS Tablet, email account, or a micro SIM card. 1. Importing contacts Import your contacts and their respective data from one contact source to your...

User Manual
Page 33
... social network account Sync your social network account to add the social network accounts of your contacts, you can integrate social network accounts of your ASUS Tablet. 1. When done, tap or anywhere on the screen. Before you need to log in to display then untick the other contact sources, leaving the social...
... social network account Sync your social network account to add the social network accounts of your contacts, you can integrate social network accounts of your ASUS Tablet. 1. When done, tap or anywhere on the screen. Before you need to log in to display then untick the other contact sources, leaving the social...

User Manual
Page 34
... app. From the lock screen Drag down until the camera app is for reference only. NOTE: Before using your ASUS Tablet is on sleep mode, double-click the volume key to ON. 34 Chapter 4: Your precious moments Capture moments Launching the Camera app Capture images and ...
... app. From the lock screen Drag down until the camera app is for reference only. NOTE: Before using your ASUS Tablet is on sleep mode, double-click the volume key to ON. 34 Chapter 4: Your precious moments Capture moments Launching the Camera app Capture images and ...

User Manual
Page 35
... to proceed from this screen: 1. Tap Agree on the next screen to fully enable the feature and proceed to set up location tagging for your ASUS Tablet's camera, you get started: Tutorial and Image locations. On the Remember Photo Locations screen, tap No thanks to proceed to the camera screen or Yes...
... to proceed from this screen: 1. Tap Agree on the next screen to fully enable the feature and proceed to set up location tagging for your ASUS Tablet's camera, you get started: Tutorial and Image locations. On the Remember Photo Locations screen, tap No thanks to proceed to the camera screen or Yes...

User Manual
Page 36
It also features a video stabilization function that helps prevent shakiness while video recording. Tap the icons to start using your camera and explore the image and video features of a scene Take photos Record videos 36 Chapter 4: Your precious moments Adjust settings Apply image Switch between the front effects and rear cameras Use advanced camera settings Zoom in or zoom out See the gallery Use Turbo Burst for multiple shots of your ASUS Tablet. Camera home screen Your ASUS Tablet's camera is equipped with auto-scene detection and auto-image stabilizer features.
It also features a video stabilization function that helps prevent shakiness while video recording. Tap the icons to start using your camera and explore the image and video features of a scene Take photos Record videos 36 Chapter 4: Your precious moments Adjust settings Apply image Switch between the front effects and rear cameras Use advanced camera settings Zoom in or zoom out See the gallery Use Turbo Burst for multiple shots of your ASUS Tablet. Camera home screen Your ASUS Tablet's camera is equipped with auto-scene detection and auto-image stabilizer features.
User Manual
Page 39
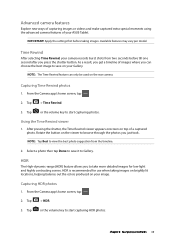
... the Camera app's home screen, tap . 2. Chapter 4: Your precious moments 39 From the Camera app's home screen, tap . 2. Time Rewind After selecting Time Rewind, your ASUS Tablet. HDR is recommended for low-light and highly contrasting scenes. Tap or the volume key to save it to view the best photo suggestion from...
... the Camera app's home screen, tap . 2. Chapter 4: Your precious moments 39 From the Camera app's home screen, tap . 2. Time Rewind After selecting Time Rewind, your ASUS Tablet. HDR is recommended for low-light and highly contrasting scenes. Tap or the volume key to save it to view the best photo suggestion from...

User Manual
Page 40
... capturing the image to capture the scenery. From the Camera app's home screen, tap . 2. NOTE: While panning your ASUS Tablet to the left or right to prevent blurry results. From the Camera app's home screen, tap . 2. Tap when finished. Tap > Night. ... Night photos 1. Panorama Capture images from a wide angle perspective are automatically stitched together using this feature. Tap or the volume key then pan your ASUS Tablet, a timeline of thumbnails appears on low-light situations using Panorama. Capturing panoramic photos 1. Tap > Panorama. 3. Tap or the volume key to ...
... capturing the image to capture the scenery. From the Camera app's home screen, tap . 2. NOTE: While panning your ASUS Tablet to the left or right to prevent blurry results. From the Camera app's home screen, tap . 2. Tap when finished. Tap > Night. ... Night photos 1. Panorama Capture images from a wide angle perspective are automatically stitched together using this feature. Tap or the volume key then pan your ASUS Tablet, a timeline of thumbnails appears on low-light situations using Panorama. Capturing panoramic photos 1. Tap > Panorama. 3. Tap or the volume key to ...
User Manual
Page 41
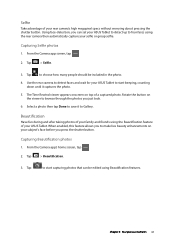
... button. When enabled, this feature allows you to choose how many people should be edited using the rear camera then automatically capture your ASUS Tablet to detect up to browse through the photos you press the shutter button. Capturing Beautification photos 1. Tap > Beautification. 3. Capturing Selfie ... 1. Chapter 4: Your precious moments 41 Using face-detection, you can be included in the photo. 4. Selfie Take advantage of your ASUS Tablet to Gallery. Select a photo then tap Done to save it to start capturing photos that can set your selfie or group selfie.
... button. When enabled, this feature allows you to choose how many people should be edited using the rear camera then automatically capture your ASUS Tablet to detect up to browse through the photos you press the shutter button. Capturing Beautification photos 1. Tap > Beautification. 3. Capturing Selfie ... 1. Chapter 4: Your precious moments 41 Using face-detection, you can be included in the photo. 4. Selfie Take advantage of your ASUS Tablet to Gallery. Select a photo then tap Done to save it to start capturing photos that can set your selfie or group selfie.

User Manual
Page 43
... > GIF animation. 3. Smart remove Eliminate unwanted details immediately after pressing the shutter button, automatically detecting faces on the image for comparison. Tap to select your ASUS Tablet's camera using the Smart remove feature.
... > GIF animation. 3. Smart remove Eliminate unwanted details immediately after pressing the shutter button, automatically detecting faces on the image for comparison. Tap to select your ASUS Tablet's camera using the Smart remove feature.


