
User Manual
Page 2
...OF THEIR POSSIBILITY. It is liable for no more than damages for which ASUS, its reseller. SERVICE AND SUPPORT Visit our multi-language web site at: http://support.asus.com 2 IN NO EVENT SHALL ASUS, ITS DIRECTORS, OFFICERS, EMPLOYEES OR AGENTS BE LIABLE FOR ANY INDIRECT, SPECIAL...Circumstances may arise where because of a default on which you are used only for backup purposes, without intent to infringe. ASUS ASSUMES NO RESPONSIBILITY OR LIABILITY FOR ANY ERRORS OR INACCURACIES THAT MAY APPEAR IN THIS MANUAL, INCLUDING THE PRODUCTS AND SOFTWARE DESCRIBED IN IT. Copyright © ...
...OF THEIR POSSIBILITY. It is liable for no more than damages for which ASUS, its reseller. SERVICE AND SUPPORT Visit our multi-language web site at: http://support.asus.com 2 IN NO EVENT SHALL ASUS, ITS DIRECTORS, OFFICERS, EMPLOYEES OR AGENTS BE LIABLE FOR ANY INDIRECT, SPECIAL...Circumstances may arise where because of a default on which you are used only for backup purposes, without intent to infringe. ASUS ASSUMES NO RESPONSIBILITY OR LIABILITY FOR ANY ERRORS OR INACCURACIES THAT MAY APPEAR IN THIS MANUAL, INCLUDING THE PRODUCTS AND SOFTWARE DESCRIBED IN IT. Copyright © ...

User Manual
Page 3
...!...8 Starting...9 Using the touchscreen...11 2 There's no place like Home Zen Home features...14 Home screen...14 Manage Home screens 16 App shortcuts...16 Widgets...17 Wallpapers...18 Extended Home screen...19 Setting up the date and time...20 Setting up your alert sounds...20 Quick settings...21 System notifications...22 Lock Screen...23 Customizing your lock screen...23 Customizing the quick access buttons 24 3 Keeping in touch Managing contacts...
...!...8 Starting...9 Using the touchscreen...11 2 There's no place like Home Zen Home features...14 Home screen...14 Manage Home screens 16 App shortcuts...16 Widgets...17 Wallpapers...18 Extended Home screen...19 Setting up the date and time...20 Setting up your alert sounds...20 Quick settings...21 System notifications...22 Lock Screen...23 Customizing your lock screen...23 Customizing the quick access buttons 24 3 Keeping in touch Managing contacts...
User Manual
Page 4
...Setting up a Gmail account...54 Calendar...55 Creating events...55 Adding accounts to Calendar...55 Creating an event from your account 56 Enabling alert reminders for events 56 What's Next...57 Getting event reminders...57 Accepting or declining invites to events 58 Getting event-related alerts...59 Getting weather updates...61 Displaying...SuperNote...64 Creating a notebook...65 File Manager...66 Accessing the internal storage...66 Accessing the external storage device 66 Data Transfer...67 Fun and entertainment Using a headset...68 Connecting the audio jack...68 Play Games...69 Using Play ...
...Setting up a Gmail account...54 Calendar...55 Creating events...55 Adding accounts to Calendar...55 Creating an event from your account 56 Enabling alert reminders for events 56 What's Next...57 Getting event reminders...57 Accepting or declining invites to events 58 Getting event-related alerts...59 Getting weather updates...61 Displaying...SuperNote...64 Creating a notebook...65 File Manager...66 Accessing the internal storage...66 Accessing the external storage device 66 Data Transfer...67 Fun and entertainment Using a headset...68 Connecting the audio jack...68 Play Games...69 Using Play ...

User Manual
Page 5
... Weather home screen...77 Clock...78 World Clock...78 Alarm clock...79 Stopwatch...79 Timer...80 9 Zen Everywhere Special Zen Tools...81 Calculator...81 Quick Memo...83 Sound Recorder...84 Audio Wizard...86 Splendid...87 Power Saver...89 10 Maintain your Zen Keeping your device up-to-date 91 Updating your system...91 Storage...91 Backup and reset...91 Securing...
... Weather home screen...77 Clock...78 World Clock...78 Alarm clock...79 Stopwatch...79 Timer...80 9 Zen Everywhere Special Zen Tools...81 Calculator...81 Quick Memo...83 Sound Recorder...84 Audio Wizard...86 Splendid...87 Power Saver...89 10 Maintain your Zen Keeping your device up-to-date 91 Updating your system...91 Storage...91 Backup and reset...91 Securing...
User Manual
Page 6
.... Conventions used To highlight key information in this device. Turn off your device dry. Use only AC adapters and cables approved by ASUS for use or expose your device when driving or operating any type of mobile devices is presented as those used in conveyor belts for repair to magnetic detectors and wands. Keep your device in restricted areas where the use damaged power cables, accessories, and other peripherals with this manual...
.... Conventions used To highlight key information in this device. Turn off your device dry. Use only AC adapters and cables approved by ASUS for use or expose your device when driving or operating any type of mobile devices is presented as those used in conveyor belts for repair to magnetic detectors and wands. Keep your device in restricted areas where the use damaged power cables, accessories, and other peripherals with this manual...

User Manual
Page 7
... has been designed to enable proper reuse of electronic products. WARNING: This product may contains chemicals known to the State of explosion if battery is replaced by an incorrect type. Do not throw the battery in municipal waste. Wash hands after handling. 7 The symbol of used batteries according to the instructions. DO NOT disassemble the device. Proper disposal Risk of...
... has been designed to enable proper reuse of electronic products. WARNING: This product may contains chemicals known to the State of explosion if battery is replaced by an incorrect type. Do not throw the battery in municipal waste. Wash hands after handling. 7 The symbol of used batteries according to the instructions. DO NOT disassemble the device. Proper disposal Risk of...

User Manual
Page 9
... configure your device. Starting When you turn your data. • Leverage Google services conveniently from anywhere. • Automatically backup all your ASUS Tablet on for the first time, a wizard will guide you through the setup process. Google account Using a Google account allows you do not have a Google account yet, go ahead and create a Google account. Follow the onscreen instructions to set up your location services...
... configure your device. Starting When you turn your data. • Leverage Google services conveniently from anywhere. • Automatically backup all your ASUS Tablet on for the first time, a wizard will guide you through the setup process. Google account Using a Google account allows you do not have a Google account yet, go ahead and create a Google account. Follow the onscreen instructions to set up your location services...
User Manual
Page 10
...; Disable Bluetooth feature. • Disable PlayTo feature. • Disable GPS. • Disable the screen auto-rotate feature. • Disable all auto-sync features in Power Saver app. • Decrease brightness of your device. 10 Chapter 1: Basics Here are some battery power conservation tips that helps preserve the power of your ASUS Tablet's battery. • When not in use, press the power button to put the device in sleep mode. • Activate Smart...
...; Disable Bluetooth feature. • Disable PlayTo feature. • Disable GPS. • Disable the screen auto-rotate feature. • Disable all auto-sync features in Power Saver app. • Decrease brightness of your device. 10 Chapter 1: Basics Here are some battery power conservation tips that helps preserve the power of your ASUS Tablet's battery. • When not in use, press the power button to put the device in sleep mode. • Activate Smart...
User Manual
Page 11
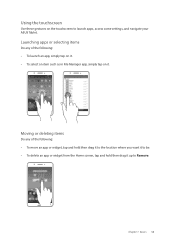
Launching apps or selecting items Do any of the following : • To move an app or widget, tap and hold then drag it to the location where you want it to be. • To delete an app or widget from the Home screen, tap and hold then drag it up to launch apps, access some settings, and navigate your ASUS Tablet. Moving or deleting items Do any of the following : • To launch an app, simply tap on it. • To select an item such as in File Manager app, simply tap on the touchscreen to Remove. Chapter 1: Basics 11 Using the touchscreen Use these gestures on it.
Launching apps or selecting items Do any of the following : • To move an app or widget, tap and hold then drag it to the location where you want it to be. • To delete an app or widget from the Home screen, tap and hold then drag it up to launch apps, access some settings, and navigate your ASUS Tablet. Moving or deleting items Do any of the following : • To launch an app, simply tap on it. • To select an item such as in File Manager app, simply tap on the touchscreen to Remove. Chapter 1: Basics 11 Using the touchscreen Use these gestures on it.
User Manual
Page 20
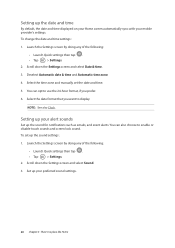
...;• Launch Quick settings then tap . •• Tap > Settings. 2. You can opt to use the 24-hour format, if you want to enable or disable touch sounds and screen lock sound. Select the date format that you prefer. 6. NOTE: See also Clock. Select the time zone and manually set up the date and time By default, the date and time displayed on your Home screen automatically sync...
...;• Launch Quick settings then tap . •• Tap > Settings. 2. You can opt to use the 24-hour format, if you want to enable or disable touch sounds and screen lock sound. Select the date format that you prefer. 6. NOTE: See also Clock. Select the time zone and manually set up the date and time By default, the date and time displayed on your Home screen automatically sync...
User Manual
Page 21
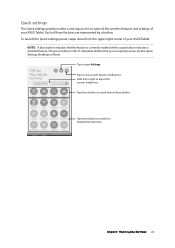
... adjust the screen's brightness. Slide left or right to view current System notifications. NOTE: A blue button indicates that you can quickly access via the Quick Settings Notification Panel. Quick settings The Quick settings panel provides a one-tap access to some of the wireless features and settings of your ASUS Tablet. To launch the Quick settings panel, swipe down from the upper right corner of these buttons to individual utilities that the feature is currently enabled...
... adjust the screen's brightness. Slide left or right to view current System notifications. NOTE: A blue button indicates that you can quickly access via the Quick Settings Notification Panel. Quick settings The Quick settings panel provides a one-tap access to some of the wireless features and settings of your ASUS Tablet. To launch the Quick settings panel, swipe down from the upper right corner of these buttons to individual utilities that the feature is currently enabled...

User Manual
Page 23
Customizing your lock screen If you want to change your lock screen settings from sleep mode. From the lock screen, you would like Home 23 Tap the screen lock option you can also be customized to regulate access to use. Scroll down the Settings screen and select Lock screen. 3. Launch Quick settings then tap . 2. Your device's lock screen can proceed to the following steps: 1. Chapter 2: There's no place like to your mobile data and apps. NOTE...
Customizing your lock screen If you want to change your lock screen settings from sleep mode. From the lock screen, you would like Home 23 Tap the screen lock option you can also be customized to regulate access to use. Scroll down the Settings screen and select Lock screen. 3. Launch Quick settings then tap . 2. Your device's lock screen can proceed to the following steps: 1. Chapter 2: There's no place like to your mobile data and apps. NOTE...

User Manual
Page 24
NOTE: Scroll up or down the Settings screen and select Lock screen. 3. Scroll down to view the current list of apps you can preset. 24 Chapter 2: There's no place like to customize. 6. Under Display, slide the bar from OFF to ON beside Quick Access to enable this default settings and customize these apps: Browser, Email, and Camera. Launch Quick settings then tap . 2. Change this feature. 4. Under the Quick Access screen, select...
NOTE: Scroll up or down the Settings screen and select Lock screen. 3. Scroll down to view the current list of apps you can preset. 24 Chapter 2: There's no place like to customize. 6. Under Display, slide the bar from OFF to ON beside Quick Access to enable this default settings and customize these apps: Browser, Email, and Camera. Launch Quick settings then tap . 2. Change this feature. 4. Under the Quick Access screen, select...
User Manual
Page 39
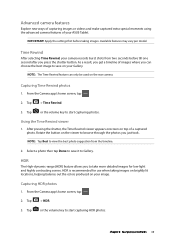
... allows you can only be used on the rear camera. Capturing HDR photos 1. Tap or the volume key to start capturing HDR photos. Available features may vary per model. NOTE: The Time Rewind feature...brightly lit locations, helping balance out the colors produced on the viewer to Gallery. HDR is recommended for low-light and highly contrasting scenes. Chapter 4: Your precious moments 39 Rotate the button on your Gallery. From the Camera app's home screen, tap . 2. Tap > HDR. 3. Advanced camera features Explore new ways of capturing images or videos and make...
... allows you can only be used on the rear camera. Capturing HDR photos 1. Tap or the volume key to start capturing HDR photos. Available features may vary per model. NOTE: The Time Rewind feature...brightly lit locations, helping balance out the colors produced on the viewer to Gallery. HDR is recommended for low-light and highly contrasting scenes. Chapter 4: Your precious moments 39 Rotate the button on your Gallery. From the Camera app's home screen, tap . 2. Tap > HDR. 3. Advanced camera features Explore new ways of capturing images or videos and make...

User Manual
Page 54
... succeeding instructions to complete setting up your email accounts. 54 Chapter 5: Work hard, play harder Tap Google then tap Gmail. 2. Tap to sign in the Setting up and access all your new email account. NOTE: You may also refer to steps 3 to 5 in to complete this setup process. If you have several email accounts aside from Gmail, use Email...
... succeeding instructions to complete setting up your email accounts. 54 Chapter 5: Work hard, play harder Tap Google then tap Gmail. 2. Tap to sign in the Setting up and access all your new email account. NOTE: You may also refer to steps 3 to 5 in to complete this setup process. If you have several email accounts aside from Gmail, use Email...

User Manual
Page 74
... save battery power. For a secured network, you can also enable the Bluetooth from Quick Settings screen. Disabling Wi-Fi To disable Wi-Fi: 1. NOTE: You can also disable the Wi-Fi from Quick Settings screen. See Quick settings on how to a Wi-Fi network 1. Do any of the following : •• Launch Quick settings then tap . •• Tap > Settings. 2. NOTE: You can share your media files with your ASUS Tablet to turn...
... save battery power. For a secured network, you can also enable the Bluetooth from Quick Settings screen. Disabling Wi-Fi To disable Wi-Fi: 1. NOTE: You can also disable the Wi-Fi from Quick Settings screen. See Quick settings on how to a Wi-Fi network 1. Do any of the following : •• Launch Quick settings then tap . •• Tap > Settings. 2. NOTE: You can share your media files with your ASUS Tablet to turn...
User Manual
Page 76
... then tap PlayTo. 3. Doing this allows an external display to become a dual monitor or second screen to start using PlayTo from your ASUS Tablet to support PlayTo app. Your external display must have Miracast™ or DLNA® technology to a streaming-supported display. Under Wireless & networks, tap More... Setup the streaming-supported display you want to use to start pairing. PlayTo PlayTo app lets you screencast your ASUS Tablet: From Quick settings 1.
... then tap PlayTo. 3. Doing this allows an external display to become a dual monitor or second screen to start using PlayTo from your ASUS Tablet to support PlayTo app. Your external display must have Miracast™ or DLNA® technology to a streaming-supported display. Under Wireless & networks, tap More... Setup the streaming-supported display you want to use to start pairing. PlayTo PlayTo app lets you screencast your ASUS Tablet: From Quick settings 1.
User Manual
Page 91
... facilitates restoration of Android system updates and upgraded apps and features. You need an internet connection to transfer or download your system 1. Tap then tap Settings > Backup and reset. 2. From the Backup & reset window, you can store data, apps, or files on an online storage. Tap then tap Settings. 2. Tap AT&T Software Update. On the Settings screen, slide down to display other settings to Google servers when enabled. •• Backup account...
... facilitates restoration of Android system updates and upgraded apps and features. You need an internet connection to transfer or download your system 1. Tap then tap Settings > Backup and reset. 2. From the Backup & reset window, you can store data, apps, or files on an online storage. Tap then tap Settings. 2. Tap AT&T Software Update. On the Settings screen, slide down to display other settings to Google servers when enabled. •• Backup account...

User Manual
Page 93
... of capturing the image. Read the terms in setting up Face Unlock on your screen, then tap Continue. 4. Read the instructions in using Face Unlock feature on your screen, then tap Set it . Face Unlock Show your face on the black window of the lock screen to capture it up. 3. To set up Face Unlock: 1. Hold your ASUS Tablet at eye level and align your face...
... of capturing the image. Read the terms in setting up Face Unlock on your screen, then tap Continue. 4. Read the instructions in using Face Unlock feature on your screen, then tap Set it . Face Unlock Show your face on the black window of the lock screen to capture it up. 3. To set up Face Unlock: 1. Hold your ASUS Tablet at eye level and align your face...

User Manual
Page 96
... camera: Slide the Instant camera switch to ON to launch the Camera app even if your ASUS Tablet is in idle mode by pressing the volume button twice. • Owner info: Tap this to edit and key in at least four characters to appear even when your screen is locked. 96 Chapter 10: Maintain your device. Password Key in the information that you want to create a password...
... camera: Slide the Instant camera switch to ON to launch the Camera app even if your ASUS Tablet is in idle mode by pressing the volume button twice. • Owner info: Tap this to edit and key in at least four characters to appear even when your screen is locked. 96 Chapter 10: Maintain your device. Password Key in the information that you want to create a password...


