User Manual
Page 1
Motherboard M5A78L M5A78L LE
Motherboard M5A78L M5A78L LE
User Manual
Page 3
Contents Notices...vi Safety information vii About this guide viii M5A78L Series specifications summar ix Chapter 1: Product introduction 1.1 Welcome 1-1 1.2 Package contents 1-1 1.3 Special features 1-1 1.3.1 Product highlights 1-1 1.3.2 Innovative ASUS features 1-3 1.4 Before you proceed 1-5 1.5 Motherboard overview 1-6 1.5.1 Placement direction 1-6 1.5.2 Screw holes 1-6 1.5.3 Motherboard layout 1-7 1.5.4 Layout contents 1-8 1.6 Central Processing Unit (CPU 1-8 1.6.1 Installing the CPU 1-8 1.6.2 Installing the heatsink and fan 1-10 1.7 System...
Contents Notices...vi Safety information vii About this guide viii M5A78L Series specifications summar ix Chapter 1: Product introduction 1.1 Welcome 1-1 1.2 Package contents 1-1 1.3 Special features 1-1 1.3.1 Product highlights 1-1 1.3.2 Innovative ASUS features 1-3 1.4 Before you proceed 1-5 1.5 Motherboard overview 1-6 1.5.1 Placement direction 1-6 1.5.2 Screw holes 1-6 1.5.3 Motherboard layout 1-7 1.5.4 Layout contents 1-8 1.6 Central Processing Unit (CPU 1-8 1.6.1 Installing the CPU 1-8 1.6.2 Installing the heatsink and fan 1-10 1.7 System...
User Manual
Page 7
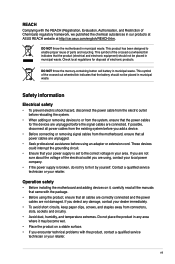
...8226; Seek professional assistance before using an adapter or extension cord. vii Operation safety • Before installing the motherboard and adding devices on a stable surface. • If you encounter technical problems with the package. •...asus.com/english/REACH.htm. If possible, disconnect all power cables from the existing system before relocating the system. • When adding or removing devices to the correct voltage in any damage, contact your dealer immediately. • To avoid short circuits, keep paper clips, screws, and staples away from the motherboard...
...8226; Seek professional assistance before using an adapter or extension cord. vii Operation safety • Before installing the motherboard and adding devices on a stable surface. • If you encounter technical problems with the package. •...asus.com/english/REACH.htm. If possible, disconnect all power cables from the existing system before relocating the system. • When adding or removing devices to the correct voltage in any damage, contact your dealer immediately. • To avoid short circuits, keep paper clips, screws, and staples away from the motherboard...
User Manual
Page 8
...perform certain tasks properly, take note of the following parts: • Chapter 1: Product introduction This chapter describes the features of the motherboard and the new technology it supports. • Chapter 2: BIOS information This chapter tells how to select. Detailed descriptions of the ... you must press the enclosed key. Used to help you must press the Enter or Return key. ASUS websites The ASUS website provides updated information on ASUS hardware and software products. Typography Bold text Italics ++ Indicates a menu or an item to change system...
...perform certain tasks properly, take note of the following parts: • Chapter 1: Product introduction This chapter describes the features of the motherboard and the new technology it supports. • Chapter 2: BIOS information This chapter tells how to select. Detailed descriptions of the ... you must press the enclosed key. Used to help you must press the Enter or Return key. ASUS websites The ASUS website provides updated information on ASUS hardware and software products. Typography Bold text Italics ++ Indicates a menu or an item to change system...
User Manual
Page 9
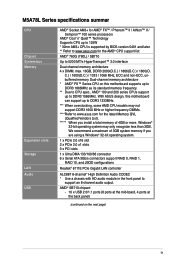
...system may not support DDR3 1600 MHz or higher frequency DIMMs. ****Refer to www.asus.com for the AMD® CPU support list AMD® 760G (780L) / SB710 Up to DDR3 1066MHz. With ASUS design, this motherboard supports up to DDR3 1866MHz as its standard memory frequency. ** Due to CPU ... / 1333 / 1066 MHz, ECC and non-ECC, unbuffered memory Dual-channel memory architecture * AMD® FX™ Series CPU on the next page) ix M5A78L Series specifications summar CPU Chipset System bus Memory Expansion slots Storage LAN Audio USB AMD® Socket AM3+ for AMD® FX™ / Phenom™...
...system may not support DDR3 1600 MHz or higher frequency DIMMs. ****Refer to www.asus.com for the AMD® CPU support list AMD® 760G (780L) / SB710 Up to DDR3 1066MHz. With ASUS design, this motherboard supports up to DDR3 1866MHz as its standard memory frequency. ** Due to CPU ... / 1333 / 1066 MHz, ECC and non-ECC, unbuffered memory Dual-channel memory architecture * AMD® FX™ Series CPU on the next page) ix M5A78L Series specifications summar CPU Chipset System bus Memory Expansion slots Storage LAN Audio USB AMD® Socket AM3+ for AMD® FX™ / Phenom™...

User Manual
Page 11
.... 1.2 Package contents Check your package with less power consumption. ASUS M5A78L Series 1-1 Before you for the following items. Motherboard Cables Accessories Application DVD Documentation ASUS M5A78L Series motherboard 2 x Serial ATA cables 1 x I/O shield ASUS motherboard Support DVD User Manual • M5A78L Series motherboards include M5A78L and M5A78L LE two models. Chapter 1 Product introduction 1.1 Welcome! The motherboard delivers a host of new features and latest technologies, making...
.... 1.2 Package contents Check your package with less power consumption. ASUS M5A78L Series 1-1 Before you for the following items. Motherboard Cables Accessories Application DVD Documentation ASUS M5A78L Series motherboard 2 x Serial ATA cables 1 x I/O shield ASUS motherboard Support DVD User Manual • M5A78L Series motherboards include M5A78L and M5A78L LE two models. Chapter 1 Product introduction 1.1 Welcome! The motherboard delivers a host of new features and latest technologies, making...
User Manual
Page 12
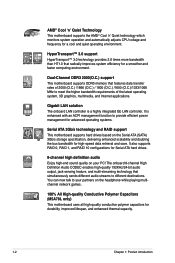
... hard drives based on the headphone while playing multichannel network games. 100% All High-quality Conductive Polymer Capacitors (M5A78L only) This motherboard uses all high-quality conductive polymer capacitors for a smoother and faster computing environment. It also supports RAID 0, RAID 1,... of the latest operating system, 3D graphics, multimedia, and Internet applications. Dual-Channel DDR3 2000(O.C.) support This motherboard supports DDR3 memory that features data transfer rates of 2000 (O.C.) /1866 (O.C.) / 1800 (O.C.) /1600 (O.C.)/1333/1066 MHz to different destinations.
... hard drives based on the headphone while playing multichannel network games. 100% All High-quality Conductive Polymer Capacitors (M5A78L only) This motherboard uses all high-quality conductive polymer capacitors for a smoother and faster computing environment. It also supports RAID 0, RAID 1,... of the latest operating system, 3D graphics, multimedia, and Internet applications. Dual-Channel DDR3 2000(O.C.) support This motherboard supports DDR3 memory that features data transfer rates of 2000 (O.C.) /1866 (O.C.) / 1800 (O.C.) /1600 (O.C.)/1333/1066 MHz to different destinations.
User Manual
Page 13
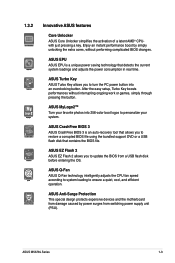
... button into 256-color boot logos to ensure a quiet, cool, and efficient operation. ASUS Anti-Surge Protection This special design protects expensive devices and the motherboard from a USB flash disk before entering the OS. ASUS M5A78L Series 1-3 1.3.2 Innovative ASUS features Core Unlocker ASUS Core Unlocker simplifies the activation of a latent AMD® CPUwith just pressing a key...
... button into 256-color boot logos to ensure a quiet, cool, and efficient operation. ASUS Anti-Surge Protection This special design protects expensive devices and the motherboard from a USB flash disk before entering the OS. ASUS M5A78L Series 1-3 1.3.2 Innovative ASUS features Core Unlocker ASUS Core Unlocker simplifies the activation of a latent AMD® CPUwith just pressing a key...
User Manual
Page 14
C.P.R. (CPU Parameter Recall) The BIOS C.P.R. eliminates the need to energy consumptions. ErP ready The motherboard is in regards to open the system chassis and clear the RTC data. Simply shut down and reboot the system, and ... This is European Union´s Energy-related Products (ErP) ready, and ErP requires products to meet certain energy efficiency requirements in line with ASUS vision of creating environment-friendly and energy-efficient products through product design and innovation to their default settings. C.P.R. feature automatically restores the CPU default...
C.P.R. (CPU Parameter Recall) The BIOS C.P.R. eliminates the need to energy consumptions. ErP ready The motherboard is in regards to open the system chassis and clear the RTC data. Simply shut down and reboot the system, and ... This is European Union´s Energy-related Products (ErP) ready, and ErP requires products to meet certain energy efficiency requirements in line with ASUS vision of creating environment-friendly and energy-efficient products through product design and innovation to their default settings. C.P.R. feature automatically restores the CPU default...
User Manual
Page 15
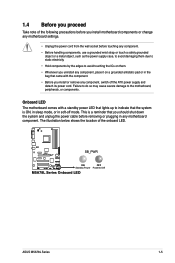
... the ATX power supply and detach its power cord. M5A78L Series SB_PWR ON OFF Standby Power Powered Off M5A78L Series Onboard LED ASUS M5A78L Series 1-5 1.4 Before you proceed Take note of the onboard LED. Onboard LED The motherboard comes with the component. • Before you should shut... in any component, switch off mode. The illustration below shows the location of the following precautions before you install motherboard components or change any motherboard settings. • Unplug the power cord from the wall socket before removing or plugging in the bag that you...
... the ATX power supply and detach its power cord. M5A78L Series SB_PWR ON OFF Standby Power Powered Off M5A78L Series Onboard LED ASUS M5A78L Series 1-5 1.4 Before you proceed Take note of the onboard LED. Onboard LED The motherboard comes with the component. • Before you should shut... in any component, switch off mode. The illustration below shows the location of the following precautions before you install motherboard components or change any motherboard settings. • Unplug the power cord from the wall socket before removing or plugging in the bag that you...
User Manual
Page 16
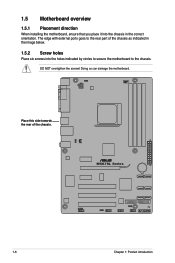
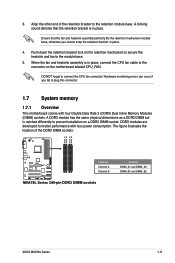
The edge with external ports goes to the chassis. Doing so can damage the motherboard. Place this side towards the rear of the chassis as indicated in the image below. 1.5.2 Screw holes Place six screws into the chassis in the correct orientation. M5A78L Series 1-6 Chapter 1: Product introduction 1.5 Motherboard overview 1.5.1 Placement direction When installing the motherboard, ensure that you place it into the holes indicated by circles to secure the motherboard to the rear part of the chassis. DO NOT overtighten the screws!
The edge with external ports goes to the chassis. Doing so can damage the motherboard. Place this side towards the rear of the chassis as indicated in the image below. 1.5.2 Screw holes Place six screws into the chassis in the correct orientation. M5A78L Series 1-6 Chapter 1: Product introduction 1.5 Motherboard overview 1.5.1 Placement direction When installing the motherboard, ensure that you place it into the holes indicated by circles to secure the motherboard to the rear part of the chassis. DO NOT overtighten the screws!
User Manual
Page 18
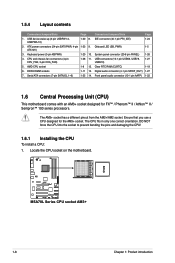
...a CPU designed for FX™ / Phenom™ II / Athlon™ II / Sempron™ 100 series processors. Locate the CPU socket on the motherboard. IDE connector (40-1 pin PRI_IDE) 1-24 USBPW5-10) 2. System panel connector (20-8 pin PANEL) 1-26 4. USB connectors (10-1 pin USB56, USB78,... M5A78L Series CPU socket AM3+ 1-8 Chapter 1: Product introduction ATX power connectors (24-pin EATXPWR, 4-pin 1-23 9. DDR3 DIMM sockets 1-11 13. Front panel audio connector (10-1 pin AAFP) 1-22 1.6 Central Processing Unit (CPU) This motherboard comes with an AM3+ socket designed for the AM3+ socket....
...a CPU designed for FX™ / Phenom™ II / Athlon™ II / Sempron™ 100 series processors. Locate the CPU socket on the motherboard. IDE connector (40-1 pin PRI_IDE) 1-24 USBPW5-10) 2. System panel connector (20-8 pin PANEL) 1-26 4. USB connectors (10-1 pin USB56, USB78,... M5A78L Series CPU socket AM3+ 1-8 Chapter 1: Product introduction ATX power connectors (24-pin EATXPWR, 4-pin 1-23 9. DDR3 DIMM sockets 1-11 13. Front panel audio connector (10-1 pin AAFP) 1-22 1.6 Central Processing Unit (CPU) This motherboard comes with an AM3+ socket designed for the AM3+ socket....
User Manual
Page 19
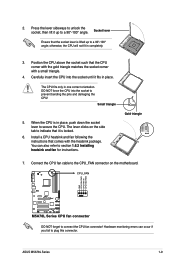
... to section 1.6.2 Installing heatsink and fan for instructions. Connect the CPU fan cable to connect the CPU fan connector! The lever clicks on the motherboard. Position the CPU above the socket such that comes with a small triangle. 4. Install a CPU heatsink and fan following the instructions that the... to indicate that the socket lever is lifted up to secure the CPU. otherwise, the CPU will not fit in one correct orientation. ASUS M5A78L Series 1-9 You can occur if you fail to prevent bending the pins and damaging the CPU! Press the lever sideways to unlock the ...
... to section 1.6.2 Installing heatsink and fan for instructions. Connect the CPU fan cable to connect the CPU fan connector! The lever clicks on the motherboard. Position the CPU above the socket such that comes with a small triangle. 4. Install a CPU heatsink and fan following the instructions that the... to indicate that the socket lever is lifted up to secure the CPU. otherwise, the CPU will not fit in one correct orientation. ASUS M5A78L Series 1-9 You can occur if you fail to prevent bending the pins and damaging the CPU! Press the lever sideways to unlock the ...
User Manual
Page 20
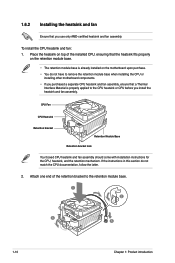
If the instructions in this section do not have to remove the retention module base when installing the CPU or installing other motherboard components. • If you purchased a separate CPU heatsink and fan assembly, ensure that a Thermal Interface Material is properly applied to the retention module base.... CPU, ensuring that the heatsink fits properly on the retention module base. • The retention module base is already installed on the motherboard upon purchase. • You do not match the CPU documentation, follow the latter. 2. Place the heatsink on top of the retention...
If the instructions in this section do not have to remove the retention module base when installing the CPU or installing other motherboard components. • If you purchased a separate CPU heatsink and fan assembly, ensure that a Thermal Interface Material is properly applied to the retention module base.... CPU, ensuring that the heatsink fits properly on the retention module base. • The retention module base is already installed on the motherboard upon purchase. • You do not match the CPU documentation, follow the latter. 2. Place the heatsink on top of the retention...
User Manual
Page 21
...you fail to connect the CPU fan connector! DO NOT forget to plug this connector. 1.7 System memory 1.7.1 Overview This motherboard comes with less power consumption. The figure illustrates the location of the retention bracket to prevent installation on the... motherboard labeled CPU_FAN. Align the other end of the DDR3 DIMM sockets: DIMM_A1 DIMM_A2 DIMM_B1 DIMM_B2 M5A78L Series Channel Channel A Channel B M5A78L Series 240-pin DDR3 DIMM sockets Sockets DIMM_A1 and DIMM_A2 DIMM_B1 and DIMM_B2 ASUS M5A78L Series 1-11 3. Ensure that the...
...you fail to connect the CPU fan connector! DO NOT forget to plug this connector. 1.7 System memory 1.7.1 Overview This motherboard comes with less power consumption. The figure illustrates the location of the retention bracket to prevent installation on the... motherboard labeled CPU_FAN. Align the other end of the DDR3 DIMM sockets: DIMM_A1 DIMM_A2 DIMM_B1 DIMM_B2 M5A78L Series Channel Channel A Channel B M5A78L Series 240-pin DDR3 DIMM sockets Sockets DIMM_A1 and DIMM_A2 DIMM_B1 and DIMM_B2 ASUS M5A78L Series 1-11 3. Ensure that the...
User Manual
Page 22
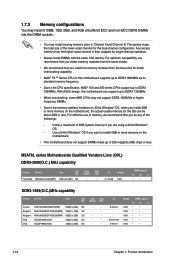
... we recommend that you install the memory modules from the higher-sized channel is then mapped for the dual-channel configuration. With ASUS design, this motherboard supports up to DDR3 1866MHz as its standard memory frequency. • Due to the CPU specification, AMD® 100 and ...OS can support up to DDR3 1333MHz. • When overclocking, some AMD CPUs may install varying memory sizes in Channel A and Channel B. M5A78L series Motherboards Qualified Vendors Lists (QVL) DDR3-2000(O.C.) MHz capability Vendor Part No. Transcend TX2400KLU-4GK(XMP) Size SS/ DS 4GB ( 2x 2GB )...
... we recommend that you install the memory modules from the higher-sized channel is then mapped for the dual-channel configuration. With ASUS design, this motherboard supports up to DDR3 1866MHz as its standard memory frequency. • Due to the CPU specification, AMD® 100 and ...OS can support up to DDR3 1333MHz. • When overclocking, some AMD CPUs may install varying memory sizes in Channel A and Channel B. M5A78L series Motherboards Qualified Vendors Lists (QVL) DDR3-2000(O.C.) MHz capability Vendor Part No. Transcend TX2400KLU-4GK(XMP) Size SS/ DS 4GB ( 2x 2GB )...
User Manual
Page 26
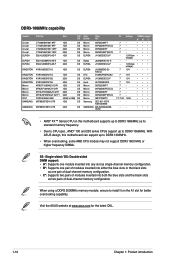
... KINGSTON KINGSTON Micron Micron Micron Micron OCZ SAMSUNG SAMSUNG Part No. When using a DDR3 2000MHz memory module, ensure to install it on this motherboard can support up to DDR3 1333MHz. • When overclocking, some AMD CPU models may not support DDR3 1600 MHz or higher frequency DIMMs.... black slots as one pair of dual-channel memory configuration. • C*: Supports two pairs of dual-channel memory configuration. With ASUS design, this motherboard supports up to DDR3 1866MHz as two pairs of modules inserted into both the blue slots and the black slots as its standard ...
... KINGSTON KINGSTON Micron Micron Micron Micron OCZ SAMSUNG SAMSUNG Part No. When using a DDR3 2000MHz memory module, ensure to install it on this motherboard can support up to DDR3 1333MHz. • When overclocking, some AMD CPU models may not support DDR3 1600 MHz or higher frequency DIMMs.... black slots as one pair of dual-channel memory configuration. • C*: Supports two pairs of dual-channel memory configuration. With ASUS design, this motherboard supports up to DDR3 1866MHz as two pairs of modules inserted into both the blue slots and the black slots as its standard ...
User Manual
Page 27
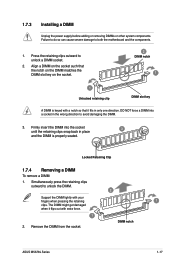
Press the retaining clips outward to unlock the DIMM. 2 Support the DIMM lightly with your fingers when pressing the retaining 1 clips. DIMM notch ASUS M5A78L Series 1-17 1.7.3 Installing a DIMM Unplug the power supply before adding or removing DIMMs or other system components. DO NOT force a DIMM ... Retaining Clip 1.7.4 Removing a DIMM To remove a DIMM: 1. The DIMM might get damaged when it fits in the wrong direction to both the motherboard and the components. 1. Align a DIMM on the socket such that it flips out with a notch so that the notch on the DIMM matches the...
Press the retaining clips outward to unlock the DIMM. 2 Support the DIMM lightly with your fingers when pressing the retaining 1 clips. DIMM notch ASUS M5A78L Series 1-17 1.7.3 Installing a DIMM Unplug the power supply before adding or removing DIMMs or other system components. DO NOT force a DIMM ... Retaining Clip 1.7.4 Removing a DIMM To remove a DIMM: 1. The DIMM might get damaged when it fits in the wrong direction to both the motherboard and the components. 1. Align a DIMM on the socket such that it flips out with a notch so that the notch on the DIMM matches the...
User Manual
Page 28
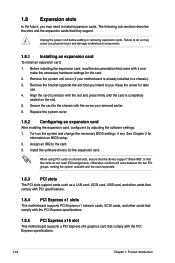
... as a LAN card, SCSI card, USB card, and other cards that comply with PCI specifications. 1.8.4 PCI Express x1 slots This motherboard supports PCI Express x1 network cards, SCSI cards, and other cards that comply with the PCI Express specifications. 1.8.5 PCI Express x16 slot This...Before installing the expansion card, read the documentation that comply with it by adjusting the software settings. 1. Remove the system unit cover (if your motherboard is completely seated on shared slots, ensure that the drivers support "Share IRQ" or that they support. Secure the card to use . 4. ...
... as a LAN card, SCSI card, USB card, and other cards that comply with PCI specifications. 1.8.4 PCI Express x1 slots This motherboard supports PCI Express x1 network cards, SCSI cards, and other cards that comply with the PCI Express specifications. 1.8.5 PCI Express x16 slot This...Before installing the expansion card, read the documentation that comply with it by adjusting the software settings. 1. Remove the system unit cover (if your motherboard is completely seated on shared slots, ensure that the drivers support "Share IRQ" or that they support. Secure the card to use . 4. ...
User Manual
Page 32
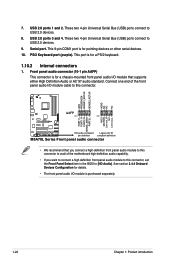
...USB 2.0 devices. 8. This 9-pin COM1 port is purchased separately. 1-22 Chapter 1: Product introduction GND PRESENCE# SENSE1_RETUR SENSE2_RETUR AGND NC NC NC M5A78L Series AAFP PIN 1 PIN 1 MIC2 MICPWR Line out_R NC Line out_L PORT1 L PORT1 R PORT2 R SENSE_SEND PORT2 L HD-audio-compliant Legacy AC... a chassis-mounted front panel audio I/O module that you connect a high-definition front panel audio module to this connector to avail of the motherboard high-definition audio capability. • If you want to connect a high definition front panel audio module to [HD Audio]. These two ...
...USB 2.0 devices. 8. This 9-pin COM1 port is purchased separately. 1-22 Chapter 1: Product introduction GND PRESENCE# SENSE1_RETUR SENSE2_RETUR AGND NC NC NC M5A78L Series AAFP PIN 1 PIN 1 MIC2 MICPWR Line out_R NC Line out_L PORT1 L PORT1 R PORT2 R SENSE_SEND PORT2 L HD-audio-compliant Legacy AC... a chassis-mounted front panel audio I/O module that you connect a high-definition front panel audio module to this connector to avail of the motherboard high-definition audio capability. • If you want to connect a high definition front panel audio module to [HD Audio]. These two ...


