User Guide
Page 6
...4.4.2 Installing Serial ATA hard disks 4-14 4.4.3 Setting the RAID item in BIOS 4-14 4.4.4 NVIDIA® MediaShield BIOS RAID configurations 4-15 4.5 Creating a RAID driver disk 4-21 4.5.1 Creating a RAID driver disk without entering the OS 4-21 4.5.2 Creating a RAID/SATA driver disk in Windows 4-21 Chapter 5: ATI® CrossFireX™ technology support 5.1 NVIDIA® SLI™ technology 5-1 5.1.1 Requirements 5-1 5.1.2 Installing two SLI-ready graphics cards 5-2 5.1.3 Installing three SLI-ready graphics cards 5-3 5.1.4 Installing the device drivers 5-4 5.1.5 Enabling...
...4.4.2 Installing Serial ATA hard disks 4-14 4.4.3 Setting the RAID item in BIOS 4-14 4.4.4 NVIDIA® MediaShield BIOS RAID configurations 4-15 4.5 Creating a RAID driver disk 4-21 4.5.1 Creating a RAID driver disk without entering the OS 4-21 4.5.2 Creating a RAID/SATA driver disk in Windows 4-21 Chapter 5: ATI® CrossFireX™ technology support 5.1 NVIDIA® SLI™ technology 5-1 5.1.1 Requirements 5-1 5.1.2 Installing two SLI-ready graphics cards 5-2 5.1.3 Installing three SLI-ready graphics cards 5-3 5.1.4 Installing the device drivers 5-4 5.1.5 Enabling...

User Guide
Page 31
... into the DIMM sockets. • You may operate at a higher frequency, see section 3.6 Advanced menu for manual memory frequency adjustment. • For system stability, use of memory, we recommend that you install the memory modules from the yellow slots for single-channel operation. • Due to support a full memory load (4 DIMMs) or overclocking condition. Any excess memory from the higher-sized channel is supported by AM3/AM2+ CPU for the OS...
... into the DIMM sockets. • You may operate at a higher frequency, see section 3.6 Advanced menu for manual memory frequency adjustment. • For system stability, use of memory, we recommend that you install the memory modules from the yellow slots for single-channel operation. • Due to support a full memory load (4 DIMMs) or overclocking condition. Any excess memory from the higher-sized channel is supported by AM3/AM2+ CPU for the OS...
User Guide
Page 50
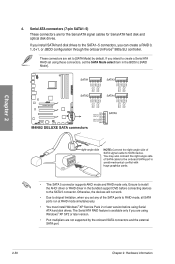
... a Serial ATA RAID set using these connectors, set the SATA Mode select item in the bundled support DVD before using Windows® XP SP2 or later version. • Port multipliers are set any of the SATA ports to RAID mode, all SATA ports run at RAID mode simultaneously. • You must install Windows® XP Service Pack 2 or later version before connecting devices to the SATA 5 connector. If you can create a RAID 0, 1, 0+1, or JBOD configuration through the onboard nForce® 980a SLI controller. If you install SATA hard disk drives to...
... a Serial ATA RAID set using these connectors, set the SATA Mode select item in the bundled support DVD before using Windows® XP SP2 or later version. • Port multipliers are set any of the SATA ports to RAID mode, all SATA ports run at RAID mode simultaneously. • You must install Windows® XP Service Pack 2 or later version before connecting devices to the SATA 5 connector. If you can create a RAID 0, 1, 0+1, or JBOD configuration through the onboard nForce® 980a SLI controller. If you install SATA hard disk drives to...
User Guide
Page 61
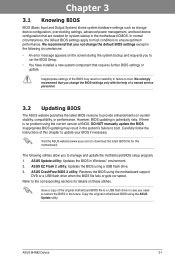
However, BIOS updating is no problem using the motherboard support DVD or a USB flash drive when the BIOS file fails or gets corrupted. Refer to run the BIOS Setup. • You have installed a new system component that you not change the BIOS settings only with the help of BIOS, DO NOT manually update the BIOS. ASUS M4N82 Deluxe 3-1 We recommend that requires further BIOS settings or update. The following circumstances: • An error message appears on the screen during the system...
However, BIOS updating is no problem using the motherboard support DVD or a USB flash drive when the BIOS file fails or gets corrupted. Refer to run the BIOS Setup. • You have installed a new system component that you not change the BIOS settings only with the help of BIOS, DO NOT manually update the BIOS. ASUS M4N82 Deluxe 3-1 We recommend that requires further BIOS settings or update. The following circumstances: • An error message appears on the screen during the system...
User Guide
Page 62
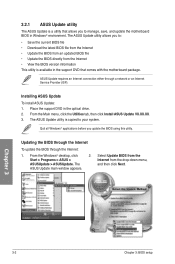
... motherboard BIOS in the optical drive. 2. From the Main menu, click the Utilities tab, then click Install ASUS Update VX.XX.XX. 3. Quit all Windows® applications before you to your system. Place the support DVD in Windows® environment. Updating the BIOS through the Internet To update the BIOS through a network or an Internet Service Provider (ISP). Chapter 3 3-2 Chapter 3: BIOS setup The ASUS Update utility allows you to: • Save the current BIOS file • Download...
... motherboard BIOS in the optical drive. 2. From the Main menu, click the Utilities tab, then click Install ASUS Update VX.XX.XX. 3. Quit all Windows® applications before you to your system. Place the support DVD in Windows® environment. Updating the BIOS through the Internet To update the BIOS through a network or an Internet Service Provider (ISP). Chapter 3 3-2 Chapter 3: BIOS setup The ASUS Update utility allows you to: • Save the current BIOS file • Download...
User Guide
Page 64
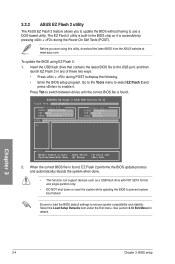
... boot failure! The EZ Flash 2 utility is found . 3.2.2 ASUS EZ Flash 2 utility The ASUS EZ Flash 2 feature allows you start using EZ Flash 2: 1. ASUSTek EZ Flash 2 BIOS ROM Utility V3.35 FLASH TYPE: MXIC 25L8005 Current ROM BOARD: M4N82 DELUXE VER: 0202 DATE: 02/05/2009 Update ROM BOARD: Unknown VER: Unknown DATE: Unknown PATH: A:\ A: Note [Enter] Select or Load [Up/Down/Home/End] Move [Tab] Switch [B] Backup [V] Drive Info [Esc] Exit 2. Before you to update the BIOS without having to display...
... boot failure! The EZ Flash 2 utility is found . 3.2.2 ASUS EZ Flash 2 utility The ASUS EZ Flash 2 feature allows you start using EZ Flash 2: 1. ASUSTek EZ Flash 2 BIOS ROM Utility V3.35 FLASH TYPE: MXIC 25L8005 Current ROM BOARD: M4N82 DELUXE VER: 0202 DATE: 02/05/2009 Update ROM BOARD: Unknown VER: Unknown DATE: Unknown PATH: A:\ A: Note [Enter] Select or Load [Up/Down/Home/End] Move [Tab] Switch [B] Backup [V] Drive Info [Esc] Exit 2. Before you to update the BIOS without having to display...
User Guide
Page 65
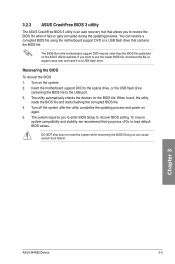
... system boot failure! Turn on again. 5. Turn off the system after the utility completes the updating process and power on the system. 2. Chapter 3 ASUS M4N82 Deluxe 3-5 The utility automatically checks the devices for the BIOS file. The BIOS file in the motherboard support DVD may be older than the BIOS file published on the ASUS official website. Recovering the BIOS To recover the BIOS 1. Insert the motherboard support DVD to the optical drive, or the USB flash drive containing the BIOS file to load default BIOS...
... system boot failure! Turn on again. 5. Turn off the system after the utility completes the updating process and power on the system. 2. Chapter 3 ASUS M4N82 Deluxe 3-5 The utility automatically checks the devices for the BIOS file. The BIOS file in the motherboard support DVD may be older than the BIOS file published on the ASUS official website. Recovering the BIOS To recover the BIOS 1. Insert the motherboard support DVD to the optical drive, or the USB flash drive containing the BIOS file to load default BIOS...
User Guide
Page 68
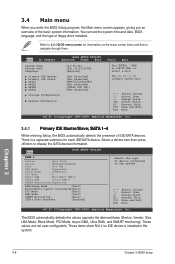
... [Enabled] Select the type of floppy drive installed. Select a device item then press to configure system Date. ←→ Select Screen ↑↓ Select Item +- There is installed in the system. The BIOS automatically detects the values opposite the dimmed items (Device, Vendor, Size, LBA Mode, Block Mode, PIO Mode, Async DMA, Ultra DMA, and SMART monitoring). Use [+] or [-] to display the SATA device information. Chapter 3 3-8 Chapter 3: BIOS setup Main Ai Tweaker BIOS SETUP UTILITY Advanced Power Boot System...
... [Enabled] Select the type of floppy drive installed. Select a device item then press to configure system Date. ←→ Select Screen ↑↓ Select Item +- There is installed in the system. The BIOS automatically detects the values opposite the dimmed items (Device, Vendor, Size, LBA Mode, Block Mode, PIO Mode, Async DMA, Ultra DMA, and SMART monitoring). Use [+] or [-] to display the SATA device information. Chapter 3 3-8 Chapter 3: BIOS setup Main Ai Tweaker BIOS SETUP UTILITY Advanced Power Boot System...
User Guide
Page 70
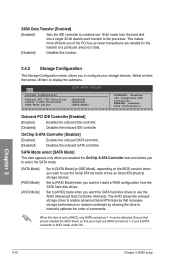
...SATA Mode] [RAID Mode] [AHCI Mode] Set to [SATA Mode] (or [IDE Mode], depending on random workloads by allowing the drive to the processor. Set to [RAID Mode] when you to configure your storage devices. Ensure that you've installed the AHCI driver, so that increases storage performance on the BIOS version) when you want to use of the PCI bus as Serial ATA physical storage devices. Select an item then press to [AHCI], only SATA connectors 1-4 can be detected. Main Storage Configuration Onboard PCI IDE Controller OnChip S-ATA Controller SATA Mode select BIOS SETUP UTILITY...
...SATA Mode] [RAID Mode] [AHCI Mode] Set to [SATA Mode] (or [IDE Mode], depending on random workloads by allowing the drive to the processor. Set to [RAID Mode] when you to configure your storage devices. Ensure that you've installed the AHCI driver, so that increases storage performance on the BIOS version) when you want to use of the PCI bus as Serial ATA physical storage devices. Select an item then press to [AHCI], only SATA connectors 1-4 can be detected. Main Storage Configuration Onboard PCI IDE Controller OnChip S-ATA Controller SATA Mode select BIOS SETUP UTILITY...
User Guide
Page 72
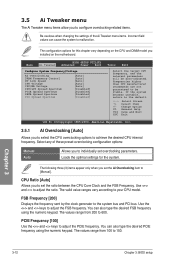
...setup 3.5 Ai Tweaker menu The Ai Tweaker menu items allow you to set the ratio between the CPU Core Clock and the FSB Frequency. If the system becomes unstable, return to adjust the FSB frequency. The values range from 200 to 600. Main Ai Tweaker BIOS SETUP UTILITY Advanced Power Boot Configure System Frequency/Voltage AI Overclocking DRAM Frequency Control HT Link Speed CPU Voltage CPU/NB Voltage CPU/LDT Spread Spectrum PCIE Spread Spectrum SATA Spread Spectrum PCI Spread Spectrum [Auto] [Auto] [Auto] [Auto] [Auto] [Disabled] [Disabled] [Disabled] [Disabled...
...setup 3.5 Ai Tweaker menu The Ai Tweaker menu items allow you to set the ratio between the CPU Core Clock and the FSB Frequency. If the system becomes unstable, return to adjust the FSB frequency. The values range from 200 to 600. Main Ai Tweaker BIOS SETUP UTILITY Advanced Power Boot Configure System Frequency/Voltage AI Overclocking DRAM Frequency Control HT Link Speed CPU Voltage CPU/NB Voltage CPU/LDT Spread Spectrum PCIE Spread Spectrum SATA Spread Spectrum PCI Spread Spectrum [Auto] [Auto] [Auto] [Auto] [Auto] [Disabled] [Disabled] [Disabled] [Disabled...
User Guide
Page 73
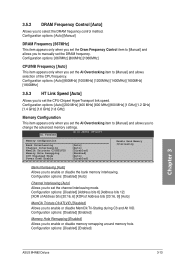
... BIOS SETUP UTILITY Memory Configuration Bank Interleaving Channel Interleaving MemClk Tristate C3/ATLVID Memory Hole Remapping DCT Unganged Mode Power Down Enable [Auto] [Auto] [Disabled] [Enabled] [Auto] [Disabled] Enable Bank Memory Interleaving Bank Interleaving [Auto] Allows you to set the CPU-Chipset HyperTransport link speed. Configuration options: [Disabled] [Address bits 6] [Address bits 12] [XOR of Address bits [20:16, 6] [XOR of the CPU frequency. Configuration options: [Disabled] [Enabled] Chapter 3 ASUS M4N82 Deluxe 3-13 Configuration options...
... BIOS SETUP UTILITY Memory Configuration Bank Interleaving Channel Interleaving MemClk Tristate C3/ATLVID Memory Hole Remapping DCT Unganged Mode Power Down Enable [Auto] [Auto] [Disabled] [Enabled] [Auto] [Disabled] Enable Bank Memory Interleaving Bank Interleaving [Auto] Allows you to set the CPU-Chipset HyperTransport link speed. Configuration options: [Disabled] [Address bits 6] [Address bits 12] [XOR of Address bits [20:16, 6] [XOR of the CPU frequency. Configuration options: [Disabled] [Enabled] Chapter 3 ASUS M4N82 Deluxe 3-13 Configuration options...
User Guide
Page 79
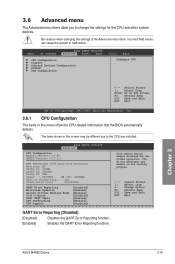
..., American Megatrends, Inc. 3.6.1 CPU Configuration The items in this menu show the CPU-related information that the BIOS automatically detects. Main Ai Tweaker BIOS SETUP UTILITY Advanced Power Boot CPU Configuration Chipset Onboard Devices Configuration PCIPnP USB Configuration Tools Exit Configure CPU. ←→ Select Screen ↑↓ Select Item Enter Go to change the settings for the CPU and other system devices. BIOS SETUP UTILITY Advanced CPU Configuration Module Version: 13.40 AGESA Version: 3.3.1.0 AMD Phenom(tm) 9550 Quad-Core Processor Revision: B3 Cache L1...
..., American Megatrends, Inc. 3.6.1 CPU Configuration The items in this menu show the CPU-related information that the BIOS automatically detects. Main Ai Tweaker BIOS SETUP UTILITY Advanced Power Boot CPU Configuration Chipset Onboard Devices Configuration PCIPnP USB Configuration Tools Exit Configure CPU. ←→ Select Screen ↑↓ Select Item Enter Go to change the settings for the CPU and other system devices. BIOS SETUP UTILITY Advanced CPU Configuration Module Version: 13.40 AGESA Version: 3.3.1.0 AMD Phenom(tm) 9550 Quad-Core Processor Revision: B3 Cache L1...
User Guide
Page 81
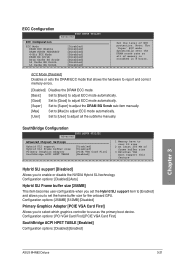
... Graphics Adapter SouthBridge ACPI HPET TABLE [Disabled] [Disabled] [PCIE VGA Card Firs] [Enabled] 1 Memory have to over 2G size 2 At least 256 MB of frame buffer size 3 External VGA must support this feature Hybrid SLI support [Disabled] Allows you to select which graphics controller to use as the primary boot device. Configuration options: [256MB] [512MB] [Disabled] Primary Graphics Adapter [PCIE VGA Card First] Allows you to adjust all of ECC protection. Set to [User] to enable or disable the NVIDIA Hybrid SLI technology. ECC Configuration BIOS SETUP UTILITY...
... Graphics Adapter SouthBridge ACPI HPET TABLE [Disabled] [Disabled] [PCIE VGA Card Firs] [Enabled] 1 Memory have to over 2G size 2 At least 256 MB of frame buffer size 3 External VGA must support this feature Hybrid SLI support [Disabled] Allows you to select which graphics controller to use as the primary boot device. Configuration options: [256MB] [512MB] [Disabled] Primary Graphics Adapter [PCIE VGA Card First] Allows you to adjust all of ECC protection. Set to [User] to enable or disable the NVIDIA Hybrid SLI technology. ECC Configuration BIOS SETUP UTILITY...
User Guide
Page 82
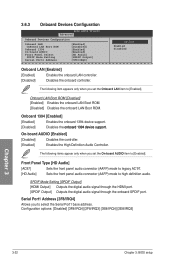
...Devices Configuration BIOS SETUP UTILITY Advanced Onboard Devices Configuration Onboard LAN OnBoard LAN Boot ROM Onboard 1394 On-board AUDIO Front Panel Select SPDIF Mode Setting Serial Port1 Address [Enabled] [Disabled] [Enabled] [Enabled] [HD Audio] [SPDIF Output] [3F8/IRQ4] Options Enabled Disabled Onboard LAN [Enabled] [Enabled] Enables the onboard LAN controller. [Disabled] Disables the onboard controller. Onboard LAN Boot ROM [Disabled] [Enabled] Enables the onboard LAN Boot ROM. [Disabled] Disables the onboard LAN Boot ROM. SPDIF Mode Setting [SPDIF Output] [HDMI...
...Devices Configuration BIOS SETUP UTILITY Advanced Onboard Devices Configuration Onboard LAN OnBoard LAN Boot ROM Onboard 1394 On-board AUDIO Front Panel Select SPDIF Mode Setting Serial Port1 Address [Enabled] [Disabled] [Enabled] [Enabled] [HD Audio] [SPDIF Output] [3F8/IRQ4] Options Enabled Disabled Onboard LAN [Enabled] [Enabled] Enables the onboard LAN controller. [Disabled] Disables the onboard controller. Onboard LAN Boot ROM [Disabled] [Enabled] Enables the onboard LAN Boot ROM. [Disabled] Disables the onboard LAN Boot ROM. SPDIF Mode Setting [SPDIF Output] [HDMI...
User Guide
Page 83
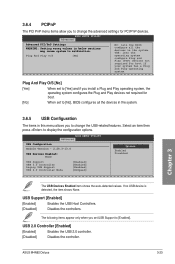
... controllers. BIOS SETUP UTILITY Advanced Advanced PCI/PnP Settings WARNING: Setting wrong values in the system. BIOS SETUP UTILITY Advanced USB Configuration Module Version - 2.24.3-13.4 USB Devices Enabled: None Options Enabled Disabled USB Support USB 2.0 Controller Legacy USB Support USB 2.0 Controller Mode [Enabled] [Enabled] [Enabled] [HiSpeed] Chapter 3 The USB Devices Enabled item shows the auto-detected values. The following items appear only when you to change the USB-related features. ASUS M4N82 Deluxe 3-23 USB 2.0 Controller [Enabled] [Enabled] Enables...
... controllers. BIOS SETUP UTILITY Advanced Advanced PCI/PnP Settings WARNING: Setting wrong values in the system. BIOS SETUP UTILITY Advanced USB Configuration Module Version - 2.24.3-13.4 USB Devices Enabled: None Options Enabled Disabled USB Support USB 2.0 Controller Legacy USB Support USB 2.0 Controller Mode [Enabled] [Enabled] [Enabled] [HiSpeed] Chapter 3 The USB Devices Enabled item shows the auto-detected values. The following items appear only when you to change the USB-related features. ASUS M4N82 Deluxe 3-23 USB 2.0 Controller [Enabled] [Enabled] Enables...
User Guide
Page 91
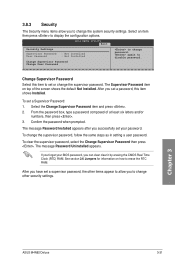
... 3. Chapter 3 ASUS M4N82 Deluxe 3-31 again to display the configuration options. Change Supervisor Password Select this item shows Installed. To clear the supervisor password, select the Change Supervisor Password then press . After you have set your BIOS password, you can clear clear it by erasing the CMOS Real Time Clock (RTC) RAM. Select an item then press to disable password. BIOS SETUP UTILITY Boot Security Settings Supervisor Password User Password : Not Installed : Not Installed Change Supervisor Password Change User Passward to change the system security settings. The...
... 3. Chapter 3 ASUS M4N82 Deluxe 3-31 again to display the configuration options. Change Supervisor Password Select this item shows Installed. To clear the supervisor password, select the Change Supervisor Password then press . After you have set your BIOS password, you can clear clear it by erasing the CMOS Real Time Clock (RTC) RAM. Select an item then press to disable password. BIOS SETUP UTILITY Boot Security Settings Supervisor Password User Password : Not Installed : Not Installed Change Supervisor Password Change User Passward to change the system security settings. The...
User Guide
Page 99
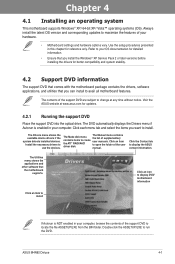
... the support DVD into the optical drive. Refer to install. Click the Contact tab to run the DVD. Double-click the ASSETUP.EXE to display the ASUS contact information. ASUS M4N82 Deluxe 4-1 Install the necessary drivers to create the ATI® RAID/AHCI driver disk. The Make disk menu contains items to use the devices. The Utilities menu shows the applications and other software that you want to your hardware. • Motherboard settings and hardware options...
... the support DVD into the optical drive. Refer to install. Click the Contact tab to run the DVD. Double-click the ASSETUP.EXE to display the ASUS contact information. ASUS M4N82 Deluxe 4-1 Install the necessary drivers to create the ATI® RAID/AHCI driver disk. The Make disk menu contains items to use the devices. The Utilities menu shows the applications and other software that you want to your hardware. • Motherboard settings and hardware options...
User Guide
Page 104
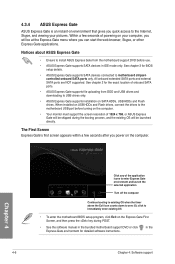
... after you power on SATA HDDs, USB HDDs and Flash drives. When installed on USB HDDs and Flash drives, connect the drives to install ASUS Express Gate from ODD and USB drives and downloading to immediately enter existing OS • To enter the motherboard BIOS setup program, click Exit on the computer. • Your monitor must support the screen resolution of onboard SATA ports. • ASUS Express Gate supports file uploading from the motherboard support DVD before turning on the Express Gate First Screen, and then press the key during the booting process...
... after you power on SATA HDDs, USB HDDs and Flash drives. When installed on USB HDDs and Flash drives, connect the drives to install ASUS Express Gate from ODD and USB drives and downloading to immediately enter existing OS • To enter the motherboard BIOS setup program, click Exit on the computer. • Your monitor must support the screen resolution of onboard SATA ports. • ASUS Express Gate supports file uploading from the motherboard support DVD before turning on the Express Gate First Screen, and then press the key during the booting process...
User Guide
Page 113
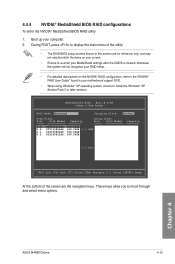
... your motherboard support DVD. • When using Windows® XP operating system, ensure to display the main menu of the screen are the navigation keys. 4.4.4 NVIDIA® MediaShield BIOS RAID configurations To enter the NVIDIA® MediaShield BIOS RAID utility 1. otherwise, the system will not recognize your RAID setup. • For detailed descriptions on your screen. • Ensure to move through and select menu options. RAID Mode: Mirrored Striping Block: Optimal Free Disks Port Disk Model Capacity Array Disks Port Disk Model Capacity...
... your motherboard support DVD. • When using Windows® XP operating system, ensure to display the main menu of the screen are the navigation keys. 4.4.4 NVIDIA® MediaShield BIOS RAID configurations To enter the NVIDIA® MediaShield BIOS RAID utility 1. otherwise, the system will not recognize your RAID setup. • For detailed descriptions on your screen. • Ensure to move through and select menu options. RAID Mode: Mirrored Striping Block: Optimal Free Disks Port Disk Model Capacity Array Disks Port Disk Model Capacity...

User Guide
Page 119
... disk. 7. Set the optical drive as the primary boot device. 4. When the Make Disk menu appears, press to enter the NVIDIA SATA RAID Driver Page to enter the BIOS setup utility. 3. party SCSI or RAID driver. 2. Follow the succeeding screen instructions to avoid a computer virus infection. For Windows® Vista operating system, use a USB floppy drive when creating a SATA RAID driver disk. 4.5.1 Creating a RAID driver disk without entering the OS To create a RAID/SATA driver disk without entering the OS: 1. The motherboard does not provide a floppy drive connector. Save changes...
... disk. 7. Set the optical drive as the primary boot device. 4. When the Make Disk menu appears, press to enter the NVIDIA SATA RAID Driver Page to enter the BIOS setup utility. 3. party SCSI or RAID driver. 2. Follow the succeeding screen instructions to avoid a computer virus infection. For Windows® Vista operating system, use a USB floppy drive when creating a SATA RAID driver disk. 4.5.1 Creating a RAID driver disk without entering the OS To create a RAID/SATA driver disk without entering the OS: 1. The motherboard does not provide a floppy drive connector. Save changes...


