User Guide
Page 4
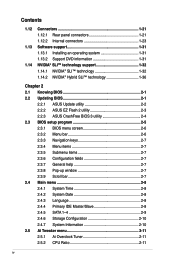
...; technology support 1-32 1.14.1 NVIDIA® SLI™ technology 1-32 1.14.2 NVIDIA® Hybrid SLI™ technology 1-36 Chapter 2 2.1 Knowing BIOS 2-1 2.2 Updating BIOS 2-1 2.2.1 ASUS Update utility 2-2 2.2.2 ASUS EZ Flash 2 utility 2-3 2.2.3 ASUS CrashFree BIOS 3 utility 2-4 2.3 BIOS setup program 2-5 2.3.1 BIOS menu screen 2-6 2.3.2 Menu bar 2-6 2.3.3 Navigation keys 2-7 2.3.4 Menu items 2-7 2.3.5 Submenu items 2-7 2.3.6 Configuration fields 2-7 2.3.7 General help 2-7 2.3.8 Pop-up window 2-7 2.3.9 Scroll bar 2-7 2.4 Main...
...; technology support 1-32 1.14.1 NVIDIA® SLI™ technology 1-32 1.14.2 NVIDIA® Hybrid SLI™ technology 1-36 Chapter 2 2.1 Knowing BIOS 2-1 2.2 Updating BIOS 2-1 2.2.1 ASUS Update utility 2-2 2.2.2 ASUS EZ Flash 2 utility 2-3 2.2.3 ASUS CrashFree BIOS 3 utility 2-4 2.3 BIOS setup program 2-5 2.3.1 BIOS menu screen 2-6 2.3.2 Menu bar 2-6 2.3.3 Navigation keys 2-7 2.3.4 Menu items 2-7 2.3.5 Submenu items 2-7 2.3.6 Configuration fields 2-7 2.3.7 General help 2-7 2.3.8 Pop-up window 2-7 2.3.9 Scroll bar 2-7 2.4 Main...

User Guide
Page 7
..., ensure that all power cables are also provided. If you need when installing and configuring the motherboard. Detailed descriptions of the BIOS parameters are unplugged. • Seek professional assistance before using an adapter or extension cord. About this guide is organized This guide... not sure about the voltage of the motherboard and the new technology it supports. • Chapter 2: BIOS setup This chapter tells how to change system settings through the BIOS Setup menus. Operation safety • Before installing the motherboard and adding devices on a stable surface. &#...
..., ensure that all power cables are also provided. If you need when installing and configuring the motherboard. Detailed descriptions of the BIOS parameters are unplugged. • Seek professional assistance before using an adapter or extension cord. About this guide is organized This guide... not sure about the voltage of the motherboard and the new technology it supports. • Chapter 2: BIOS setup This chapter tells how to change system settings through the BIOS Setup menus. Operation safety • Before installing the motherboard and adding devices on a stable surface. &#...

User Guide
Page 10
... voltage control - FSB tuning from 200MHz up to 2000MHz - EPU ASUS Express Gate ASUS Quiet Thermal Solution - Memory tuning from 100MHz to 600MHz at 1MHz increment - CrashFree BIOS 3 - PCIe frequency tuning from 1066MHz up to 200MHz at 0.0125V increment - M4N75TD specifications summary ASUS Unique Features ASUS Exclusive Overclocking Features Rear panel I /O ports (continued on the next...
... voltage control - FSB tuning from 200MHz up to 2000MHz - EPU ASUS Express Gate ASUS Quiet Thermal Solution - Memory tuning from 100MHz to 600MHz at 1MHz increment - CrashFree BIOS 3 - PCIe frequency tuning from 1066MHz up to 200MHz at 0.0125V increment - M4N75TD specifications summary ASUS Unique Features ASUS Exclusive Overclocking Features Rear panel I /O ports (continued on the next...
User Guide
Page 11
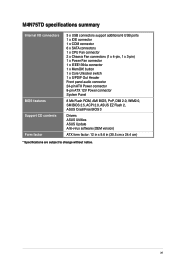
... Power connector 8-pin ATX 12V Power connector System Panel 8 Mb Flash ROM, AMI BIOS, PnP, DMI 2.0, WfM2.0, SM BIOS 2.5, ACPI 2.0, ASUS EZ Flash 2, ASUS CrashFree BIOS 3 Drivers ASUS Utilities ASUS Update Anti-virus software (OEM version) ATX form factor: 12 in x 9.6 in... (30.5 cm x 24.4 cm) * Specifications are subject to change without notice. M4N75TD specifications summary Internal I/O connectors BIOS features Support CD...
... Power connector 8-pin ATX 12V Power connector System Panel 8 Mb Flash ROM, AMI BIOS, PnP, DMI 2.0, WfM2.0, SM BIOS 2.5, ACPI 2.0, ASUS EZ Flash 2, ASUS CrashFree BIOS 3 Drivers ASUS Utilities ASUS Update Anti-virus software (OEM version) ATX form factor: 12 in x 9.6 in... (30.5 cm x 24.4 cm) * Specifications are subject to change without notice. M4N75TD specifications summary Internal I/O connectors BIOS features Support CD...

User Guide
Page 14
MemOK! This series' high quality power components effective lowers system temperature to vital components. 1-2 ASUS M4N75TD ASUS M4N75TD also features an extra 1-phase power for the world's ultimate gaming PC. The MCPs support the NVIDIA® Scalable Link Interface (SLI... or hot key. This enhances system performance in a single system. Enjoy an instant performance boost by simply unlocking the extra cores, without performing complicated BIOS changes. Worry no time. MemOK! The NVIDIA nFORCE® 750a SLI® chipset also supports six (6) Serial ATA 3 Gb/s devices, PCI ...
MemOK! This series' high quality power components effective lowers system temperature to vital components. 1-2 ASUS M4N75TD ASUS M4N75TD also features an extra 1-phase power for the world's ultimate gaming PC. The MCPs support the NVIDIA® Scalable Link Interface (SLI... or hot key. This enhances system performance in a single system. Enjoy an instant performance boost by simply unlocking the extra cores, without performing complicated BIOS changes. Worry no time. MemOK! The NVIDIA nFORCE® 750a SLI® chipset also supports six (6) Serial ATA 3 Gb/s devices, PCI ...

User Guide
Page 27
...(run at x8 bandwidth) that you intend to install expansion cards. Install the software drivers for later use . When using PCI cards on BIOS setup. 2. Remove the bracket opposite the slot that comply with the PCI Express specifications. Assign an IRQ to the chassis with the slot and... cord before adding or removing expansion cards. Remove the system unit cover (if your motherboard is completely seated on the system and change the necessary BIOS settings, if any. Failure to do not need to use . 4. Secure the card to the card. 3. See Chapter 2 for information on shared...
...(run at x8 bandwidth) that you intend to install expansion cards. Install the software drivers for later use . When using PCI cards on BIOS setup. 2. Remove the bracket opposite the slot that comply with the PCI Express specifications. Assign an IRQ to the chassis with the slot and... cord before adding or removing expansion cards. Remove the system unit cover (if your motherboard is completely seated on the system and change the necessary BIOS settings, if any. Failure to do not need to use . 4. Secure the card to the card. 3. See Chapter 2 for information on shared...

User Guide
Page 28
... 1.9 Jumpers 1. Turn OFF the computer and unplug the power cord. 2. Shut down the key during the boot process and enter BIOS setup to enable C.P.R. function. Clear RTC RAM (CLRTC) This jumper allows you to pins 2-3. Move the jumper cap from pins 1-2...RAM in CMOS, which include system setup information such as system passwords. Hold down and reboot the system so the BIOS can clear the CMOS memory of date, time, and system setup parameters by erasing the CMOS RTC RAM data. Except...the power supply or unplug and plug the power cord before rebooting the system. 1-16 ASUS M4N75TD
... 1.9 Jumpers 1. Turn OFF the computer and unplug the power cord. 2. Shut down the key during the boot process and enter BIOS setup to enable C.P.R. function. Clear RTC RAM (CLRTC) This jumper allows you to pins 2-3. Move the jumper cap from pins 1-2...RAM in CMOS, which include system setup information such as system passwords. Hold down and reboot the system so the BIOS can clear the CMOS memory of date, time, and system setup parameters by erasing the CMOS RTC RAM data. Except...the power supply or unplug and plug the power cord before rebooting the system. 1-16 ASUS M4N75TD

User Guide
Page 29
...a better cooling system (for more information about the CPU overvoltage setting. • DO NOT set the OV_CPU jumper to work stably under the highest BIOS voltage setting before you change the jumper setting. Pins 2-3 (Default) Pins 1-2 (OV Enabled) OV_CPU 0.80V - 1.55V up to 1.60V &#...setting (3-pin OV_CPU) This jumper allows you install a new CPU and have not booted for extra-high overvoltage ability, use the BIOS items introduced in BIOS. Chapter 1: Product introduction 1-17 Set to pins 1-2 to enable or disable the advanced CPU overvoltage setting in 2.5 Ai Tweaker ...
...a better cooling system (for more information about the CPU overvoltage setting. • DO NOT set the OV_CPU jumper to work stably under the highest BIOS voltage setting before you change the jumper setting. Pins 2-3 (Default) Pins 1-2 (OV Enabled) OV_CPU 0.80V - 1.55V up to 1.60V &#...setting (3-pin OV_CPU) This jumper allows you install a new CPU and have not booted for extra-high overvoltage ability, use the BIOS items introduced in BIOS. Chapter 1: Product introduction 1-17 Set to pins 1-2 to enable or disable the advanced CPU overvoltage setting in 2.5 Ai Tweaker ...

User Guide
Page 30
... memory settings. Replace the DIMMs with the motherboard may cause system boot failure, and the DRAM_LED near the MemOK! function. 1-18 ASUS M4N75TD switch until the DRAM_LED starts blinking to begin automatic memory compatibility tuning for successful boot. • Refer to section 1.11 Onboard LEDs... for about 30 seconds for overclockers and gamers who continually change settings to BIOS overclocking, press the MemOK! It takes about 5-10 seconds. • If your system fail to boot due to enhance system performance. ...
... memory settings. Replace the DIMMs with the motherboard may cause system boot failure, and the DRAM_LED near the MemOK! function. 1-18 ASUS M4N75TD switch until the DRAM_LED starts blinking to begin automatic memory compatibility tuning for successful boot. • Refer to section 1.11 Onboard LEDs... for about 30 seconds for overclockers and gamers who continually change settings to BIOS overclocking, press the MemOK! It takes about 5-10 seconds. • If your system fail to boot due to enhance system performance. ...

User Guide
Page 37
... at RAID mode together. • You must install Windows XP® Service Pack 2 or later version before connecting devices to the manual bundled in the BIOS to [RAID Mode].
... at RAID mode together. • You must install Windows XP® Service Pack 2 or later version before connecting devices to the manual bundled in the BIOS to [RAID Mode].

User Guide
Page 39
... for the HDD Activity LED. Chapter 1: Product introduction 1-27 Connect the HDD Activity LED cable to this connector. The speaker allows you turn on the BIOS settings. Pressing the power switch for more than four seconds while the system is ON turns the system OFF. • Reset button (2-pin RESET) This...
... for the HDD Activity LED. Chapter 1: Product introduction 1-27 Connect the HDD Activity LED cable to this connector. The speaker allows you turn on the BIOS settings. Pressing the power switch for more than four seconds while the system is ON turns the system OFF. • Reset button (2-pin RESET) This...

User Guide
Page 41
... connector is set the item to a slot opening at the back of the front panel audio I /O module that the Front Panel Select item in the BIOS is for details. 9. Connect one end of the system chassis. 8.
... connector is set the item to a slot opening at the back of the front panel audio I /O module that the Front Panel Select item in the BIOS is for details. 9. Connect one end of the system chassis. 8.

User Guide
Page 49
... The onboard GPU will find the Hybrid SLI icon on the system and press during the Power-On Self-Test (POST) to enter the BIOS Setup Utility. 2. Go to Advanced > Chipset > SouthBridge Configuration and set the Hybrid SLI support item to install the NVIDIA Chipset Driver Program.... 5. If the driver is properly installed. Turn on the taskbar. Save your motherboard. Visit www.asus.com for details. The Hybrid Support item becomes user-configurable only when a dGPU is enabled. Ensure that GeForce Boost is detected. Enabling GeForce...
... The onboard GPU will find the Hybrid SLI icon on the system and press during the Power-On Self-Test (POST) to enter the BIOS Setup Utility. 2. Go to Advanced > Chipset > SouthBridge Configuration and set the Hybrid SLI support item to install the NVIDIA Chipset Driver Program.... 5. If the driver is properly installed. Turn on the taskbar. Save your motherboard. Visit www.asus.com for details. The Hybrid Support item becomes user-configurable only when a dGPU is enabled. Ensure that GeForce Boost is detected. Enabling GeForce...

User Guide
Page 51
... no problem using a USB flash drive. 3. If there is potentially risky. ASUS Update utility: Updates the BIOS in the following utilities allow you change the BIOS settings only with the help of this motherboard. ASUS CrashFree BIOS 3 utility: Restores the BIOS using the ASUS Update utility. Chapter 2: BIOS setup 2-1 Carefully follow the instructions of a trained service personnel. 2.2 Updating...
... no problem using a USB flash drive. 3. If there is potentially risky. ASUS Update utility: Updates the BIOS in the following utilities allow you change the BIOS settings only with the help of this motherboard. ASUS CrashFree BIOS 3 utility: Restores the BIOS using the ASUS Update utility. Chapter 2: BIOS setup 2-1 Carefully follow the instructions of a trained service personnel. 2.2 Updating...

User Guide
Page 52
...of the updating process: Updating from the Internet a. Select Update BIOS from the Internet, and then click Next. Follow the onscreen instructions to launch the ASUS Update utility. 2. 2.2.1 ASUS Update utility The ASUS Update is a utility that allows you wish to download, ...the Windows® desktop, click Start > Programs > ASUS > ASUSUpdate > ASUSUpdate to complete the updating process. 2-2 ASUS M4N75TD Select the ASUS FTP site nearest you update the BIOS using this utility. Click the Utilities tab, and then click Install ASUS Update. 3. From the dropdown list, select any of...
...of the updating process: Updating from the Internet a. Select Update BIOS from the Internet, and then click Next. Follow the onscreen instructions to launch the ASUS Update utility. 2. 2.2.1 ASUS Update utility The ASUS Update is a utility that allows you wish to download, ...the Windows® desktop, click Start > Programs > ASUS > ASUSUpdate > ASUSUpdate to complete the updating process. 2-2 ASUS M4N75TD Select the ASUS FTP site nearest you update the BIOS using this utility. Click the Utilities tab, and then click Install ASUS Update. 3. From the dropdown list, select any of...

User Guide
Page 53
Download the latest BIOS file from the ASUS website at www.asus.com. Insert the floppy/USB flash disk that contains the latest BIOS file to display the following: ASUSTek EZ Flash 2 BIOS ROM Utility V4.12 Current ROM BOARD: M4N75TD VER: 0106 DATE: 01/15/2010 Update ROM BOARD: Unknown VER: Unknown DATE: Unknown PATH: A:\ A: Note...
Download the latest BIOS file from the ASUS website at www.asus.com. Insert the floppy/USB flash disk that contains the latest BIOS file to display the following: ASUSTek EZ Flash 2 BIOS ROM Utility V4.12 Current ROM BOARD: M4N75TD VER: 0106 DATE: 01/15/2010 Update ROM BOARD: Unknown VER: Unknown DATE: Unknown PATH: A:\ A: Note...

User Guide
Page 54
...reset the system while updating the BIOS! The system requires you want to use the newer BIOS file, download the file at support.asus.com and save it fails or gets corrupted during the updating process. 2.2.3 ASUS CrashFree BIOS 3 utility The ASUS CrashFree BIOS 3 utility is an auto recovery... completes the updating process and power on again. 5. You can cause system boot failure! 2-4 ASUS M4N75TD If you to enter BIOS Setup to recover BIOS setting. Doing so can restore a corrupted BIOS file using the motherboard support DVD or a USB flash drive that you press to the USB ...
...reset the system while updating the BIOS! The system requires you want to use the newer BIOS file, download the file at support.asus.com and save it fails or gets corrupted during the updating process. 2.2.3 ASUS CrashFree BIOS 3 utility The ASUS CrashFree BIOS 3 utility is an auto recovery... completes the updating process and power on again. 5. You can cause system boot failure! 2-4 ASUS M4N75TD If you to enter BIOS Setup to recover BIOS setting. Doing so can restore a corrupted BIOS file using the motherboard support DVD or a USB flash drive that you press to the USB ...

User Guide
Page 55
...from the available options using the provided utility described in section 2.1 Managing and updating your screen. • Visit the ASUS website at www.asus.com to "Run Setup". For example, you see on the system chassis. • Press the power button to configure... your data or system. Otherwise, POST continues with the opportunity to reconfigure your system using the BIOS Setup program so that you can update using the navigation keys. • The default BIOS...
...from the available options using the provided utility described in section 2.1 Managing and updating your screen. • Visit the ASUS website at www.asus.com to "Run Setup". For example, you see on the system chassis. • Press the power button to configure... your data or system. Otherwise, POST continues with the opportunity to reconfigure your system using the BIOS Setup program so that you can update using the navigation keys. • The default BIOS...

User Guide
Page 56
... exactly match what you see on your screen. • Visit the ASUS website at www.asus.com to configure system Time. Use [+] or [-] to download the latest BIOS information. 2-6 ASUS M4N75TD 2.3.1 BIOS menu screen Menu items Menu bar Configuration fields General help Main Ai Tweaker BIOS SETUP UTILITY Advanced Power Boot System Time System Date Language [10...
... exactly match what you see on your screen. • Visit the ASUS website at www.asus.com to configure system Time. Use [+] or [-] to download the latest BIOS information. 2-6 ASUS M4N75TD 2.3.1 BIOS menu screen Menu items Menu bar Configuration fields General help Main Ai Tweaker BIOS SETUP UTILITY Advanced Power Boot System Time System Date Language [10...

User Guide
Page 57
... of the field opposite the item. Press the / arrow keys or / keys to select items in brackets, and is highlighted when selected. Main Advanced BIOS SETUP UTILITY Power Boot Tools Exit Suspend Mode Repost Video on any menu screen means that the item has a submenu. Scroll bar Pop-up window..., American Megatrends, Inc. A configurable field is not userconfigurable. To change the value of a field, select it then press to display a pop-up window Chapter 2: BIOS setup 2-7 2.3.3 Navigation keys At the bottom right corner of a menu screen are items that do not fit on the screen.
... of the field opposite the item. Press the / arrow keys or / keys to select items in brackets, and is highlighted when selected. Main Advanced BIOS SETUP UTILITY Power Boot Tools Exit Suspend Mode Repost Video on any menu screen means that the item has a submenu. Scroll bar Pop-up window..., American Megatrends, Inc. A configurable field is not userconfigurable. To change the value of a field, select it then press to display a pop-up window Chapter 2: BIOS setup 2-7 2.3.3 Navigation keys At the bottom right corner of a menu screen are items that do not fit on the screen.


