
User Guide
Page 7
...; Avoid dust, humidity, and temperature extremes. These devices could interrupt the grounding circuit. • Ensure that your power supply is set to the correct voltage in any damage, contact your local power company. • If the power supply is organized This guide contains the following parts: • Chapter 1: Product introduction This chapter describes the features...
...; Avoid dust, humidity, and temperature extremes. These devices could interrupt the grounding circuit. • Ensure that your power supply is set to the correct voltage in any damage, contact your local power company. • If the power supply is organized This guide contains the following parts: • Chapter 1: Product introduction This chapter describes the features...

User Guide
Page 16
Place this side towards the rear of the chassis as the power supply case, to avoid damaging them due to static electricity. • Hold components by circles to secure the ...correct orientation. The edge with the component. • Before you install or remove any component, switch off the ATX power supply and detach its power cord. Doing so can damage the motherboard. Failure to do so may cause severe damage to the chassis. 1.4 ...the chassis in the bag that came with external ports goes to the rear part of the chassis. 1-4 ASUS M4N75TD Do not overtighten the screws!
Place this side towards the rear of the chassis as the power supply case, to avoid damaging them due to static electricity. • Hold components by circles to secure the ...correct orientation. The edge with the component. • Before you install or remove any component, switch off the ATX power supply and detach its power cord. Doing so can damage the motherboard. Failure to do so may cause severe damage to the chassis. 1.4 ...the chassis in the bag that came with external ports goes to the rear part of the chassis. 1-4 ASUS M4N75TD Do not overtighten the screws!

User Guide
Page 26
... only one direction. 1.7.3 Installing a DIMM Unplug the power supply before adding or removing DIMMs or other system components. Align a DIMM on the socket such that it fits in any further to prevent DIMM notch damage. 1.7.4 Removing a DIMM 1. Remove the DIMM from the socket. 2 1 1-14 ASUS M4N75TD Failure to do so can cause severe damage...
... only one direction. 1.7.3 Installing a DIMM Unplug the power supply before adding or removing DIMMs or other system components. Align a DIMM on the socket such that it fits in any further to prevent DIMM notch damage. 1.7.4 Removing a DIMM 1. Remove the DIMM from the socket. 2 1 1-14 ASUS M4N75TD Failure to do so can cause severe damage...

User Guide
Page 28
..., use the C.P.R. (CPU Parameter Recall) feature. Except when clearing the RTC RAM, never remove the cap on the power supply or unplug and plug the power cord before rebooting the system. 1-16 ASUS M4N75TD Plug the power cord and turn off is required to re-enter data. After the CMOS clearance, reinstall the battery. • You...
..., use the C.P.R. (CPU Parameter Recall) feature. Except when clearing the RTC RAM, never remove the cap on the power supply or unplug and plug the power cord before rebooting the system. 1-16 ASUS M4N75TD Plug the power cord and turn off is required to re-enter data. After the CMOS clearance, reinstall the battery. • You...

User Guide
Page 36
...cards, use a power supply unit (PSU) that complies with ATX 12 V Specification 2.0 (or later version) and provides a minimum power of a PSU with a higher power output is recommended when configuring a system with 1000W power or above to the Recommended Power Supply Wattage Calculator at http://support.asus. The system ...Thermaltake W0133RU Thermaltake W0171 Thermaltake TWV500W-AP Thermaltake PUREPower-600AP TOPower TOP-500P5 Zippy HP2-6500PE (G1) Zippy PSL6720P ASUS M4N75TD otherwise, the system will not boot. • Use of 350W. • Do not forget to fit these connectors in only...
...cards, use a power supply unit (PSU) that complies with ATX 12 V Specification 2.0 (or later version) and provides a minimum power of a PSU with a higher power output is recommended when configuring a system with 1000W power or above to the Recommended Power Supply Wattage Calculator at http://support.asus. The system ...Thermaltake W0133RU Thermaltake W0171 Thermaltake TWV500W-AP Thermaltake PUREPower-600AP TOPower TOP-500P5 Zippy HP2-6500PE (G1) Zippy PSL6720P ASUS M4N75TD otherwise, the system will not boot. • Use of 350W. • Do not forget to fit these connectors in only...

User Guide
Page 44
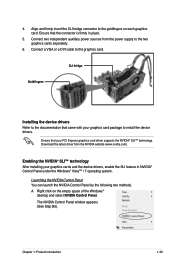
...the installation procedures in this section. Installing two SLI-ready graphics cards The following pictures are properly seated on the slots. 1-32 ASUS M4N75TD Ensure that the cards are for the latest certified graphics card and supported 3D application list. Prepare two SLI-ready graphics cards. ...graphics cards. Download the latest driver from the NVIDIA website (www.nvidia.com). • Ensure that your power supply unit (PSU) can provide at least the minimum power required by your system. The graphics cards and the motherboard layout may vary with models, but the installation ...
...the installation procedures in this section. Installing two SLI-ready graphics cards The following pictures are properly seated on the slots. 1-32 ASUS M4N75TD Ensure that the cards are for the latest certified graphics card and supported 3D application list. Prepare two SLI-ready graphics cards. ...graphics cards. Download the latest driver from the NVIDIA website (www.nvidia.com). • Ensure that your power supply unit (PSU) can provide at least the minimum power required by your system. The graphics cards and the motherboard layout may vary with models, but the installation ...
User Guide
Page 45
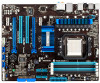
...5. Right click on each graphics card. The NVIDIA Control Panel window appears (See Step B5). Download the latest driver from the power supply to install the device drivers. A. Chapter 1: Product introduction 1-33 Ensure that came with your graphics card package to the two ...graphics cards separately. 6. Connect two independent auxiliary power sources from the NVIDIA website (www.nvidia.com). 4. SLI bridge Goldfingers Installing the device drivers Refer to the documentation that the...
...5. Right click on each graphics card. The NVIDIA Control Panel window appears (See Step B5). Download the latest driver from the power supply to install the device drivers. A. Chapter 1: Product introduction 1-33 Ensure that came with your graphics card package to the two ...graphics cards separately. 6. Connect two independent auxiliary power sources from the NVIDIA website (www.nvidia.com). 4. SLI bridge Goldfingers Installing the device drivers Refer to the documentation that the...


