
User Guide
Page 13
... for the following items. Motherboard Cables Accessories Application DVD Documentations ASUS M4N75TD motherboard 1 x Ultra DMA 133/100/66 cable 2 x Serial ATA cables 1 x SLI bridge cable 1 x I/O shield ASUS motherboard support DVD User manual If any of ASUS quality motherboards! Phenom™ II / Athlon™ II ...; CPUs in the long line of the above items is damaged or missing, contact your motherboard package for buying an ASUS® M4N75TD motherboard! Chapter 1: Product introduction 1-1 The motherboard delivers a host of new features and latest technologies, making it , ...
... for the following items. Motherboard Cables Accessories Application DVD Documentations ASUS M4N75TD motherboard 1 x Ultra DMA 133/100/66 cable 2 x Serial ATA cables 1 x SLI bridge cable 1 x I/O shield ASUS motherboard support DVD User manual If any of ASUS quality motherboards! Phenom™ II / Athlon™ II ...; CPUs in the long line of the above items is damaged or missing, contact your motherboard package for buying an ASUS® M4N75TD motherboard! Chapter 1: Product introduction 1-1 The motherboard delivers a host of new features and latest technologies, making it , ...

User Guide
Page 14
Enjoy an instant performance boost by simply unlocking the extra cores, without performing complicated BIOS changes. is an ASUS exclusive OS that provides you with quick access to increase memory data transfer rate and computing efficiency. ASUS M4N75TD also features an extra 1-phase power for the world's ultimate gaming PC. The MCPs support the...
Enjoy an instant performance boost by simply unlocking the extra cores, without performing complicated BIOS changes. is an ASUS exclusive OS that provides you with quick access to increase memory data transfer rate and computing efficiency. ASUS M4N75TD also features an extra 1-phase power for the world's ultimate gaming PC. The MCPs support the...

User Guide
Page 16
... the component. • Before you place it on a grounded antistatic pad or in the correct orientation. Place this side towards the rear of the chassis. 1-4 ASUS M4N75TD Doing so can damage the motherboard. Do not overtighten the screws! Failure to do so may cause severe damage to avoid touching the ICs on...
... the component. • Before you place it on a grounded antistatic pad or in the correct orientation. Place this side towards the rear of the chassis. 1-4 ASUS M4N75TD Doing so can damage the motherboard. Do not overtighten the screws! Failure to do so may cause severe damage to avoid touching the ICs on...
User Guide
Page 18
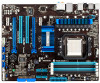
... not compatible with a small triangle. 4. Press the lever sideways to unlock the socket, then lift it fits in one correct orientation. Small triangle Gold triangle 1-6 ASUS M4N75TD 1.6 Central Processing Unit (CPU) The motherboard comes with an AM3 socket designed for AMD® Phenom™ II / Athlon™ II / Sempron™ 100 Series...
... not compatible with a small triangle. 4. Press the lever sideways to unlock the socket, then lift it fits in one correct orientation. Small triangle Gold triangle 1-6 ASUS M4N75TD 1.6 Central Processing Unit (CPU) The motherboard comes with an AM3 socket designed for AMD® Phenom™ II / Athlon™ II / Sempron™ 100 Series...

User Guide
Page 20
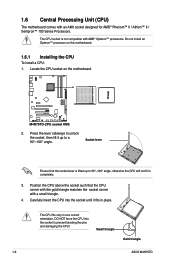
... and fan to the retention module base. 1 2 3 4 5 3. Ensure that the retention bracket is in place. 4. When the fan and heatsink assembly is in this connector. 1-8 ASUS M4N75TD Do not forget to the retention module base. Attach one end of the retention bracket to connect the CPU fan connector! Hardware monitoring errors can...
... and fan to the retention module base. 1 2 3 4 5 3. Ensure that the retention bracket is in place. 4. When the fan and heatsink assembly is in this connector. 1-8 ASUS M4N75TD Do not forget to the retention module base. Attach one end of the retention bracket to connect the CPU fan connector! Hardware monitoring errors can...

User Guide
Page 26
Apply force to both the motherboard and the components. 1. Remove the DIMM from the socket. 2 1 1-14 ASUS M4N75TD Align a DIMM on the socket such that it fits in the wrong direction to unlock the DIMM. 2. Failure to do so can cause severe damage ...
Apply force to both the motherboard and the components. 1. Remove the DIMM from the socket. 2 1 1-14 ASUS M4N75TD Align a DIMM on the socket such that it fits in the wrong direction to unlock the DIMM. 2. Failure to do so can cause severe damage ...

User Guide
Page 28
... when clearing the RTC RAM, never remove the cap on the power supply or unplug and plug the power cord before rebooting the system. 1-16 ASUS M4N75TD 1.9 Jumpers 1. Turn OFF the computer and unplug the power cord. 2. Hold down and reboot the system so the BIOS can clear the CMOS memory of...
... when clearing the RTC RAM, never remove the cap on the power supply or unplug and plug the power cord before rebooting the system. 1-16 ASUS M4N75TD 1.9 Jumpers 1. Turn OFF the computer and unplug the power cord. 2. Hold down and reboot the system so the BIOS can clear the CMOS memory of...

User Guide
Page 30
... the MemOK! Replace the DIMMs with the motherboard may cause system boot failure, and the DRAM_LED near the MemOK! function. 1-18 ASUS M4N75TD switch lights continuously. switch under Windows™ OS environment will appear during the tuning process, the system continues memory tuning after turning ... that are incompaible with ones recommended in the Memory QVL (Qualified Vendors Lists) in this user manual or on the ASUS website at www.asus.com after using the MemOK! switch until the DRAM_LED starts blinking to begin automatic memory compatibility tuning for successful boot. ...
... the MemOK! Replace the DIMMs with the motherboard may cause system boot failure, and the DRAM_LED near the MemOK! function. 1-18 ASUS M4N75TD switch lights continuously. switch under Windows™ OS environment will appear during the tuning process, the system continues memory tuning after turning ... that are incompaible with ones recommended in the Memory QVL (Qualified Vendors Lists) in this user manual or on the ASUS website at www.asus.com after using the MemOK! switch until the DRAM_LED starts blinking to begin automatic memory compatibility tuning for successful boot. ...

User Guide
Page 32
DRAM LED DRAM LED checks the DRAM in sequence during motherboard booting process. Core Unlocker LED The Core Unlocker LED lights when the Core Unclocker switch is solved. If an error is found , the LED next to the error device will continue lighting until the problem is turned to locate the root problem within a second. 3. 2. This user-friendly design provides an intuitional way to Enable. 1-20 ASUS M4N75TD
DRAM LED DRAM LED checks the DRAM in sequence during motherboard booting process. Core Unlocker LED The Core Unlocker LED lights when the Core Unclocker switch is solved. If an error is found , the LED next to the error device will continue lighting until the problem is turned to locate the root problem within a second. 3. 2. This user-friendly design provides an intuitional way to Enable. 1-20 ASUS M4N75TD

User Guide
Page 34
... (USB) ports are available for connecting USB 2.0 devices. 12. USB 2.0 ports 5 and 6. These 4-pin Universal Serial Bus (USB) ports are available for a PS/2 keyboard. 1-22 ASUS M4N75TD Rear Speaker Out - 6-channel Line In Front Speaker Out Mic In Center/Subwoofer Rear Speaker Ou - 8-channel Line In Front Speaker Out Mic In Center...
... (USB) ports are available for connecting USB 2.0 devices. 12. USB 2.0 ports 5 and 6. These 4-pin Universal Serial Bus (USB) ports are available for a PS/2 keyboard. 1-22 ASUS M4N75TD Rear Speaker Out - 6-channel Line In Front Speaker Out Mic In Center/Subwoofer Rear Speaker Ou - 8-channel Line In Front Speaker Out Mic In Center...

User Guide
Page 36
...only one orientation. The plugs from the power supply are designed to the Recommended Power Supply Wattage Calculator at http://support.asus. otherwise, the system will not boot. • Use of 350W. • Do not forget to ensure the...supply requirement for an ATX power supply. 2. AcBel PC7030 AcBel API4PC24 Antec EA-380 Delta GPS-550AB ASUS P-50GA ASUS P-55GA ASUS U-65GA ASUS U-75HA Be quiet P6-PRO-850W Be quiet BN077 Be quiet BN073 Bubalus PE600WJD CoolerMaster RS-850EMBA ...-AP Thermaltake PUREPower-600AP TOPower TOP-500P5 Zippy HP2-6500PE (G1) Zippy PSL6720P ASUS M4N75TD
...only one orientation. The plugs from the power supply are designed to the Recommended Power Supply Wattage Calculator at http://support.asus. otherwise, the system will not boot. • Use of 350W. • Do not forget to ensure the...supply requirement for an ATX power supply. 2. AcBel PC7030 AcBel API4PC24 Antec EA-380 Delta GPS-550AB ASUS P-50GA ASUS P-55GA ASUS U-65GA ASUS U-75HA Be quiet P6-PRO-850W Be quiet BN077 Be quiet BN073 Bubalus PE600WJD CoolerMaster RS-850EMBA ...-AP Thermaltake PUREPower-600AP TOPower TOP-500P5 Zippy HP2-6500PE (G1) Zippy PSL6720P ASUS M4N75TD

User Guide
Page 38
...motherboard components. Do not forget to connect the fan cables to the motherboard connector labeled CHA_FAN1 or CHA_FAN2 for better thermal environment. 1-26 ASUS M4N75TD DO NOT place jumper caps on the motherboard, ensuring that you install two VGA cards, we recommend that the black wire of each cable... matches the ground pin of maximum 1A (12 W) fan power. • Only the CPU_FAN, CHA_FAN1 and CHA_FAN2 connectors support the ASUS Fan Xpert feature. • If you plug the rear chassis fan cable to the fan connectors. These are not jumpers! 4. CPU, Chassis and...
...motherboard components. Do not forget to connect the fan cables to the motherboard connector labeled CHA_FAN1 or CHA_FAN2 for better thermal environment. 1-26 ASUS M4N75TD DO NOT place jumper caps on the motherboard, ensuring that you install two VGA cards, we recommend that the black wire of each cable... matches the ground pin of maximum 1A (12 W) fan power. • Only the CPU_FAN, CHA_FAN1 and CHA_FAN2 connectors support the ASUS Fan Xpert feature. • If you plug the rear chassis fan cable to the fan connectors. These are not jumpers! 4. CPU, Chassis and...

User Guide
Page 40
... connectors, then install the module to 480 Mbps connection speed. Never connect a 1394 cable to the USB connectors. The S/PDIF module is purchased separately. 1-28 ASUS M4N75TD
... connectors, then install the module to 480 Mbps connection speed. Never connect a 1394 cable to the USB connectors. The S/PDIF module is purchased separately. 1-28 ASUS M4N75TD

User Guide
Page 42
10. IEEE 1394a port connector (10-1 pin IE1394_2) This connector is for an IEEE 1394a port. Doing so will damage the motherboard! 1-30 ASUS M4N75TD Never connect a USB cable to a slot opening at the back of the system chassis. Connect the IEEE 1394a module cable to this connector, then install the module to the IEEE 1394a connector.
10. IEEE 1394a port connector (10-1 pin IE1394_2) This connector is for an IEEE 1394a port. Doing so will damage the motherboard! 1-30 ASUS M4N75TD Never connect a USB cable to a slot opening at the back of the system chassis. Connect the IEEE 1394a module cable to this connector, then install the module to the IEEE 1394a connector.

User Guide
Page 44
... latest certified graphics card and supported 3D application list. Installing two SLI-ready graphics cards The following pictures are properly seated on the slots. 1-32 ASUS M4N75TD 1.14 NVIDIA® SLI™ technology support 1.14.1 NVIDIA® SLI™ technology The motherboard supports the NVIDIA® SLI™ (Scalable Link Interface) technology...
... latest certified graphics card and supported 3D application list. Installing two SLI-ready graphics cards The following pictures are properly seated on the slots. 1-32 ASUS M4N75TD 1.14 NVIDIA® SLI™ technology support 1.14.1 NVIDIA® SLI™ technology The motherboard supports the NVIDIA® SLI™ (Scalable Link Interface) technology...

User Guide
Page 46
B1. From the Personalization window, select Display Settings. B2. From the Display Settings dialog box, click Advanced Settings. 1-34 ASUS M4N75TD B3. If you cannot see the NVIDIA Control Panel item in step (A), select Personalize.
B1. From the Personalization window, select Display Settings. B2. From the Display Settings dialog box, click Advanced Settings. 1-34 ASUS M4N75TD B3. If you cannot see the NVIDIA Control Panel item in step (A), select Personalize.

User Guide
Page 48
... dGPUs. You can be enabled when displays are driven through the dGPU. • HybridPower and GeForce Boost are connected to learn the supported GPUs. 1-36 ASUS M4N75TD 1.14.2 NVIDIA® Hybrid SLI™ technology The motherboard supports the NVIDIA® Hybrid SLI™ technology that includes two primary features: GeForce® Boost...
... dGPUs. You can be enabled when displays are driven through the dGPU. • HybridPower and GeForce Boost are connected to learn the supported GPUs. 1-36 ASUS M4N75TD 1.14.2 NVIDIA® Hybrid SLI™ technology The motherboard supports the NVIDIA® Hybrid SLI™ technology that includes two primary features: GeForce® Boost...
User Guide
Page 50
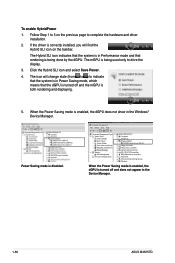
When the Power Saving mode is enabled, the dGPU does not show in the Device Manager. 1-38 ASUS M4N75TD Power Saving mode is being done by the dGPU. Follow Step 1 to 5 on the taskbar. If the driver is turned off and the mGPU is ...
When the Power Saving mode is enabled, the dGPU does not show in the Device Manager. 1-38 ASUS M4N75TD Power Saving mode is being done by the dGPU. Follow Step 1 to 5 on the taskbar. If the driver is turned off and the mGPU is ...

User Guide
Page 52
... dropdown list, select any of updating itself through the Internet. Follow the onscreen instructions to launch the ASUS Update utility. 2. From the Windows® desktop, click Start > Programs > ASUS > ASUSUpdate > ASUSUpdate to complete the updating process. 2-2 ASUS M4N75TD Always update the utility to download, and then click Next. b. Locate the BIOS file from a file...
... dropdown list, select any of updating itself through the Internet. Follow the onscreen instructions to launch the ASUS Update utility. 2. From the Windows® desktop, click Start > Programs > ASUS > ASUSUpdate > ASUSUpdate to complete the updating process. 2-2 ASUS M4N75TD Always update the utility to download, and then click Next. b. Locate the BIOS file from a file...

User Guide
Page 54
...port. 3. If you want to use the newer BIOS file, download the file at support.asus.com and save it fails or gets corrupted during the updating process. Turn off the system after the... When found, the utility reads the BIOS file and starts flashing the corrupted BIOS file. 4. 2.2.3 ASUS CrashFree BIOS 3 utility The ASUS CrashFree BIOS 3 utility is an auto recovery tool that allows you to restore the BIOS file when it...the BIOS file. You can cause system boot failure! 2-4 ASUS M4N75TD To ensure system compatibility and stability, we recommend that contains the BIOS file.
...port. 3. If you want to use the newer BIOS file, download the file at support.asus.com and save it fails or gets corrupted during the updating process. Turn off the system after the... When found, the utility reads the BIOS file and starts flashing the corrupted BIOS file. 4. 2.2.3 ASUS CrashFree BIOS 3 utility The ASUS CrashFree BIOS 3 utility is an auto recovery tool that allows you to restore the BIOS file when it...the BIOS file. You can cause system boot failure! 2-4 ASUS M4N75TD To ensure system compatibility and stability, we recommend that contains the BIOS file.


