User Manual
Page 9
... this guide This user guide contains the information you have been added by your dealer. ASUS websites The ASUS website provides updated information on the motherboard. • Chapter 3: BIOS setup This chapter tells how to change system settings through the BIOS Setup menus. Optional documentation Your product package may include optional documentation, such as warranty flyers...
... this guide This user guide contains the information you have been added by your dealer. ASUS websites The ASUS website provides updated information on the motherboard. • Chapter 3: BIOS setup This chapter tells how to change system settings through the BIOS Setup menus. Optional documentation Your product package may include optional documentation, such as warranty flyers...

User Manual
Page 18
... solutions make the system more stable and enhance the overclocking capability. This innovative and groundbreaking fanless heat pipe design effectively lowers temperatures by up your motherboard against Electronic Magnetic Interference (EMI). ASUS O.C. The BIOS settings can be stored in the CMOS or a separate file, giving users freedom to dissipate heat generated by yourself.
... solutions make the system more stable and enhance the overclocking capability. This innovative and groundbreaking fanless heat pipe design effectively lowers temperatures by up your motherboard against Electronic Magnetic Interference (EMI). ASUS O.C. The BIOS settings can be stored in the CMOS or a separate file, giving users freedom to dissipate heat generated by yourself.
User Manual
Page 19
...case the system hangs due to overclocking. eliminates the need to buy a replacement ROM chip. ASUS EZ Flash 2 ASUS EZ Flash 2 is a user-friendly BIOS update utility. ASUS M4A79 Deluxe 1-5 This protection eliminates the need to open the system chassis and clear the RTC data.... performances without having to short the pins or moving jumpers! 1.3.3 ASUS intelligent performance and overclocking features TurboV Feel the adrenaline rush of the motherboard BIOS allows automatic re-setting to the BIOS default settings in TurboV provides the best O.C. When the system hangs due to...
...case the system hangs due to overclocking. eliminates the need to buy a replacement ROM chip. ASUS EZ Flash 2 ASUS EZ Flash 2 is a user-friendly BIOS update utility. ASUS M4A79 Deluxe 1-5 This protection eliminates the need to open the system chassis and clear the RTC data.... performances without having to short the pins or moving jumpers! 1.3.3 ASUS intelligent performance and overclocking features TurboV Feel the adrenaline rush of the motherboard BIOS allows automatic re-setting to the BIOS default settings in TurboV provides the best O.C. When the system hangs due to...
User Manual
Page 37
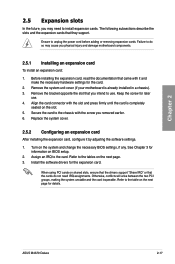
... the slots and the expansion cards that came with it by adjusting the software settings. 1. Turn on BIOS setup. 2. Remove the system unit cover (if your motherboard is completely seated on shared slots, ensure that the drivers support "Share IRQ"...ASUS M4A79 Deluxe 2-17 Failure to install expansion cards. Keep the screw for the card. 2. Align the card connector with the screw you removed earlier. 6. Assign an IRQ to unplug the power cord before adding or removing expansion cards. Install the software drivers for information on the system and change the necessary BIOS settings...
... the slots and the expansion cards that came with it by adjusting the software settings. 1. Turn on BIOS setup. 2. Remove the system unit cover (if your motherboard is completely seated on shared slots, ensure that the drivers support "Share IRQ"...ASUS M4A79 Deluxe 2-17 Failure to install expansion cards. Keep the screw for the card. 2. Align the card connector with the screw you removed earlier. 6. Assign an IRQ to unplug the power cord before adding or removing expansion cards. Install the software drivers for information on the system and change the necessary BIOS settings...
User Manual
Page 40
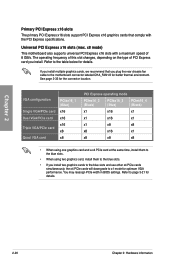
... you plug the rear chassis fan cable to the motherboard connector labeled CHA_FAN1/2 for better thermal environment. Universal PCI Express x16 slots (max. See page 2-33 for optimum VGA performance. Refer to page 3-21 for details. You may reassign PCIe width in BIOS settings. If you install multiple graphics cards, we recommend that..., install them to the blue slots. • When using two graphics card, install them to the blue slots. • If you install. x8 mode) This motherboard also supports universal PCI Express x16 slots with the PCI Express specifications.
... you plug the rear chassis fan cable to the motherboard connector labeled CHA_FAN1/2 for better thermal environment. Universal PCI Express x16 slots (max. See page 2-33 for optimum VGA performance. Refer to page 3-21 for details. You may reassign PCIe width in BIOS settings. If you install multiple graphics cards, we recommend that..., install them to the blue slots. • When using two graphics card, install them to the blue slots. • If you install. x8 mode) This motherboard also supports universal PCI Express x16 slots with the PCI Express specifications.
User Manual
Page 41
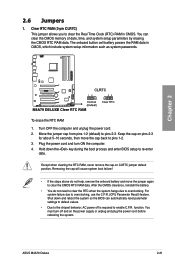
Hold down and reboot the system so the BIOS can clear the CMOS memory of date, time, and system setup parameters by erasing the CMOS RTC RAM data. 2.6 Jumpers 1. You can automatically reset parameter settings to default values. • Due to the chipset behavior, AC power off and on ...After the CMOS clearance, reinstall the battery. • You do not help, remove the onboard battery and move the cap back to enable C.P.R. ASUS M4A79 Deluxe 2-21 The onboard button cell battery powers the RAM data in CMOS. Turn OFF the computer and unplug the power cord. 2. Shut down the ...
Hold down and reboot the system so the BIOS can clear the CMOS memory of date, time, and system setup parameters by erasing the CMOS RTC RAM data. 2.6 Jumpers 1. You can automatically reset parameter settings to default values. • Due to the chipset behavior, AC power off and on ...After the CMOS clearance, reinstall the battery. • You do not help, remove the onboard battery and move the cap back to enable C.P.R. ASUS M4A79 Deluxe 2-21 The onboard button cell battery powers the RAM data in CMOS. Turn OFF the computer and unplug the power cord. 2. Shut down the ...

User Manual
Page 42
...70V up to 1.90V • Before you change the setting of the OV_CPU jumper, shut down the computer and move the cap back to pins 2-3. • The system may cause the system to work stably under the highest BIOS voltage setting before you install a new CPU and have not booted... for extra-high overvoltage ability, use the BIOS items introduced in BIOS. CPU overvoltage setting (3-pin OV_CPU) This jumper allows you change the jumper setting for the first time. Doing so may need a better cooling system (for example, a water-cooling system) ...
...70V up to 1.90V • Before you change the setting of the OV_CPU jumper, shut down the computer and move the cap back to pins 2-3. • The system may cause the system to work stably under the highest BIOS voltage setting before you install a new CPU and have not booted... for extra-high overvoltage ability, use the BIOS items introduced in BIOS. CPU overvoltage setting (3-pin OV_CPU) This jumper allows you change the jumper setting for the first time. Doing so may need a better cooling system (for example, a water-cooling system) ...
User Manual
Page 44
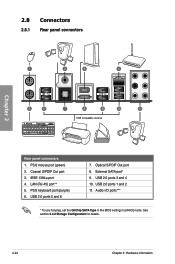
PS/2 keyboard port (purple) 6. Optical S/PDIF Out port 8. Audio I/O ports*** * To use hot-plug, set the OnChip SATA Type in the BIOS settings to [AHCI] mode. USB 2.0 ports 5 and 6 7. Coaxial S/PDIF Out port 3. LAN (RJ-45) port** 5. External SATA port* 9. 2.8 Connectors 2.8.1 Rear panel connectors Chapter 2 Rear panel connectors 1. See section 3.4.2 Storage Configuration for details. 2-24 Chapter 2: Hardware information USB 2.0 ports 3 and 4 10. PS/2 mouse port (green) 2. IEEE 1394a port 4. USB 2.0 ports 1 and 2 11.
PS/2 keyboard port (purple) 6. Optical S/PDIF Out port 8. Audio I/O ports*** * To use hot-plug, set the OnChip SATA Type in the BIOS settings to [AHCI] mode. USB 2.0 ports 5 and 6 7. Coaxial S/PDIF Out port 3. LAN (RJ-45) port** 5. External SATA port* 9. 2.8 Connectors 2.8.1 Rear panel connectors Chapter 2 Rear panel connectors 1. See section 3.4.2 Storage Configuration for details. 2-24 Chapter 2: Hardware information USB 2.0 ports 3 and 4 10. PS/2 mouse port (green) 2. IEEE 1394a port 4. USB 2.0 ports 1 and 2 11.
User Manual
Page 50
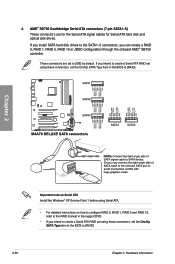
... RAID 10, refer to the RAID manual in the support DVD. • If you intend to create a Serial ATA RAID set using these connectors, set the Onchip SATA Type item in the BIOS to [RAID]. If you can create a RAID 0, RAID 1, RAID 5, RAID 10 or JBOD configuration through the onboard AMD®...for Serial ATA hard disk and optical disk drives. 4. AMD® SB750 Southbridge Serial ATA connectors (7-pin SATA1-5) These connectors are set the Onchip SATA Type item in the BIOS to [IDE] by default. If you install SATA hard disk drives to the SATA1-5 connectors, you intend to create a Serial ATA...
... RAID 10, refer to the RAID manual in the support DVD. • If you intend to create a Serial ATA RAID set using these connectors, set the Onchip SATA Type item in the BIOS to [RAID]. If you can create a RAID 0, RAID 1, RAID 5, RAID 10 or JBOD configuration through the onboard AMD®...for Serial ATA hard disk and optical disk drives. 4. AMD® SB750 Southbridge Serial ATA connectors (7-pin SATA1-5) These connectors are set the Onchip SATA Type item in the BIOS to [IDE] by default. If you install SATA hard disk drives to the SATA1-5 connectors, you intend to create a Serial ATA...
User Manual
Page 56
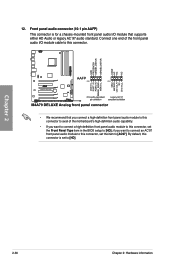
if you want to connect an AC'97 front panel audio module to this connector, set the item to [HD]; Front panel audio connector (10-1 pin AAFP) This connector is set the Front Panel Type item in the BIOS setup to [AC97]. Chapter 2 2-36 Chapter 2: Hardware information By default, this... to avail of the front panel audio I/O module cable to this connector, set to this connector. • We recommend that supports either HD Audio or legacy AC`97 audio standard. Connect one end of the motherboard's high-definition audio capability. • If you want to connect a high...
if you want to connect an AC'97 front panel audio module to this connector, set the item to [HD]; Front panel audio connector (10-1 pin AAFP) This connector is set the Front Panel Type item in the BIOS setup to [AC97]. Chapter 2 2-36 Chapter 2: Hardware information By default, this... to avail of the front panel audio I/O module cable to this connector, set to this connector. • We recommend that supports either HD Audio or legacy AC`97 audio standard. Connect one end of the motherboard's high-definition audio capability. • If you want to connect a high...
User Manual
Page 57
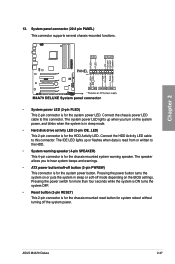
System panel connector (20-8 pin PANEL) This connector supports several chassis-mounted functions. Pressing the power button turns the system on the BIOS settings. 13. Connect the chassis power LED cable to the HDD. • System warning speaker (4-pin SPEAKER) This 4-pin connector is for ... power LED lights up or flashes when data is read from or written to this connector. ASUS M4A79 Deluxe 2-37 Connect the HDD Activity LED cable to hear system beeps and warnings. • ATX power button/soft-off button (2-pin PWRSW) This connector is for the chassis-mounted reset button...
System panel connector (20-8 pin PANEL) This connector supports several chassis-mounted functions. Pressing the power button turns the system on the BIOS settings. 13. Connect the chassis power LED cable to the HDD. • System warning speaker (4-pin SPEAKER) This 4-pin connector is for ... power LED lights up or flashes when data is read from or written to this connector. ASUS M4A79 Deluxe 2-37 Connect the HDD Activity LED cable to hear system beeps and warnings. • ATX power button/soft-off button (2-pin PWRSW) This connector is for the chassis-mounted reset button...
User Manual
Page 59
...system LED lights up when you turned on the power, the system may light up or change from the time you press the ATX power button. Monitor b. Refer to disabled No keyboard detected No memory detected No VGA detected Hardware component failure 7. System power 6. ... power cord to green after the system LED turns on the BIOS setting. ASUS M4A79 Deluxe 2-39 After making all switches are running, the BIOS beeps (see anything within 30 seconds from orange to the power connector at the back of the BIOS setting. Pressing the power switch for the first time 1. Chapter 2...
...system LED lights up when you turned on the power, the system may light up or change from the time you press the ATX power button. Monitor b. Refer to disabled No keyboard detected No memory detected No VGA detected Hardware component failure 7. System power 6. ... power cord to green after the system LED turns on the BIOS setting. ASUS M4A79 Deluxe 2-39 After making all switches are running, the BIOS beeps (see anything within 30 seconds from orange to the power connector at the back of the BIOS setting. Pressing the power switch for the first time 1. Chapter 2...
User Manual
Page 61
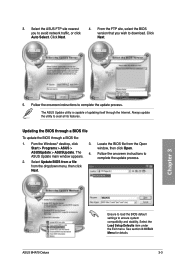
... default BIOS settings except in the following utilities allow you to manage and update the motherboard BIOS setup program. 1. Copy the original motherboard BIOS using a floppy disk or USB flash disk. 3. If there is potentially risky. Visit the ASUS website (www.asus.com) to download the latest BIOS file for system startup in the system's failure to boot. Chapter 3 ASUS M4A79 Deluxe...
... default BIOS settings except in the following utilities allow you to manage and update the motherboard BIOS setup program. 1. Copy the original motherboard BIOS using a floppy disk or USB flash disk. 3. If there is potentially risky. Visit the ASUS website (www.asus.com) to download the latest BIOS file for system startup in the system's failure to boot. Chapter 3 ASUS M4A79 Deluxe...
User Manual
Page 63
... window, then click Open. 4. Click Next. 4. The ASUS Update main window appears. 2. M4a79dlx.ROM ASUS M4A79 Deluxe M4a79dlx Ensure to load the BIOS default settings to complete the update process. From the FTP site, select the BIOS version that you to download. Fom the Windows® desktop, click Start > Programs > ASUS > ASUSUpdate > ASUSUpdate. Follow the onscreen instructions to...
... window, then click Open. 4. Click Next. 4. The ASUS Update main window appears. 2. M4a79dlx.ROM ASUS M4A79 Deluxe M4a79dlx Ensure to load the BIOS default settings to complete the update process. From the FTP site, select the BIOS version that you to download. Fom the Windows® desktop, click Start > Programs > ASUS > ASUSUpdate > ASUSUpdate. Follow the onscreen instructions to...
User Manual
Page 65
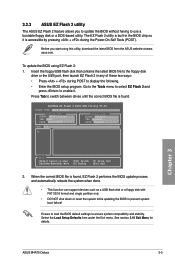
... the floppy/USB flash disk that contains the latest BIOS file to display the following. • Enter the BIOS setup program. ASUSTek EZ Flash 2 BIOS ROM Utility V3.34 FLASH TYPE: MXIC 25L8005 Current ROM BOARD: M4A79 Deluxe VER: 0302 DATE: 12/19/2008 Update ROM BOARD... the BIOS default settings to use a bootable floppy disk or a DOS‑based utility. To update the BIOS using this utility, download the latest BIOS from the ASUS website at www. 3.2.3 ASUS EZ Flash 2 utility The ASUS EZ Flash 2 feature allows you start using EZ Flash 2: 1. Chapter 3 ASUS M4A79 Deluxe 3-5
... the floppy/USB flash disk that contains the latest BIOS file to display the following. • Enter the BIOS setup program. ASUSTek EZ Flash 2 BIOS ROM Utility V3.34 FLASH TYPE: MXIC 25L8005 Current ROM BOARD: M4A79 Deluxe VER: 0302 DATE: 12/19/2008 Update ROM BOARD... the BIOS default settings to use a bootable floppy disk or a DOS‑based utility. To update the BIOS using this utility, download the latest BIOS from the ASUS website at www. 3.2.3 ASUS EZ Flash 2 utility The ASUS EZ Flash 2 feature allows you start using EZ Flash 2: 1. Chapter 3 ASUS M4A79 Deluxe 3-5
User Manual
Page 66
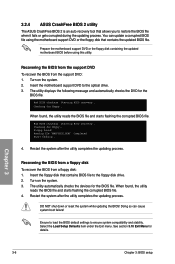
...ASUS CrashFree BIOS 2 utility The ASUS CrashFree BIOS 2 is an auto recovery tool that allows you to the floppy disk drive. 2. Turn on the system. 3. Starting BIOS recovery... Restart the system after the utility completes the updating process. Prepare the motherboard support DVD or the floppy disk containing the updated motherboard BIOS before using the motherboard...Recovering the BIOS from a floppy disk To recover the BIOS from the support DVD: 1. Ensure to load the BIOS default settings to the optical drive. 3. Bad BIOS checksum. When found, the utility reads the BIOS file ...
...ASUS CrashFree BIOS 2 utility The ASUS CrashFree BIOS 2 is an auto recovery tool that allows you to the floppy disk drive. 2. Turn on the system. 3. Starting BIOS recovery... Restart the system after the utility completes the updating process. Prepare the motherboard support DVD or the floppy disk containing the updated motherboard BIOS before using the motherboard...Recovering the BIOS from a floppy disk To recover the BIOS from the support DVD: 1. Ensure to load the BIOS default settings to the optical drive. 3. Bad BIOS checksum. When found, the utility reads the BIOS file ...
User Manual
Page 67
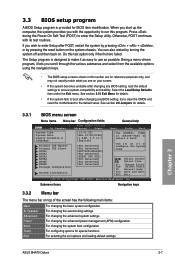
... not exactly match what you see on your screen. • If the system becomes unstable after changing any BIOS setting, try to clear the CMOS and reset the motherboard to the default value. Select Screen Select Item +- When you start up the computer, the system provides you...System Time. If you with its test routines. See section 2.6 Jumpers for special functions For selecting the exit options and loading default settings Chapter 3 ASUS M4A79 Deluxe 3-7 Submenu items Navigation keys 3.3.2 Menu bar The menu bar on top of the screen has the following main items: Main Ai ...
... not exactly match what you see on your screen. • If the system becomes unstable after changing any BIOS setting, try to clear the CMOS and reset the motherboard to the default value. Select Screen Select Item +- When you start up the computer, the system provides you...System Time. If you with its test routines. See section 2.6 Jumpers for special functions For selecting the exit options and loading default settings Chapter 3 ASUS M4A79 Deluxe 3-7 Submenu items Navigation keys 3.3.2 Menu bar The menu bar on top of the screen has the following main items: Main Ai ...

User Manual
Page 68
...when selected. You cannot select an item that is user-configurable, you can change the value of the field opposite the item. To change the settings. The navigation keys may differ from one screen to display a list of options. Refer to 3.3.7 Pop-up window. 3.3.7 Pop-up window ... keys for that particular menu. For example, selecting Main shows the Main menu items. The other items on the screen. Chapter 3 3-8 Chapter 3: BIOS setup Use the navigation keys to display a pop-up window Select a menu item then press to select items in brackets, and is a brief description...
...when selected. You cannot select an item that is user-configurable, you can change the value of the field opposite the item. To change the settings. The navigation keys may differ from one screen to display a list of options. Refer to 3.3.7 Pop-up window. 3.3.7 Pop-up window ... keys for that particular menu. For example, selecting Main shows the Main menu items. The other items on the screen. Chapter 3 3-8 Chapter 3: BIOS setup Use the navigation keys to display a pop-up window Select a menu item then press to select items in brackets, and is a brief description...
User Manual
Page 94
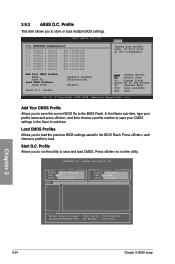
...ASUS O.C. BIOS SETUP UTILITY Tools O.C. Add Your CMOS Profile. Press , and choose a profile to Sub Screen F1 General Help F10 Save and Exit ESC Exit v02.61 (C)Copyright 1985-2008, American Megatrends, Inc. Press to run the utility to save your CMOS settings in the BIOS... Flash. Profile 2 Status O.C. Profile 3 Status O.C. Load CMOS Profiles Allows you to save and load CMOS. PROFILE Configuration O.C. Profile 4 Status O.C. Name: Save To: Load CMOS Profiles. Profile Utility V1.34 Current CMOS BOARD: M4A79 Deluxe VER: 0115 ...
...ASUS O.C. BIOS SETUP UTILITY Tools O.C. Add Your CMOS Profile. Press , and choose a profile to Sub Screen F1 General Help F10 Save and Exit ESC Exit v02.61 (C)Copyright 1985-2008, American Megatrends, Inc. Press to run the utility to save your CMOS settings in the BIOS... Flash. Profile 2 Status O.C. Profile 3 Status O.C. Load CMOS Profiles Allows you to save and load CMOS. PROFILE Configuration O.C. Profile 4 Status O.C. Name: Save To: Load CMOS Profiles. Profile Utility V1.34 Current CMOS BOARD: M4A79 Deluxe VER: 0115 ...
User Manual
Page 107
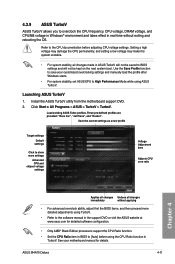
...set ASUS EPU to High Performance Mode while using ASUS TurboV. ASUS M4A79 Deluxe 4-11 4.3.9 ASUS TurboV ASUS TurboV allows you to overclock the CPU frequency, CPU voltage, DRAM voltage, and CPU/NB voltage in WIndows® environment and takes effect in ASUS TurboV will not be saved to BIOS settings... manual in the support DVD or visit the ASUS website at www.asus.com for details. Launching ASUS TurboV 1. Install the ASUS TurboV utility from the motherboard support DVD. 2. Setting a high voltage may damage the CPU permanently, and setting a low voltage may make the system unstable....
...set ASUS EPU to High Performance Mode while using ASUS TurboV. ASUS M4A79 Deluxe 4-11 4.3.9 ASUS TurboV ASUS TurboV allows you to overclock the CPU frequency, CPU voltage, DRAM voltage, and CPU/NB voltage in WIndows® environment and takes effect in ASUS TurboV will not be saved to BIOS settings... manual in the support DVD or visit the ASUS website at www.asus.com for details. Launching ASUS TurboV 1. Install the ASUS TurboV utility from the motherboard support DVD. 2. Setting a high voltage may damage the CPU permanently, and setting a low voltage may make the system unstable....


