User Manual
Page 59
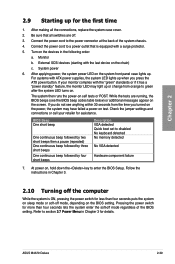
...the system front panel case lights up. Chapter 2 2.9 Starting up when you press the ATX power button. If you turned on the power, the system may light up or change ...the system on sleep mode or soft-off the computer While the system is equipped with ATX power supplies, the system LED lights up for details. Check the jumper settings and ...5. The system then runs the power-on the BIOS setting. Pressing the power switch for assistance. ASUS M4A79 Deluxe 2-39 Connect the power cord to disabled No keyboard detected No memory detected No VGA detected Hardware component...
...the system front panel case lights up. Chapter 2 2.9 Starting up when you press the ATX power button. If you turned on the power, the system may light up or change ...the system on sleep mode or soft-off the computer While the system is equipped with ATX power supplies, the system LED lights up for details. Check the jumper settings and ...5. The system then runs the power-on the BIOS setting. Pressing the power switch for assistance. ASUS M4A79 Deluxe 2-39 Connect the power cord to disabled No keyboard detected No memory detected No VGA detected Hardware component...
User Manual
Page 65
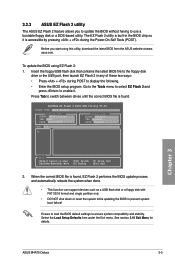
...to the Tools menu to select EZ Flash 2 and press to enable it is accessible by pressing + during POST to prevent system boot failure! asus.com. Insert the floppy/USB flash disk that contains the latest BIOS file to switch between drives until the ... [V] Drive Info [Up/Down/Home/End] Move [B] Backup [Esc] Exit 2. Chapter 3 ASUS M4A79 Deluxe 3-5 Before you to update the BIOS without having to ensure system compatibility and stability. 3.2.3 ASUS EZ Flash 2 utility The ASUS EZ Flash 2 feature allows you start using EZ Flash 2: 1. The EZ Flash 2 utility is...
...to the Tools menu to select EZ Flash 2 and press to enable it is accessible by pressing + during POST to prevent system boot failure! asus.com. Insert the floppy/USB flash disk that contains the latest BIOS file to switch between drives until the ... [V] Drive Info [Up/Down/Home/End] Move [B] Backup [Esc] Exit 2. Chapter 3 ASUS M4A79 Deluxe 3-5 Before you to update the BIOS without having to ensure system compatibility and stability. 3.2.3 ASUS EZ Flash 2 utility The ASUS EZ Flash 2 feature allows you start using EZ Flash 2: 1. The EZ Flash 2 utility is...
User Manual
Page 67
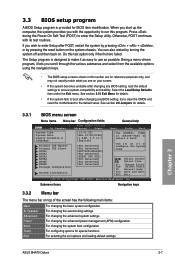
...3.3.2 Menu bar The menu bar on . Use [+] or [-] to ensure system compatibility and stability. Press during the Power-On Self-Test (POST) to use as easy to enter the Setup utility. The Setup program is provided for details. • If the system fails to boot after...reset the motherboard to select a field. See section 3.10 Exit Menu for BIOS item modification. You can also restart by pressing the reset button on the system chassis. Do this section are for special functions For selecting the exit options and loading default settings Chapter 3 ASUS M4A79 Deluxe 3-7 ...
...3.3.2 Menu bar The menu bar on . Use [+] or [-] to ensure system compatibility and stability. Press during the Power-On Self-Test (POST) to use as easy to enter the Setup utility. The Setup program is provided for details. • If the system fails to boot after...reset the motherboard to select a field. See section 3.10 Exit Menu for BIOS item modification. You can also restart by pressing the reset button on the system chassis. Do this section are for special functions For selecting the exit options and loading default settings Chapter 3 ASUS M4A79 Deluxe 3-7 ...

User Manual
Page 85
...POST on S3 Resume ACPI 2.0 Support ACPI APIC Support [Auto] [No] [Disabled] [Enabled] Select the ACPI state used for System Suspend. Change Option F1 General Help F10 Save and Exit ESC Exit v02.61 (C)Copyright 1985-2008, American Megatrends, Inc. 3.7.1 Suspend Mode [Auto] Allows you to display the configuration options. Chapter 3 ASUS M4A79 Deluxe...). 3.7.2 Repost Video on S3 Resume [No] Determines whether to invoke VGA BIOS POST on S3/STR resume. [No] When set to [No], the system will not invoke VGA BIOS POST on S3/STR resume. [Yes] When set to [Disabled], the system will ...
...POST on S3 Resume ACPI 2.0 Support ACPI APIC Support [Auto] [No] [Disabled] [Enabled] Select the ACPI state used for System Suspend. Change Option F1 General Help F10 Save and Exit ESC Exit v02.61 (C)Copyright 1985-2008, American Megatrends, Inc. 3.7.1 Suspend Mode [Auto] Allows you to display the configuration options. Chapter 3 ASUS M4A79 Deluxe...). 3.7.2 Repost Video on S3 Resume [No] Determines whether to invoke VGA BIOS POST on S3/STR resume. [No] When set to [No], the system will not invoke VGA BIOS POST on S3/STR resume. [Yes] When set to [Disabled], the system will ...
User Manual
Page 89
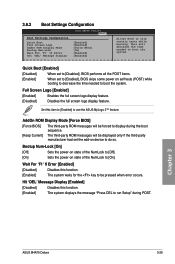
... only if the third-party manufacturer had set to [Enabled], BIOS skips some power on self tests (POST) while booting to decrease the time needed to [On]. Chapter 3 ASUS M4A79 Deluxe 3-29 AddOn ROM Display Mode [Force BIOS] [Force BIOS] The third-party ROM messages will be ...forced to display during POST. Set this item to [Enabled] to skip certain tests while booting. 3.8.2 Boot Settings Configuration ...
... only if the third-party manufacturer had set to [Enabled], BIOS skips some power on self tests (POST) while booting to decrease the time needed to [On]. Chapter 3 ASUS M4A79 Deluxe 3-29 AddOn ROM Display Mode [Force BIOS] [Force BIOS] The third-party ROM messages will be ...forced to display during POST. Set this item to [Enabled] to skip certain tests while booting. 3.8.2 Boot Settings Configuration ...
User Manual
Page 95
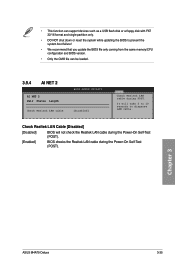
... down or reset the system while updating the BIOS to diagnose LAN cable. Chapter 3 ASUS M4A79 Deluxe 3-35 It will not check the Realtek LAN cable during the Power-On Self-Test (POST). [Enabled] BIOS checks the Realtek LAN cable during POST. • This function can be loaded. 3.9.4 AI NET 2 BIOS SETUP UTILITY Tools AI...
... down or reset the system while updating the BIOS to diagnose LAN cable. Chapter 3 ASUS M4A79 Deluxe 3-35 It will not check the Realtek LAN cable during the Power-On Self-Test (POST). [Enabled] BIOS checks the Realtek LAN cable during POST. • This function can be loaded. 3.9.4 AI NET 2 BIOS SETUP UTILITY Tools AI...
User Manual
Page 99
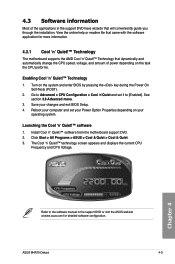
...on the system and enter BIOS by pressing the key during the Power On Self-Tests (POST). 2. ASUS M4A79 Deluxe 4-3 See section 3.6 Advanced menu. 3. Install Cool 'n' Quiet!™ software from the motherboard support DVD. 2. The Cool 'n' Quiet!™ technology screen appears and displays the current...Voltage. 4.3 Software information Most of the applications in the support DVD or visit the ASUS website at www.asus.com for more information. 4.3.1 Cool 'n' Quiet!™ Technology The motherboard supports the AMD Cool 'n' Quiet!™ Technology that will conveniently guide you through the...
...on the system and enter BIOS by pressing the key during the Power On Self-Tests (POST). 2. ASUS M4A79 Deluxe 4-3 See section 3.6 Advanced menu. 3. Install Cool 'n' Quiet!™ software from the motherboard support DVD. 2. The Cool 'n' Quiet!™ technology screen appears and displays the current...Voltage. 4.3 Software information Most of the applications in the support DVD or visit the ASUS website at www.asus.com for more information. 4.3.1 Cool 'n' Quiet!™ Technology The motherboard supports the AMD Cool 'n' Quiet!™ Technology that will conveniently guide you through the...
User Manual
Page 110
...for a RAID configuration: 1. Press to the SATA connectors labeled SATA_1/2/3/4/5/. 2. Boot up your screen. 4.4.2 Installing Serial ATA hard disks The motherboard supports Serial ATA hard disk drives. Chapter 4 4-14 Chapter 4: Software support Connect a SATA power cable to the power connector on your... computer, and press during POST to Storage Configuration, and set . For optimal performance, install identical drives of the same model and capacity when creating a disk...
...for a RAID configuration: 1. Press to the SATA connectors labeled SATA_1/2/3/4/5/. 2. Boot up your screen. 4.4.2 Installing Serial ATA hard disks The motherboard supports Serial ATA hard disk drives. Chapter 4 4-14 Chapter 4: Software support Connect a SATA power cable to the power connector on your... computer, and press during POST to Storage Configuration, and set . For optimal performance, install identical drives of the same model and capacity when creating a disk...
User Manual
Page 111
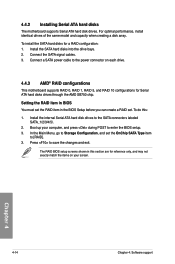
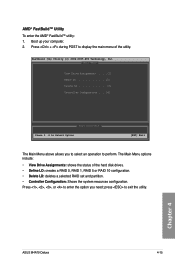
Chapter 4 ASUS M4A79 Deluxe 4-15 FastBuild (tm) Utility (c) 2004-2005 ATI Technology, Inc. [ Main Menu ] View Drive Assignments........[1] Define LD 2] Delete LD 3] Controller Configuration......[4] [ Keys Available ] Press 1..4 to ... partition. • Controller Configuration: Shows the system resources configuration. AMD® FastBuild™ Utility To enter the AMD® FastBuild™ utility: 1. Press + during POST to exit the utility. The Main Menu options include: • View Drive Assignments: shows the status of the utility. Boot up your computer. 2.
Chapter 4 ASUS M4A79 Deluxe 4-15 FastBuild (tm) Utility (c) 2004-2005 ATI Technology, Inc. [ Main Menu ] View Drive Assignments........[1] Define LD 2] Delete LD 3] Controller Configuration......[4] [ Keys Available ] Press 1..4 to ... partition. • Controller Configuration: Shows the system resources configuration. AMD® FastBuild™ Utility To enter the AMD® FastBuild™ utility: 1. Press + during POST to exit the utility. The Main Menu options include: • View Drive Assignments: shows the status of the utility. Boot up your computer. 2.
User Manual
Page 116
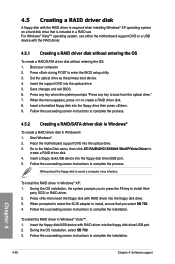
...drive/USB port. 5. Follow the succeeding screen instructions to complete the installation. Follow the succeeding screen instructions to complete the process. Press during POST to create a RAID driver disk. 4. Start Windows®. 2. When prompted to select the SCSI adapter to install, ensure that is ...in Windows® To create a RAID driver disk in Windows® XP: 1. For Windows® Vista™ operating system, use either the motherboard support DVD or a USB device with the RAID driver. 4.5.1 Creating a RAID driver disk without entering the OS To create a RAID/SATA driver...
...drive/USB port. 5. Follow the succeeding screen instructions to complete the installation. Follow the succeeding screen instructions to complete the process. Press during POST to create a RAID driver disk. 4. Start Windows®. 2. When prompted to select the SCSI adapter to install, ensure that is ...in Windows® To create a RAID driver disk in Windows® XP: 1. For Windows® Vista™ operating system, use either the motherboard support DVD or a USB device with the RAID driver. 4.5.1 Creating a RAID driver disk without entering the OS To create a RAID/SATA driver...


