User Manual
Page 1
Motherboard M4A78LT M4A78LT LE
Motherboard M4A78LT M4A78LT LE
User Manual
Page 3
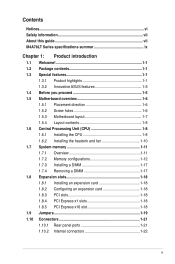
Contents Notices...vi Safety information vii About this guide vii M4A78LT Series specifications summar ix Chapter 1: Product introduction 1.1 Welcome 1-1 1.2 Package contents 1-1 1.3 Special features 1-1 1.3.1 Product highlights 1-1 1.3.2 Innovative ASUS features 1-3 1.4 Before you proceed 1-5 1.5 Motherboard overview 1-6 1.5.1 Placement direction 1-6 1.5.2 Screw holes 1-6 1.5.3 Motherboard layout 1-7 1.5.4 Layout contents 1-8 1.6 Central Processing Unit (CPU 1-8 1.6.1 Installing the CPU 1-8 1.6.2 Installing the heatsink and fan 1-10 1.7 System...
Contents Notices...vi Safety information vii About this guide vii M4A78LT Series specifications summar ix Chapter 1: Product introduction 1.1 Welcome 1-1 1.2 Package contents 1-1 1.3 Special features 1-1 1.3.1 Product highlights 1-1 1.3.2 Innovative ASUS features 1-3 1.4 Before you proceed 1-5 1.5 Motherboard overview 1-6 1.5.1 Placement direction 1-6 1.5.2 Screw holes 1-6 1.5.3 Motherboard layout 1-7 1.5.4 Layout contents 1-8 1.6 Central Processing Unit (CPU 1-8 1.6.1 Installing the CPU 1-8 1.6.2 Installing the heatsink and fan 1-10 1.7 System...

User Manual
Page 6
... out wheeled bin indicates that the product (electrical and electronic equipment) should not be placed in our products at ASUS REACH website at http://csr.asus.com/english/REACH.htm. However, there is connected. • Consult the dealer or an experienced radio/TV technician...digital apparatus complies with Part 15 of Chemicals) regulatory framework, we published the chemical substances in municipal waste. DO NOT throw the motherboard in a particular installation. This equipment generates, uses and can be determined by the party responsible for disposal of parts and recycling...
... out wheeled bin indicates that the product (electrical and electronic equipment) should not be placed in our products at ASUS REACH website at http://csr.asus.com/english/REACH.htm. However, there is connected. • Consult the dealer or an experienced radio/TV technician...digital apparatus complies with Part 15 of Chemicals) regulatory framework, we published the chemical substances in municipal waste. DO NOT throw the motherboard in a particular installation. This equipment generates, uses and can be determined by the party responsible for disposal of parts and recycling...
User Manual
Page 7
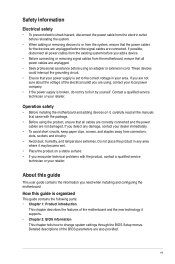
...About this guide is organized This guide contains the following parts: • Chapter 1: Product introduction This chapter describes the features of the motherboard and the new technology it supports. • Chapter 2: BIOS information This chapter tells how to the correct voltage in any damage,...When adding or removing devices to fix it by yourself. Detailed descriptions of the electrical outlet you need when installing and configuring the motherboard. Contact a qualified service technician or your local power company. • If the power supply is set to change system settings ...
...About this guide is organized This guide contains the following parts: • Chapter 1: Product introduction This chapter describes the features of the motherboard and the new technology it supports. • Chapter 2: BIOS information This chapter tells how to the correct voltage in any damage,...When adding or removing devices to fix it by yourself. Detailed descriptions of the electrical outlet you need when installing and configuring the motherboard. Contact a qualified service technician or your local power company. • If the power supply is set to change system settings ...

User Manual
Page 9
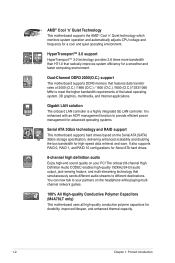
...ASUS design, this motherboard can support up to DDR3 1333MHz. ** Refer to DDR3 1066MHz. C.) / 1600(O.C.) / 1333 / 1066 MHz, ECC and non-ECC, unbuffered memory Dual-channel memory architecture * Due to CPU spec., AMD® 100 and 200 series CPUs support up to www.asus....ports at the back panel) 100% All high quality conductive polymer capacitors (M4A78LT only) Core Unlocker ASUS EPU-4 Engine ASUS CrashFree BIOS 3 ASUS EZ Flash 2 ASUS Q-Fan ASUS MyLogo 2 ASUS C.P.R. (CPU Parameter Recall) ASUS Anti Surge ASUS AI Charger ASUS Turbo Key (continued on the next page) ix We recommend a maximum of...
...ASUS design, this motherboard can support up to DDR3 1333MHz. ** Refer to DDR3 1066MHz. C.) / 1600(O.C.) / 1333 / 1066 MHz, ECC and non-ECC, unbuffered memory Dual-channel memory architecture * Due to CPU spec., AMD® 100 and 200 series CPUs support up to www.asus....ports at the back panel) 100% All high quality conductive polymer capacitors (M4A78LT only) Core Unlocker ASUS EPU-4 Engine ASUS CrashFree BIOS 3 ASUS EZ Flash 2 ASUS Q-Fan ASUS MyLogo 2 ASUS C.P.R. (CPU Parameter Recall) ASUS Anti Surge ASUS AI Charger ASUS Turbo Key (continued on the next page) ix We recommend a maximum of...

User Manual
Page 11
... and latest technologies, making it , check the items in your motherboard package for buying an ASUS® M4A78LT Series motherboard! Before you for the following items. Motherboard Cables Accessories Application DVD Documentation ASUS M4A78LT Series motherboard 2 x Serial ATA cables 1 x I/O shield ASUS motherboard Support DVD User Manual • M4A78LT Series motherboards include M4A78LT and M4A78LT LE two models. The package contents vary from models. •...
... and latest technologies, making it , check the items in your motherboard package for buying an ASUS® M4A78LT Series motherboard! Before you for the following items. Motherboard Cables Accessories Application DVD Documentation ASUS M4A78LT Series motherboard 2 x Serial ATA cables 1 x I/O shield ASUS motherboard Support DVD User Manual • M4A78LT Series motherboards include M4A78LT and M4A78LT LE two models. The package contents vary from models. •...
User Manual
Page 12
...efficiency for durability, improved lifespan, and enhanced thermal capacity. 1-2 Chapter 1: Product introduction Dual-Channel DDR3 2000(O.C.) support This motherboard supports DDR3 memory that simultaneously sends different audio streams to provide efficient power management for advanced operating systems. Serial ATA 3Gb...based on the headphone while playing multichannel network games. 100% All High-quality Conductive Polymer Capacitors (M4A78LT only) This motherboard uses all high-quality conductive polymer capacitors for a smoother and faster computing environment. The onboard 8-...
...efficiency for durability, improved lifespan, and enhanced thermal capacity. 1-2 Chapter 1: Product introduction Dual-Channel DDR3 2000(O.C.) support This motherboard supports DDR3 memory that simultaneously sends different audio streams to provide efficient power management for advanced operating systems. Serial ATA 3Gb...based on the headphone while playing multichannel network games. 100% All High-quality Conductive Polymer Capacitors (M4A78LT only) This motherboard uses all high-quality conductive polymer capacitors for a smoother and faster computing environment. The onboard 8-...

User Manual
Page 13
...-Surge Protection This special design protects expensive devices and the motherboard from damage caused by simply unlocking the extra cores, without interrupting ongoing work or games, simply through pressing the button. ASUS M4A78LT Series 1-3 1.3.2 Innovative ASUS features Core Unlocker ASUS Core Unlocker simplifies the activation of a latent AMD® CPUwith just pressing a key. After the...
...-Surge Protection This special design protects expensive devices and the motherboard from damage caused by simply unlocking the extra cores, without interrupting ongoing work or games, simply through pressing the button. ASUS M4A78LT Series 1-3 1.3.2 Innovative ASUS features Core Unlocker ASUS Core Unlocker simplifies the activation of a latent AMD® CPUwith just pressing a key. After the...
User Manual
Page 14
... (ErP) ready, and ErP requires products to meet certain energy efficiency requirements in line with ASUS vision of creating environment-friendly and energy-efficient products through product design and innovation to overclocking failure. C.P.R. ErP ready The motherboard is in regards to energy consumptions. C.P.R. (CPU Parameter Recall) The BIOS C.P.R. feature automatically restores the...
... (ErP) ready, and ErP requires products to meet certain energy efficiency requirements in line with ASUS vision of creating environment-friendly and energy-efficient products through product design and innovation to overclocking failure. C.P.R. ErP ready The motherboard is in regards to energy consumptions. C.P.R. (CPU Parameter Recall) The BIOS C.P.R. feature automatically restores the...

User Manual
Page 15
...power supply and detach its power cord. This is ON, in sleep mode, or in any component, switch off mode. Onboard LED The motherboard comes with the component. • Before you should shut down the system and unplug the power cable before touching any component. •... pad or in the bag that came with a standby power LED that you install or remove any motherboard component. M4A78LT Series SB_PWR ON OFF Standby Power Powered Off M4A78LT Series Onboard LED ASUS M4A78LT Series 1-5 Failure to do so may cause severe damage to indicate that the system is a reminder ...
...power supply and detach its power cord. This is ON, in sleep mode, or in any component, switch off mode. Onboard LED The motherboard comes with the component. • Before you should shut down the system and unplug the power cable before touching any component. •... pad or in the bag that came with a standby power LED that you install or remove any motherboard component. M4A78LT Series SB_PWR ON OFF Standby Power Powered Off M4A78LT Series Onboard LED ASUS M4A78LT Series 1-5 Failure to do so may cause severe damage to indicate that the system is a reminder ...
User Manual
Page 16
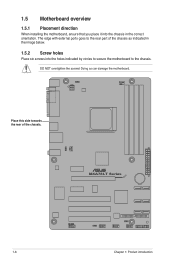
Place this side towards the rear of the chassis as indicated in the image below. 1.5.2 Screw holes Place six screws into the chassis in the correct orientation. M4A78LT Series 1-6 Chapter 1: Product introduction The edge with external ports goes to the chassis. DO NOT overtighten the screws! 1.5 Motherboard overview 1.5.1 Placement direction When installing the motherboard, ensure that you place it into the holes indicated by circles to secure the motherboard to the rear part of the chassis. Doing so can damage the motherboard.
Place this side towards the rear of the chassis as indicated in the image below. 1.5.2 Screw holes Place six screws into the chassis in the correct orientation. M4A78LT Series 1-6 Chapter 1: Product introduction The edge with external ports goes to the chassis. DO NOT overtighten the screws! 1.5 Motherboard overview 1.5.1 Placement direction When installing the motherboard, ensure that you place it into the holes indicated by circles to secure the motherboard to the rear part of the chassis. Doing so can damage the motherboard.
User Manual
Page 17
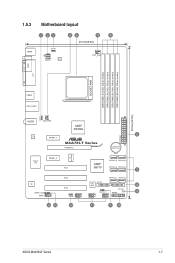
1.5.3 Motherboard layout 1 23 45 4 6 20.3cm(8.0in) KBMS KBPWR ATX12V EPU CPU_FAN COM1 LPT DDR3 DIMM_A1 (64bit, 240-pin module) DDR3 DIMM_A2 (64bit, 240-pin module) ... module) DDR3 DIMM_B2 (64bit, 240-pin module) SOCKET AM3 USB34 LAN1_USB12 30.5cm(12.0in) USBPW1-4 AUDIO CHA_FAN AMD® RS780L EATXPWR 2 RTL 8111E PCIEX1_1 M4A78LT Series PCIEX16_1 Lithium Cell CMOS Power ICS 9LPRS483 Super I/O PCIEX1_2 PCI1 SATA3G_5 SATA3G_6 AMD® SB710 SATA3G_3 SATA3G_4 7 ALC 887 SPDIF_OUT AAFP PCI2 SATA3G_1 SATA3G_2...
1.5.3 Motherboard layout 1 23 45 4 6 20.3cm(8.0in) KBMS KBPWR ATX12V EPU CPU_FAN COM1 LPT DDR3 DIMM_A1 (64bit, 240-pin module) DDR3 DIMM_A2 (64bit, 240-pin module) ... module) DDR3 DIMM_B2 (64bit, 240-pin module) SOCKET AM3 USB34 LAN1_USB12 30.5cm(12.0in) USBPW1-4 AUDIO CHA_FAN AMD® RS780L EATXPWR 2 RTL 8111E PCIEX1_1 M4A78LT Series PCIEX16_1 Lithium Cell CMOS Power ICS 9LPRS483 Super I/O PCIEX1_2 PCI1 SATA3G_5 SATA3G_6 AMD® SB710 SATA3G_3 SATA3G_4 7 ALC 887 SPDIF_OUT AAFP PCI2 SATA3G_1 SATA3G_2...

User Manual
Page 18
... 4-pin 1-23 9. USB connectors (10-1 pin USB56, USB78, 1-27 USB910) 5. DDR3 DIMM sockets 1-11 13. Locate the CPU socket on the motherboard. USB device wake-up (3-pin USBPW1-4, 1-20 8. Front panel audio connector (10-1 pin AAFP) 1-22 1.6 Central Processing Unit (CPU) This...8482; II / Athlon™ II / Sempron™ 100 series processors. CPU and chassis fan connectors (4-pin CPU_FAN, 3-pin CHA_FAN) 1-28 11. M4A78LT Series M4A78LT Series CPU socket AM3 1-8 Chapter 1: Product introduction Digital audio connector (4-1 pin SPDIF_OUT) 1-27 7. AMD CPU socket 1-8 12.
... 4-pin 1-23 9. USB connectors (10-1 pin USB56, USB78, 1-27 USB910) 5. DDR3 DIMM sockets 1-11 13. Locate the CPU socket on the motherboard. USB device wake-up (3-pin USBPW1-4, 1-20 8. Front panel audio connector (10-1 pin AAFP) 1-22 1.6 Central Processing Unit (CPU) This...8482; II / Athlon™ II / Sempron™ 100 series processors. CPU and chassis fan connectors (4-pin CPU_FAN, 3-pin CHA_FAN) 1-28 11. M4A78LT Series M4A78LT Series CPU socket AM3 1-8 Chapter 1: Product introduction Digital audio connector (4-1 pin SPDIF_OUT) 1-27 7. AMD CPU socket 1-8 12.
User Manual
Page 19
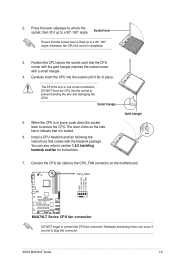
...socket lever is lifted up to secure the CPU. ASUS M4A78LT Series 1-9 2. Socket lever Ensure that comes with a small triangle. 4. Carefully insert the CPU into the socket to connect the CPU fan connector! The lever clicks on the motherboard. Hardware monitoring errors can also refer to the CPU_FAN... connector on the side tab to plug this connector. otherwise, the CPU will not fit in place. CPU_FAN GND CPU FAN PWR CPU FAN IN CPU FAN PWM M4A78LT Series M4A78LT Series CPU fan ...
...socket lever is lifted up to secure the CPU. ASUS M4A78LT Series 1-9 2. Socket lever Ensure that comes with a small triangle. 4. Carefully insert the CPU into the socket to connect the CPU fan connector! The lever clicks on the motherboard. Hardware monitoring errors can also refer to the CPU_FAN... connector on the side tab to plug this connector. otherwise, the CPU will not fit in place. CPU_FAN GND CPU FAN PWR CPU FAN IN CPU FAN PWM M4A78LT Series M4A78LT Series CPU fan ...
User Manual
Page 20
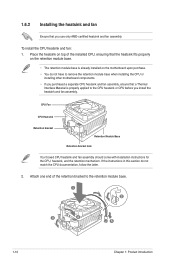
... and fan assembly. If the instructions in this section do not have to remove the retention module base when installing the CPU or installing other motherboard components. • If you purchased a separate CPU heatsink and fan assembly, ensure that you install the heatsink and fan assembly. CPU Fan ...the retention module base. 1 2 3 4 5 1-10 Chapter 1: Product introduction 1.6.2 Installing the heatsink and fan Ensure that a Thermal Interface Material is already installed on the motherboard upon purchase. • You do not match the CPU documentation, follow the latter. 2.
... and fan assembly. If the instructions in this section do not have to remove the retention module base when installing the CPU or installing other motherboard components. • If you purchased a separate CPU heatsink and fan assembly, ensure that you install the heatsink and fan assembly. CPU Fan ...the retention module base. 1 2 3 4 5 1-10 Chapter 1: Product introduction 1.6.2 Installing the heatsink and fan Ensure that a Thermal Interface Material is already installed on the motherboard upon purchase. • You do not match the CPU documentation, follow the latter. 2.
User Manual
Page 21
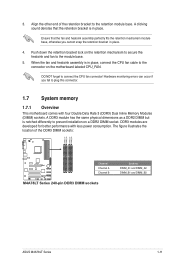
When the fan and heatsink assembly is notched differently to the connector on the motherboard labeled CPU_FAN. A DDR3 module has the same physical dimensions as a DDR2 DIMM but is in place, connect the CPU fan cable ...connector. 1.7 System memory 1.7.1 Overview This motherboard comes with less power consumption. Align the other end of the DDR3 DIMM sockets: DIMM_A1 DIMM_A2 DIMM_B1 DIMM_B2 M4A78LT Series Channel Channel A Channel B M4A78LT Series 240-pin DDR3 DIMM sockets Sockets DIMM_A1 and DIMM_A2 DIMM_B1 and DIMM_B2 ASUS M4A78LT Series 1-11 Ensure that the retention ...
When the fan and heatsink assembly is notched differently to the connector on the motherboard labeled CPU_FAN. A DDR3 module has the same physical dimensions as a DDR2 DIMM but is in place, connect the CPU fan cable ...connector. 1.7 System memory 1.7.1 Overview This motherboard comes with less power consumption. Align the other end of the DDR3 DIMM sockets: DIMM_A1 DIMM_A2 DIMM_B1 DIMM_B2 M4A78LT Series Channel Channel A Channel B M4A78LT Series 240-pin DDR3 DIMM sockets Sockets DIMM_A1 and DIMM_A2 DIMM_B1 and DIMM_B2 ASUS M4A78LT Series 1-11 Ensure that the retention ...

User Manual
Page 22
...channel configuration. Transcend TX2400KLU-4GK(XMP) Size SS/ DS 4GB ( 2x 2GB ) DS Chip Brand - With ASUS design, this motherboard can be about 3GB or less. For optimum compatibility, we recommend that you install the memory modules from the...;m��o�r�y�i�f �y�o�u�a��re��u�s�in Channel A and Channel B. M4A78LT series Motherboards Qualified Vendors Lists (QVL) DDR3-2000(O.C.) MHz capability Vendor Part No. Chip NO. - CL Voltage 9-11-9-28 1.65V DIMM support...
...channel configuration. Transcend TX2400KLU-4GK(XMP) Size SS/ DS 4GB ( 2x 2GB ) DS Chip Brand - With ASUS design, this motherboard can be about 3GB or less. For optimum compatibility, we recommend that you install the memory modules from the...;m��o�r�y�i�f �y�o�u�a��re��u�s�in Channel A and Channel B. M4A78LT series Motherboards Qualified Vendors Lists (QVL) DDR3-2000(O.C.) MHz capability Vendor Part No. Chip NO. - CL Voltage 9-11-9-28 1.65V DIMM support...

User Manual
Page 26
Visit the ASUS website at www.asus.com for better overclocking capability. When using a DDR3 2000MHz memory module, ensure to DDR3 1066MHz. CT12864BA1067.8FF CT12872BA1067.9FF CT25664BA1067.16FF CT25672BA1067.18FF EBJ10UE8EDF0-AE-F .... DDR3-1066MHz capability Vendor Crucial Crucial Crucial Crucial ELPIDA ELPIDA ELPIDA KINGSTON KINGSTON KINGSTON KINGSTON Micron Micron Micron Micron OCZ SAMSUNG SAMSUNG Part No. With ASUS design, this motherboard can support up to install it on the A1 slot for the latest QVL. 1-16 Chapter 1: Product introduction
Visit the ASUS website at www.asus.com for better overclocking capability. When using a DDR3 2000MHz memory module, ensure to DDR3 1066MHz. CT12864BA1067.8FF CT12872BA1067.9FF CT25664BA1067.16FF CT25672BA1067.18FF EBJ10UE8EDF0-AE-F .... DDR3-1066MHz capability Vendor Crucial Crucial Crucial Crucial ELPIDA ELPIDA ELPIDA KINGSTON KINGSTON KINGSTON KINGSTON Micron Micron Micron Micron OCZ SAMSUNG SAMSUNG Part No. With ASUS design, this motherboard can support up to install it on the A1 slot for the latest QVL. 1-16 Chapter 1: Product introduction

User Manual
Page 27
... unlock the DIMM. 2 Support the DIMM lightly with extra force. 1 2. DIMM notch ASUS M4A78LT Series 1-17 Firmly insert the DIMM into a socket in only one direction. 1.7.3 Installing a DIMM Unplug the power supply before adding or removing DIMMs or other system components. Press the retaining clips outward to both the motherboard and the components. 1.
... unlock the DIMM. 2 Support the DIMM lightly with extra force. 1 2. DIMM notch ASUS M4A78LT Series 1-17 Firmly insert the DIMM into a socket in only one direction. 1.7.3 Installing a DIMM Unplug the power supply before adding or removing DIMMs or other system components. Press the retaining clips outward to both the motherboard and the components. 1.

User Manual
Page 28
...a LAN card, SCSI card, USB card, and other cards that comply with PCI specifications. 1.8.4 PCI Express x1 slots This motherboard supports PCI Express x1 network cards, SCSI cards, and other cards that comply with the PCI Express specifications. 1.8.5 PCI Express x16 slot ...with the PCI Express specifications. 1-18 Chapter 1: Product introduction 1.8 Expansion slots In the future, you may cause you physical injury and damage motherboard components. 1.8.1 Installing an expansion card To install an expansion card: 1. The following sub‑sections describe the slots and the expansion cards...
...a LAN card, SCSI card, USB card, and other cards that comply with PCI specifications. 1.8.4 PCI Express x1 slots This motherboard supports PCI Express x1 network cards, SCSI cards, and other cards that comply with the PCI Express specifications. 1.8.5 PCI Express x16 slot ...with the PCI Express specifications. 1-18 Chapter 1: Product introduction 1.8 Expansion slots In the future, you may cause you physical injury and damage motherboard components. 1.8.1 Installing an expansion card To install an expansion card: 1. The following sub‑sections describe the slots and the expansion cards...


