User Manual
Page 3
......vi Safety information vii About this guide vii M4A78LT Series specifications summar ix Chapter 1: Product introduction 1.1 Welcome 1-1 1.2 Package contents 1-1 1.3 Special features 1-1 1.3.1 Product highlights 1-1 1.3.2 Innovative ASUS features 1-3 1.4 Before you proceed 1-5 1.5 Motherboard overview 1-6 1.5.1 Placement direction 1-6 1.5.2 Screw holes 1-6 1.5.3 Motherboard layout 1-7 1.5.4 Layout contents 1-8 1.6 Central Processing Unit (CPU 1-8 1.6.1 Installing the CPU 1-8 1.6.2 Installing the heatsink and fan 1-10 1.7 System memory...
......vi Safety information vii About this guide vii M4A78LT Series specifications summar ix Chapter 1: Product introduction 1.1 Welcome 1-1 1.2 Package contents 1-1 1.3 Special features 1-1 1.3.1 Product highlights 1-1 1.3.2 Innovative ASUS features 1-3 1.4 Before you proceed 1-5 1.5 Motherboard overview 1-6 1.5.1 Placement direction 1-6 1.5.2 Screw holes 1-6 1.5.3 Motherboard layout 1-7 1.5.4 Layout contents 1-8 1.6 Central Processing Unit (CPU 1-8 1.6.1 Installing the CPU 1-8 1.6.2 Installing the heatsink and fan 1-10 1.7 System memory...
User Manual
Page 4
... Update 2-1 2.1.2 ASUS EZ Flash 2 2-2 2.1.3 ASUS CrashFree BIOS 3 2-3 2.2 BIOS setup program 2-4 2.2.1 BIOS menu screen 2-5 2.2.2 Menu bar 2-5 2.2.3 Navigation keys 2-5 2.2.4 Menu items 2-6 2.2.5 Submenu items 2-6 2.2.6 Configuration fields 2-6 2.2.7 Pop-up window 2-6 2.2.8 Scroll bar 2-6 2.2.9 General help 2-6 2.3 Main menu 2-7 2.3.1 System Time 2-7 2.3.2 System Date 2-7 2.3.3 Primary IDE Master/Slave, SATA 1/2/3/4/5/6 2-8 2.3.4 System Information 2-9 2.4 Advanced menu 2-9 2.4.1 JumperFree Configuration 2-9 2.4.2 CPU Configuration 2-12 2.4.3 Chipset 2-13 2.4.4 Onboard...
... Update 2-1 2.1.2 ASUS EZ Flash 2 2-2 2.1.3 ASUS CrashFree BIOS 3 2-3 2.2 BIOS setup program 2-4 2.2.1 BIOS menu screen 2-5 2.2.2 Menu bar 2-5 2.2.3 Navigation keys 2-5 2.2.4 Menu items 2-6 2.2.5 Submenu items 2-6 2.2.6 Configuration fields 2-6 2.2.7 Pop-up window 2-6 2.2.8 Scroll bar 2-6 2.2.9 General help 2-6 2.3 Main menu 2-7 2.3.1 System Time 2-7 2.3.2 System Date 2-7 2.3.3 Primary IDE Master/Slave, SATA 1/2/3/4/5/6 2-8 2.3.4 System Information 2-9 2.4 Advanced menu 2-9 2.4.1 JumperFree Configuration 2-9 2.4.2 CPU Configuration 2-12 2.4.3 Chipset 2-13 2.4.4 Onboard...

User Manual
Page 9
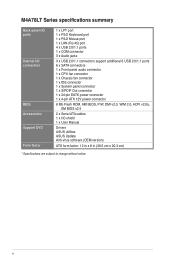
...more, Windows® 32-bit operating system may only recognize less than 3GB. M4A78LT Series specifications summar CPU Chipset System bus Memory Expansion slots Storage LAN Audio USB Special features ASUS unique features AMD® Socket AM3 AMD® Phenom™ II / ...at the mid-board, 4 ports at the back panel) 100% All high quality conductive polymer capacitors (M4A78LT only) Core Unlocker ASUS EPU-4 Engine ASUS CrashFree BIOS 3 ASUS EZ Flash 2 ASUS Q-Fan ASUS MyLogo 2 ASUS C.P.R. (CPU Parameter Recall) ASUS Anti Surge ASUS AI Charger ASUS Turbo Key (continued on the next page) ix
...more, Windows® 32-bit operating system may only recognize less than 3GB. M4A78LT Series specifications summar CPU Chipset System bus Memory Expansion slots Storage LAN Audio USB Special features ASUS unique features AMD® Socket AM3 AMD® Phenom™ II / ...at the mid-board, 4 ports at the back panel) 100% All high quality conductive polymer capacitors (M4A78LT only) Core Unlocker ASUS EPU-4 Engine ASUS CrashFree BIOS 3 ASUS EZ Flash 2 ASUS Q-Fan ASUS MyLogo 2 ASUS C.P.R. (CPU Parameter Recall) ASUS Anti Surge ASUS AI Charger ASUS Turbo Key (continued on the next page) ix
User Manual
Page 10
... audio connector 1 x CPU fan connector 1 x Chassis fan connector 1 x IDE connector 1 x System panel connector 1 x S/PDIF Out connector 1 x 24-pin EATX power connector 1 x 4-pin ATX 12V power connector 8 Mb Flash ROM, AMI BIOS, PnP, DMI v2.0, WfM 2.0, ACPI v2.0a, SM BIOS v2.5 2 x Serial ATA cables 1 x I/O shield 1 x User Manual Drivers ASUS utilities ASUS Update Anti...
... audio connector 1 x CPU fan connector 1 x Chassis fan connector 1 x IDE connector 1 x System panel connector 1 x S/PDIF Out connector 1 x 24-pin EATX power connector 1 x 4-pin ATX 12V power connector 8 Mb Flash ROM, AMI BIOS, PnP, DMI v2.0, WfM 2.0, ACPI v2.0a, SM BIOS v2.5 2 x Serial ATA cables 1 x I/O shield 1 x User Manual Drivers ASUS utilities ASUS Update Anti...

User Manual
Page 11
...; II / Athlon™ II / Sempron™ 100 series CPU support This motherboard supports AMD® Socket AM3 multi-core processors with unique L3 cache and delivers better overclocking capabilities with the list below. 1.2 Package contents Check your package with less power consumption. ASUS M4A78LT Series 1-1 Thank you start installing the motherboard, and hardware...
...; II / Athlon™ II / Sempron™ 100 series CPU support This motherboard supports AMD® Socket AM3 multi-core processors with unique L3 cache and delivers better overclocking capabilities with the list below. 1.2 Package contents Check your package with less power consumption. ASUS M4A78LT Series 1-1 Thank you start installing the motherboard, and hardware...
User Manual
Page 12
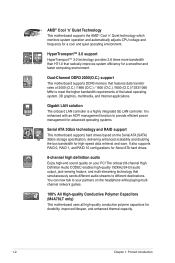
...8-channel high definition audio Enjoy high-end sound quality on the headphone while playing multichannel network games. 100% All High-quality Conductive Polymer Capacitors (M4A78LT only) This motherboard uses all high-quality conductive polymer capacitors for high-speed data retrieval and save. Dual-Channel DDR3 2000(O.C.) support This motherboard ... environment. AMD® Cool 'n' Quiet Technology This motherboard supports the AMD® Cool 'n' Quiet technology which monitors system operation and automatically adjusts CPU voltage and frequency for a cool and quiet operating environment.
...8-channel high definition audio Enjoy high-end sound quality on the headphone while playing multichannel network games. 100% All High-quality Conductive Polymer Capacitors (M4A78LT only) This motherboard uses all high-quality conductive polymer capacitors for high-speed data retrieval and save. Dual-Channel DDR3 2000(O.C.) support This motherboard ... environment. AMD® Cool 'n' Quiet Technology This motherboard supports the AMD® Cool 'n' Quiet technology which monitors system operation and automatically adjusts CPU voltage and frequency for a cool and quiet operating environment.

User Manual
Page 13
...Turbo Key boosts performances without performing complicated BIOS changes. ASUS Q-Fan ASUS Q-Fan technology intelligently adjusts the CPU fan speed according to system loading to personalize your favorite photos into an overclocking button. ASUS Turbo Key ASUS Turbo Key allows you to turn the PC power... button into 256-color boot logos to ensure a quiet, cool, and efficient operation. Enjoy an instant performance boost by power surges from a USB flash disk before entering the OS. ASUS M4A78LT Series...
...Turbo Key boosts performances without performing complicated BIOS changes. ASUS Q-Fan ASUS Q-Fan technology intelligently adjusts the CPU fan speed according to system loading to personalize your favorite photos into an overclocking button. ASUS Turbo Key ASUS Turbo Key allows you to turn the PC power... button into 256-color boot logos to ensure a quiet, cool, and efficient operation. Enjoy an instant performance boost by power surges from a USB flash disk before entering the OS. ASUS M4A78LT Series...
User Manual
Page 14
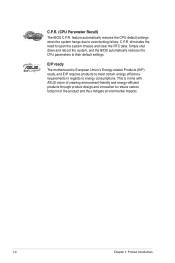
...chassis and clear the RTC data. Simply shut down and reboot the system, and the BIOS automatically restores the CPU parameters to energy consumptions. C.P.R. (CPU Parameter Recall) The BIOS C.P.R. This is European Union´s Energy-related Products (ErP) ready, and ErP requires... products to meet certain energy efficiency requirements in line with ASUS vision of creating environment-friendly and energy-efficient products ...
...chassis and clear the RTC data. Simply shut down and reboot the system, and the BIOS automatically restores the CPU parameters to energy consumptions. C.P.R. (CPU Parameter Recall) The BIOS C.P.R. This is European Union´s Energy-related Products (ErP) ready, and ErP requires... products to meet certain energy efficiency requirements in line with ASUS vision of creating environment-friendly and energy-efficient products ...

User Manual
Page 18
... for Phenom™ II / Athlon™ II / Sempron™ 100 series processors. Locate the CPU socket on the motherboard. M4A78LT Series M4A78LT Series CPU socket AM3 1-8 Chapter 1: Product introduction Onboard LED 1-5 ATX12V) 3. The AM3 socket has a different pinout from the AM2+/AM2 socket. Clear RTC RAM (CLRTC) 1-19 6. USB ...
... for Phenom™ II / Athlon™ II / Sempron™ 100 series processors. Locate the CPU socket on the motherboard. M4A78LT Series M4A78LT Series CPU socket AM3 1-8 Chapter 1: Product introduction Onboard LED 1-5 ATX12V) 3. The AM3 socket has a different pinout from the AM2+/AM2 socket. Clear RTC RAM (CLRTC) 1-19 6. USB ...
User Manual
Page 19
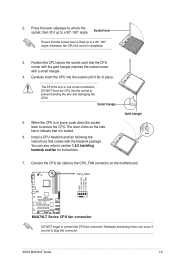
... only in completely. 3. Small triangle 5. CPU_FAN GND CPU FAN PWR CPU FAN IN CPU FAN PWM M4A78LT Series M4A78LT Series CPU fan connector DO NOT forget to prevent bending the pins and damaging the CPU! otherwise, the CPU will not fit in one correct orientation. ASUS M4A78LT Series 1-9 DO NOT force the CPU into the socket until it is in place...
... only in completely. 3. Small triangle 5. CPU_FAN GND CPU FAN PWR CPU FAN IN CPU FAN PWM M4A78LT Series M4A78LT Series CPU fan connector DO NOT forget to prevent bending the pins and damaging the CPU! otherwise, the CPU will not fit in one correct orientation. ASUS M4A78LT Series 1-9 DO NOT force the CPU into the socket until it is in place...
User Manual
Page 20
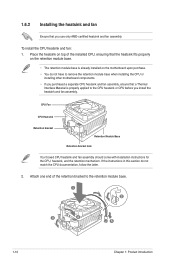
... instructions in this section do not have to remove the retention module base when installing the CPU or installing other motherboard components. • If you purchased a separate CPU heatsink and fan assembly, ensure that you install the heatsink and fan assembly. 1.6.2 Installing the... heatsink and fan Ensure that a Thermal Interface Material is already installed on the motherboard upon purchase. • You do not match the CPU documentation, follow the latter. 2. Place the heatsink on top of the retention bracket to the retention module base. 1 2 3 4 5 1-10...
... instructions in this section do not have to remove the retention module base when installing the CPU or installing other motherboard components. • If you purchased a separate CPU heatsink and fan assembly, ensure that you install the heatsink and fan assembly. 1.6.2 Installing the... heatsink and fan Ensure that a Thermal Interface Material is already installed on the motherboard upon purchase. • You do not match the CPU documentation, follow the latter. 2. Place the heatsink on top of the retention bracket to the retention module base. 1 2 3 4 5 1-10...
User Manual
Page 21
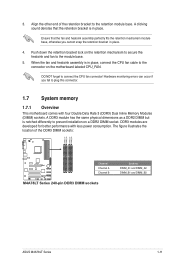
... is in place. Hardware monitoring errors can occur if you cannot snap the retention bracket in place, connect the CPU fan cable to connect the CPU fan connector! When the fan and heatsink assembly is notched differently to plug this connector. 1.7 System memory 1.7.1 ...socket. Align the other end of the DDR3 DIMM sockets: DIMM_A1 DIMM_A2 DIMM_B1 DIMM_B2 M4A78LT Series Channel Channel A Channel B M4A78LT Series 240-pin DDR3 DIMM sockets Sockets DIMM_A1 and DIMM_A2 DIMM_B1 and DIMM_B2 ASUS M4A78LT Series 1-11 A DDR3 module has the same physical dimensions as a DDR2 DIMM...
... is in place. Hardware monitoring errors can occur if you cannot snap the retention bracket in place, connect the CPU fan cable to connect the CPU fan connector! When the fan and heatsink assembly is notched differently to plug this connector. 1.7 System memory 1.7.1 ...socket. Align the other end of the DDR3 DIMM sockets: DIMM_A1 DIMM_A2 DIMM_B1 DIMM_B2 M4A78LT Series Channel Channel A Channel B M4A78LT Series 240-pin DDR3 DIMM sockets Sockets DIMM_A1 and DIMM_A2 DIMM_B1 and DIMM_B2 ASUS M4A78LT Series 1-11 A DDR3 module has the same physical dimensions as a DDR2 DIMM...

User Manual
Page 22
... when you install 4GB or more memory on the motherboard, the actual usable memory for better overclocking capability. • Due to the CPU specification, AMD® 100 and 200 series CPUs support up of the lower-sized channel for single-channel operation. • Always install... DIMMs with the same CAS latency. With ASUS design, this motherboard can be about 3GB or less. M4A78LT series Motherboards Qualified Vendors Lists (QVL) DDR3-2000(O.C.) MHz capability Vendor Part No. Chip NO. - The ...
... when you install 4GB or more memory on the motherboard, the actual usable memory for better overclocking capability. • Due to the CPU specification, AMD® 100 and 200 series CPUs support up of the lower-sized channel for single-channel operation. • Always install... DIMMs with the same CAS latency. With ASUS design, this motherboard can be about 3GB or less. M4A78LT series Motherboards Qualified Vendors Lists (QVL) DDR3-2000(O.C.) MHz capability Vendor Part No. Chip NO. - The ...

User Manual
Page 26
... ••• -- ••• • Due to CPU spec., AMD® 100 and 200 series CPUs support up to DDR3 1066MHz. Visit the ASUS website at www.asus.com for better overclocking capability. With ASUS design, this motherboard can support up to DDR3 1333MHz. • When ...overclocking, some AMD CPU models may not support DDR3 1600 MHz or higher frequency ...
... ••• -- ••• • Due to CPU spec., AMD® 100 and 200 series CPUs support up to DDR3 1066MHz. Visit the ASUS website at www.asus.com for better overclocking capability. With ASUS design, this motherboard can support up to DDR3 1333MHz. • When ...overclocking, some AMD CPU models may not support DDR3 1600 MHz or higher frequency ...

User Manual
Page 29
... do not help, remove the onboard battery and move the cap back to pins 2-3. M4A78LT Series CLRTC 12 23 Normal (Default) M4A78LT Series Clear RTC RAM Clear RTC To erase the RTC RAM: 1. ASUS M4A78LT Series 1-19 You can automatically reset parameter settings to clear the CMOS RTC RAM data.... Keep the cap on CLRTC jumper default position. The onboard button cell battery powers the RAM data in CMOS. Clear RTC RAM (CLRTC) This jumper allows you to overclocking, use the CPU ...
... do not help, remove the onboard battery and move the cap back to pins 2-3. M4A78LT Series CLRTC 12 23 Normal (Default) M4A78LT Series Clear RTC RAM Clear RTC To erase the RTC RAM: 1. ASUS M4A78LT Series 1-19 You can automatically reset parameter settings to clear the CMOS RTC RAM data.... Keep the cap on CLRTC jumper default position. The onboard button cell battery powers the RAM data in CMOS. Clear RTC RAM (CLRTC) This jumper allows you to overclocking, use the CPU ...

User Manual
Page 30
... Power Setting 1-20 Chapter 1: Product introduction Set these jumpers to +5V to CPU, DRAM in slow refresh, power supply in reduced power mode). USBPW1-4 12 23 +5V +5VSB (Default) M4A78LT Series USBPW5-8 12 23 +5V +5VSB (Default) M4A78LT Series USB Device Wake Up 3. This feature requires an ATX power supply that... jumpers to +5VSB to wake up the computer from S3 and S4 sleep modes (no power to wake up the compurer from S1 sleep mode (CPU stopped, DRAM refreshed, system running in the BIOS. Keyboard power (3-pin KBPWR) This jumper allows you to pins 2-3 (+5VSB), you set this ...
... Power Setting 1-20 Chapter 1: Product introduction Set these jumpers to +5V to CPU, DRAM in slow refresh, power supply in reduced power mode). USBPW1-4 12 23 +5V +5VSB (Default) M4A78LT Series USBPW5-8 12 23 +5V +5VSB (Default) M4A78LT Series USB Device Wake Up 3. This feature requires an ATX power supply that... jumpers to +5VSB to wake up the computer from S3 and S4 sleep modes (no power to wake up the compurer from S1 sleep mode (CPU stopped, DRAM refreshed, system running in the BIOS. Keyboard power (3-pin KBPWR) This jumper allows you to pins 2-3 (+5VSB), you set this ...

User Manual
Page 38
Only the 4-pin CPU fan supports the ASUS Q-Fan feature. 1-28 Chapter 1: Product introduction CPU and chassis fan connectors (4-pin CPU_FAN and 3-pin CHA_FAN) Connect the fan cables to the fan connectors. Insufficient air flow inside the system may damage the motherboard components. CPU_FAN GND CPU FAN PWR CPU FAN IN CPU FAN PWM M4A78LT Series CHA_FAN GND...
Only the 4-pin CPU fan supports the ASUS Q-Fan feature. 1-28 Chapter 1: Product introduction CPU and chassis fan connectors (4-pin CPU_FAN and 3-pin CHA_FAN) Connect the fan cables to the fan connectors. Insufficient air flow inside the system may damage the motherboard components. CPU_FAN GND CPU FAN PWR CPU FAN IN CPU FAN PWM M4A78LT Series CHA_FAN GND...

User Manual
Page 49
... The BIOS automatically detects the items in this menu. Main Advanced Advanced Settings Power M4A78LT BIOS Setup Boot Tools Exit JumperFree Configuration CPU Configuration Chipset Onboard Devices Configuration PCIPnP USB Configuration Version 0307 Adjust System Frequency/Voltage etc...configuration options in this menu may vary depending on the AMD CPU type. Configuration options: [Manual] [Auto] [Overclock Profile] [Test Mode] ASUS M4A78LT Series 2-9 Processor Displays the auto-detected CPU specification. AMIBIOS Displays the auto-detected BIOS information. 2.3.4 System...
... The BIOS automatically detects the items in this menu. Main Advanced Advanced Settings Power M4A78LT BIOS Setup Boot Tools Exit JumperFree Configuration CPU Configuration Chipset Onboard Devices Configuration PCIPnP USB Configuration Version 0307 Adjust System Frequency/Voltage etc...configuration options in this menu may vary depending on the AMD CPU type. Configuration options: [Manual] [Auto] [Overclock Profile] [Test Mode] ASUS M4A78LT Series 2-9 Processor Displays the auto-detected CPU specification. AMIBIOS Displays the auto-detected BIOS information. 2.3.4 System...

User Manual
Page 50
...Auto] Sets the processor frequency multiplier. Use / keys to adjust the ratio. The following item only appears when you set CPU Overclocking to [Overclock Profile]. PCIE Clock [100] Sets the PCIE Clock. Configuration options: [Min.=200] [Max.=550] ... 2300MHz] [x12.0 2400MHz] [x12.5 2500MHz] [x13.0 2600MHz] [x13.5 2700MHz] [x14.0 2800MHz] [x14.5 2900MHz] [x15.0 3000MHz] CPU/NB Frequency [Auto] Sets the CPU/Northbridge frequency. Configuration options: [Auto] 2-10 Chapter 2: BIOS information Configuration options: [Auto] [Manual] The following item only appears when you set...
...Auto] Sets the processor frequency multiplier. Use / keys to adjust the ratio. The following item only appears when you set CPU Overclocking to [Overclock Profile]. PCIE Clock [100] Sets the PCIE Clock. Configuration options: [Min.=200] [Max.=550] ... 2300MHz] [x12.0 2400MHz] [x12.5 2500MHz] [x13.0 2600MHz] [x13.5 2700MHz] [x14.0 2800MHz] [x14.5 2900MHz] [x15.0 3000MHz] CPU/NB Frequency [Auto] Sets the CPU/Northbridge frequency. Configuration options: [Auto] 2-10 Chapter 2: BIOS information Configuration options: [Auto] [Manual] The following item only appears when you set...

User Manual
Page 52
...] [90ns] [110ns] [160ns] [300ns] [350ns] DRAM Refresh Rate [Auto] Configuration options: [Auto] [Every 7.8ms] [Every 3.9ms] DRAM Command Rate [Auto] Configuration options: [Auto] [1T] [2T] 2.4.2 CPU Configuration The items in this menu show the CPU-related information that the BIOS automatically detects.
...] [90ns] [110ns] [160ns] [300ns] [350ns] DRAM Refresh Rate [Auto] Configuration options: [Auto] [Every 7.8ms] [Every 3.9ms] DRAM Command Rate [Auto] Configuration options: [Auto] [1T] [2T] 2.4.2 CPU Configuration The items in this menu show the CPU-related information that the BIOS automatically detects.


