
User Manual
Page 1
M4A78L-M LE Motherboard
M4A78L-M LE Motherboard
User Manual
Page 3
Contents Notices...vi Safety information vii About this guide viii M4A78L-M LE specifications summary x Chapter 1: Product introduction 1.1 Welcome 1-1 1.2 Package contents 1-1 1.3 Special features 1-1 1.3.1 Product highlights 1-1 1.3.2 Innovative ASUS features 1-3 1.4 Before you proceed 1-5 1.5 Motherboard overview 1-6 1.5.1 Placement direction 1-6 1.5.2 Screw holes 1-6 1.5.3 Motherboard layout 1-7 1.5.4 Layout contents 1-7 1.6 Central Processing Unit (CPU 1-8 1.6.1 Installing the CPU 1-8 1.6.2 Installing the heatsink and fan 1-10 1.7 System memory 1-11...
Contents Notices...vi Safety information vii About this guide viii M4A78L-M LE specifications summary x Chapter 1: Product introduction 1.1 Welcome 1-1 1.2 Package contents 1-1 1.3 Special features 1-1 1.3.1 Product highlights 1-1 1.3.2 Innovative ASUS features 1-3 1.4 Before you proceed 1-5 1.5 Motherboard overview 1-6 1.5.1 Placement direction 1-6 1.5.2 Screw holes 1-6 1.5.3 Motherboard layout 1-7 1.5.4 Layout contents 1-7 1.6 Central Processing Unit (CPU 1-8 1.6.1 Installing the CPU 1-8 1.6.2 Installing the heatsink and fan 1-10 1.7 System memory 1-11...

User Manual
Page 6
...technician for help. REACH Complying with Canadian ICES-003. This equipment generates, uses and can be placed in our products at ASUS REACH website at http://green.asus.com/english/REACH.htm. This class B digital apparatus complies with the REACH (Registration, Evaluation, Authorisation, and Restriction of ...device complies with the limits for a Class B digital device, pursuant to Part 15 of the FCC Rules. DO NOT throw the motherboard in municipal waste. If this equipment. Check local regulations for disposal of parts and recycling. Changes or modifications to this unit not ...
...technician for help. REACH Complying with Canadian ICES-003. This equipment generates, uses and can be placed in our products at ASUS REACH website at http://green.asus.com/english/REACH.htm. This class B digital apparatus complies with the REACH (Registration, Evaluation, Authorisation, and Restriction of ...device complies with the limits for a Class B digital device, pursuant to Part 15 of the FCC Rules. DO NOT throw the motherboard in municipal waste. If this equipment. Check local regulations for disposal of parts and recycling. Changes or modifications to this unit not ...
User Manual
Page 7
..., ensure that all power cables from the existing system before you add a device. • Before connecting or removing signal cables from the motherboard, ensure that the power cables for the devices are unplugged before using , contact your local power company. • If the power supply ... Contact a qualified service technician or your retailer. • The optical S/PDIF is an optional component (may or may not be included in your motherboard) and is set to a hazardous material collection point. • Never replace the battery with your power supply is defined as a CLASS 1 LASER...
..., ensure that all power cables from the existing system before you add a device. • Before connecting or removing signal cables from the motherboard, ensure that the power cables for the devices are unplugged before using , contact your local power company. • If the power supply ... Contact a qualified service technician or your retailer. • The optical S/PDIF is an optional component (may or may not be included in your motherboard) and is set to a hazardous material collection point. • Never replace the battery with your power supply is defined as a CLASS 1 LASER...
User Manual
Page 8
... only be used in any damage, contact your retailer. If you need when installing and configuring the motherboard. Detailed descriptions of the motherboard and the new technology it supports. • Chapter 2: BIOS information This chapter tells how to change system settings ...through the BIOS Setup menus. Operation safety • Before installing the motherboard and adding devices on a stable surface. • If you encounter technical problems with the package. • Before using the product, ensure...
... only be used in any damage, contact your retailer. If you need when installing and configuring the motherboard. Detailed descriptions of the motherboard and the new technology it supports. • Chapter 2: BIOS information This chapter tells how to change system settings ...through the BIOS Setup menus. Operation safety • Before installing the motherboard and adding devices on a stable surface. • If you encounter technical problems with the package. • Before using the product, ensure...
User Manual
Page 13
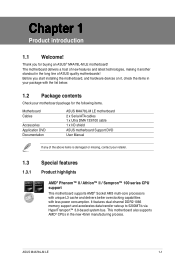
... supports AMD® CPUs in the long line of the above items is damaged or missing, contact your motherboard package for buying an ASUS® M4A78L-M LE motherboard! ASUS M4A78L-M LE 1-1 Before you for the following items. Motherboard Cables Accessories Application DVD Documentation ASUS M4A78L-M LE motherboard 2 x Serial ATA cables 1 x Ultra DMA 133/100 cable 1 x I/O shield ASUS motherboard Support DVD User Manual If any of...
... supports AMD® CPUs in the long line of the above items is damaged or missing, contact your motherboard package for buying an ASUS® M4A78L-M LE motherboard! ASUS M4A78L-M LE 1-1 Before you for the following items. Motherboard Cables Accessories Application DVD Documentation ASUS M4A78L-M LE motherboard 2 x Serial ATA cables 1 x Ultra DMA 133/100 cable 1 x I/O shield ASUS motherboard Support DVD User Manual If any of...

User Manual
Page 14
...requirements of the latest operating system, 3D graphics, multimedia, and Internet applications. AMD® Cool 'n' Quiet Technology This motherboard supports the AMD® Cool 'n' Quiet technology which monitors system operation and automatically adjusts CPU voltage and frequency for ... discrete GPUs that radically improves system efficiency for a smoother and faster computing environment. DDR2 1200(O.C.) support To attain top performance, ASUS engineers have successfully unleashed DDR2 1200(O.C.) MHz to 5200MT/s via HyperTransport™ 3.0-based system bus. AMD® Phenom™ ...
...requirements of the latest operating system, 3D graphics, multimedia, and Internet applications. AMD® Cool 'n' Quiet Technology This motherboard supports the AMD® Cool 'n' Quiet technology which monitors system operation and automatically adjusts CPU voltage and frequency for ... discrete GPUs that radically improves system efficiency for a smoother and faster computing environment. DDR2 1200(O.C.) support To attain top performance, ASUS engineers have successfully unleashed DDR2 1200(O.C.) MHz to 5200MT/s via HyperTransport™ 3.0-based system bus. AMD® Phenom™ ...

User Manual
Page 15
...; Update the audio driver to the latest version. • Use the chassis with HD audio module in the front panel to the motherboard USB port before turning on the computer. • The actual boot time depends on SATA HDDs, USB HDDs and flash drives with... without interrupting ongoing work or games, simply through pressing the button. ASUS M4A78L-M LE 1-3 When installing it on USB HDDs or flash drives, connect the drives to support 8-channel audio output. 1.3.2 Innovative ASUS features ASUS Express Gate ASUS Express Gate is a highly integrated Gb LAN controller. It supports file...
...; Update the audio driver to the latest version. • Use the chassis with HD audio module in the front panel to the motherboard USB port before turning on the computer. • The actual boot time depends on SATA HDDs, USB HDDs and flash drives with... without interrupting ongoing work or games, simply through pressing the button. ASUS M4A78L-M LE 1-3 When installing it on USB HDDs or flash drives, connect the drives to support 8-channel audio output. 1.3.2 Innovative ASUS features ASUS Express Gate ASUS Express Gate is a highly integrated Gb LAN controller. It supports file...
User Manual
Page 16
... favorite photos into 256-color boot logos to open the system chassis and clear the RTC data. Green ASUS This motherboard and its packaging comply with the ASUS vision of Hazardous Substances (RoHS). ASUS EZ Flash 2 ASUS EZ Flash 2 allows you to 100 meters at 1 meter accuracy. Simply shut down and reboot the system, and...
... favorite photos into 256-color boot logos to open the system chassis and clear the RTC data. Green ASUS This motherboard and its packaging comply with the ASUS vision of Hazardous Substances (RoHS). ASUS EZ Flash 2 ASUS EZ Flash 2 allows you to 100 meters at 1 meter accuracy. Simply shut down and reboot the system, and...
User Manual
Page 17
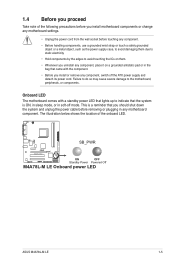
... grounded object or a metal object, such as the power supply case, to avoid damaging them due to the motherboard, peripherals, or components. SB_PWR M4A78L-M LE ON OFF Standby Power Powered Off M4A78L-M LE Onboard power LED ASUS M4A78L-M LE 1-5 The illustration below shows the location of the following precautions before you should shut down the system and unplug...
... grounded object or a metal object, such as the power supply case, to avoid damaging them due to the motherboard, peripherals, or components. SB_PWR M4A78L-M LE ON OFF Standby Power Powered Off M4A78L-M LE Onboard power LED ASUS M4A78L-M LE 1-5 The illustration below shows the location of the following precautions before you should shut down the system and unplug...

User Manual
Page 18
DO NOT overtighten the screws! The edge with external ports goes to the rear part of the chassis. Doing so can damage the motherboard. Place this side towards the rear of the chassis as indicated in the image below. 1.5.2 Screw holes Place six screws into the chassis in the correct orientation. M4A78L-M LE 1-6 Chapter 1: Product introduction 1.5 Motherboard overview 1.5.1 Placement direction When installing the motherboard, ensure that you place it into the holes indicated by circles to secure the motherboard to the chassis.
DO NOT overtighten the screws! The edge with external ports goes to the rear part of the chassis. Doing so can damage the motherboard. Place this side towards the rear of the chassis as indicated in the image below. 1.5.2 Screw holes Place six screws into the chassis in the correct orientation. M4A78L-M LE 1-6 Chapter 1: Product introduction 1.5 Motherboard overview 1.5.1 Placement direction When installing the motherboard, ensure that you place it into the holes indicated by circles to secure the motherboard to the chassis.

User Manual
Page 19
...27 1-26 1-28 1-22 1-18 ASUS M4A78L-M LE 1-7 CPU Socket AM2+ 6. Internal speaker connector (4-pin SPEAKER) 1-20 10. ATX power connectors (24-pin EATXPWR, 4-pin ATX12V) 4. Digital audio connector (4-1 pin SPDIF_OUT) 1-24 15. SATA connectors (7-pin SATA1 - 6) 1-29 12. 1.5.3 Motherboard layout 12 3 45 20.8cm(8.2in)... LAN1_USB12 Super I/O CHA_FAN CPU_FAN AUDIO AMD® 780L ICS9LPRS485 PCIe Gb LAN VT1708S AAFP PCIEX1_1 SPDIF_OUT PRI_IDE PCIEX16 M4A78L-M LE PCI1 PCI2 AMD® SB710 Lithium Cell CMOS Power SB_PWR SPEAKER SATA1 SATA4 SATA2 SATA5 SATA3 SATA6 8Mb BIOS CLRTC...
...27 1-26 1-28 1-22 1-18 ASUS M4A78L-M LE 1-7 CPU Socket AM2+ 6. Internal speaker connector (4-pin SPEAKER) 1-20 10. ATX power connectors (24-pin EATXPWR, 4-pin ATX12V) 4. Digital audio connector (4-1 pin SPDIF_OUT) 1-24 15. SATA connectors (7-pin SATA1 - 6) 1-29 12. 1.5.3 Motherboard layout 12 3 45 20.8cm(8.2in)... LAN1_USB12 Super I/O CHA_FAN CPU_FAN AUDIO AMD® 780L ICS9LPRS485 PCIe Gb LAN VT1708S AAFP PCIEX1_1 SPDIF_OUT PRI_IDE PCIEX16 M4A78L-M LE PCI1 PCI2 AMD® SB710 Lithium Cell CMOS Power SB_PWR SPEAKER SATA1 SATA4 SATA2 SATA5 SATA3 SATA6 8Mb BIOS CLRTC...

User Manual
Page 20
...the AM2+ / AM2 socket. 1.6.1 Installing the CPU To install a CPU: 1. M4A78L-M LE M4A78L-M LE CPU socket AM2+ 2. DO NOT force the CPU into the socket until it up to a 90°-100° angle; 1.6 Central Processing Unit (CPU) This motherboard supports AMD® Phenom™ II / Athlon™ II / Phenom™... / Athlon™ / Sempron™ Family processors. Locate the CPU socket on the motherboard. otherwise, the CPU will not fit in one correct orientation. Position the CPU above the socket such that the socket lever is designed for...
...the AM2+ / AM2 socket. 1.6.1 Installing the CPU To install a CPU: 1. M4A78L-M LE M4A78L-M LE CPU socket AM2+ 2. DO NOT force the CPU into the socket until it up to a 90°-100° angle; 1.6 Central Processing Unit (CPU) This motherboard supports AMD® Phenom™ II / Athlon™ II / Phenom™... / Athlon™ / Sempron™ Family processors. Locate the CPU socket on the motherboard. otherwise, the CPU will not fit in one correct orientation. Position the CPU above the socket such that the socket lever is designed for...

User Manual
Page 21
... CPU is locked. 6. Hardware monitoring errors can also refer to indicate that comes with the heatsink package. ASUS M4A78L-M LE 1-9 The lever clicks on the motherboard. M4A78L-M LE CPU_FAN CPU FAN PWM CPU FAN IN CPU FAN PWR GND M4A78L-M LE CPU fan connector DO NOT forget to the CPU_FAN connector on the side tab to section 1.6.2 Installing...
... CPU is locked. 6. Hardware monitoring errors can also refer to indicate that comes with the heatsink package. ASUS M4A78L-M LE 1-9 The lever clicks on the motherboard. M4A78L-M LE CPU_FAN CPU FAN PWM CPU FAN IN CPU FAN PWR GND M4A78L-M LE CPU fan connector DO NOT forget to the CPU_FAN connector on the side tab to section 1.6.2 Installing...
User Manual
Page 22
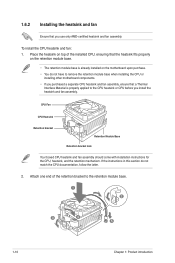
...CPU, heatsink, and the retention mechanism. Attach one end of the installed CPU, ensuring that a Thermal Interface Material is already installed on the motherboard upon purchase. • You do not match the CPU documentation, follow the latter. 2. To install the CPU heatsink and fan: 1. If... the instructions in this section do not have to remove the retention module base when installing the CPU or installing other motherboard components. • If you use only AMD-certified heatsink and fan assembly. 1.6.2 Installing the heatsink and fan Ensure that you purchased a...
...CPU, heatsink, and the retention mechanism. Attach one end of the installed CPU, ensuring that a Thermal Interface Material is already installed on the motherboard upon purchase. • You do not match the CPU documentation, follow the latter. 2. To install the CPU heatsink and fan: 1. If... the instructions in this section do not have to remove the retention module base when installing the CPU or installing other motherboard components. • If you use only AMD-certified heatsink and fan assembly. 1.6.2 Installing the heatsink and fan Ensure that you purchased a...
User Manual
Page 23
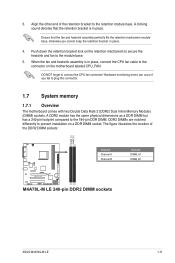
Align the other end of the DDR2 DIMM sockets: DIMM_A1 DIMM_B1 Channel Channel A Channel B M4A78L-M LE M4A78L-M LE 240-pin DDR2 DIMM sockets Sockets DIMM_A1 DIMM_B1 ASUS M4A78L-M LE 1-11 DDR2 DIMMs are notched differently to prevent installation on the retention mechanism to secure the heatsink...sound denotes that the fan and heatsink assembly perfectly fits the retention mechanism module base, otherwise you fail to the connector on the motherboard labeled CPU_FAN. Ensure that the retention bracket is in place. 3. Push down the retention bracket lock on a DDR DIMM socket. ...
Align the other end of the DDR2 DIMM sockets: DIMM_A1 DIMM_B1 Channel Channel A Channel B M4A78L-M LE M4A78L-M LE 240-pin DDR2 DIMM sockets Sockets DIMM_A1 DIMM_B1 ASUS M4A78L-M LE 1-11 DDR2 DIMMs are notched differently to prevent installation on the retention mechanism to secure the heatsink...sound denotes that the fan and heatsink assembly perfectly fits the retention mechanism module base, otherwise you fail to the connector on the motherboard labeled CPU_FAN. Ensure that the retention bracket is in place. 3. Push down the retention bracket lock on a DDR DIMM socket. ...
User Manual
Page 24
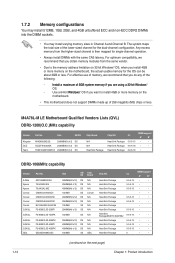
...• • • • • • • • • • • • • • • • • • (continued on the motherboard, the actual usable memory for the OS can be about 3GB or less. For effective use of memory, we recommend that you do any of... made up of the lower-sized channel for single-channel operation. • Always install DIMMs with the same CAS latency. M4A78L-M LE Motherboard Qualified Vendors Lists (QVL) DDR2-1200(O.C.)MHz capability Vendor Part No. Any excess memory from the same vendor. • Due...
...• • • • • • • • • • • • • • • • • • (continued on the motherboard, the actual usable memory for the OS can be about 3GB or less. For effective use of memory, we recommend that you do any of... made up of the lower-sized channel for single-channel operation. • Always install DIMMs with the same CAS latency. M4A78L-M LE Motherboard Qualified Vendors Lists (QVL) DDR2-1200(O.C.)MHz capability Vendor Part No. Any excess memory from the same vendor. • Due...
User Manual
Page 29
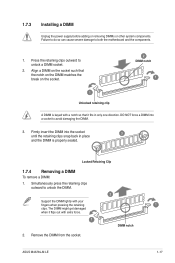
... that it flips out with your fingers when pressing the retaining clips. Press the retaining clips outward to both the motherboard and the components. 1. Locked Retaining Clip 1.7.4 Removing a DIMM To remove a DIMM: 1. ASUS M4A78L-M LE 1 1-17 Simultaneously press the retaining clips outward to avoid damaging the DIMM. 3. DO NOT force a DIMM into the socket...
... that it flips out with your fingers when pressing the retaining clips. Press the retaining clips outward to both the motherboard and the components. 1. Locked Retaining Clip 1.7.4 Removing a DIMM To remove a DIMM: 1. ASUS M4A78L-M LE 1 1-17 Simultaneously press the retaining clips outward to avoid damaging the DIMM. 3. DO NOT force a DIMM into the socket...

User Manual
Page 30
...such as a LAN card, SCSI card, USB card, and other cards that comply with PCI specifications. 1.8.4 PCI Express x1 slot This motherboard supports PCI Express x1 network cards, SCSI cards, and other cards that comply with the PCI Express specifications. 1.8.5 PCI Express x16 slot This...Before installing the expansion card, read the documentation that the cards do so may need IRQ assignments. Remove the system unit cover (if your motherboard is completely seated on the system and change the necessary BIOS settings, if any. Align the card connector with it by adjusting the software ...
...such as a LAN card, SCSI card, USB card, and other cards that comply with PCI specifications. 1.8.4 PCI Express x1 slot This motherboard supports PCI Express x1 network cards, SCSI cards, and other cards that comply with the PCI Express specifications. 1.8.5 PCI Express x16 slot This...Before installing the expansion card, read the documentation that the cards do so may need IRQ assignments. Remove the system unit cover (if your motherboard is completely seated on the system and change the necessary BIOS settings, if any. Align the card connector with it by adjusting the software ...
User Manual
Page 34
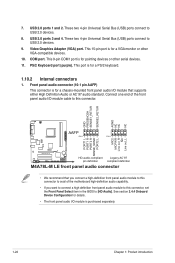
... PIN 1 PIN 1 MIC2 MICPWR Line out_R NC Line out_L PORT1 L PORT1 R PORT2 R SENSE_SEND PORT2 L M4A78L-M LE HD-audio-compliant Legacy AC'97 pin definition compliant definition M4A78L-M LE front panel audio connector • We recommend that supports either High Definition Audio or AC`97 audio standard. 7....I/O module cable to this connector, set the Front Panel Select item in the BIOS to this connector. Connect one end of the motherboard high-definition audio capability. • If you want to connect a high definition front panel audio module to [HD Audio]. Video Graphics...
... PIN 1 PIN 1 MIC2 MICPWR Line out_R NC Line out_L PORT1 L PORT1 R PORT2 R SENSE_SEND PORT2 L M4A78L-M LE HD-audio-compliant Legacy AC'97 pin definition compliant definition M4A78L-M LE front panel audio connector • We recommend that supports either High Definition Audio or AC`97 audio standard. 7....I/O module cable to this connector, set the Front Panel Select item in the BIOS to this connector. Connect one end of the motherboard high-definition audio capability. • If you want to connect a high definition front panel audio module to [HD Audio]. Video Graphics...


