
User Manual
Page 1
Motherboard
Motherboard

User Manual
Page 1
M4A78-E Motherboard
M4A78-E Motherboard
User Manual
Page 3
...Contents...iii Notices ...vii Safety information...viii About this guide...ix M4A78-E specifications summary xi Chapter 1: Product introduction 1.1 Welcome!...1-1 1.2 Package contents 1-1 1.3 Special features 1-2 1.3.1 Product highlights 1-2 1.3.2 ASUS unique features 1-3 1.3.3 ASUS intelligent performance and overclocking features........... 1-5 Chapter 2: Hardware information 2.1 Before you proceed 2-1 2.2 Motherboard overview 2-2 2.2.1 Motherboard layout 2-2 2.2.2 Layout contents 2-3 2.2.3 Placement direction 2-4 2.2.4 Screw holes 2-4 2.3 Central Processing Unit...
...Contents...iii Notices ...vii Safety information...viii About this guide...ix M4A78-E specifications summary xi Chapter 1: Product introduction 1.1 Welcome!...1-1 1.2 Package contents 1-1 1.3 Special features 1-2 1.3.1 Product highlights 1-2 1.3.2 ASUS unique features 1-3 1.3.3 ASUS intelligent performance and overclocking features........... 1-5 Chapter 2: Hardware information 2.1 Before you proceed 2-1 2.2 Motherboard overview 2-2 2.2.1 Motherboard layout 2-2 2.2.2 Layout contents 2-3 2.2.3 Placement direction 2-4 2.2.4 Screw holes 2-4 2.3 Central Processing Unit...

User Manual
Page 8
..., contact your retailer. These devices could interrupt the grounding circuit. • Make sure that your retailer. Operation safety • Before installing the motherboard and adding devices on a stable surface. • If you detect any area where it may become wet. • Place the product on ...bin indicates that all cables are correctly connected and the power cables are using an adapter or extension cord. DO NOT throw the motherboard in municipal waste. DO NOT throw the mercury-containing button cell battery in municipal waste. If you are not damaged. If possible...
..., contact your retailer. These devices could interrupt the grounding circuit. • Make sure that your retailer. Operation safety • Before installing the motherboard and adding devices on a stable surface. • If you detect any area where it may become wet. • Place the product on ...bin indicates that all cables are correctly connected and the power cables are using an adapter or extension cord. DO NOT throw the motherboard in municipal waste. DO NOT throw the mercury-containing button cell battery in municipal waste. If you are not damaged. If possible...
User Manual
Page 9
... support This chapter describes the contents of the switches, jumpers, and connectors on ASUS hardware and software products. Detailed descriptions of the BIOS parameters are not part of the motherboard and the new technology it supports. • Chapter 2: Hardware information This chapter...describes the features of the standard package. ix Where to find more information Refer to the ASUS contact information. 2. ASUS websites The ASUS website provides updated information on the motherboard. • Chapter 3: BIOS setup This chapter tells how to change system settings through the...
... support This chapter describes the contents of the switches, jumpers, and connectors on ASUS hardware and software products. Detailed descriptions of the BIOS parameters are not part of the motherboard and the new technology it supports. • Chapter 2: Hardware information This chapter...describes the features of the standard package. ix Where to find more information Refer to the ASUS contact information. 2. ASUS websites The ASUS website provides updated information on the motherboard. • Chapter 3: BIOS setup This chapter tells how to change system settings through the...
User Manual
Page 15
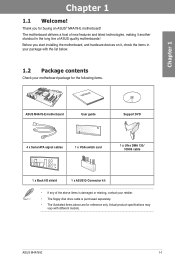
... damaged or missing, contact your retailer. • The floppy disk drive cable is purchased separately. • The illustrated items above are for buying an ASUS® M4A78-E motherboard! Before you for reference only. ASUS M4A78-E 1-1 Product introduction Thank you start installing the motherboard, and hardware devices on it another standout in your package with different models.
... damaged or missing, contact your retailer. • The floppy disk drive cable is purchased separately. • The illustrated items above are for buying an ASUS® M4A78-E motherboard! Before you for reference only. ASUS M4A78-E 1-1 Product introduction Thank you start installing the motherboard, and hardware devices on it another standout in your package with different models.
User Manual
Page 16
...-rendered previews within ATI Catalyst™ Control Center. 1-2 Chapter 1: Product Introduction Dual channel DDR2 1066 support This motherboard supports DDR2 1066, which provides faster data transfer rate and more bandwidth to the next level boosting PC performance by...;�M����3����C����P���U��) This motherboard supports AMD® AM3 �m�u��lt�i-�c�o�r�e��p�r�o�...
...-rendered previews within ATI Catalyst™ Control Center. 1-2 Chapter 1: Product Introduction Dual channel DDR2 1066 support This motherboard supports DDR2 1066, which provides faster data transfer rate and more bandwidth to the next level boosting PC performance by...;�M����3����C����P���U��) This motherboard supports AMD® AM3 �m�u��lt�i-�c�o�r�e��p�r�o�...
User Manual
Page 17
...impact of the environment. Furthermore, high quality power components can continue running at minimum power and noise when you are temporarily away. ASUS M4A78-E 1-3 Chapter 1 HDMI support Enjoy Full HD 1080p Multimedia Home-Theater Entertainment High-Definition Multimedia Interface (HDMI) is supported by AM2+/...delivers multi-channel audio and uncompressed digital video for critical PC components in real-time-helping save power and money! ASUS Green Design This motherboard and its packaging comply with the highest-quality home theater experience. AI Nap With AI Nap, the system can...
...impact of the environment. Furthermore, high quality power components can continue running at minimum power and noise when you are temporarily away. ASUS M4A78-E 1-3 Chapter 1 HDMI support Enjoy Full HD 1080p Multimedia Home-Theater Entertainment High-Definition Multimedia Interface (HDMI) is supported by AM2+/...delivers multi-channel audio and uncompressed digital video for critical PC components in real-time-helping save power and money! ASUS Green Design This motherboard and its packaging comply with the highest-quality home theater experience. AI Nap With AI Nap, the system can...
User Manual
Page 18
... BIOS without entering the OS. Fanless Design-Stylish Heatsink Design The streamline-shaped heatsink features 0-dB thermal solution that allows users to the motherboard. Profile The motherboard features the ASUS O.C. The BIOS settings can utilize the most popular Instant Messengers (IM) like MSN, Skype, Google talk, QQ, and Yahoo! The actual boot time...
... BIOS without entering the OS. Fanless Design-Stylish Heatsink Design The streamline-shaped heatsink features 0-dB thermal solution that allows users to the motherboard. Profile The motherboard features the ASUS O.C. The BIOS settings can utilize the most popular Instant Messengers (IM) like MSN, Skype, Google talk, QQ, and Yahoo! The actual boot time...

User Manual
Page 19
...setup, Turbo Key can boost performances without exiting or rebooting the OS; Chapter 1 1.3.3 ASUS intelligent performance and overclocking features TurboV Feel the adrenaline rush of the motherboard BIOS allows automatic re-setting to the BIOS default settings in case the system hangs due... the need to overclock without interrupting ongoing work or games-with the ASUS TurboV. and its user-friendly interface makes overclock with just a few clicks away. C.P.R. (CPU Parameter Recall) The C.P.R. ASUS M4A78-E 1-5 Simply shut down and reboot the system, and the BIOS automatically...
...setup, Turbo Key can boost performances without exiting or rebooting the OS; Chapter 1 1.3.3 ASUS intelligent performance and overclocking features TurboV Feel the adrenaline rush of the motherboard BIOS allows automatic re-setting to the BIOS default settings in case the system hangs due... the need to overclock without interrupting ongoing work or games-with the ASUS TurboV. and its user-friendly interface makes overclock with just a few clicks away. C.P.R. (CPU Parameter Recall) The C.P.R. ASUS M4A78-E 1-5 Simply shut down and reboot the system, and the BIOS automatically...

User Manual
Page 21
... Failure to do so may cause severe damage to the motherboard, peripherals, or components. The illustration below shows the location of the following precautions before you install motherboard components or change any motherboard settings. • Unplug the power cord from the wall... removing or plugging in any component, ensure that the ATX power supply is detached from the power supply. Onboard LED The motherboard comes with the component. • Before you install or remove any motherboard component. Chapter 2 ASUS M4A78-E 2-1 Chapter 2: Chapter 2 2.1 Before you proceed...
... Failure to do so may cause severe damage to the motherboard, peripherals, or components. The illustration below shows the location of the following precautions before you install motherboard components or change any motherboard settings. • Unplug the power cord from the wall... removing or plugging in any component, ensure that the ATX power supply is detached from the power supply. Onboard LED The motherboard comes with the component. • Before you install or remove any motherboard component. Chapter 2 ASUS M4A78-E 2-1 Chapter 2: Chapter 2 2.1 Before you proceed...
User Manual
Page 22
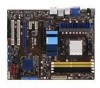
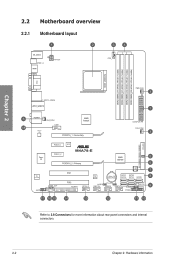
2.2 Motherboard overview 2.2.1 Motherboard layout Chapter 2 Refer to 2.8 Connectors for more information about rear panel connectors and internal connectors. 2-2 Chapter 2: Hardware information
2.2 Motherboard overview 2.2.1 Motherboard layout Chapter 2 Refer to 2.8 Connectors for more information about rear panel connectors and internal connectors. 2-2 Chapter 2: Hardware information

User Manual
Page 24
Doing so can damage the motherboard. DO NOT overtighten the screws! Place this side towards the rear of the chassis as indicated in the correct orientation. The edge with external ports goes to the chassis. 2.2.3 Placement direction When installing the motherboard, ensure that you place it into the chassis in the image below. 2.2.4 Screw holes Place nine screws into the holes indicated by circles to secure the motherboard to the rear part of the chassis Chapter 2 2-4 Chapter 2: Hardware information
Doing so can damage the motherboard. DO NOT overtighten the screws! Place this side towards the rear of the chassis as indicated in the correct orientation. The edge with external ports goes to the chassis. 2.2.3 Placement direction When installing the motherboard, ensure that you place it into the chassis in the image below. 2.2.4 Screw holes Place nine screws into the holes indicated by circles to secure the motherboard to the rear part of the chassis Chapter 2 2-4 Chapter 2: Hardware information

User Manual
Page 25
...; Opteron™ processors. Ensure that the socket lever is lifted up to a 90º angle; Do not install an Opteron™ processor on the motherboard. Socket lever ASUS M4A78-E 2-5 The CPU socket is also compatible with AMD® Phenom™ II / Athlon™ X4 / Athlon™ X3 / Athlon™ X2 (AM3 CPU). Unlock...
...; Opteron™ processors. Ensure that the socket lever is lifted up to a 90º angle; Do not install an Opteron™ processor on the motherboard. Socket lever ASUS M4A78-E 2-5 The CPU socket is also compatible with AMD® Phenom™ II / Athlon™ X4 / Athlon™ X3 / Athlon™ X2 (AM3 CPU). Unlock...
User Manual
Page 27
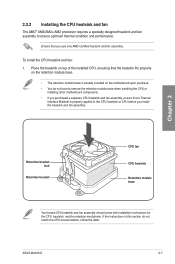
...and performance. If the instructions in this section do not have to remove the retention module base when installing the CPU or installing other motherboard components. • If you purchased a separate CPU heatsink and fan assembly, ensure that you install the heatsink and fan assembly. ...the CPU, heatsink, and the retention mechanism. ASUS M4A78-E 2-7 Place the heatsink on top of the installed CPU, ensuring that the heatsink fits properly on the retention module base. • The retention module base is already installed on the motherboard upon purchase. • You do not ...
...and performance. If the instructions in this section do not have to remove the retention module base when installing the CPU or installing other motherboard components. • If you purchased a separate CPU heatsink and fan assembly, ensure that you install the heatsink and fan assembly. ...the CPU, heatsink, and the retention mechanism. ASUS M4A78-E 2-7 Place the heatsink on top of the installed CPU, ensuring that the heatsink fits properly on the retention module base. • The retention module base is already installed on the motherboard upon purchase. • You do not ...

User Manual
Page 29
Hardware monitoring errors can occur if you fail to plug this connector. • This connector is in place, connect the CPU fan cable to the connector on the motherboard labeled CPU_FAN. • Do not forget to connect the CPU fan connector! Chapter 2 ASUS M4A78-E 2-9 5. When the fan and heatsink assembly is backward compatible with old 3-pin CPU fan.
Hardware monitoring errors can occur if you fail to plug this connector. • This connector is in place, connect the CPU fan cable to the connector on the motherboard labeled CPU_FAN. • Do not forget to connect the CPU fan connector! Chapter 2 ASUS M4A78-E 2-9 5. When the fan and heatsink assembly is backward compatible with old 3-pin CPU fan.

User Manual
Page 30
A DDR2 module has the same physical dimensions as a DDR DIMM but has a 240-pin footprint compared to prevent installation on a DDR DIMM socket. DDR2 DIMMs are notched differently to the 184-pin DDR DIMM. The figure illustrates the location of the DDR2 DIMM sockets: Chapter 2 2-10 Chapter 2: Hardware information 2.4 System memory 2.4.1 Overview The motherboard comes with four Double Data Rate 2 (DDR2) Dual Inline Memory Modules (DIMM) sockets.
A DDR2 module has the same physical dimensions as a DDR DIMM but has a 240-pin footprint compared to prevent installation on a DDR DIMM socket. DDR2 DIMMs are notched differently to the 184-pin DDR DIMM. The figure illustrates the location of the DDR2 DIMM sockets: Chapter 2 2-10 Chapter 2: Hardware information 2.4 System memory 2.4.1 Overview The motherboard comes with four Double Data Rate 2 (DDR2) Dual Inline Memory Modules (DIMM) sockets.
User Manual
Page 31
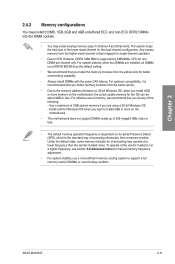
... DIMMs made up of 256 megabit (Mb) chips or less. • The default memory operation frequency is dependent on the motherboard, the actual usable memory for the dual-channel configuration. Chapter 2 ASUS M4A78-E 2-11 2.4.2 Memory configurations You may install 512MB, 1GB, 2GB and 4GB unbuffered ECC and non‑ECC DDR2 DIMMs into...
... DIMMs made up of 256 megabit (Mb) chips or less. • The default memory operation frequency is dependent on the motherboard, the actual usable memory for the dual-channel configuration. Chapter 2 ASUS M4A78-E 2-11 2.4.2 Memory configurations You may install 512MB, 1GB, 2GB and 4GB unbuffered ECC and non‑ECC DDR2 DIMMs into...

User Manual
Page 32
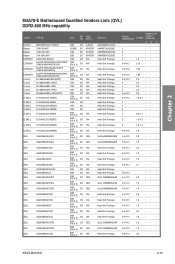
...; • BoxP/N:TXDD4096M1066HC5DC-D 4GB (TXDD2048M1066HC5-D) (Kit of 2) DS N/A Heat-Sink Package 5-5-5-15 2.2-2.3 • 2-12 Chapter 2: Hardware information Size SS/ DS Chip Brand Chip NO. Chapter 2 M4A78-E Motherboard Qualified Vendors Lists (QVL) DDR2-1066 MHz capability Vendor Apacer Apacer CORSAIR Crucial Crucial G.SKILL G.SKILL G.SKILL GEIL GEIL GEIL GEIL GEIL GEIL GEIL Hynix...
...; • BoxP/N:TXDD4096M1066HC5DC-D 4GB (TXDD2048M1066HC5-D) (Kit of 2) DS N/A Heat-Sink Package 5-5-5-15 2.2-2.3 • 2-12 Chapter 2: Hardware information Size SS/ DS Chip Brand Chip NO. Chapter 2 M4A78-E Motherboard Qualified Vendors Lists (QVL) DDR2-1066 MHz capability Vendor Apacer Apacer CORSAIR Crucial Crucial G.SKILL G.SKILL G.SKILL GEIL GEIL GEIL GEIL GEIL GEIL GEIL Hynix...
User Manual
Page 33
...; 5-5-5-15 1.8 •• 5-5-5-15 1.8 ••• 4-4-4-12 2.0 •• 5-5-5-15 1.8 • • 4-4-4-12 2.0 ••• 5-5-5-15 1.8 ••• 4-4-4-12 2.0 ••• ASUS M4A78-E 2-13 Chapter 2 M4A78-E Motherboard Qualified Vendors Lists (QVL) DDR2-800 MHz capability Vendor Part No.
...; 5-5-5-15 1.8 •• 5-5-5-15 1.8 ••• 4-4-4-12 2.0 •• 5-5-5-15 1.8 • • 4-4-4-12 2.0 ••• 5-5-5-15 1.8 ••• 4-4-4-12 2.0 ••• ASUS M4A78-E 2-13 Chapter 2 M4A78-E Motherboard Qualified Vendors Lists (QVL) DDR2-800 MHz capability Vendor Part No.


