
User Manual
Page 1
M3N72-D Motherboard
M3N72-D Motherboard
User Manual
Page 3
......iii Notices...vii Safety information viii About this guide ix M3N72-D specifications summary xi Chapter 1: Product introduction 1.1 Welcome 1-1 1.2 Package contents 1-1 1.3 Special features 1-2 1.3.1 Product highlights 1-2 1.3.2 ASUS unique features 1-4 1.3.3 ASUS intelligent performance and overclocking features 1-6 Chapter 2: Hardware information 2.1 Before you proceed 2-1 2.2 Motherboard overview 2-2 2.2.1 Placement direction 2-2 2.2.2 Screw holes 2-2 2.2.3 Motherboard layout 2-3 2.2.4 Layout contents 2-4 2.3 Central Processing Unit (CPU 2-6 2.3.1 Installing the...
......iii Notices...vii Safety information viii About this guide ix M3N72-D specifications summary xi Chapter 1: Product introduction 1.1 Welcome 1-1 1.2 Package contents 1-1 1.3 Special features 1-2 1.3.1 Product highlights 1-2 1.3.2 ASUS unique features 1-4 1.3.3 ASUS intelligent performance and overclocking features 1-6 Chapter 2: Hardware information 2.1 Before you proceed 2-1 2.2 Motherboard overview 2-2 2.2.1 Placement direction 2-2 2.2.2 Screw holes 2-2 2.2.3 Motherboard layout 2-3 2.2.4 Layout contents 2-4 2.3 Central Processing Unit (CPU 2-6 2.3.1 Installing the...

User Manual
Page 8
...disconnect all power cables from the existing system before you add a device. • Before connecting or removing signal cables from the motherboard, ensure that the power cables for disposal of electronic products. Safety information Electrical safety • To prevent electrical shock hazard, ... or your retailer. Check local regulations for the devices are using an adpater or extension cord. Operation safety • Before installing the motherboard and adding devices on a stable surface. • If you are unplugged before using , contact your local power company. •...
...disconnect all power cables from the existing system before you add a device. • Before connecting or removing signal cables from the motherboard, ensure that the power cables for disposal of electronic products. Safety information Electrical safety • To prevent electrical shock hazard, ... or your retailer. Check local regulations for the devices are using an adpater or extension cord. Operation safety • Before installing the motherboard and adding devices on a stable surface. • If you are unplugged before using , contact your local power company. •...
User Manual
Page 9
... components. How this guide This user guide contains the information you have been added by your dealer. ASUS websites The ASUS website provides updated information on the motherboard. • Chapter 3: Powering up This chapter describes the power up sequence and ways of the support... may include optional documentation, such as warranty flyers, that you need when installing and configuring the motherboard. It includes description of the switches, jumpers, and connectors on ASUS hardware and software products. Detailed descriptions of the BIOS parameters are not part of the...
... components. How this guide This user guide contains the information you have been added by your dealer. ASUS websites The ASUS website provides updated information on the motherboard. • Chapter 3: Powering up This chapter describes the power up sequence and ways of the support... may include optional documentation, such as warranty flyers, that you need when installing and configuring the motherboard. It includes description of the switches, jumpers, and connectors on ASUS hardware and software products. Detailed descriptions of the BIOS parameters are not part of the...

User Manual
Page 15
Chapter 1: 1Product introduction This chapter describes the motherboard features and the new technologies it supports.
Chapter 1: 1Product introduction This chapter describes the motherboard features and the new technologies it supports.
User Manual
Page 17
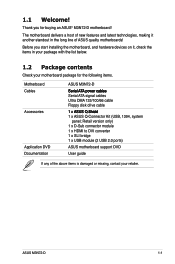
...converter 1 x SLI bridge 1 x USB module (2 USB 2.0 ports) Application DVD ASUS motherboard support DVD Documentation User guide If any of ASUS quality motherboards! ASUS M3N72-D 1-1 Thank you start installing the motherboard, and hardware devices on it another standout in your package with the list below. ... of the above items is damaged or missing, contact your motherboard package for buying an ASUS® M3N72-D motherboard! 1.1 Welcome! Before you for the following items. Motherboard ASUS M3N72-D Cables S�e��ri��al��...
...converter 1 x SLI bridge 1 x USB module (2 USB 2.0 ports) Application DVD ASUS motherboard support DVD Documentation User guide If any of ASUS quality motherboards! ASUS M3N72-D 1-1 Thank you start installing the motherboard, and hardware devices on it another standout in your package with the list below. ... of the above items is damaged or missing, contact your motherboard package for buying an ASUS® M3N72-D motherboard! 1.1 Welcome! Before you for the following items. Motherboard ASUS M3N72-D Cables S�e��ri��al��...
User Manual
Page 18
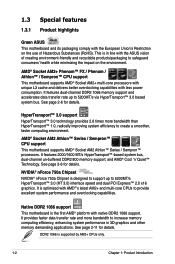
...to increase memory computing efficiency, enhancing system performance in line with the ASUS vision of Hazardous Substances (RoHS). See page 2‑11 for details. Native DDR2 1066 support This motherboard is the first AMD® platform with less power consumption. AMD®...buffered DDR2 800 memory support, and AMD® Cool 'n' Quiet™ Technology. 1.3 Special features 1.3.1 Product highlights Green ASUS This motherboard and its packaging comply with the European Union's Restriction on the use of creating environment-friendly and recyclable products/packaging to ...
...to increase memory computing efficiency, enhancing system performance in line with the ASUS vision of Hazardous Substances (RoHS). See page 2‑11 for details. Native DDR2 1066 support This motherboard is the first AMD® platform with less power consumption. AMD®...buffered DDR2 800 memory support, and AMD® Cool 'n' Quiet™ Technology. 1.3 Special features 1.3.1 Product highlights Green ASUS This motherboard and its packaging comply with the European Union's Restriction on the use of creating environment-friendly and recyclable products/packaging to ...
User Manual
Page 19
... a quiet, low power PC experience. ASUS M3N72-D 1-3 GeForce Boost turbo-charges performance of digital video standards that delivers multi-channel audio and uncompressed digital video through a single cable for audio/video appliances such as HD DVD and Blu-ray Discs, HDMI provides you with M3N series motherboard GPUs. Supporting HDCP copy protection such...
... a quiet, low power PC experience. ASUS M3N72-D 1-3 GeForce Boost turbo-charges performance of digital video standards that delivers multi-channel audio and uncompressed digital video through a single cable for audio/video appliances such as HD DVD and Blu-ray Discs, HDMI provides you with M3N series motherboard GPUs. Supporting HDCP copy protection such...
User Manual
Page 20
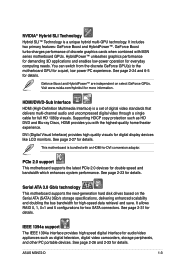
... for details. See page 2-27 and 2-39 for details . • The bootup speed depends on system configurations. • ASUS Express Gate supports installation on the headphones while playing multi-channel network games. To wake the system and return to different destinations. ...ASUS Express Gate allows you to adjust CPU frequency and vCore voltage, minimizing system noise and saving CPU power consumption at minimum power and noise when you are temporarily away. AI Gear 2 AI Gear 2 allows you want! See page 4-36 and 5-34 for details. S/PDIF digital sound ready This motherboard...
... for details. See page 2-27 and 2-39 for details . • The bootup speed depends on system configurations. • ASUS Express Gate supports installation on the headphones while playing multi-channel network games. To wake the system and return to different destinations. ...ASUS Express Gate allows you to adjust CPU frequency and vCore voltage, minimizing system noise and saving CPU power consumption at minimum power and noise when you are temporarily away. AI Gear 2 AI Gear 2 allows you want! See page 4-36 and 5-34 for details. S/PDIF digital sound ready This motherboard...
User Manual
Page 21
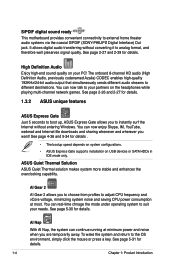
...speeds according to system loading to the motherboard. ASUS Q-Shield The specially designed ASUS Q-Shield does without entering the OS. With better electric conductivity, it ideally protects your motherboard against Electronic Magnetic Interference (EMI). ASUS Q-Connector ASUS Q-Connector allows you easy ways to launch... connect or disconnect the chassis front panel cables to ensure quiet, cool and efficient operation. ASUS M3N72-D 1-5 See page 4-29 and 5-32 for details. ASUS Crystal Sound This feature can enhance speech-centric applications like computer fans, air conditioners, and...
...speeds according to system loading to the motherboard. ASUS Q-Shield The specially designed ASUS Q-Shield does without entering the OS. With better electric conductivity, it ideally protects your motherboard against Electronic Magnetic Interference (EMI). ASUS Q-Connector ASUS Q-Connector allows you easy ways to launch... connect or disconnect the chassis front panel cables to ensure quiet, cool and efficient operation. ASUS M3N72-D 1-5 See page 4-29 and 5-32 for details. ASUS Crystal Sound This feature can enhance speech-centric applications like computer fans, air conditioners, and...

User Manual
Page 22
...Simply shut down and reboot the system, and the BIOS automatically restores the CPU default setting for details. AI Booster The ASUS AI Booster allows you to fine tune the CPU/memory voltage and gradually increase the memory, Front Side Bus (FSB) and...photo into a 256-color boot logo for details. 1.3.3 ASUS intelligent performance and overclocking features Precision Tweaker This feature allows you to overclocking, C.P.R. ASUS MyLogo 2™ This feature allows you can easily monitor the critical components of the motherboard BIOS allows automatic re-setting to the BIOS default settings ...
...Simply shut down and reboot the system, and the BIOS automatically restores the CPU default setting for details. AI Booster The ASUS AI Booster allows you to fine tune the CPU/memory voltage and gradually increase the memory, Front Side Bus (FSB) and...photo into a 256-color boot logo for details. 1.3.3 ASUS intelligent performance and overclocking features Precision Tweaker This feature allows you to overclocking, C.P.R. ASUS MyLogo 2™ This feature allows you can easily monitor the critical components of the motherboard BIOS allows automatic re-setting to the BIOS default settings ...
User Manual
Page 23
Chapter 2: 2 Hardware information This chapter lists the hardware setup procedures that you have to perform when installing system components. It includes description of the jumpers and connectors on the motherboard.
Chapter 2: 2 Hardware information This chapter lists the hardware setup procedures that you have to perform when installing system components. It includes description of the jumpers and connectors on the motherboard.
User Manual
Page 24
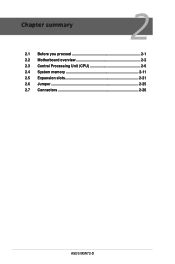
Chapter summary 2 2.1 Before you proceed 2-1 2.2 Motherboard overview 2-2 2.3 Central Processing Unit (CPU 2-6 2.4 System memory 2-11 2.5 Expansion slots 2-21 2.6 Jumper 2-25 2.7 Connectors 2-26 ASUS M3N72-D
Chapter summary 2 2.1 Before you proceed 2-1 2.2 Motherboard overview 2-2 2.3 Central Processing Unit (CPU 2-6 2.4 System memory 2-11 2.5 Expansion slots 2-21 2.6 Jumper 2-25 2.7 Connectors 2-26 ASUS M3N72-D
User Manual
Page 25
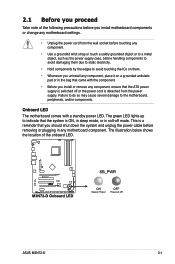
... pad or in any motherboard component. Onboard LED The motherboard comes with the component. • Before you should shut down the system and unplug the power cable before removing or plugging in the bag that the ATX power supply is switched off mode. ASUS M3N72-D 2-1 Failure to do... so may cause severe damage to indicate that the system is a reminder that you install or remove any component, ensure that came with a standby power LED. The green LED lights up to the motherboard, peripherals, and/or components...
... pad or in any motherboard component. Onboard LED The motherboard comes with the component. • Before you should shut down the system and unplug the power cable before removing or plugging in the bag that the ATX power supply is switched off mode. ASUS M3N72-D 2-1 Failure to do... so may cause severe damage to indicate that the system is a reminder that you install or remove any component, ensure that came with a standby power LED. The green LED lights up to the motherboard, peripherals, and/or components...
User Manual
Page 26
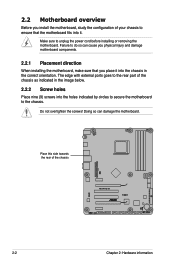
... sure to unplug the power cord before installing or removing the motherboard. 2.2 Motherboard overview Before you install the motherboard, study the configuration of your chassis to ensure that you physical injury and damage motherboard components. 2.2.1 Placement direction When installing the motherboard, make sure that the motherboard fits into it into the chassis in the image below...
... sure to unplug the power cord before installing or removing the motherboard. 2.2 Motherboard overview Before you install the motherboard, study the configuration of your chassis to ensure that you physical injury and damage motherboard components. 2.2.1 Placement direction When installing the motherboard, make sure that the motherboard fits into it into the chassis in the image below...
User Manual
Page 27
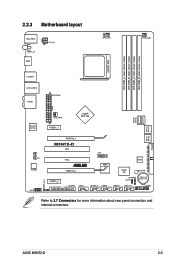
2.2.3 Motherboard layout Refer to 2.7 Connectors for more information about rear panel connectors and internal connectors. ASUS M3N72-D 2-3
2.2.3 Motherboard layout Refer to 2.7 Connectors for more information about rear panel connectors and internal connectors. ASUS M3N72-D 2-3
User Manual
Page 30
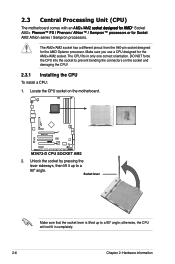
... a 90º angle; otherwise, the CPU will not fit in only one correct orientation. 2.3 Central Processing Unit (CPU) The motherboard comes with an �A�M�2��+�/A��M�2���s��o��c��k���... to a 90º angle. Socket lever Make sure that the socket lever is lifted up to prevent bending the connectors on the motherboard. 2. Make sure you use a CPU designed for the AMD Opteron processor. Locate the CPU socket on the socket and damaging the ...
... a 90º angle; otherwise, the CPU will not fit in only one correct orientation. 2.3 Central Processing Unit (CPU) The motherboard comes with an �A�M�2��+�/A��M�2���s��o��c��k���... to a 90º angle. Socket lever Make sure that the socket lever is lifted up to prevent bending the connectors on the motherboard. 2. Make sure you use a CPU designed for the AMD Opteron processor. Locate the CPU socket on the socket and damaging the ...
User Manual
Page 32
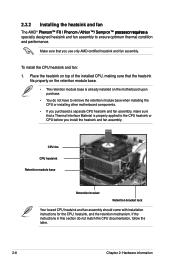
...installed CPU, making sure that the heatsink fits properly on the retention module base. • The retention module base is already installed on the motherboard upon purchase. • You do not match the CPU documentation, follow the latter. 2-8 Chapter 2: Hardware information 2.3.2 Installing the heatsink and ... If the instructions in this section do not have to remove the retention module base when installing the CPU or installing other motherboard components. • If you purchased a separate CPU heatsink and fan assembly, make sure that you use only AMD-certified heatsink and ...
...installed CPU, making sure that the heatsink fits properly on the retention module base. • The retention module base is already installed on the motherboard upon purchase. • You do not match the CPU documentation, follow the latter. 2-8 Chapter 2: Hardware information 2.3.2 Installing the heatsink and ... If the instructions in this section do not have to remove the retention module base when installing the CPU or installing other motherboard components. • If you purchased a separate CPU heatsink and fan assembly, make sure that you use only AMD-certified heatsink and ...
User Manual
Page 34
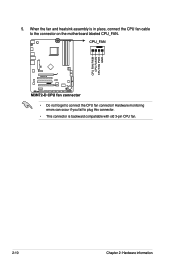
When the fan and heatsink assembly is in place, connect the CPU fan cable to the connector on the motherboard labeled CPU_FAN. • Do not forget to plug this connector. • This connector is backward compatiable with old 3-pin CPU fan. 2-10 Chapter 2: Hardware information Hardware monitoring errors can occur if you fail to connect the CPU fan connector! 5.
When the fan and heatsink assembly is in place, connect the CPU fan cable to the connector on the motherboard labeled CPU_FAN. • Do not forget to plug this connector. • This connector is backward compatiable with old 3-pin CPU fan. 2-10 Chapter 2: Hardware information Hardware monitoring errors can occur if you fail to connect the CPU fan connector! 5.

User Manual
Page 35
The figure illustrates the location of the DDR2 DIMM sockets: Channel Channel A Channel B Sockets DIMM_A1 and DIMM_A2 DIMM_B1 and DIMM_B2 ASUS M3N72-D 2-11 2.4 System memory 2.4.1 Overview The motherboard comes with four Double Data Rate 2 (DDR2) Dual Inline Memory Modules (DIMM) sockets.
The figure illustrates the location of the DDR2 DIMM sockets: Channel Channel A Channel B Sockets DIMM_A1 and DIMM_A2 DIMM_B1 and DIMM_B2 ASUS M3N72-D 2-11 2.4 System memory 2.4.1 Overview The motherboard comes with four Double Data Rate 2 (DDR2) Dual Inline Memory Modules (DIMM) sockets.


