
User Manual
Page 1
M3N-H/ HDMI Motherboard
M3N-H/ HDMI Motherboard

User Manual
Page 3
Contents Contents...iii Notices...vii Safety information viii About this guide ix M3N-H/HDMI specifications summary xi Chapter 1: Product introduction 1.1 Welcome 1-1 1.2 Package contents 1-1 1.3 Special features 1-2 1.3.1 Product highlights 1-2 1.3.2 ASUS AI Lifestyle unique features 1-4 1.3.3 ASUS intelligent performance and overclocking features 1-6 Chapter 2: Hardware information 2.1 Before you proceed 2-1 2.2 Motherboard overview 2-2 2.2.1 Placement direction 2-2 2.2.2 Screw holes 2-2 2.2.3 Motherboard layout 2-3 2.2.4 Layout contents 2-4 2.3 Central...
Contents Contents...iii Notices...vii Safety information viii About this guide ix M3N-H/HDMI specifications summary xi Chapter 1: Product introduction 1.1 Welcome 1-1 1.2 Package contents 1-1 1.3 Special features 1-2 1.3.1 Product highlights 1-2 1.3.2 ASUS AI Lifestyle unique features 1-4 1.3.3 ASUS intelligent performance and overclocking features 1-6 Chapter 2: Hardware information 2.1 Before you proceed 2-1 2.2 Motherboard overview 2-2 2.2.1 Placement direction 2-2 2.2.2 Screw holes 2-2 2.2.3 Motherboard layout 2-3 2.2.4 Layout contents 2-4 2.3 Central...
User Manual
Page 11
... & D-Sub - Supports up to 8 GB system memory *DDR2 1066 is supported by AM2+ CPUs only. resolution up to 1920 x 1440 @ 60 Hz - M3N-H/HDMI specifications summary CPU Chipset System bus Memory VGA Expansion slots Storage LAN High Definition audio IEEE 1394 USB AMD® Socket AM2/AM2+ for Phenom&#...;�a�n�d���M���u��lt�i-�S�t�r�e�a�m��in�g� - Supports HDMI™ Technology with HDCP compliant with max.
... & D-Sub - Supports up to 8 GB system memory *DDR2 1066 is supported by AM2+ CPUs only. resolution up to 1920 x 1440 @ 60 Hz - M3N-H/HDMI specifications summary CPU Chipset System bus Memory VGA Expansion slots Storage LAN High Definition audio IEEE 1394 USB AMD® Socket AM2/AM2+ for Phenom&#...;�a�n�d���M���u��lt�i-�S�t�r�e�a�m��in�g� - Supports HDMI™ Technology with HDCP compliant with max.

User Manual
Page 12
... features upgradable * File downloading and uploading through USB devices only. ASUS AI Gear 2 - ASUS AI Nap - M3N-H/HDMI specifications summary ASUS AI Lifestyle unique features Other features ASUS exclusive overclocking features ASUS Express Gate Lite: - Web browser, file downloading and uploading* - ASUS Noise Filter ASUS EZ DIY: - ASUS EZ Flash 2 ASUS MyLogo 2™ Intelligent overclocking tools: - vCore: Adjustable CPU voltage at...
... features upgradable * File downloading and uploading through USB devices only. ASUS AI Gear 2 - ASUS AI Nap - M3N-H/HDMI specifications summary ASUS AI Lifestyle unique features Other features ASUS exclusive overclocking features ASUS Express Gate Lite: - Web browser, file downloading and uploading* - ASUS Noise Filter ASUS EZ DIY: - ASUS EZ Flash 2 ASUS MyLogo 2™ Intelligent overclocking tools: - vCore: Adjustable CPU voltage at...
User Manual
Page 13
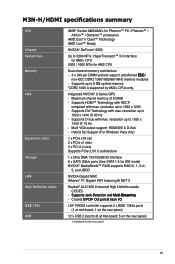
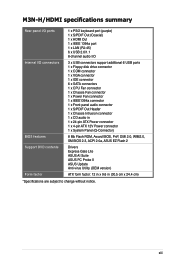
M3N-H/HDMI specifications summary Rear panel I/O ports 1 x PS/2 keyboard port (purple) 1 x S/PDIF Out (Coaxial) 1 x HDMI Out 1 x IEEE 1394a port 1 x LAN (RJ-45) 6 x USB 2.0/1.1 8-channel audio I/O Internal I/O connectors 3 x USB connectors support additional 6 USB ports 1 x Floppy disk drive ...(Q-Connector) BIOS features 8 Mb Flash ROM, Award BIOS, PnP, DMI 2.0, WfM2.0, SM BIOS 2.3, ACPI 2.0a, ASUS EZ Flash 2 Support DVD contents Drivers Express Gate Lite ASUS AI Suite ASUS PC Probe II ASUS Update Anti-virus Utility (OEM version) Form factor ATX form factor: 12 in x 9.6 in (30.5 cm x...
M3N-H/HDMI specifications summary Rear panel I/O ports 1 x PS/2 keyboard port (purple) 1 x S/PDIF Out (Coaxial) 1 x HDMI Out 1 x IEEE 1394a port 1 x LAN (RJ-45) 6 x USB 2.0/1.1 8-channel audio I/O Internal I/O connectors 3 x USB connectors support additional 6 USB ports 1 x Floppy disk drive ...(Q-Connector) BIOS features 8 Mb Flash ROM, Award BIOS, PnP, DMI 2.0, WfM2.0, SM BIOS 2.3, ACPI 2.0a, ASUS EZ Flash 2 Support DVD contents Drivers Express Gate Lite ASUS AI Suite ASUS PC Probe II ASUS Update Anti-virus Utility (OEM version) Form factor ATX form factor: 12 in x 9.6 in (30.5 cm x...

User Manual
Page 17
Retail version only) 1 x D-Sub connector module 1 x HDMI to DVI converter Application DVD ASUS motherboard support DVD Documentation User guide If any of ASUS quality motherboards! The motherboard delivers a host of new features and latest technologies, making it...of the above items is damaged or missing, contact your motherboard package for buying an ASUS® M3N-H/HDMI motherboard! 1.1 Welcome! Before you for the following items. Motherboard ASUS M3N-H/HDMI Cables 2�x�S�e�ri�a�l A�T�A�p�o�w&#...
Retail version only) 1 x D-Sub connector module 1 x HDMI to DVI converter Application DVD ASUS motherboard support DVD Documentation User guide If any of ASUS quality motherboards! The motherboard delivers a host of new features and latest technologies, making it...of the above items is damaged or missing, contact your motherboard package for buying an ASUS® M3N-H/HDMI motherboard! 1.1 Welcome! Before you for the following items. Motherboard ASUS M3N-H/HDMI Cables 2�x�S�e�ri�a�l A�T�A�p�o�w&#...

User Manual
Page 19
See page 2-22 for more information. ASUS M3N-H/HDMI 1-3 Visit www.nvidia.com/hybridsli for details. Serial ATA 3.0 Gb/s technology This motherboard supports the next-generation hard disk drives based on select GeForce GPUs. ... that delivers multi-channel audio and uncompressed digital video through a single cable for audio/video appliances such as HD DVD and Blu-ray Discs, HDMI provides you with M3N series motherboard GPUs. Geforce Boost and HybridPower™ are independent on the Serial ATA (SATA) 3Gb/s storage specifications, delivering enhanced scalability and doubling...
See page 2-22 for more information. ASUS M3N-H/HDMI 1-3 Visit www.nvidia.com/hybridsli for details. Serial ATA 3.0 Gb/s technology This motherboard supports the next-generation hard disk drives based on select GeForce GPUs. ... that delivers multi-channel audio and uncompressed digital video through a single cable for audio/video appliances such as HD DVD and Blu-ray Discs, HDMI provides you with M3N series motherboard GPUs. Geforce Boost and HybridPower™ are independent on the Serial ATA (SATA) 3Gb/s storage specifications, delivering enhanced scalability and doubling...

User Manual
Page 21
... This unique module eliminates the trouble of connecting the system panel cables one at a time and avoiding wrong cable connections. ASUS EZ Flash 2 ASUS EZ Flash 2 is a user-friendly BIOS update utility. See page 4-5 and 4-35 for details. making it convenient and...ASUS Q-Connector ASUS Q-Connector allows you easy ways to install. See page 4-29 and 5-28 for details. See page 5-17 for details. Q-Fan 2 ASUS Q-Fan2 technology intelligently adjusts both CPU fan and chassis fan speeds according to system loading to ensure quiet, cool and efficient operation. ASUS M3N-H/HDMI...
... This unique module eliminates the trouble of connecting the system panel cables one at a time and avoiding wrong cable connections. ASUS EZ Flash 2 ASUS EZ Flash 2 is a user-friendly BIOS update utility. See page 4-5 and 4-35 for details. making it convenient and...ASUS Q-Connector ASUS Q-Connector allows you easy ways to install. See page 4-29 and 5-28 for details. See page 5-17 for details. Q-Fan 2 ASUS Q-Fan2 technology intelligently adjusts both CPU fan and chassis fan speeds according to system loading to ensure quiet, cool and efficient operation. ASUS M3N-H/HDMI...

User Manual
Page 24
Chapter summary 2 2.1 Before you proceed 2-1 2.2 Motherboard overview 2-2 2.3 Central Processing Unit (CPU 2-6 2.4 System memory 2-11 2.5 Expansion slots 2-17 2.6 Jumper 2-20 2.7 Connectors 2-21 ASUS M3N-H/HDMI
Chapter summary 2 2.1 Before you proceed 2-1 2.2 Motherboard overview 2-2 2.3 Central Processing Unit (CPU 2-6 2.4 System memory 2-11 2.5 Expansion slots 2-17 2.6 Jumper 2-20 2.7 Connectors 2-21 ASUS M3N-H/HDMI

User Manual
Page 25
... avoid damaging them due to static electricity. • Hold components by the edges to the motherboard, peripherals, and/or components. M3N-H/HDMI ® M3N-H/HDMI Onboard LED SB_PWR ON OFF Standy Power Powered Off ASUS M3N-H/HDMI 2-1 Failure to do so may cause severe damage to avoid touching the ICs on them. • Whenever you should shut...
... avoid damaging them due to static electricity. • Hold components by the edges to the motherboard, peripherals, and/or components. M3N-H/HDMI ® M3N-H/HDMI Onboard LED SB_PWR ON OFF Standy Power Powered Off ASUS M3N-H/HDMI 2-1 Failure to do so may cause severe damage to avoid touching the ICs on them. • Whenever you should shut...

User Manual
Page 26
... motherboard to unplug the power cord before installing or removing the motherboard. The edge with external ports goes to the rear part of the chassis M3N-H/HDMI ® 2-2 Chapter 2: Hardware information 2.2 Motherboard overview Before you place it . Place this side towards the rear of the chassis as indicated in the correct orientation...
... motherboard to unplug the power cord before installing or removing the motherboard. The edge with external ports goes to the rear part of the chassis M3N-H/HDMI ® 2-2 Chapter 2: Hardware information 2.2 Motherboard overview Before you place it . Place this side towards the rear of the chassis as indicated in the correct orientation...

User Manual
Page 27
ASUS M3N-H/HDMI 2-3 30.5cm (12.0in) 2.2.3 Motherboard layout 24.5cm (9.6in) KB_USB56 ATX12V CPU_FAN SPDIF_O1 HDMI PWR_FAN SOCKET AM2 DDR DIMM_A1 (64bit, 240-pin module) DDR DIMM_B1 (64bit, 240-pin module) DDR DIMM_A2 (64bit, 240-pin module) ...F_USB34 LAN1_USB12 AUDIO EATXPWR SATA5 SATA6 Attansic F1 CHA_FAN1 PCIEX1_1 nVidia® GeForce 8300 SATA2 SATA4 SATA3 SATA1 PRI_IDE CD ALC883 AAFP SPDIF_OUT PCIEX16_1 M3N-H/HDMI PCI1 VGA PCIEX1_2 PCI2 PCI3 BIOS ® agere L-FW3227 Super I/O SB_PWR CHASSIS CLRTC Lithium Cell CMOS Power FLOPPY COM1 IE1394_2 USB78 USB910...
ASUS M3N-H/HDMI 2-3 30.5cm (12.0in) 2.2.3 Motherboard layout 24.5cm (9.6in) KB_USB56 ATX12V CPU_FAN SPDIF_O1 HDMI PWR_FAN SOCKET AM2 DDR DIMM_A1 (64bit, 240-pin module) DDR DIMM_B1 (64bit, 240-pin module) DDR DIMM_A2 (64bit, 240-pin module) ...F_USB34 LAN1_USB12 AUDIO EATXPWR SATA5 SATA6 Attansic F1 CHA_FAN1 PCIEX1_1 nVidia® GeForce 8300 SATA2 SATA4 SATA3 SATA1 PRI_IDE CD ALC883 AAFP SPDIF_OUT PCIEX16_1 M3N-H/HDMI PCI1 VGA PCIEX1_2 PCI2 PCI3 BIOS ® agere L-FW3227 Super I/O SB_PWR CHASSIS CLRTC Lithium Cell CMOS Power FLOPPY COM1 IE1394_2 USB78 USB910...

User Manual
Page 30
DO NOT force the CPU into the socket to a 90º angle. M3N-H/HDMI ® M3N-H/HDMI CPU SOCKET AM2 2. Unlock the socket by pressing the lever sideways, then lift it up to a 90º angle; The AM2+/AM2 socket has a different ...
DO NOT force the CPU into the socket to a 90º angle. M3N-H/HDMI ® M3N-H/HDMI CPU SOCKET AM2 2. Unlock the socket by pressing the lever sideways, then lift it up to a 90º angle; The AM2+/AM2 socket has a different ...

User Manual
Page 31
Install a CPU heatsink and fan following the instructions that came with a small triangle. 4. When the CPU is in place. Gold triangle Small triangle 5. ASUS M3N-H/HDMI 2-7 The lever clicks on the side tab to secure the CPU. Position the CPU above the socket such that it fits in place, push down the socket lever to indicate that the CPU corner with the gold triangle matches the socket corner with the heatsink package. Carefully insert the CPU into the socket until it is locked. 6. 3.
Install a CPU heatsink and fan following the instructions that came with a small triangle. 4. When the CPU is in place. Gold triangle Small triangle 5. ASUS M3N-H/HDMI 2-7 The lever clicks on the side tab to secure the CPU. Position the CPU above the socket such that it fits in place, push down the socket lever to indicate that the CPU corner with the gold triangle matches the socket corner with the heatsink package. Carefully insert the CPU into the socket until it is locked. 6. 3.

User Manual
Page 33
Make sure that the retention bracket is in place. 4. A clicking sound denotes that the fan and heatsink assembly perfectly fits the retention mechanism module base, otherwise you cannot snap the retention bracket in place. Push down the retention bracket lock on the retention mechanism to secure the heatsink and fan to the retention module base. 3. 2. ASUS M3N-H/HDMI 2-9 Attach one end of the retention bracket (near the retention bracket lock) to the retention module base. Align the other end of the retention bracket to the module base.
Make sure that the retention bracket is in place. 4. A clicking sound denotes that the fan and heatsink assembly perfectly fits the retention mechanism module base, otherwise you cannot snap the retention bracket in place. Push down the retention bracket lock on the retention mechanism to secure the heatsink and fan to the retention module base. 3. 2. ASUS M3N-H/HDMI 2-9 Attach one end of the retention bracket (near the retention bracket lock) to the retention module base. Align the other end of the retention bracket to the module base.

User Manual
Page 34
CPU FAN PWM CPU FAN IN CPU FAN PWR GND 5. Hardware monitoring errors can occur if you fail to plug this connector. • This connector is in place, connect the CPU fan cable to connect the CPU fan connector! When the fan and heatsink assembly is backward compatiable with old 3-pin CPU fan. 2-10 Chapter 2: Hardware information CPU_FAN M3N-H/HDMI ® M3N-H/HDMI CPU fan connector • Do not forget to the connector on the motherboard labeled CPU_FAN.
CPU FAN PWM CPU FAN IN CPU FAN PWR GND 5. Hardware monitoring errors can occur if you fail to plug this connector. • This connector is in place, connect the CPU fan cable to connect the CPU fan connector! When the fan and heatsink assembly is backward compatiable with old 3-pin CPU fan. 2-10 Chapter 2: Hardware information CPU_FAN M3N-H/HDMI ® M3N-H/HDMI CPU fan connector • Do not forget to the connector on the motherboard labeled CPU_FAN.

User Manual
Page 35
The figure illustrates the location of the DDR2 DIMM sockets: M3N-H/HDMI ® M3N-H/HDMI 240-pin DDR2 DIMM sockets Channel Channel A Channel B Sockets DIMM_A1 and DIMM_A2 DIMM_B1 and DIMM_B2 ASUS M3N-H/HDMI 2-11 2.4 System memory 2.4.1 Overview The motherboard comes with four Double Data Rate 2 (DDR2) Dual Inline Memory Modules (DIMM) sockets.
The figure illustrates the location of the DDR2 DIMM sockets: M3N-H/HDMI ® M3N-H/HDMI 240-pin DDR2 DIMM sockets Channel Channel A Channel B Sockets DIMM_A1 and DIMM_A2 DIMM_B1 and DIMM_B2 ASUS M3N-H/HDMI 2-11 2.4 System memory 2.4.1 Overview The motherboard comes with four Double Data Rate 2 (DDR2) Dual Inline Memory Modules (DIMM) sockets.

User Manual
Page 38
...; • • • • • • • • • • • • • • • • • • • • • 2-14 Chapter 2: Hardware information M3N-H/HDMI Motherboard Qualified Vendors Lists (QVL) DDR2-667MHz capability for AM2 CPU Size Vendor 512MB KINGSTON 256MB KINGSTON 256MB KINGSTON 1GB KINGSTON 2GB KINGSTON 512MB Qimonda...
...; • • • • • • • • • • • • • • • • • • • • • 2-14 Chapter 2: Hardware information M3N-H/HDMI Motherboard Qualified Vendors Lists (QVL) DDR2-667MHz capability for AM2 CPU Size Vendor 512MB KINGSTON 256MB KINGSTON 256MB KINGSTON 1GB KINGSTON 2GB KINGSTON 512MB Qimonda...

User Manual
Page 39
Double-sided DIMM support: • A*: Supports one module inserted into either slot as Single-channel memory configuration. • B*: Supports two modules inserted into either the yellow slots or the black slots as one pair of Dual-channel memory configuration. • C*: Supports four modules inserted into both the yellow slots and the black slots as two pairs of Dual-channel memory configuration. ASUS M3N-H/HDMI 2-15 Visit the ASUS website for the latest QVL. Single-sided DS - Side(s): SS -
Double-sided DIMM support: • A*: Supports one module inserted into either slot as Single-channel memory configuration. • B*: Supports two modules inserted into either the yellow slots or the black slots as one pair of Dual-channel memory configuration. • C*: Supports four modules inserted into both the yellow slots and the black slots as two pairs of Dual-channel memory configuration. ASUS M3N-H/HDMI 2-15 Visit the ASUS website for the latest QVL. Single-sided DS - Side(s): SS -

User Manual
Page 41
... earlier. 6. See Chapter 4 for the card. 2. When using PCI cards on the next page. 3. Secure the card to do not need to install expansion cards. ASUS M3N-H/HDMI 2-17 Make sure to the card. Assign an IRQ to unplug the power cord before adding or removing expansion cards. 2.5 Expansion slots In the future...
... earlier. 6. See Chapter 4 for the card. 2. When using PCI cards on the next page. 3. Secure the card to do not need to install expansion cards. ASUS M3N-H/HDMI 2-17 Make sure to the card. Assign an IRQ to unplug the power cord before adding or removing expansion cards. 2.5 Expansion slots In the future...

