
User Manual
Page 4
... Using the dual function power switch 3-2 Chapter 4: BIOS setup 4.1 Managing and updating your BIOS 4-1 4.1.1 ASUS Update utility 4-1 4.1.2 Creating a bootable floppy disk 4-4 4.1.3 ASUS EZ Flash 2 utility 4-5 4.1.4 Updating the BIOS 4-6 4.1.5 Saving the current BIOS file 4-8 4.2 BIOS setup... program 4-9 4.2.1 BIOS menu screen 4-10 4.2.2 Menu bar 4-10 4.2.3 Legend bar 4-11 4.2.4 Menu items 4-11 4.2.5 Sub-menu items 4-11 4.2.6 Configuration fields 4-11 4.2.7 Pop-up window...
... Using the dual function power switch 3-2 Chapter 4: BIOS setup 4.1 Managing and updating your BIOS 4-1 4.1.1 ASUS Update utility 4-1 4.1.2 Creating a bootable floppy disk 4-4 4.1.3 ASUS EZ Flash 2 utility 4-5 4.1.4 Updating the BIOS 4-6 4.1.5 Saving the current BIOS file 4-8 4.2 BIOS setup... program 4-9 4.2.1 BIOS menu screen 4-10 4.2.2 Menu bar 4-10 4.2.3 Legend bar 4-11 4.2.4 Menu items 4-11 4.2.5 Sub-menu items 4-11 4.2.6 Configuration fields 4-11 4.2.7 Pop-up window...

User Manual
Page 6
Contents 5.3.2 Cool 'n' Quiet!™ Technology 5-11 5.3.3 Audio configurations 5-14 5.3.4 ASUS PC Probe II 5-18 5.3.5 ASUS AI Suite 5-24 5.3.6 ASUS AI Gear 2 5-26 5.3.7 ASUS AI Nap 5-27 5.3.8 ASUS Q-Fan 2 5-28 5.3.9 ASUS AI Booster 5-29 5.3.10 ASUS Express Gate Lite 5-30 5.4 RAID configurations 5-37 5.4.1 RAID definitions 5-37 5.4.2 NVIDIA® RAID configurations 5-38 5.5 Creating a RAID driver disk 5-45 5.5.1 Creating a RAID driver disk without entering the OS.... 5-45 5.5.2 Creating a RAID/SATA driver disk in Windows 5-45 vi
Contents 5.3.2 Cool 'n' Quiet!™ Technology 5-11 5.3.3 Audio configurations 5-14 5.3.4 ASUS PC Probe II 5-18 5.3.5 ASUS AI Suite 5-24 5.3.6 ASUS AI Gear 2 5-26 5.3.7 ASUS AI Nap 5-27 5.3.8 ASUS Q-Fan 2 5-28 5.3.9 ASUS AI Booster 5-29 5.3.10 ASUS Express Gate Lite 5-30 5.4 RAID configurations 5-37 5.4.1 RAID definitions 5-37 5.4.2 NVIDIA® RAID configurations 5-38 5.5 Creating a RAID driver disk 5-45 5.5.1 Creating a RAID driver disk without entering the OS.... 5-45 5.5.2 Creating a RAID/SATA driver disk in Windows 5-45 vi
User Manual
Page 11
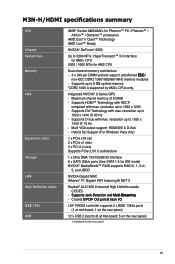
... with HDCP compliant with max. resolution up to 1920 x 1440 @ 75 Hz - Multi VGA output support: HDMI/DVI & D-Sub - M3N-H/HDMI specifications summary CPU Chipset System bus Memory VGA Expansion slots Storage LAN High Definition audio IEEE 1394 USB AMD®...;d���M���u��lt�i-�S�t�r�e�a�m��in�g� - Hybrid SLI Support (For Windows Vista only) 1 x PCIe x16 slot 2 x PCIe x1 slots 3 x PCI 2.2 slots Supports PCIe 2.0/1.0 architecture 1 x Ultra DMA 133/100/66/33 ...
... with HDCP compliant with max. resolution up to 1920 x 1440 @ 75 Hz - Multi VGA output support: HDMI/DVI & D-Sub - M3N-H/HDMI specifications summary CPU Chipset System bus Memory VGA Expansion slots Storage LAN High Definition audio IEEE 1394 USB AMD®...;d���M���u��lt�i-�S�t�r�e�a�m��in�g� - Hybrid SLI Support (For Windows Vista only) 1 x PCIe x16 slot 2 x PCIe x1 slots 3 x PCI 2.2 slots Supports PCIe 2.0/1.0 architecture 1 x Ultra DMA 133/100/66/33 ...

User Manual
Page 20
... and Internet file downloads and sharing whenever and wherever you to instantly surf the Internet without converting it to boot up, the ASUS Express Gate Lite allows you want! See page 2-21 and 2-22 for details . See page 4-36, 5-30 to 5-36 for details.... 1.3.2 ASUS AI Lifestyle unique features ASUS Express Gate Lite Just 5 seconds to analog format, and therefore well preserves signal quality. It allows digital audio transferring without entering Windows. High Definition Audio Enjoy high-end sound quality on the headphones while playing...
... and Internet file downloads and sharing whenever and wherever you to instantly surf the Internet without converting it to boot up, the ASUS Express Gate Lite allows you want! See page 2-21 and 2-22 for details . See page 4-36, 5-30 to 5-36 for details.... 1.3.2 ASUS AI Lifestyle unique features ASUS Express Gate Lite Just 5 seconds to analog format, and therefore well preserves signal quality. It allows digital audio transferring without entering Windows. High Definition Audio Enjoy high-end sound quality on the headphones while playing...

User Manual
Page 22
...for each parameter. 1-6 Chapter 1: Product Introduction When the system hangs due to the BIOS default settings in Windows environment without the hassle of booting the BIOS. ASUS MyLogo 2™ This feature allows you to fine tune the CPU/memory voltage and gradually increase the memory... PCI Express frequency at 1MHz increment to convert your favorite photo into a 256-color boot logo for details. 1.3.3 ASUS intelligent performance and overclocking features Precision Tweaker This feature allows you to achieve maximum system performance. feature of the computer. AI Booster...
...for each parameter. 1-6 Chapter 1: Product Introduction When the system hangs due to the BIOS default settings in Windows environment without the hassle of booting the BIOS. ASUS MyLogo 2™ This feature allows you to fine tune the CPU/memory voltage and gradually increase the memory... PCI Express frequency at 1MHz increment to convert your favorite photo into a 256-color boot logo for details. 1.3.3 ASUS intelligent performance and overclocking features Precision Tweaker This feature allows you to achieve maximum system performance. feature of the computer. AI Booster...

User Manual
Page 36
... from the higher-sized channel is reserved for other critical functions. Any excess memory from the same vendor. • If you install Windows® XP/Vista 32-bit operation system, a total memory of less than 3GB because the address space is then mapped for the... dual-channel configuration. Populated Populated Populated Sockets DIMM_A2 (black) DIMM_B1 (yellow) - This limitation appears on Windows® XP/Vista 32-bit operation system which does not support Physical Address Extension (PAE). • If you install four 1 GB memory ...
... from the higher-sized channel is reserved for other critical functions. Any excess memory from the same vendor. • If you install Windows® XP/Vista 32-bit operation system, a total memory of less than 3GB because the address space is then mapped for the... dual-channel configuration. Populated Populated Populated Sockets DIMM_A2 (black) DIMM_B1 (yellow) - This limitation appears on Windows® XP/Vista 32-bit operation system which does not support Physical Address Extension (PAE). • If you install four 1 GB memory ...

User Manual
Page 43
ASUS M3N-H/HDMI 2-19 PCI Express x1_1 slot PCI Express 2.0 x16_1 slot PCI_1 slot PCI_2 slot PCI_3 slot PCI Express x 1_2 slot • Currently, only Windows® Vista operation system supports Hybrid SLI™ mode. • Currently, only NVIDIA® GeForce® 8500 GT and GeForce® ... 9800 GX2 and GeForce® 9800 GTX graphics cards support Hybrid Power function under Hybrid SLI™ mode. • Use only the onboard HDMI/DVI/D-Sub port for video signal output when activating the Hybird Power function under Hybrid SLI™ mode. • Visit www.nvidia.com/hybridsli...
ASUS M3N-H/HDMI 2-19 PCI Express x1_1 slot PCI Express 2.0 x16_1 slot PCI_1 slot PCI_2 slot PCI_3 slot PCI Express x 1_2 slot • Currently, only Windows® Vista operation system supports Hybrid SLI™ mode. • Currently, only NVIDIA® GeForce® 8500 GT and GeForce® ... 9800 GX2 and GeForce® 9800 GTX graphics cards support Hybrid Power function under Hybrid SLI™ mode. • Use only the onboard HDMI/DVI/D-Sub port for video signal output when activating the Hybird Power function under Hybrid SLI™ mode. • Visit www.nvidia.com/hybridsli...

User Manual
Page 50
...; GeForce 8300 controller. SATA5 GND RSATA_TXP5 RSATA_TXN5 GND RSATA_RXP5 RSATA_RXN5 GND SATA6 GND RSATA_TXP6 RSATA_TXN6 GND RSATA_RXP6 RSATA_RXN6 GND M3N-H/HDMI ® M3N-H/HDMI SATA connectors SATA2 GND RSATA_TXP2 RSATA_TXN2 GND RSATA_RXP2 RSATA_RXN2 GND SATA4 GND RSATA_TXP4 RSATA_TXN4 GND RSATA_RXP4 RSATA_RXN4 GND SATA3 GND...• SATA1-4 connectors are set , refer to SATA 5-6 connectors. Or you intend to create a Serial ATA RAID set using Windows XP® or later version. Otherwise, the devices will not work. • Due to chipset limitation, when set the SATA Operation...
...; GeForce 8300 controller. SATA5 GND RSATA_TXP5 RSATA_TXN5 GND RSATA_RXP5 RSATA_RXN5 GND SATA6 GND RSATA_TXP6 RSATA_TXN6 GND RSATA_RXP6 RSATA_RXN6 GND M3N-H/HDMI ® M3N-H/HDMI SATA connectors SATA2 GND RSATA_TXP2 RSATA_TXN2 GND RSATA_RXP2 RSATA_RXN2 GND SATA4 GND RSATA_TXP4 RSATA_TXN4 GND RSATA_RXP4 RSATA_RXN4 GND SATA3 GND...• SATA1-4 connectors are set , refer to SATA 5-6 connectors. Or you intend to create a Serial ATA RAID set using Windows XP® or later version. Otherwise, the devices will not work. • Due to chipset limitation, when set the SATA Operation...

User Manual
Page 64
...Click the Turn Off button to soft-off mode, depending on the BIOS setting. The power supply should turn off after Windows® shuts down. If you are using Windows® XP: 1. Pressing the power switch for more than four seconds puts the system to sleep mode or to shut ...down the computer. 3. The power supply should turn off after Windows® shuts down. 3.2.2 Using the dual function power switch While the system is ON, pressing the power switch for details. 3-2 Chapter 3: Powering up 3.2...
...Click the Turn Off button to soft-off mode, depending on the BIOS setting. The power supply should turn off after Windows® shuts down. If you are using Windows® XP: 1. Pressing the power switch for more than four seconds puts the system to sleep mode or to shut ...down the computer. 3. The power supply should turn off after Windows® shuts down. 3.2.2 Using the dual function power switch While the system is ON, pressing the power switch for details. 3-2 Chapter 3: Powering up 3.2...

User Manual
Page 67
... the BIOS using a floppy disk or USB flash disk.) 3. Installing ASUS Update To install ASUS Update: 1. Click the Utilities tab, then click Install ASUS Update. 3. ASUS M3N-H/HDMI 4-1 ASUS EZ Flash 2 (Updates the BIOS using a bootable floppy disk.) Refer to manage and update the motherboard... the original motherboard BIOS using the ASUS Update or AFUDOS utilities. 4.1.1 ASUS Update utility The ASUS Update is a utility that comes with the motherboard package. ASUS Update (Updates the BIOS in the optical drive. Place the support DVD in Windows® environment.) 2. The Drivers menu...
... the BIOS using a floppy disk or USB flash disk.) 3. Installing ASUS Update To install ASUS Update: 1. Click the Utilities tab, then click Install ASUS Update. 3. ASUS M3N-H/HDMI 4-1 ASUS EZ Flash 2 (Updates the BIOS using a bootable floppy disk.) Refer to manage and update the motherboard... the original motherboard BIOS using the ASUS Update or AFUDOS utilities. 4.1.1 ASUS Update utility The ASUS Update is a utility that comes with the motherboard package. ASUS Update (Updates the BIOS in the optical drive. Place the support DVD in Windows® environment.) 2. The Drivers menu...

User Manual
Page 68
Launch the ASUS Update utility from the 3. The ASUS Update main window appears. 2. Click Next. 4-2 Chapter 4: BIOS setup Select Update BIOS from the Windows® desktop by clicking Start > Programs > ASUS > ASUSUpdate > ASUSUpdate. Select the ASUS FTP site nearest Internet option from the drop‑down you update the BIOS using this utility. click Auto Select. Quit all Windows® applications before you to avoid network traffic, or menu, then click Next. Updating the BIOS through the Internet To update the BIOS through the Internet: 1.
Launch the ASUS Update utility from the 3. The ASUS Update main window appears. 2. Click Next. 4-2 Chapter 4: BIOS setup Select Update BIOS from the Windows® desktop by clicking Start > Programs > ASUS > ASUSUpdate > ASUSUpdate. Select the ASUS FTP site nearest Internet option from the drop‑down you update the BIOS using this utility. click Auto Select. Quit all Windows® applications before you to avoid network traffic, or menu, then click Next. Updating the BIOS through the Internet To update the BIOS through the Internet: 1.

User Manual
Page 69
...that you wish to complete the update process. The ASUS Update utility is capable of updating itself through a BIOS file: 1. Launch the ASUS Update utility from the Open window, then click Open. 4. The ASUS Update main window appears. 2. 4. Follow the screen instructions to ... To update the BIOS through the Internet. Locate the BIOS file from the Windows® desktop by clicking Start > Programs > ASUS > ASUSUpdate > ASUSUpdate. Select Update BIOS from a file option from the drop‑down menu, then click Next. 3. M3N-H.rom M3N-H ASUS M3N-H/HDMI 4-3 Click Next. 5.
...that you wish to complete the update process. The ASUS Update utility is capable of updating itself through a BIOS file: 1. Launch the ASUS Update utility from the Open window, then click Open. 4. The ASUS Update main window appears. 2. 4. Follow the screen instructions to ... To update the BIOS through the Internet. Locate the BIOS file from the Windows® desktop by clicking Start > Programs > ASUS > ASUSUpdate > ASUSUpdate. Select Update BIOS from a file option from the drop‑down menu, then click Next. 3. M3N-H.rom M3N-H ASUS M3N-H/HDMI 4-3 Click Next. 5.

User Manual
Page 70
...display the Format 3 1/2 Floppy dialog box . b. c. d. Copy the original or the latest motherboard BIOS file to the floppy disk drive. Windows® XP environment a. Insert a 1.44 MB floppy disk to the bootable floppy disk. 4-4 Chapter 4: BIOS setup Click Start. 2. Insert a... a. b. Select the 3 1/2 Floppy Drive icon. Click File from the Windows® desktop, then select My Computer. e. Select Create an MS-DOS startup disk from the Windows® desktop, then select Computer. Windows® Vista environment a. Click from the format options field, then click Start...
...display the Format 3 1/2 Floppy dialog box . b. c. d. Copy the original or the latest motherboard BIOS file to the floppy disk drive. Windows® XP environment a. Insert a 1.44 MB floppy disk to the bootable floppy disk. 4-4 Chapter 4: BIOS setup Click Start. 2. Insert a... a. b. Select the 3 1/2 Floppy Drive icon. Click File from the Windows® desktop, then select My Computer. e. Select Create an MS-DOS startup disk from the Windows® desktop, then select Computer. Windows® Vista environment a. Click from the format options field, then click Start...

User Manual
Page 77
... other items (Advanced, Power, Boot, and Exit) on the menu bar have their corresponding functions. To change the value of the field opposite the item. ASUS M3N-H/HDMI 4-11 You cannot select an item that is highlighted when selected. The keys in the legend bar with their respective menu items. 4.2.5 Sub-menu items... legend bar allow you can change the value of a field, select it then press to navigate through the values for the highlighted field Brings up window.
... other items (Advanced, Power, Boot, and Exit) on the menu bar have their corresponding functions. To change the value of the field opposite the item. ASUS M3N-H/HDMI 4-11 You cannot select an item that is highlighted when selected. The keys in the legend bar with their respective menu items. 4.2.5 Sub-menu items... legend bar allow you can change the value of a field, select it then press to navigate through the values for the highlighted field Brings up window.

User Manual
Page 78
... ↑↓ : Select Item →←: Select Menu -/+: Change Value F5: Setup Defaults Enter: Select SubMenu F10: Save and Exit Pop-up window with the configuration options for that item. HDD SMART Monitoring [Disabled] Select Menu Item Specific Help Specifies the capacity and physical size of the selected...Exit System Time System Date 15 : 30 : 36 Thu, Apr 6 2006 Legacy Diskette A: [1.44M, 3.5 in.] Primary IDE MasterLegac[ySTD3i2s1k1e2t2tAe] A: Primary IDE Slave [ASUS CDS520/A] SATA1 SATA3 SATA2 SATA4 D71i2.s04aK4bM[[[[l,,NNNNeooood33nnnn..eeee55]]]] in .
... ↑↓ : Select Item →←: Select Menu -/+: Change Value F5: Setup Defaults Enter: Select SubMenu F10: Save and Exit Pop-up window with the configuration options for that item. HDD SMART Monitoring [Disabled] Select Menu Item Specific Help Specifies the capacity and physical size of the selected...Exit System Time System Date 15 : 30 : 36 Thu, Apr 6 2006 Legacy Diskette A: [1.44M, 3.5 in.] Primary IDE MasterLegac[ySTD3i2s1k1e2t2tAe] A: Primary IDE Slave [ASUS CDS520/A] SATA1 SATA3 SATA2 SATA4 D71i2.s04aK4bM[[[[l,,NNNNeooood33nnnn..eeee55]]]] in .

User Manual
Page 88
... HT Speed [Auto] Allows you assign 512M of the total memory to the onboard GPU, a memory size of around 1GB will be used under 32bit Windows® XP/Vista operation system.
... HT Speed [Auto] Allows you assign 512M of the total memory to the onboard GPU, a memory size of around 1GB will be used under 32bit Windows® XP/Vista operation system.

User Manual
Page 102
...to [Reset], make sure to save the setting to the BIOS so that the user data will run again when you to section 5.3.10 ASUS Express Gate Lite for user action. Configuration options: [Enabled] [Disabled] Boot Out Timer [10] Sets countdown duration that provides quick access... to stay at the Express Gate Lite's first screen before starting Windows or other installed OS. Configuration options: [Disabled] [1 second] ~ [30 seconds] The time length is adjusted by the web browser (bookmarks, cookies, ...
...to [Reset], make sure to save the setting to the BIOS so that the user data will run again when you to section 5.3.10 ASUS Express Gate Lite for user action. Configuration options: [Enabled] [Disabled] Boot Out Timer [10] Sets countdown duration that provides quick access... to stay at the Express Gate Lite's first screen before starting Windows or other installed OS. Configuration options: [Disabled] [1 second] ~ [30 seconds] The time length is adjusted by the web browser (bookmarks, cookies, ...

User Manual
Page 103
...Changes Once you are finished making your selections, choose this option, a confirmation appears. When you select this menu or from this option, a confirmation window appears. Select one of the parameters on even when the PC is turned off. If you attempt to exit the Setup program without saving your.... When you select this menu. Discard Changes This option allows you to discard the selections you made and restore the previously saved values. ASUS M3N-H/HDMI 4-37 4.8 Exit menu The Exit menu items allow you to load the optimal or failsafe default values for the BIOS items, and save...
...Changes Once you are finished making your selections, choose this option, a confirmation appears. When you select this menu or from this option, a confirmation window appears. Select one of the parameters on even when the PC is turned off. If you attempt to exit the Setup program without saving your.... When you select this menu. Discard Changes This option allows you to discard the selections you made and restore the previously saved values. ASUS M3N-H/HDMI 4-37 4.8 Exit menu The Exit menu items allow you to load the optimal or failsafe default values for the BIOS items, and save...

User Manual
Page 107
... updates to maximize the features of your OS documentation for detailed information. • Make sure that you install Windows® 2000 Service Pack 4 or the Windows® XP Service Pack 2 or later versions before installing the drivers for better compatibility and system stability. 5.2... motherboard supports Windows® XP/64-bit XP/Vista/64-bit Vista operating systems (OS). Visit the ASUS website(www.asus.com) for reference only. Click an icon to display support DVD/motherboard information Click an item to install If Autorun is enabled in your computer. ASUS M3N-H/HDMI 5-1
... updates to maximize the features of your OS documentation for detailed information. • Make sure that you install Windows® 2000 Service Pack 4 or the Windows® XP Service Pack 2 or later versions before installing the drivers for better compatibility and system stability. 5.2... motherboard supports Windows® XP/64-bit XP/Vista/64-bit Vista operating systems (OS). Visit the ASUS website(www.asus.com) for reference only. Click an icon to display support DVD/motherboard information Click an item to install If Autorun is enabled in your computer. ASUS M3N-H/HDMI 5-1

User Manual
Page 111
...RAID driver disk for 32/64bit Windows® XP. NVIDIA 32/64bit XP SATA RAID Driver Allows you to create the NVIDIA® GeForce™ 8300 SATA/RAID driver disk. Find RAID driver in the support DVD/DVD through the path below : Drivers\Chipset\Disk\AHCI ASUS M3N-H/HDMI 5-5 5.2.4 Make Disk menu The... Make Disk menu contains items to create an NVIDIA AHCI driver disk for 32/64bit Windows® XP.
...RAID driver disk for 32/64bit Windows® XP. NVIDIA 32/64bit XP SATA RAID Driver Allows you to create the NVIDIA® GeForce™ 8300 SATA/RAID driver disk. Find RAID driver in the support DVD/DVD through the path below : Drivers\Chipset\Disk\AHCI ASUS M3N-H/HDMI 5-5 5.2.4 Make Disk menu The... Make Disk menu contains items to create an NVIDIA AHCI driver disk for 32/64bit Windows® XP.


