
User Manual
Page 31
Reading flash ..... Version 1.19(ASUS V2.07(03.11.24BB)) Copyright (C) 2002 American Megatrends, Inc. done Write to file...... ok A:\> 當 BIOS DOS 31 All rights reserved. exe 2 DOS afudos /o[filename filename A:\>afudos /oOLDBIOS1.rom 3. 按下 afudos /oOLDBIOS1.rom AMI Firmware Update Utility - BIOS 2.1 使用 AFUDOS BIOS AFUDOS DOS BIOS BIOS 程式。AFUDOS BIOS BIOS BIOS 程式 BIOS 程式。 1.2MB BIOS 1 AFUDOS 程式(afudos.
Reading flash ..... Version 1.19(ASUS V2.07(03.11.24BB)) Copyright (C) 2002 American Megatrends, Inc. done Write to file...... ok A:\> 當 BIOS DOS 31 All rights reserved. exe 2 DOS afudos /o[filename filename A:\>afudos /oOLDBIOS1.rom 3. 按下 afudos /oOLDBIOS1.rom AMI Firmware Update Utility - BIOS 2.1 使用 AFUDOS BIOS AFUDOS DOS BIOS BIOS 程式。AFUDOS BIOS BIOS BIOS 程式 BIOS 程式。 1.2MB BIOS 1 AFUDOS 程式(afudos.

User Manual
Page 32
... American Megatrends, Inc. done Reading flash ...... done Verifying flash .... 更新 BIOS 程式 AFUDOS BIOS 程式。 1 tw.asus.com BIOS 片中。 BIOS BIOS 2. 將 AFUDOS.EXE BIOS 3 DOS afudos /i[filename filename BIOS 程式。 A:\>afudos /iP5B-VM DO.ROM 4. Version 1.19(ASUS V2.07(03.11.24BB)) Copyright (C) 2002 American Megatrends, Inc. done...
... American Megatrends, Inc. done Reading flash ...... done Verifying flash .... 更新 BIOS 程式 AFUDOS BIOS 程式。 1 tw.asus.com BIOS 片中。 BIOS BIOS 2. 將 AFUDOS.EXE BIOS 3 DOS afudos /i[filename filename BIOS 程式。 A:\>afudos /iP5B-VM DO.ROM 4. Version 1.19(ASUS V2.07(03.11.24BB)) Copyright (C) 2002 American Megatrends, Inc. done...

User Manual
Page 33
... Message: Do You Want To Save Bios (Y/N) 33 2.2 使用 AwardBIOS Flash BIOS AwardBIOS Flash AwardBIOS Flash 程式(AWDFLASH.EXE BIOS AwardBIOS Flash BIOS 程式。 1 http://tw.asus.com BIOS M2N-VM HDMI.bin FAT 32/16 格式的 USB BIOS 2 CD/DVD AwardBIOS Flash BIOS 3 DOS 4. 當 A BIOS 檔案與 AwardBIOS Flash 5 A awdflash...
... Message: Do You Want To Save Bios (Y/N) 33 2.2 使用 AwardBIOS Flash BIOS AwardBIOS Flash AwardBIOS Flash 程式(AWDFLASH.EXE BIOS AwardBIOS Flash BIOS 程式。 1 http://tw.asus.com BIOS M2N-VM HDMI.bin FAT 32/16 格式的 USB BIOS 2 CD/DVD AwardBIOS Flash BIOS 3 DOS 4. 當 A BIOS 檔案與 AwardBIOS Flash 5 A awdflash...

User Manual
Page 34
...- PMC Pm49FL004T LPC/FWH File Name to Program: M2A-VM HDMI.bin Flashing Complete Press to Program: M2A-VM HDMI.bin Programming Flash Memory - All Rights Reserved For C51PV-MCP51-M2A-VM HDMI-00 DATE:04/13/2006 Flash Type - PMC Pm49FL004T LPC/...Update Write Fail 34 BIOS OFE00 OK Write OK No Update Write Fail Warning: Don't Turn Off Power Or Reset System! 在更新 BIOS 9 Flash Complete BIOS F1 AwardBIOS Flash Utility for ASUS V1.14 (C) Phoenix Technologies Ltd. 7 BIOS N BIOS 8 BIOS BIOS AwardBIOS Flash Utility for ASUS V1.14 (C) Phoenix...
...- PMC Pm49FL004T LPC/FWH File Name to Program: M2A-VM HDMI.bin Flashing Complete Press to Program: M2A-VM HDMI.bin Programming Flash Memory - All Rights Reserved For C51PV-MCP51-M2A-VM HDMI-00 DATE:04/13/2006 Flash Type - PMC Pm49FL004T LPC/...Update Write Fail 34 BIOS OFE00 OK Write OK No Update Write Fail Warning: Don't Turn Off Power Or Reset System! 在更新 BIOS 9 Flash Complete BIOS F1 AwardBIOS Flash Utility for ASUS V1.14 (C) Phoenix Technologies Ltd. 7 BIOS N BIOS 8 BIOS BIOS AwardBIOS Flash Utility for ASUS V1.14 (C) Phoenix...

User Manual
Page 4
... computer 3-2 3.2.1 Using the OS shut down function 3-2 3.2.2 Using the dual function power switch 3-2 Chapter 4: BIOS setup 4.1 Managing and updating your BIOS 4-1 4.1.1 ASUS Update utility 4-1 4.1.2 Creating a bootable floppy disk 4-4 4.1.3 ASUS EZ Flash 2 utility 4-5 4.1.4 Updating the BIOS 4-6 4.1.5 Saving the current BIOS file 4-8 4.2 BIOS setup program 4-9 4.2.1 BIOS menu screen 4-10 4.2.2 Menu bar 4-10 4.2.3 Legend bar 4-11 4.2.4 Menu items 4-11 4.2.5 Sub-menu...
... computer 3-2 3.2.1 Using the OS shut down function 3-2 3.2.2 Using the dual function power switch 3-2 Chapter 4: BIOS setup 4.1 Managing and updating your BIOS 4-1 4.1.1 ASUS Update utility 4-1 4.1.2 Creating a bootable floppy disk 4-4 4.1.3 ASUS EZ Flash 2 utility 4-5 4.1.4 Updating the BIOS 4-6 4.1.5 Saving the current BIOS file 4-8 4.2 BIOS setup program 4-9 4.2.1 BIOS menu screen 4-10 4.2.2 Menu bar 4-10 4.2.3 Legend bar 4-11 4.2.4 Menu items 4-11 4.2.5 Sub-menu...

User Manual
Page 9
...guide contains the following sources for additional information and for product and software updates. 1. Refer to change system settings through the BIOS Setup menus. Where to find more information Refer to the following parts: • Chapter 1: Product introduction This chapter describes ...the features of shutting down the system. • Chapter 4: BIOS setup This chapter tells how to the ASUS contact information. 2. How this guide This user guide contains the information you have been added by your dealer.
...guide contains the following sources for additional information and for product and software updates. 1. Refer to change system settings through the BIOS Setup menus. Where to find more information Refer to the following parts: • Chapter 1: Product introduction This chapter describes ...the features of shutting down the system. • Chapter 4: BIOS setup This chapter tells how to the ASUS contact information. 2. How this guide This user guide contains the information you have been added by your dealer.
User Manual
Page 13
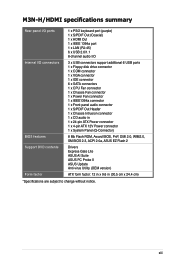
xiii M3N-H/HDMI specifications summary Rear panel I/O ports 1 x PS/2 keyboard port (purple) 1 x S/PDIF Out (Coaxial) 1 x HDMI Out 1 x IEEE 1394a port 1 x LAN (RJ-45) 6 x USB 2.0/1.1 8-channel audio I/O Internal I/O connectors 3 x USB connectors support additional 6 USB ports 1 x ...pin ATX 12V Power connector 1 x System Panel (Q-Connector) BIOS features 8 Mb Flash ROM, Award BIOS, PnP, DMI 2.0, WfM2.0, SM BIOS 2.3, ACPI 2.0a, ASUS EZ Flash 2 Support DVD contents Drivers Express Gate Lite ASUS AI Suite ASUS PC Probe II ASUS Update Anti-virus Utility (OEM version) Form factor ATX form...
xiii M3N-H/HDMI specifications summary Rear panel I/O ports 1 x PS/2 keyboard port (purple) 1 x S/PDIF Out (Coaxial) 1 x HDMI Out 1 x IEEE 1394a port 1 x LAN (RJ-45) 6 x USB 2.0/1.1 8-channel audio I/O Internal I/O connectors 3 x USB connectors support additional 6 USB ports 1 x ...pin ATX 12V Power connector 1 x System Panel (Q-Connector) BIOS features 8 Mb Flash ROM, Award BIOS, PnP, DMI 2.0, WfM2.0, SM BIOS 2.3, ACPI 2.0a, ASUS EZ Flash 2 Support DVD contents Drivers Express Gate Lite ASUS AI Suite ASUS PC Probe II ASUS Update Anti-virus Utility (OEM version) Form factor ATX form...

User Manual
Page 21
... 4-35 for details. ASUS M3N-H/HDMI 1-5 Noise Filter This feature detects repetitive and stationary noises (non-voice signals) like Skype, online game, video conference and recording. ASUS Q-Shield The specially designed ASUS Q-Shield does without preparing a bootable diskette or using an OS-based flash utility. ASUS EZ Flash 2 ASUS EZ Flash 2 is a user-friendly BIOS update utility. Simply...
... 4-35 for details. ASUS M3N-H/HDMI 1-5 Noise Filter This feature detects repetitive and stationary noises (non-voice signals) like Skype, online game, video conference and recording. ASUS Q-Shield The specially designed ASUS Q-Shield does without preparing a bootable diskette or using an OS-based flash utility. ASUS EZ Flash 2 ASUS EZ Flash 2 is a user-friendly BIOS update utility. Simply...

User Manual
Page 22
...) The C.P.R. See page 5-29 for each parameter. 1-6 Chapter 1: Product Introduction Simply shut down and reboot the system, and the BIOS automatically restores the CPU default setting for details. ASUS MyLogo 2™ This feature allows you to convert your favorite photo into a 256-color boot logo for details... Tweaker This feature allows you can easily monitor the critical components of booting the BIOS. See page 4-33 and 5-9 for a more colorful and vivid image on your screen. When using ASUS PC Probe II, you to fine tune the CPU/memory voltage and gradually increase...
...) The C.P.R. See page 5-29 for each parameter. 1-6 Chapter 1: Product Introduction Simply shut down and reboot the system, and the BIOS automatically restores the CPU default setting for details. ASUS MyLogo 2™ This feature allows you to convert your favorite photo into a 256-color boot logo for details... Tweaker This feature allows you can easily monitor the critical components of booting the BIOS. See page 4-33 and 5-9 for a more colorful and vivid image on your screen. When using ASUS PC Probe II, you to fine tune the CPU/memory voltage and gradually increase...

User Manual
Page 27
ASUS M3N-H/HDMI 2-3 30.5cm (12.0in) 2.2.3 Motherboard layout 24.5cm (9.6in) KB_USB56 ATX12V CPU_FAN SPDIF_O1 HDMI PWR_FAN SOCKET AM2 DDR DIMM_A1 (64bit, 240-pin module) DDR DIMM_B1 (64bit, 240-pin module) DDR DIMM_A2 (64bit, 240-pin module)...AUDIO EATXPWR SATA5 SATA6 Attansic F1 CHA_FAN1 PCIEX1_1 nVidia® GeForce 8300 SATA2 SATA4 SATA3 SATA1 PRI_IDE CD ALC883 AAFP SPDIF_OUT PCIEX16_1 M3N-H/HDMI PCI1 VGA PCIEX1_2 PCI2 PCI3 BIOS ® agere L-FW3227 Super I/O SB_PWR CHASSIS CLRTC Lithium Cell CMOS Power FLOPPY COM1 IE1394_2 USB78 USB910 USB1112 PANEL Refer ...
ASUS M3N-H/HDMI 2-3 30.5cm (12.0in) 2.2.3 Motherboard layout 24.5cm (9.6in) KB_USB56 ATX12V CPU_FAN SPDIF_O1 HDMI PWR_FAN SOCKET AM2 DDR DIMM_A1 (64bit, 240-pin module) DDR DIMM_B1 (64bit, 240-pin module) DDR DIMM_A2 (64bit, 240-pin module)...AUDIO EATXPWR SATA5 SATA6 Attansic F1 CHA_FAN1 PCIEX1_1 nVidia® GeForce 8300 SATA2 SATA4 SATA3 SATA1 PRI_IDE CD ALC883 AAFP SPDIF_OUT PCIEX16_1 M3N-H/HDMI PCI1 VGA PCIEX1_2 PCI2 PCI3 BIOS ® agere L-FW3227 Super I/O SB_PWR CHASSIS CLRTC Lithium Cell CMOS Power FLOPPY COM1 IE1394_2 USB78 USB910 USB1112 PANEL Refer ...

User Manual
Page 41
...information on BIOS setup. 2. Replace the system cover. 2.5.2 Configuring an expansion card After installing the expansion card, configure the it and make the necessary hardware settings for the expansion card. See Chapter 4 for later use . When using PCI cards on the slot. 5. ASUS M3N-H/HDMI 2-17 Failure...the card. 2. 2.5 Expansion slots In the future, you removed earlier. 6. Make sure to the tables on the system and change the necessary BIOS settings, if any. Align the card connector with it by adjusting the software settings. 1. Assign an IRQ to use . 4. Turn on the...
...information on BIOS setup. 2. Replace the system cover. 2.5.2 Configuring an expansion card After installing the expansion card, configure the it and make the necessary hardware settings for the expansion card. See Chapter 4 for later use . When using PCI cards on the slot. 5. ASUS M3N-H/HDMI 2-17 Failure...the card. 2. 2.5 Expansion slots In the future, you removed earlier. 6. Make sure to the tables on the system and change the necessary BIOS settings, if any. Align the card connector with it by adjusting the software settings. 1. Assign an IRQ to use . 4. Turn on the...

User Manual
Page 44
... to clear the CMOS RTC RAM data. If the steps above do not need to clear the RTC when the system hangs due to pins 2-3. M3N-H/HDMI ® M3N-H/HDMI Clear RTC RAM CLRTC 2 1 Disable (Default) 3 2 Enable • You do not help, remove the onboard battery and move the cap back ...to re-enter data. You must turn ON the computer. 4. Shut down the key during the boot process and enter BIOS setup to pins 1-2. 3. For system failure ...
... to clear the CMOS RTC RAM data. If the steps above do not need to clear the RTC when the system hangs due to pins 2-3. M3N-H/HDMI ® M3N-H/HDMI Clear RTC RAM CLRTC 2 1 Disable (Default) 3 2 Enable • You do not help, remove the onboard battery and move the cap back ...to re-enter data. You must turn ON the computer. 4. Shut down the key during the boot process and enter BIOS setup to pins 1-2. 3. For system failure ...

User Manual
Page 50
... SATA hard disk drives to the SATA connectors, you are using these connectors, set the SATA Operation Mode item in the BIOS to [RAID]. • Before creating a RAID set any of SATA cable to the onboard SATA port to the manual bundled...2-26 Chapter 2: Hardware information SATA5 GND RSATA_TXP5 RSATA_TXN5 GND RSATA_RXP5 RSATA_RXN5 GND SATA6 GND RSATA_TXP6 RSATA_TXN6 GND RSATA_RXP6 RSATA_RXN6 GND M3N-H/HDMI ® M3N-H/HDMI SATA connectors SATA2 GND RSATA_TXP2 RSATA_TXN2 GND RSATA_RXP2 RSATA_RXN2 GND SATA4 GND RSATA_TXP4 RSATA_TXN4 GND RSATA_RXP4 RSATA_RXN4 GND SATA3 GND RSATA_TXP3 ...
... SATA hard disk drives to the SATA connectors, you are using these connectors, set the SATA Operation Mode item in the BIOS to [RAID]. • Before creating a RAID set any of SATA cable to the onboard SATA port to the manual bundled...2-26 Chapter 2: Hardware information SATA5 GND RSATA_TXP5 RSATA_TXN5 GND RSATA_RXP5 RSATA_RXN5 GND SATA6 GND RSATA_TXP6 RSATA_TXN6 GND RSATA_RXP6 RSATA_RXN6 GND M3N-H/HDMI ® M3N-H/HDMI SATA connectors SATA2 GND RSATA_TXP2 RSATA_TXN2 GND RSATA_RXP2 RSATA_RXN2 GND SATA4 GND RSATA_TXP4 RSATA_TXN4 GND RSATA_RXP4 RSATA_RXN4 GND SATA3 GND RSATA_TXP3 ...

User Manual
Page 56
... this connector is for details. 2-32 Chapter 2: Hardware information GND PRESENCE# SENSE1_RETUR SENSE2_RETUR AGND NC NC NC M3N-H/HDMI AAFP PIN 1 PIN 1 MIC2 MICPWR Line out_R NC Line out_L PORT1 L PORT1 R PORT2 R SENSE_SEND PORT1 L ® M3N-H/HDMI Analog front panel connector HD-audio-compliant pin definition Legacy AC'97 compliant definition • We recommend..., this connector, set to [HD Audio]; Front panel audio connector (10-1 pin AAFP) This connector is set the Front Panel Support Type item in the BIOS setup to [HD Audio]. 9.
... this connector is for details. 2-32 Chapter 2: Hardware information GND PRESENCE# SENSE1_RETUR SENSE2_RETUR AGND NC NC NC M3N-H/HDMI AAFP PIN 1 PIN 1 MIC2 MICPWR Line out_R NC Line out_L PORT1 L PORT1 R PORT2 R SENSE_SEND PORT1 L ® M3N-H/HDMI Analog front panel connector HD-audio-compliant pin definition Legacy AC'97 compliant definition • We recommend..., this connector, set to [HD Audio]; Front panel audio connector (10-1 pin AAFP) This connector is set the Front Panel Support Type item in the BIOS setup to [HD Audio]. 9.

User Manual
Page 59
...2-pin connector is read from or written to this connector. The IDE LED lights up when you to this connector. ASUS M3N-H/HDMI 2-35 System panel connector (20-8 pin PANEL) This connector supports several chassis-mounted functions. Connect the HDD Activity LED... (2-pin RESET) This 2-pin connector is for the system power button. PLED SPEAKER PLED+ PLED+5V Ground Ground Speaker M3N-H/HDMI ® PANEL PIN 1 IDE_LED+ IDE_LED- 14. The system power LED lights up or flashes when data is for ... system power LED. Pressing the power button turns the system on the BIOS settings.
...2-pin connector is read from or written to this connector. The IDE LED lights up when you to this connector. ASUS M3N-H/HDMI 2-35 System panel connector (20-8 pin PANEL) This connector supports several chassis-mounted functions. Connect the HDD Activity LED... (2-pin RESET) This 2-pin connector is for the system power button. PLED SPEAKER PLED+ PLED+5V Ground Ground Speaker M3N-H/HDMI ® PANEL PIN 1 IDE_LED+ IDE_LED- 14. The system power LED lights up or flashes when data is for ... system power LED. Pressing the power button turns the system on the BIOS settings.

User Manual
Page 63
...the last device on , hold down the key to the power connector at the back of the system chassis. 4. ASUS M3N-H/HDMI 3-1 External SCSI devices (starting with a surge protector. 5. After making all switches are running, the BIOS beeps or additional messages appear on self tests or POST. Connect the power cord to enter the... BIOS Setup. Turn on the system front panel case lights up for assistance. 7. After applying power, the system power LED on the devices in Chapter 4. 3.1 ...
...the last device on , hold down the key to the power connector at the back of the system chassis. 4. ASUS M3N-H/HDMI 3-1 External SCSI devices (starting with a surge protector. 5. After making all switches are running, the BIOS beeps or additional messages appear on self tests or POST. Connect the power cord to enter the... BIOS Setup. Turn on the system front panel case lights up for assistance. 7. After applying power, the system power LED on the devices in Chapter 4. 3.1 ...

User Manual
Page 64
...® shuts down function If you are using Windows® Vista™: 1. Click the Turn Off button to soft-off mode, depending on the BIOS setting. Click the Start button then select ShutDown. 2. Refer to section 4.5 Power Menu in Chapter 4 for less than four seconds lets the system ...enter the soft-off mode regardless of the BIOS setting. 3.2 Turning off the computer 3.2.1 Using the OS shut down . Pressing the power switch for more than four seconds puts the system to sleep...
...® shuts down function If you are using Windows® Vista™: 1. Click the Turn Off button to soft-off mode, depending on the BIOS setting. Click the Start button then select ShutDown. 2. Refer to section 4.5 Power Menu in Chapter 4 for less than four seconds lets the system ...enter the soft-off mode regardless of the BIOS setting. 3.2 Turning off the computer 3.2.1 Using the OS shut down . Pressing the power switch for more than four seconds puts the system to sleep...

User Manual
Page 65
Detailed descriptions of the BIOS ChapBtIeOrS4:se4tup parameters are also provided. This chapter tells how to change the system settings through the BIOS Setup menus.
Detailed descriptions of the BIOS ChapBtIeOrS4:se4tup parameters are also provided. This chapter tells how to change the system settings through the BIOS Setup menus.

User Manual
Page 66
Chapter summary 4 4.1 Managing and updating your BIOS 4-1 4.2 BIOS setup program 4-9 4.3 Main menu 4-13 4.4 Advanced menu 4-18 4.5 Power menu 4-27 4.6 Boot menu 4-31 4.7 Tools menu 4-35 4.8 Exit menu 4-37 ASUS M3N-H/HDMI
Chapter summary 4 4.1 Managing and updating your BIOS 4-1 4.2 BIOS setup program 4-9 4.3 Main menu 4-13 4.4 Advanced menu 4-18 4.5 Power menu 4-27 4.6 Boot menu 4-31 4.7 Tools menu 4-35 4.8 Exit menu 4-37 ASUS M3N-H/HDMI

User Manual
Page 67
... (ISP). Click the Utilities tab, then click Install ASUS Update. 3. The Drivers menu appears. 2. ASUS M3N-H/HDMI 4-1 The ASUS Update utility allows you to : • Save the current BIOS file • Download the latest BIOS file from the Internet • Update the BIOS from an updated BIOS file • Update the BIOS directly from the Internet, and • View the...
... (ISP). Click the Utilities tab, then click Install ASUS Update. 3. The Drivers menu appears. 2. ASUS M3N-H/HDMI 4-1 The ASUS Update utility allows you to : • Save the current BIOS file • Download the latest BIOS file from the Internet • Update the BIOS from an updated BIOS file • Update the BIOS directly from the Internet, and • View the...


