User Manual
Page 4
... OS shut down function 2-36 2.10.2 Using the dual function power switch 2-36 Chapter 3: BIOS setup 3.1 Managing and updating your BIOS 3-1 3.1.1 ASUS Update utility 3-1 3.1.2 Creating a bootable floppy disk 3-4 3.1.3 ASUS EZ Flash 2 utility 3-5 3.1.4 AFUDOS utility 3-6 3.1.5 ASUS CrashFree BIOS 2 utility 3-8 3.2 BIOS setup program 3-9 3.2.1 BIOS menu screen 3-10 3.2.2 Menu bar 3-10 3.2.3 Navigation keys 3-10 3.2.4 Menu items 3-11 3.2.5 Sub...
... OS shut down function 2-36 2.10.2 Using the dual function power switch 2-36 Chapter 3: BIOS setup 3.1 Managing and updating your BIOS 3-1 3.1.1 ASUS Update utility 3-1 3.1.2 Creating a bootable floppy disk 3-4 3.1.3 ASUS EZ Flash 2 utility 3-5 3.1.4 AFUDOS utility 3-6 3.1.5 ASUS CrashFree BIOS 2 utility 3-8 3.2 BIOS setup program 3-9 3.2.1 BIOS menu screen 3-10 3.2.2 Menu bar 3-10 3.2.3 Navigation keys 3-10 3.2.4 Menu items 3-11 3.2.5 Sub...
User Manual
Page 9
... documentation, such as warranty flyers, that comes with the motherboard package and the software. ASUS websites The ASUS website provides updated information on the motherboard. • Chapter 3: BIOS setup This chapter tells how to the ASUS contact information. 2. ix Refer to change system settings through the BIOS Setup menus. About this guide is organized This guide contains...
... documentation, such as warranty flyers, that comes with the motherboard package and the software. ASUS websites The ASUS website provides updated information on the motherboard. • Chapter 3: BIOS setup This chapter tells how to the ASUS contact information. 2. ix Refer to change system settings through the BIOS Setup menus. About this guide is organized This guide contains...
User Manual
Page 19
... bandwidth which enhances system performance. PCIe 2.0 support This motherboard supports the latest PCIe 2.0 devices for details. See page 2-18 for details. The external SATA port located at the back I/O provides smart setup and hot-plug functions. See pages 2-23 and 2-26 for details. ASUS M3A79-T Deluxe 1-3 DDR2 1066 is ready to support Quad CrossFireX™...
... bandwidth which enhances system performance. PCIe 2.0 support This motherboard supports the latest PCIe 2.0 devices for details. See page 2-18 for details. The external SATA port located at the back I/O provides smart setup and hot-plug functions. See pages 2-23 and 2-26 for details. ASUS M3A79-T Deluxe 1-3 DDR2 1066 is ready to support Quad CrossFireX™...
User Manual
Page 25
It includes description of the jumpers and connectors on the motherboard. 2 Hardware information This chapter lists the hardware setup procedures that you have to perform when installing system components.
It includes description of the jumpers and connectors on the motherboard. 2 Hardware information This chapter lists the hardware setup procedures that you have to perform when installing system components.
User Manual
Page 42
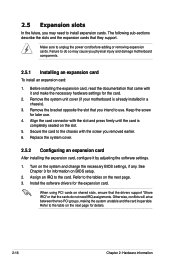
...and change the necessary BIOS settings, if any. Failure to use . 4. Remove the system unit cover (if your motherboard is completely seated on the slot. 5. Turn on BIOS setup. 2. When using PCI cards on shared slots, ensure that the drivers support "Share IRQ" or that you intend ...slot that the cards do so may need IRQ assignments. 2.5 Expansion slots In the future, you may cause you physical injury and damage motherboard components. 2.5.1 Installing an expansion card To install an expansion card: 1. Refer to install expansion cards. The following sub‑sections describe the...
...and change the necessary BIOS settings, if any. Failure to use . 4. Remove the system unit cover (if your motherboard is completely seated on the slot. 5. Turn on BIOS setup. 2. When using PCI cards on shared slots, ensure that the drivers support "Share IRQ" or that you intend ...slot that the cards do so may need IRQ assignments. 2.5 Expansion slots In the future, you may cause you physical injury and damage motherboard components. 2.5.1 Installing an expansion card To install an expansion card: 1. Refer to install expansion cards. The following sub‑sections describe the...
User Manual
Page 46
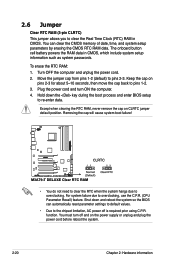
... RTC RAM: 1. Plug the power cord and turn off is required prior using C.P.R. Shut down the key during the boot process and enter BIOS setup to overclocking, use the C.P.R. (CPU Parameter Recall) feature. Except when clearing the RTC RAM, never remove the cap on the power supply or ... You can automatically reset parameter settings to default values. • Due to clear the Real Time Clock (RTC) RAM in CMOS, which include system setup information such as system passwords. Keep the cap on pins 2-3 for about 5~10 seconds, then move the cap back to overclocking. Removing the cap ...
... RTC RAM: 1. Plug the power cord and turn off is required prior using C.P.R. Shut down the key during the boot process and enter BIOS setup to overclocking, use the C.P.R. (CPU Parameter Recall) feature. Except when clearing the RTC RAM, never remove the cap on the power supply or ... You can automatically reset parameter settings to default values. • Due to clear the Real Time Clock (RTC) RAM in CMOS, which include system setup information such as system passwords. Keep the cap on pins 2-3 for about 5~10 seconds, then move the cap back to overclocking. Removing the cap ...
User Manual
Page 58
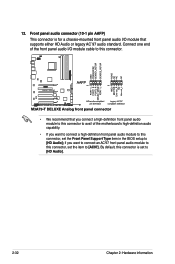
.... Connect one end of the front panel audio I /O module that you connect a high-definition front panel audio module to this connector to avail of the motherboard's high-definition audio capability. • If you want to connect a high-definition front panel audio module to this connector, set the item to [AC97]. if... legacy AC`97 audio standard. Front panel audio connector (10-1 pin AAFP) This connector is set the Front Panel Support Type item in the BIOS setup to [HD Audio]. 2-32 Chapter 2: Hardware information
.... Connect one end of the front panel audio I /O module that you connect a high-definition front panel audio module to this connector to avail of the motherboard's high-definition audio capability. • If you want to connect a high-definition front panel audio module to this connector, set the item to [AC97]. if... legacy AC`97 audio standard. Front panel audio connector (10-1 pin AAFP) This connector is set the Front Panel Support Type item in the BIOS setup to [HD Audio]. 2-32 Chapter 2: Hardware information
User Manual
Page 61
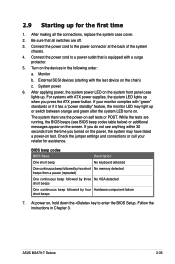
... supplies, the system LED lights up when you press the ATX power button. For systems with the last device on , hold down the key to the power connector at the back of the system chassis. 4. BIOS ... the first time 1. Check the jumper settings and connections or call your monitor complies with a surge protector. 5. Connect the power cord to enter the BIOS Setup. ASUS M3A79-T Deluxe 2-35 Be sure that is equipped with "green" standards or if it has a "power standby" feature, the monitor LED may have failed a power-on the...
... supplies, the system LED lights up when you press the ATX power button. For systems with the last device on , hold down the key to the power connector at the back of the system chassis. 4. BIOS ... the first time 1. Check the jumper settings and connections or call your monitor complies with a surge protector. 5. Connect the power cord to enter the BIOS Setup. ASUS M3A79-T Deluxe 2-35 Be sure that is equipped with "green" standards or if it has a "power standby" feature, the monitor LED may have failed a power-on the...
User Manual
Page 63
Detailed descriptions of the BIOS parameters are also provided. 3 BIOS setup This chapter tells how to change the system settings through the BIOS Setup menus.
Detailed descriptions of the BIOS parameters are also provided. 3 BIOS setup This chapter tells how to change the system settings through the BIOS Setup menus.
User Manual
Page 64
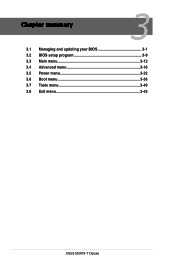
Chapter summary 3 3.1 Managing and updating your BIOS 3-1 3.2 BIOS setup program 3-9 3.3 Main menu 3-12 3.4 Advanced menu 3-16 3.5 Power menu 3-32 3.6 Boot menu 3-36 3.7 Tools menu 3-40 3.8 Exit menu 3-43 ASUS M3A79-T Deluxe
Chapter summary 3 3.1 Managing and updating your BIOS 3-1 3.2 BIOS setup program 3-9 3.3 Main menu 3-12 3.4 Advanced menu 3-16 3.5 Power menu 3-32 3.6 Boot menu 3-36 3.7 Tools menu 3-40 3.8 Exit menu 3-43 ASUS M3A79-T Deluxe
User Manual
Page 65
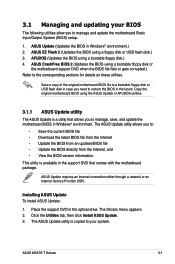
...BIOS in Windows® environment. Installing ASUS Update To install ASUS Update: 1. The ASUS Update utility allows you to manage and update the motherboard Basic Input/Output System (BIOS) setup. 1. Click the Utilities tab, then click Install ASUS Update. 3. 3.1 Managing and updating your system. ASUS EZ Flash 2 (Updates the BIOS ... updated BIOS file • Update the BIOS directly from the Internet, and • View the BIOS version information. ASUS M3A79-T Deluxe 3-1 ASUS Update (Updates the BIOS in the optical drive. Place the support DVD in Windows® environment.) 2.
...BIOS in Windows® environment. Installing ASUS Update To install ASUS Update: 1. The ASUS Update utility allows you to manage and update the motherboard Basic Input/Output System (BIOS) setup. 1. Click the Utilities tab, then click Install ASUS Update. 3. 3.1 Managing and updating your system. ASUS EZ Flash 2 (Updates the BIOS ... updated BIOS file • Update the BIOS directly from the Internet, and • View the BIOS version information. ASUS M3A79-T Deluxe 3-1 ASUS Update (Updates the BIOS in the optical drive. Place the support DVD in Windows® environment.) 2.
User Manual
Page 66
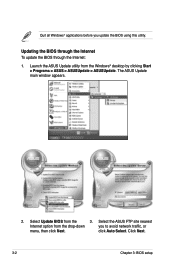
Launch the ASUS Update utility from the drop‑down you update the BIOS using this utility. Select the ASUS FTP site nearest Internet option from the Windows® desktop by clicking Start > Programs > ASUS > ASUSUpdate > ASUSUpdate. Updating the BIOS through the Internet To update the BIOS through the Internet: 1. The ASUS Update main window appears. 2. click Auto Select. Click Next. 3-2 Chapter 3: BIOS setup Quit all Windows® applications before you to avoid network traffic, or menu, then click Next. Select Update BIOS from the 3.
Launch the ASUS Update utility from the drop‑down you update the BIOS using this utility. Select the ASUS FTP site nearest Internet option from the Windows® desktop by clicking Start > Programs > ASUS > ASUSUpdate > ASUSUpdate. Updating the BIOS through the Internet To update the BIOS through the Internet: 1. The ASUS Update main window appears. 2. click Auto Select. Click Next. 3-2 Chapter 3: BIOS setup Quit all Windows® applications before you to avoid network traffic, or menu, then click Next. Select Update BIOS from the 3.

User Manual
Page 68
...-click Floppy Disk Drive then click Format to the bootable floppy disk. 3-4 Chapter 3: BIOS setup Insert a 1.44MB floppy disk into the drive. c. c. Select the Create an MS-DOS startup disk check box. Copy the original or the latest motherboard BIOS file to display the Format 3 1/2 Floppy dialog box . Click Start from the...
...-click Floppy Disk Drive then click Format to the bootable floppy disk. 3-4 Chapter 3: BIOS setup Insert a 1.44MB floppy disk into the drive. c. c. Select the Create an MS-DOS startup disk check box. Copy the original or the latest motherboard BIOS file to display the Format 3 1/2 Floppy dialog box . Click Start from the...
User Manual
Page 69
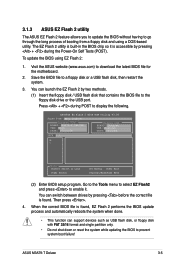
ASUS M3A79-T Deluxe 3-5 Visit the ASUS website (www.asus.com) to a floppy disk or a USB flash disk, then restart the system. 3. ...A: C: Note [Enter] Select or Load [Tab] Switch [B] Backup [ESC] Exit [Up/Down/Home/End] Move (2) Enter BIOS setup program. The EZ Flash 2 utility is found , EZ Flash 2 performs the BIOS update process and automatically reboots the system when done... BIOS to prevent system boot failure! Save the BIOS file to download the latest BIOS file for the motherboard. 2. You can switch between drives by two methods. (1) Insert the floppy disk / USB flash disk...
ASUS M3A79-T Deluxe 3-5 Visit the ASUS website (www.asus.com) to a floppy disk or a USB flash disk, then restart the system. 3. ...A: C: Note [Enter] Select or Load [Tab] Switch [B] Backup [ESC] Exit [Up/Down/Home/End] Move (2) Enter BIOS setup program. The EZ Flash 2 utility is found , EZ Flash 2 performs the BIOS update process and automatically reboots the system when done... BIOS to prevent system boot failure! Save the BIOS file to download the latest BIOS file for the motherboard. 2. You can switch between drives by two methods. (1) Insert the floppy disk / USB flash disk...
User Manual
Page 70
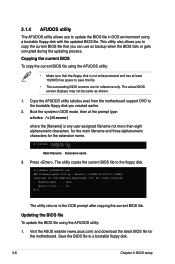
... the system in DOS environment using the AFUDOS utility: 1. done Write to the floppy disk. Visit the ASUS website (www.asus.com) and download the latest BIOS file for the motherboard. 3.1.4 AFUDOS utility The AFUDOS utility allows you to update the BIOS file in DOS mode, then at ... reference only. This utility also allows you created earlier. 2. Press . ok A:\> The utility returns to a bootable floppy disk. 3-6 Chapter 3: BIOS setup A:\>afudos /oOLDBIOS1.rom AMI Firmware Update Utility - Save the BIOS file to the DOS prompt after copying the current BIOS file.
... the system in DOS environment using the AFUDOS utility: 1. done Write to the floppy disk. Visit the ASUS website (www.asus.com) and download the latest BIOS file for the motherboard. 3.1.4 AFUDOS utility The AFUDOS utility allows you to update the BIOS file in DOS mode, then at ... reference only. This utility also allows you created earlier. 2. Press . ok A:\> The utility returns to a bootable floppy disk. 3-6 Chapter 3: BIOS setup A:\>afudos /oOLDBIOS1.rom AMI Firmware Update Utility - Save the BIOS file to the DOS prompt after copying the current BIOS file.
User Manual
Page 72
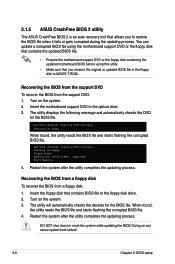
... BIOS file. • Prepare the motherboard support DVD or the floppy disk containing the updated motherboard BIOS before using this utility. • Make sure that contains BIOS file to the floppy disk drive. 2. You can cause system boot failure! 3-8 Chapter 3: BIOS setup Recovering the BIOS from the support DVD... BIOS 2 utility The ASUS CrashFree BIOS 2 is an auto recovery tool that allows you rename the original or updated BIOS file in the floppy disk to M3A79-T.ROM.. Restart the system after the utility completes the updating process. DO NOT shut down or reset the system while updating...
... BIOS file. • Prepare the motherboard support DVD or the floppy disk containing the updated motherboard BIOS before using this utility. • Make sure that contains BIOS file to the floppy disk drive. 2. You can cause system boot failure! 3-8 Chapter 3: BIOS setup Recovering the BIOS from the support DVD... BIOS 2 utility The ASUS CrashFree BIOS 2 is an auto recovery tool that allows you rename the original or updated BIOS file in the floppy disk to M3A79-T.ROM.. Restart the system after the utility completes the updating process. DO NOT shut down or reset the system while updating...

User Manual
Page 73
... as easy to use the Setup program, you are for most conditions to enter Setup after changing any BIOS settings, load the default settings to enter the Setup utility; ASUS M3A79-T Deluxe 3-9 Press during the Power-...On Self-Test (POST) to ensure system compatibility and stability. You can also restart by pressing the reset button on . The Setup program is designed to make your system using the provided utility described in section 3.1 Managing and updating your computer in the future. 3.2 BIOS setup program This motherboard...
... as easy to use the Setup program, you are for most conditions to enter Setup after changing any BIOS settings, load the default settings to enter the Setup utility; ASUS M3A79-T Deluxe 3-9 Press during the Power-...On Self-Test (POST) to ensure system compatibility and stability. You can also restart by pressing the reset button on . The Setup program is designed to make your system using the provided utility described in section 3.1 Managing and updating your computer in the future. 3.2 BIOS setup program This motherboard...
User Manual
Page 74
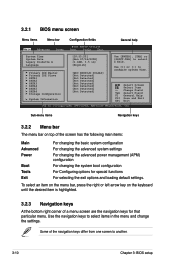
...keys for special functions For selecting the exit options and loading default settings. Use [+] or [-] to another. 3-10 Chapter 3: BIOS setup Use the navigation keys to select items in ] [English] Primary IDE Master Primary IDE Slave SATA1 SATA2 SATA3 SATA4 SATA5 SATA6 Storage ...ENTER], [TAB] or [SHIFT-TAB] to select a field. 3.2.1 BIOS menu screen Menu items Menu bar Main Advanced Power Configuration fields BIOS SETUP UTILITY Boot Tools Exit General help System Time System Date Legacy Diskette A Language [10:55:25] [Mon 07/16/2008] [1.44M, 3.5...
...keys for special functions For selecting the exit options and loading default settings. Use [+] or [-] to another. 3-10 Chapter 3: BIOS setup Use the navigation keys to select items in ] [English] Primary IDE Master Primary IDE Slave SATA1 SATA2 SATA3 SATA4 SATA5 SATA6 Storage ...ENTER], [TAB] or [SHIFT-TAB] to select a field. 3.2.1 BIOS menu screen Menu items Menu bar Main Advanced Power Configuration fields BIOS SETUP UTILITY Boot Tools Exit General help System Time System Date Legacy Diskette A Language [10:55:25] [Mon 07/16/2008] [1.44M, 3.5...
User Manual
Page 76
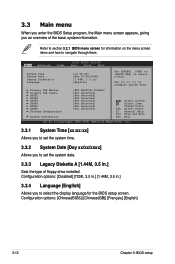
...] System Information Select Screen Select Item +- Configuration options: [Chinese(BIG5)] [Chinese(GB)] [Français] [English] 3-12 Chapter 3: BIOS setup Change Field Tab Select Field F1 General Help F10 Save and Exit ESC Exit v02.61 (C)Copyright 1985-2008, American Megatrends, Inc. 3.3.1 System Time...[+] or [-] to navigate through them. 3.3 Main menu When you enter the BIOS Setup program, the Main menu screen appears, giving you to select a field. Main Advanced Power BIOS SETUP UTILITY Boot Tools Exit System Time System Date Legacy Diskette A Language [10:55:25]...
...] System Information Select Screen Select Item +- Configuration options: [Chinese(BIG5)] [Chinese(GB)] [Français] [English] 3-12 Chapter 3: BIOS setup Change Field Tab Select Field F1 General Help F10 Save and Exit ESC Exit v02.61 (C)Copyright 1985-2008, American Megatrends, Inc. 3.3.1 System Time...[+] or [-] to navigate through them. 3.3 Main menu When you enter the BIOS Setup program, the Main menu screen appears, giving you to select a field. Main Advanced Power BIOS SETUP UTILITY Boot Tools Exit System Time System Date Legacy Diskette A Language [10:55:25]...
User Manual
Page 77
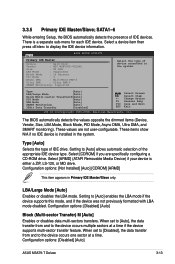
...SETUP UTILITY Primary IDE Master Device : Hard Disk Vendor : WDC WD800JD-00LSA0 Size : 80.0GB LBA Mode : Supported Block Mode : 16 Sectors PIO Mode : 4 Async DMA : MultiWord DMA-2 Ultra DMA : Ultra DMA-5 SMART Monitoring: Supported Select the type of IDE drive. Configuration options: [Disabled] [Auto] ASUS M3A79-T Deluxe...Auto] Enables or disables data multi-sectors transfers. 3.3.5 Primary IDE Master/Slave; SATA1-6 While entering Setup, the BIOS automatically detects the presence of the appropriate IDE device type. These values are specifically ...
...SETUP UTILITY Primary IDE Master Device : Hard Disk Vendor : WDC WD800JD-00LSA0 Size : 80.0GB LBA Mode : Supported Block Mode : 16 Sectors PIO Mode : 4 Async DMA : MultiWord DMA-2 Ultra DMA : Ultra DMA-5 SMART Monitoring: Supported Select the type of IDE drive. Configuration options: [Disabled] [Auto] ASUS M3A79-T Deluxe...Auto] Enables or disables data multi-sectors transfers. 3.3.5 Primary IDE Master/Slave; SATA1-6 While entering Setup, the BIOS automatically detects the presence of the appropriate IDE device type. These values are specifically ...


