
User Guide
Page 7
...not damaged. If you add a device. • Before connecting or removing signal cables from the motherboard, ensure that the product (electrical and electronic equipment, and Mercury-containing button cell battery) should not be placed in any damage, contact your local power company. • If the ...power supply is set to fix it by yourself. vii Operation safety • Before installing the motherboard and adding devices on it may become...
...not damaged. If you add a device. • Before connecting or removing signal cables from the motherboard, ensure that the product (electrical and electronic equipment, and Mercury-containing button cell battery) should not be placed in any damage, contact your local power company. • If the ...power supply is set to fix it by yourself. vii Operation safety • Before installing the motherboard and adding devices on it may become...
User Guide
Page 37
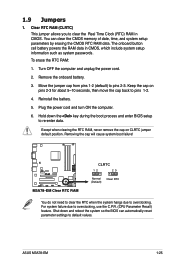
.... Removing the cap will cause system boot failure! Reinstall the battery. 5. Hold down and reboot the system so the BIOS can clear the CMOS memory of date, time, and system setup parameters by erasing the CMOS RTC RAM data. ASUS M3A78-EM 1-25 R M3A78-EM M3A78-EM Clear RTC RAM CLRTC 12 23 Normal (Default) Clear RTC You...) This jumper allows you to overclocking. Shut down the key during the boot process and enter BIOS setup to default values. The onboard button cell battery powers the RAM data in CMOS. To erase the RTC RAM: 1. Remove the onboard...
.... Removing the cap will cause system boot failure! Reinstall the battery. 5. Hold down and reboot the system so the BIOS can clear the CMOS memory of date, time, and system setup parameters by erasing the CMOS RTC RAM data. ASUS M3A78-EM 1-25 R M3A78-EM M3A78-EM Clear RTC RAM CLRTC 12 23 Normal (Default) Clear RTC You...) This jumper allows you to overclocking. Shut down the key during the boot process and enter BIOS setup to default values. The onboard button cell battery powers the RAM data in CMOS. To erase the RTC RAM: 1. Remove the onboard...
User Guide
Page 92
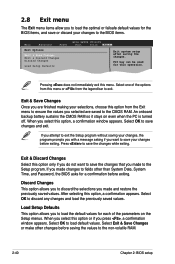
... to save the changes while exiting. Select OK to load default values. Press to the non-volatile RAM. 2-40 Chapter 2: BIOS setup An onboard backup battery sustains the CMOS RAM so it stays on the Setup menus. Discard Changes This option allows you to discard the selections you made and restore...
... to save the changes while exiting. Select OK to load default values. Press to the non-volatile RAM. 2-40 Chapter 2: BIOS setup An onboard backup battery sustains the CMOS RAM so it stays on the Setup menus. Discard Changes This option allows you to discard the selections you made and restore...

