
User Manual
Page 33
... Message: Do You Want To Save Bios (Y/N) 33 2.2 使用 AwardBIOS Flash BIOS AwardBIOS Flash AwardBIOS Flash 程式(AWDFLASH.EXE BIOS AwardBIOS Flash BIOS 程式。 1 http://tw.asus.com BIOS M2N-VM HDMI.bin FAT 32/16 格式的 USB BIOS 2 CD/DVD AwardBIOS Flash BIOS 3 DOS 4. 當 A BIOS 檔案與 AwardBIOS Flash 5 A awdflash...
... Message: Do You Want To Save Bios (Y/N) 33 2.2 使用 AwardBIOS Flash BIOS AwardBIOS Flash AwardBIOS Flash 程式(AWDFLASH.EXE BIOS AwardBIOS Flash BIOS 程式。 1 http://tw.asus.com BIOS M2N-VM HDMI.bin FAT 32/16 格式的 USB BIOS 2 CD/DVD AwardBIOS Flash BIOS 3 DOS 4. 當 A BIOS 檔案與 AwardBIOS Flash 5 A awdflash...

User Manual
Page 34
... File Name to Program: M2A-VM HDMI.bin Flashing Complete Press to Program: M2A-VM HDMI.bin Programming Flash Memory - OFE00 OK Write OK No Update Write Fail Warning: Don't Turn Off Power Or Reset System! 在更新 BIOS 9 Flash Complete BIOS F1 AwardBIOS Flash Utility for ASUS V1.14 (C) Phoenix Technologies Ltd. All...
... File Name to Program: M2A-VM HDMI.bin Flashing Complete Press to Program: M2A-VM HDMI.bin Programming Flash Memory - OFE00 OK Write OK No Update Write Fail Warning: Don't Turn Off Power Or Reset System! 在更新 BIOS 9 Flash Complete BIOS F1 AwardBIOS Flash Utility for ASUS V1.14 (C) Phoenix Technologies Ltd. All...
User Manual
Page 12
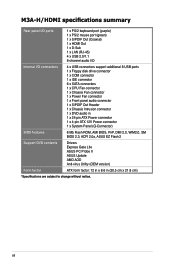
xii M3A-H/HDMI specifications summary Rear panel I/O ports 1 x PS/2 keyboard port (purple) 1 x PS/2 mouse port (green) 1 x S/PDIF Out (Coaxial) 1 x HDMI Out 1 x D-Sub 1 x LAN (RJ-45) 4 x USB 2.0/1.1 8-channel audio I/O Internal I/O connectors 4 x USB connectors support additional 8 USB ports 1 x ...pin ATX 12V Power connector 1 x System Panel (Q-Connector) BIOS features 8 Mb Flash ROM, AMI BIOS, PnP, DMI 2.0, WfM2.0, SM BIOS 2.3, ACPI 2.0a, ASUS EZ Flash 2 Support DVD contents Drivers Express Gate Lite ASUS PC Probe II ASUS Update AMD AOD Anti-virus Utility (OEM version) Form factor...
xii M3A-H/HDMI specifications summary Rear panel I/O ports 1 x PS/2 keyboard port (purple) 1 x PS/2 mouse port (green) 1 x S/PDIF Out (Coaxial) 1 x HDMI Out 1 x D-Sub 1 x LAN (RJ-45) 4 x USB 2.0/1.1 8-channel audio I/O Internal I/O connectors 4 x USB connectors support additional 8 USB ports 1 x ...pin ATX 12V Power connector 1 x System Panel (Q-Connector) BIOS features 8 Mb Flash ROM, AMI BIOS, PnP, DMI 2.0, WfM2.0, SM BIOS 2.3, ACPI 2.0a, ASUS EZ Flash 2 Support DVD contents Drivers Express Gate Lite ASUS PC Probe II ASUS Update AMD AOD Anti-virus Utility (OEM version) Form factor...

User Manual
Page 19
... and 2-39 for each parameter. Simply shut down and reboot the system, and the BIOS automatically restores the CPU default setting for details. ASUS M3A-H/HDMI 1-7 AI Booster The ASUS AI Booster allows you to know which drivers are already installed, as well as those that...to overclock the CPU speed in 0.02V steps to overclocking. ASUS EZ Flash 2 ASUS EZ Flash 2 is a user-friendly BIOS update utility. Update your favorite photo into a 256-color boot logo for details. 1.3.3 ASUS intelligent performance and overclocking features Precision Tweaker Precision Tweaker allows ...
... and 2-39 for each parameter. Simply shut down and reboot the system, and the BIOS automatically restores the CPU default setting for details. ASUS M3A-H/HDMI 1-7 AI Booster The ASUS AI Booster allows you to know which drivers are already installed, as well as those that...to overclock the CPU speed in 0.02V steps to overclocking. ASUS EZ Flash 2 ASUS EZ Flash 2 is a user-friendly BIOS update utility. Update your favorite photo into a 256-color boot logo for details. 1.3.3 ASUS intelligent performance and overclocking features Precision Tweaker Precision Tweaker allows ...

User Manual
Page 21
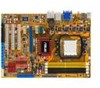
... COM1 PCIEX1_1 M3A-H/HDMI ® PCIEX16_1 EATXPWR Super I/O PCIEX1_2 ICS PCI1 AMD SB700 PWR_FAN SB_PWR PCI2 ALC1200 AAFP SPDIF_OUT CD FLOPPY PCI3 CLRTC SATA1 SATA2 USB1112 USBPW9-12 SATA3 USBPW5-8 BIOS CHASSIS USB910 USB78 USB56 SATA4 SATA5 SATA6 PANEL Refer to 1.10 Connectors for more information about rear panel connectors and internal connectors. ASUS M3A-H/HDMI 1-9
... COM1 PCIEX1_1 M3A-H/HDMI ® PCIEX16_1 EATXPWR Super I/O PCIEX1_2 ICS PCI1 AMD SB700 PWR_FAN SB_PWR PCI2 ALC1200 AAFP SPDIF_OUT CD FLOPPY PCI3 CLRTC SATA1 SATA2 USB1112 USBPW9-12 SATA3 USBPW5-8 BIOS CHASSIS USB910 USB78 USB56 SATA4 SATA5 SATA6 PANEL Refer to 1.10 Connectors for more information about rear panel connectors and internal connectors. ASUS M3A-H/HDMI 1-9
User Manual
Page 33
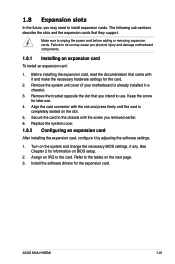
...the card to do so may need to unplug the power cord before adding or removing expansion cards. Assign an IRQ to the tables on BIOS setup. 2. Before installing the expansion card, read the documentation that you intend to use . 4. Remove the bracket opposite the slot that...the software settings. 1. Keep the screw for information on the next page. 3. ASUS M3A-H/HDMI 1-21 Refer to the card. Remove the system unit cover (if your motherboard is completely seated on the system and change the necessary BIOS settings, if any. Turn on the slot. 5. 1.8 Expansion slots In the ...
...the card to do so may need to unplug the power cord before adding or removing expansion cards. Assign an IRQ to the tables on BIOS setup. 2. Before installing the expansion card, read the documentation that you intend to use . 4. Remove the bracket opposite the slot that...the software settings. 1. Keep the screw for information on the next page. 3. ASUS M3A-H/HDMI 1-21 Refer to the card. Remove the system unit cover (if your motherboard is completely seated on the system and change the necessary BIOS settings, if any. Turn on the slot. 5. 1.8 Expansion slots In the ...

User Manual
Page 36
...before reboot the system. 1-24 Chapter 1: Product introduction Shut down the key during the boot process and enter BIOS setup to pins 1-2. 3. Hold down and reboot the system so the BIOS can clear the CMOS memory of date, time, and system setup parameters by erasing the CMOS RTC RAM data....again to clear the Real Time Clock (RTC) RAM in CMOS, which include system setup information such as system passwords. M3A-H/HDMI ® CLRTC 12 23 Normal Clear RTC (Default) M3A-H/HDMI Clear RTC RAM • You do not help, remove the onboard battery and move the cap back to re-enter ...
...before reboot the system. 1-24 Chapter 1: Product introduction Shut down the key during the boot process and enter BIOS setup to pins 1-2. 3. Hold down and reboot the system so the BIOS can clear the CMOS memory of date, time, and system setup parameters by erasing the CMOS RTC RAM data....again to clear the Real Time Clock (RTC) RAM in CMOS, which include system setup information such as system passwords. M3A-H/HDMI ® CLRTC 12 23 Normal Clear RTC (Default) M3A-H/HDMI Clear RTC RAM • You do not help, remove the onboard battery and move the cap back to re-enter ...
User Manual
Page 37
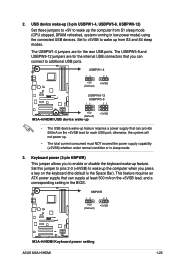
...Bar). Set to +5VSB to wake up feature. USBPW1-4 12 23 +5V (Default) +5VSB M3A-H/HDMI ® USBPW9-12 USBPW5-8 12 23 +5V (Default) M3A-H/HDMI USB device wake-up +5VSB • The USB device wake-up the computer from S3 and... or in low power mode) using the connected USB devices. KBPWR 12 23 +5V (Default) +5VSB M3A-H/HDMI ® M3A-H/HDMI Keyboard power setting ASUS M3A-H/HDMI 1-25 The USBPW1-4 jumpers are for the rear USB ports. otherwise, the system will not power up from... at least 500 mA on the +5VSB lead, and a corresponding setting in the BIOS. 2.
...Bar). Set to +5VSB to wake up feature. USBPW1-4 12 23 +5V (Default) +5VSB M3A-H/HDMI ® USBPW9-12 USBPW5-8 12 23 +5V (Default) M3A-H/HDMI USB device wake-up +5VSB • The USB device wake-up the computer from S3 and... or in low power mode) using the connected USB devices. KBPWR 12 23 +5V (Default) +5VSB M3A-H/HDMI ® M3A-H/HDMI Keyboard power setting ASUS M3A-H/HDMI 1-25 The USBPW1-4 jumpers are for the rear USB ports. otherwise, the system will not power up from... at least 500 mA on the +5VSB lead, and a corresponding setting in the BIOS. 2.

User Manual
Page 42
...for the Serial ATA signal cables for details. GND RSATA_RXN4 RSATA_TXP4 GND RSATA_TXN4 RSATA_TXP4 GND GND RSATA_RXN3 RSATA_TXP3 GND RSATA_TXN3 RSATA_TXP3 GND M3A-H/HDMI ® GND RSATA_RXN2 RSATA_TXP2 GND RSATA_TXN2 RSATA_TXP2 GND SATA3 SATA2 GND RSATA_RXN5 RSATA_TXP5 GND RSATA_TXN5 RSATA_TXP5 GND SATA4 SATA5 GND RSATA_RXN6 ... Serial ATA. • For detailed instructions on how to configure RAID 0, RAID 1 and RAID 10, refer to the RAID manual in the BIOS to create a Serial ATA RAID set the OnChip SATA Type item in the support DVD. • If you can create a RAID 0, RAID...
...for the Serial ATA signal cables for details. GND RSATA_RXN4 RSATA_TXP4 GND RSATA_TXN4 RSATA_TXP4 GND GND RSATA_RXN3 RSATA_TXP3 GND RSATA_TXN3 RSATA_TXP3 GND M3A-H/HDMI ® GND RSATA_RXN2 RSATA_TXP2 GND RSATA_TXN2 RSATA_TXP2 GND SATA3 SATA2 GND RSATA_RXN5 RSATA_TXP5 GND RSATA_TXN5 RSATA_TXP5 GND SATA4 SATA5 GND RSATA_RXN6 ... Serial ATA. • For detailed instructions on how to configure RAID 0, RAID 1 and RAID 10, refer to the RAID manual in the BIOS to create a Serial ATA RAID set the OnChip SATA Type item in the support DVD. • If you can create a RAID 0, RAID...
User Manual
Page 45
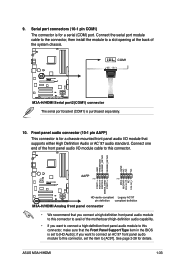
... serial port module cable to the connector, then install the module to this connector. Connect one end of the system chassis. ASUS M3A-H/HDMI 1-33 GND PRESENCE# SENSE1_RETUR SENSE2_RETUR AGND NC NC NC M3A-H/HDMI ® AAFP PIN 1 PIN 1 MIC2 MICPWR Line out_R NC Line out_L PORT1 L PORT1 R PORT2 R SENSE_SEND PORT1 L... you want to connect an AC`97 front panel audio module to this connector, make sure that the Front Panel Support Type item in the BIOS is for a chassis-mounted front panel audio I /O module cable to a slot opening at the back of the front panel audio I /O ...
... serial port module cable to the connector, then install the module to this connector. Connect one end of the system chassis. ASUS M3A-H/HDMI 1-33 GND PRESENCE# SENSE1_RETUR SENSE2_RETUR AGND NC NC NC M3A-H/HDMI ® AAFP PIN 1 PIN 1 MIC2 MICPWR Line out_R NC Line out_L PORT1 L PORT1 R PORT2 R SENSE_SEND PORT1 L... you want to connect an AC`97 front panel audio module to this connector, make sure that the Front Panel Support Type item in the BIOS is for a chassis-mounted front panel audio I /O module cable to a slot opening at the back of the front panel audio I /O ...

User Manual
Page 47
...Activity LED. PWR Ground Reset Ground IDE_LED PWRSW RESET * Requires an ATX power supply M3A-H/HDMI System panel connector • System power LED This 2-pin connector is in SLEEP or SOFT-OFF mode depending on the BIOS settings. The IDE LED lights up when you to the HDD. • System ...warning speaker This 4-pin connector is read from or written to hear system beeps and warnings. • Power/Soft-off the system power. ASUS M3A-H/HDMI 1-35 Connect the HDD Activity ...
...Activity LED. PWR Ground Reset Ground IDE_LED PWRSW RESET * Requires an ATX power supply M3A-H/HDMI System panel connector • System power LED This 2-pin connector is in SLEEP or SOFT-OFF mode depending on the BIOS settings. The IDE LED lights up when you to the HDD. • System ...warning speaker This 4-pin connector is read from or written to hear system beeps and warnings. • Power/Soft-off the system power. ASUS M3A-H/HDMI 1-35 Connect the HDD Activity ...
User Manual
Page 51
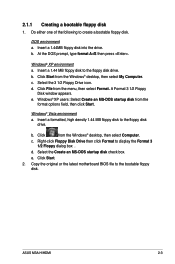
...from the menu, then select Format. Select the 3 1/2 Floppy Drive icon. Windows® Vista environment a. c. e. Copy the original or the latest motherboard BIOS file to the floppy disk drive. c. d. Click File from the Windows® desktop, then select My Computer. Insert a formatted, high density 1.44 MB...drive. Windows® XP users: Select Create an MS-DOS startup disk from the Windows® desktop, then select Computer. ASUS M3A-H/HDMI 2-3 DOS environment a. A Format 3 1/2 Floppy Disk window appears. e. b. 2.1.1 Creating a bootable floppy disk 1. d. b.
...from the menu, then select Format. Select the 3 1/2 Floppy Drive icon. Windows® Vista environment a. c. e. Copy the original or the latest motherboard BIOS file to the floppy disk drive. c. d. Click File from the Windows® desktop, then select My Computer. Insert a formatted, high density 1.44 MB...drive. Windows® XP users: Select Create an MS-DOS startup disk from the Windows® desktop, then select Computer. ASUS M3A-H/HDMI 2-3 DOS environment a. A Format 3 1/2 Floppy Disk window appears. e. b. 2.1.1 Creating a bootable floppy disk 1. d. b.

User Manual
Page 52
.... (1) Insert the floppy disk / USB flash disk that contains the BIOS file to the floppy disk drive or the USB port. ASUSTek EZ Flash 2 BIOS ROM Utility V3.06 FLASH TYPE: SST 25LF080 Current ROM BOARD: M3A-H/HDMI VER: 0109 DATE: 02/14/08 Update ROM BOARD: Unknown VER:... Unknown DATE: Unknown PATH: A:\ A: Note [Enter] Select or Load [Tab] Switch [B] Backup [ESC] Exit [Up/Down/Home/End] Move (2) Enter BIOS setup program. Then press . 4. Visit the ASUS website (www.asus.com) to a floppy ...
.... (1) Insert the floppy disk / USB flash disk that contains the BIOS file to the floppy disk drive or the USB port. ASUSTek EZ Flash 2 BIOS ROM Utility V3.06 FLASH TYPE: SST 25LF080 Current ROM BOARD: M3A-H/HDMI VER: 0109 DATE: 02/14/08 Update ROM BOARD: Unknown VER:... Unknown DATE: Unknown PATH: A:\ A: Note [Enter] Select or Load [Tab] Switch [B] Backup [ESC] Exit [Up/Down/Home/End] Move (2) Enter BIOS setup program. Then press . 4. Visit the ASUS website (www.asus.com) to a floppy ...
User Manual
Page 53
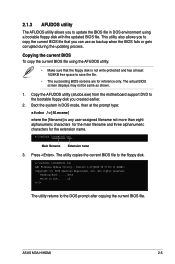
...; Make sure that you can use as shown. 1. A:\>afudos /oOLDBIOS1.rom AMI Firmware Update Utility - done Write to the DOS prompt after copying the current BIOS file. ASUS M3A-H/HDMI 2-5 Copy the AFUDOS utility (afudos.exe) from the motherboard support DVD to the floppy disk. The utility copies the current...
...; Make sure that you can use as shown. 1. A:\>afudos /oOLDBIOS1.rom AMI Firmware Update Utility - done Write to the DOS prompt after copying the current BIOS file. ASUS M3A-H/HDMI 2-5 Copy the AFUDOS utility (afudos.exe) from the motherboard support DVD to the floppy disk. The utility copies the current...

User Manual
Page 54
... prevent system boot failure! 5. Write the BIOS filename on the bootable floppy disk. A:\>afudos /iM3A-H-HDMI.ROM 4. WARNING!! done Advance Check ...... done Advance Check ...... done Please restart your computer A:\> 2-6 Chapter 2: BIOS setup Visit the ASUS website (www.asus.com) and download the latest BIOS file for the motherboard. Version 1.19(ASUS V2.07(03.11.24BB)) Copyright...
... prevent system boot failure! 5. Write the BIOS filename on the bootable floppy disk. A:\>afudos /iM3A-H-HDMI.ROM 4. WARNING!! done Advance Check ...... done Advance Check ...... done Please restart your computer A:\> 2-6 Chapter 2: BIOS setup Visit the ASUS website (www.asus.com) and download the latest BIOS file for the motherboard. Version 1.19(ASUS V2.07(03.11.24BB)) Copyright...

User Manual
Page 55
... DVD that allows you to manage, save, and update the motherboard BIOS in Windows® environment. Click the Utilities tab, then click Install ASUS Update. Quit all Windows® applications before you to your system. ASUS M3A-H/HDMI 2-7 The ASUS Update utility allows you update the BIOS using this utility. The Drivers menu appears. 2. This utility is...
... DVD that allows you to manage, save, and update the motherboard BIOS in Windows® environment. Click the Utilities tab, then click Install ASUS Update. Quit all Windows® applications before you to your system. ASUS M3A-H/HDMI 2-7 The ASUS Update utility allows you update the BIOS using this utility. The Drivers menu appears. 2. This utility is...

User Manual
Page 57
... utility to complete the update process. The ASUS Update main window appears. 2. M3A-H-HDMI.ROM M3A-H-HDMI ASUS M3A-H/HDMI 2-9 Follow the screen instructions to avail all its features. Launch the ASUS Update utility from the Open window, then click Open. 4. Locate the BIOS file from the Windows® desktop by clicking Start > Programs > ASUS > ASUSUpdate > ASUSUpdate. Follow the screen instructions...
... utility to complete the update process. The ASUS Update main window appears. 2. M3A-H-HDMI.ROM M3A-H-HDMI ASUS M3A-H/HDMI 2-9 Follow the screen instructions to avail all its features. Launch the ASUS Update utility from the Open window, then click Open. 4. Locate the BIOS file from the Windows® desktop by clicking Start > Programs > ASUS > ASUSUpdate > ASUSUpdate. Follow the screen instructions...

User Manual
Page 59
Select Screen Select Item +- ASUS M3A-H/HDMI 2-11 Change Option F1 General Help F10 Save and Exit ESC Exit v02.61 (C)Copyright 1985-2008, American Megatrends, Inc. 2.2.1 BIOS menu screen Menu items Menu bar Configuration fields General help Main Advanced Power BIOS SETUP UTILITY Boot Tools Exit System ... reference purposes only, and may not exactly match what you see on your screen. • Visit the ASUS website (www.asus.com) to download the latest BIOS information. 2.2.3 Navigation keys At the bottom right corner of the screen has the following main items: Main ...
Select Screen Select Item +- ASUS M3A-H/HDMI 2-11 Change Option F1 General Help F10 Save and Exit ESC Exit v02.61 (C)Copyright 1985-2008, American Megatrends, Inc. 2.2.1 BIOS menu screen Menu items Menu bar Configuration fields General help Main Advanced Power BIOS SETUP UTILITY Boot Tools Exit System ... reference purposes only, and may not exactly match what you see on your screen. • Visit the ASUS website (www.asus.com) to download the latest BIOS information. 2.2.3 Navigation keys At the bottom right corner of the screen has the following main items: Main ...

User Manual
Page 61
... Power BIOS SETUP UTILITY Boot Tools Exit System Time [17:41:19] System Date [Fri 01/18/2008] Legacy Diskette A [1.44M, 3.5 in .] ASUS M3A-H/HDMI 2-13 Configuration options: [Disabled] [720K , 3.5 in.] [1.44M, 3.5 in .] Primary IDE Master Primary IDE Slave SATA1 SATA2 SATA3 SATA4 SATA5 SATA6 Storage Configuration : [Not Detected] : [Not Detected] : [HDT722516DLA380] : [ASUS CRW-5232A1...
... Power BIOS SETUP UTILITY Boot Tools Exit System Time [17:41:19] System Date [Fri 01/18/2008] Legacy Diskette A [1.44M, 3.5 in .] ASUS M3A-H/HDMI 2-13 Configuration options: [Disabled] [720K , 3.5 in.] [1.44M, 3.5 in .] Primary IDE Master Primary IDE Slave SATA1 SATA2 SATA3 SATA4 SATA5 SATA6 Storage Configuration : [Not Detected] : [Not Detected] : [HDT722516DLA380] : [ASUS CRW-5232A1...
User Manual
Page 63
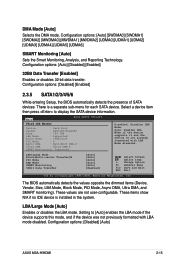
...While entering Setup, the BIOS automatically detects the presence of SATA devices. Change Option F1 General Help F10 Save and Exit ESC Exit v02.61 (C)Copyright 1985-2008, American Megatrends, Inc. Setting to display the SATA device information. Configuration options: [Disabled] [Auto] ASUS M3A-H/HDMI 2-15 There is ...-configurable. Ayto: Enables LBA Mode if the device supports it and the device is not already formatted with LBA mode disabled. The BIOS automatically detects the values opposite the dimmed items (Device, Vendor, Size, LBA Mode, Block Mode, PIO Mode, Async DMA, Ultra...
...While entering Setup, the BIOS automatically detects the presence of SATA devices. Change Option F1 General Help F10 Save and Exit ESC Exit v02.61 (C)Copyright 1985-2008, American Megatrends, Inc. Setting to display the SATA device information. Configuration options: [Disabled] [Auto] ASUS M3A-H/HDMI 2-15 There is ...-configurable. Ayto: Enables LBA Mode if the device supports it and the device is not already formatted with LBA mode disabled. The BIOS automatically detects the values opposite the dimmed items (Device, Vendor, Size, LBA Mode, Block Mode, PIO Mode, Async DMA, Ultra...


