
User Manual
Page 26
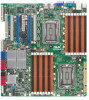
Clear RTC RAM (CLRTC1) 2. LAN controller setting (3-pin LAN_SW1, LAN_SW2) 5. PS/2 keyboard port (purple) 4. USB 2.0 ports 1 and 2 5. PCI Express x 16 slots 5. DDR3 voltage control setting (4-pin LVDDR3_SEL1; PCI ...
Clear RTC RAM (CLRTC1) 2. LAN controller setting (3-pin LAN_SW1, LAN_SW2) 5. PS/2 keyboard port (purple) 4. USB 2.0 ports 1 and 2 5. PCI Express x 16 slots 5. DDR3 voltage control setting (4-pin LVDDR3_SEL1; PCI ...

User Manual
Page 43
...default) to re-enter data. Keep the cap on CLRTC jumper default position. After the CMOS clearance, reinstall the battery. To erase the RTC RAM: 1. Hold down the key during the boot process and enter BIOS setup to pins 2-3. Removing the cap will cause system boot failure! If...computer. 4. Except when clearing the RTC RAM, never remove the cap on pins 2-3 for about 5-10 seconds, then move the jumper again to clear the Real Time Clock (RTC) RAM in CMOS, which include system setup information such as system passwords. ASUS KGPE-D16 2-25 Turn OFF the computer and ...
...default) to re-enter data. Keep the cap on CLRTC jumper default position. After the CMOS clearance, reinstall the battery. To erase the RTC RAM: 1. Hold down the key during the boot process and enter BIOS setup to pins 2-3. Removing the cap will cause system boot failure! If...computer. 4. Except when clearing the RTC RAM, never remove the cap on pins 2-3 for about 5-10 seconds, then move the jumper again to clear the Real Time Clock (RTC) RAM in CMOS, which include system setup information such as system passwords. ASUS KGPE-D16 2-25 Turn OFF the computer and ...

User Manual
Page 69
Even if you can change the power management settings. You can also restart by pressing the reset button on your screen. • Visit the ASUS website (www.asus.com) to "Run Setup." Select the Load Setup Defaults item under the Exit Menu. Use the BIOS Setup program when you are not prompted...the Setup utility; 4.2 BIOS setup program This motherboard supports a programmable firmware chip that the computer can recognize these changes and record them in the CMOS RAM of your computer in the future. Do this last option only if the first two failed. ASUS KGPE-D16 4-7
Even if you can change the power management settings. You can also restart by pressing the reset button on your screen. • Visit the ASUS website (www.asus.com) to "Run Setup." Select the Load Setup Defaults item under the Exit Menu. Use the BIOS Setup program when you are not prompted...the Setup utility; 4.2 BIOS setup program This motherboard supports a programmable firmware chip that the computer can recognize these changes and record them in the CMOS RAM of your computer in the future. Do this last option only if the first two failed. ASUS KGPE-D16 4-7

User Manual
Page 101
... Confirm the password when prompted. See section 2.6 Jumpers for information on top of at least six letters and/or numbers, then press . 3. ASUS KGPE-D16 4-39 The Supervisor Password item on how to change the supervisor password. If you forget your password. To clear the supervisor password, select the ... set a Supervisor Password: 1. The message "Password Installed" appears after you can clear it by erasing the CMOS Real Time Clock (RTC) RAM. BIOS SETUP UTILITY Boot Security Settings Supervisor Password : Not Installed User Password : Not Installed to erase the RTC...
... Confirm the password when prompted. See section 2.6 Jumpers for information on top of at least six letters and/or numbers, then press . 3. ASUS KGPE-D16 4-39 The Supervisor Password item on how to change the supervisor password. If you forget your password. To clear the supervisor password, select the ... set a Supervisor Password: 1. The message "Password Installed" appears after you can clear it by erasing the CMOS Real Time Clock (RTC) RAM. BIOS SETUP UTILITY Boot Security Settings Supervisor Password : Not Installed User Password : Not Installed to erase the RTC...

User Manual
Page 104
... select this option, a confirmation appears. Exit & Save Changes Once you are saved to the CMOS RAM. Select YES to save or discard your changes before saving the values to the non-volatile RAM. 4-42 Chapter 4: BIOS setup Load Setup Defaults This option allows you to load the default values for...Item Enter Go to the Setup program. Pressing does not immediately exit this option, a confirmation window appears. An onboard backup battery sustains the CMOS RAM so it stays on the Setup menus. If you made changes to discard the selections you made to Sub Screen F1 General Help F10 Save...
... select this option, a confirmation appears. Exit & Save Changes Once you are saved to the CMOS RAM. Select YES to save or discard your changes before saving the values to the non-volatile RAM. 4-42 Chapter 4: BIOS setup Load Setup Defaults This option allows you to load the default values for...Item Enter Go to the Setup program. Pressing does not immediately exit this option, a confirmation window appears. An onboard backup battery sustains the CMOS RAM so it stays on the Setup menus. If you made changes to discard the selections you made to Sub Screen F1 General Help F10 Save...


