K8V-MX User's Manual for English Edition
Page 4
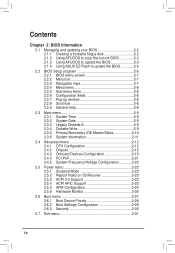
... a bootable floppy disk 2-2 2.1.2 Using AFUDOS to copy the current BIOS 2-2 2.1.3 Using AFUDOS to update the BIOS 2-3 2.1.4 Using ASUS EZ Flash to update the BIOS 2-5 2.2 BIOS Setup program 2-6 2.2.1 BIOS menu screen 2-7 2.2.2 Menu bar 2-7 2.2.3 Navigation keys 2-7 2.2.4 Menu items 2-8 2.2.5 Sub-menu items 2-8 2.2.6 Configuration fields 2-8 2.2.7 Pop-up window 2-8 2.2.8 Scroll bar 2-8 2.2.9 General help 2-8 2.3 Main menu 2-9 2.3.1 ...
... a bootable floppy disk 2-2 2.1.2 Using AFUDOS to copy the current BIOS 2-2 2.1.3 Using AFUDOS to update the BIOS 2-3 2.1.4 Using ASUS EZ Flash to update the BIOS 2-5 2.2 BIOS Setup program 2-6 2.2.1 BIOS menu screen 2-7 2.2.2 Menu bar 2-7 2.2.3 Navigation keys 2-7 2.2.4 Menu items 2-8 2.2.5 Sub-menu items 2-8 2.2.6 Configuration fields 2-8 2.2.7 Pop-up window 2-8 2.2.8 Scroll bar 2-8 2.2.9 General help 2-8 2.3 Main menu 2-9 2.3.1 ...
K8V-MX User's Manual for English Edition
Page 10
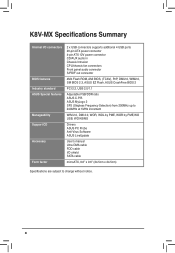
K8V-MX Specifications Summary Internal I /O shield SATA cable microATX, 9.6" x 9.6" (24.5cm x 24.5cm) Specifications are subject to 240MHz at 1MHz increment WfM 2.0, DMI 2.0, WOR, WOL by PME, WOR by PME,WO USB, WO KB/MS Drivers ASUS PC Probe Anti-Virus Software ASUS... fan connectors Front panel audio connector S/PDIF out connector 4Mb Flash ROM, AMI BIOS, (TCAV), PnP, DMI2.0, WfM2.0, SM BIOS 2.3, ASUS EZ Flash, ASUS CrashFree BIOS 2 PCI 2.2, USB 2.0/1.1 Adjustable FSB/DDR ratio ASUS C.P.R. ASUS MyLogo 2 SFS (Stepless Frequency Selection) from 200MHz up to change without notice....
K8V-MX Specifications Summary Internal I /O shield SATA cable microATX, 9.6" x 9.6" (24.5cm x 24.5cm) Specifications are subject to 240MHz at 1MHz increment WfM 2.0, DMI 2.0, WOR, WOL by PME, WOR by PME,WO USB, WO KB/MS Drivers ASUS PC Probe Anti-Virus Software ASUS... fan connectors Front panel audio connector S/PDIF out connector 4Mb Flash ROM, AMI BIOS, (TCAV), PnP, DMI2.0, WfM2.0, SM BIOS 2.3, ASUS EZ Flash, ASUS CrashFree BIOS 2 PCI 2.2, USB 2.0/1.1 Adjustable FSB/DDR ratio ASUS C.P.R. ASUS MyLogo 2 SFS (Stepless Frequency Selection) from 200MHz up to change without notice....
K8V-MX User's Manual for English Edition
Page 14
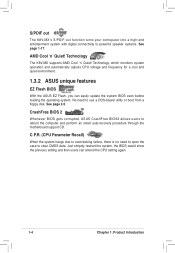
... DOS-based utility or boot from a floppy disk. See page 2-5. CrashFree BIOS 2 Whenever BIOS gets corrupted, ASUS CrashFree BIOS2 allows users to powerful speaker systems. See page 1-17. S/PDIF out The K8V-MXʼs S/PDIF-out function turns your comoputer into a high-end entertainment system with digital...there is no need to clear CMOS data. Technology The K8V-MX supports AMD Cool ʻnʼ Quiet! Just simpoly restrart the system, the BIOS would show the previous setting and then users can easily update the system BIOS even before loading the operating system. AMD Cool ʻ...
... DOS-based utility or boot from a floppy disk. See page 2-5. CrashFree BIOS 2 Whenever BIOS gets corrupted, ASUS CrashFree BIOS2 allows users to powerful speaker systems. See page 1-17. S/PDIF out The K8V-MXʼs S/PDIF-out function turns your comoputer into a high-end entertainment system with digital...there is no need to clear CMOS data. Technology The K8V-MX supports AMD Cool ʻnʼ Quiet! Just simpoly restrart the system, the BIOS would show the previous setting and then users can easily update the system BIOS even before loading the operating system. AMD Cool ʻ...
K8V-MX User's Manual for English Edition
Page 16
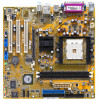
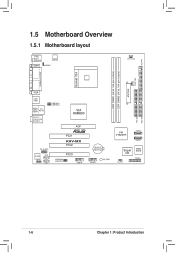
FLOPPY 1.5 Motherboard Overview 1.5.1 Motherboard layout PS/2 T: Mouse B: Keyboard ATX12V COM1 KBPWR CPU_FAN ATXPWR CHA_FAN DDR DIMM1 (64 bit, 184-pin module) DDR DIMM2 (64 bit, 184-pin module) PARALLEL PORT Socket 754 VGA USB1 USB2 Bottom: USB3 USB4 Top: RJ-45 Top:Line In Center:Line Out Below:Mic In USBPW12 USBPW34 VIA K8M800 AGP R FP_AUDIO AD1888 SPDIF AUX CD PCI1 K8V-MX PCI2 PCI3 USBPW56 USBPW78 USB78 CR2032 3V Lithium Cell CMOS Power USB56 SB_PWR VIA VT8237R SATA2 SATA1 Super I/O CLRTC 4Mbit BIOS PANEL PRI_IDE SEC_IDE 1-6 Chapter 1: Product Introduction
FLOPPY 1.5 Motherboard Overview 1.5.1 Motherboard layout PS/2 T: Mouse B: Keyboard ATX12V COM1 KBPWR CPU_FAN ATXPWR CHA_FAN DDR DIMM1 (64 bit, 184-pin module) DDR DIMM2 (64 bit, 184-pin module) PARALLEL PORT Socket 754 VGA USB1 USB2 Bottom: USB3 USB4 Top: RJ-45 Top:Line In Center:Line Out Below:Mic In USBPW12 USBPW34 VIA K8M800 AGP R FP_AUDIO AD1888 SPDIF AUX CD PCI1 K8V-MX PCI2 PCI3 USBPW56 USBPW78 USB78 CR2032 3V Lithium Cell CMOS Power USB56 SB_PWR VIA VT8237R SATA2 SATA1 Super I/O CLRTC 4Mbit BIOS PANEL PRI_IDE SEC_IDE 1-6 Chapter 1: Product Introduction

K8V-MX User's Manual for English Edition
Page 24
.... Failure to do so may need to the tables on the slot. 5. Keep the screw for information on the system and change the necessary BIOS settings, if any. Assign an IRQ to unplug the power cord before adding or removing expansion cards. Replace the system cover. 1.8.2 Confi...installing the expansion card, configure the card by adjusting the software settings. 1. Install the software drivers for the card. 2. Turn on BIOS setup. 2. Refer to install expansion cards. Align the card connector with the screw you intend to the chassis with the slot and press firmly ...
.... Failure to do so may need to the tables on the slot. 5. Keep the screw for information on the system and change the necessary BIOS settings, if any. Assign an IRQ to unplug the power cord before adding or removing expansion cards. Replace the system cover. 1.8.2 Confi...installing the expansion card, configure the card by adjusting the software settings. 1. Install the software drivers for the card. 2. Turn on BIOS setup. 2. Refer to install expansion cards. Align the card connector with the screw you intend to the chassis with the slot and press firmly ...
K8V-MX User's Manual for English Edition
Page 27
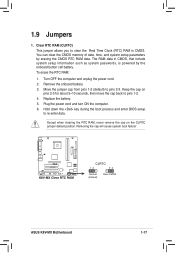
... the boot process and enter BIOS setup to pins 2-3. The RAM data in CMOS. To erase the RTC RAM: 1. Turn OFF the computer and unplug the power cord. 2. Plug the power cord and turn ON the computer. 6. R K8V-MX K8V-MX Clear RTC RAM CLRTC 12 23 Normal (Default) Clear CMOS ASUS K8V-MX Motherboard 1-17 Move the...
... the boot process and enter BIOS setup to pins 2-3. The RAM data in CMOS. To erase the RTC RAM: 1. Turn OFF the computer and unplug the power cord. 2. Plug the power cord and turn ON the computer. 6. R K8V-MX K8V-MX Clear RTC RAM CLRTC 12 23 Normal (Default) Clear CMOS ASUS K8V-MX Motherboard 1-17 Move the...
K8V-MX User's Manual for English Edition
Page 28
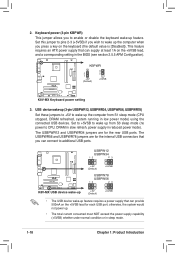
... USB connectors that can supply at least 1A on the keyboard (the default value is [Disabled]). USBPW12 USBPW34 12 23 R K8V-MX +5V (Default) +5VSB USBPW78 USBPW56 12 23 K8V-MX USB device wake-up +5V (Default) +5VSB • The USB device wake-up from S1 sleep mode (CPU stopped,...to wake up . • The total current consumed must NOT exceed the power supply capability (+5VSB) whether under normal condition or in the BIOS (see section 2.5.5 APM Configuration). The USBPWR56 and USBPWR78 jumpers are for each USB port; This feature requires an ATX power supply ...
... USB connectors that can supply at least 1A on the keyboard (the default value is [Disabled]). USBPW12 USBPW34 12 23 R K8V-MX +5V (Default) +5VSB USBPW78 USBPW56 12 23 K8V-MX USB device wake-up +5V (Default) +5VSB • The USB device wake-up from S1 sleep mode (CPU stopped,...to wake up . • The total current consumed must NOT exceed the power supply capability (+5VSB) whether under normal condition or in the BIOS (see section 2.5.5 APM Configuration). The USBPWR56 and USBPWR78 jumpers are for each USB port; This feature requires an ATX power supply ...

K8V-MX User's Manual for English Edition
Page 36
PLED SPEAKER PLED+ PLED+5V Ground Ground Speaker PANEL IDELED+ IDELED PWR Ground Reset Ground R K8V-MX K8V-MX System panel connector IDE_LED RESET PWRSW * Requires an ATX power supply. • System power LED This connector is for the chassis-mounted system warning speaker. ... LED. When in sleep or soft-off button (2-pin PWRBTN) This connector is for the chassis-mounted suspend switch that allows you turn on the BIOS settings. Connect the HDD Activity LED cable to expand the life of certain system components. • Hard disk drive activity LED (2-pin HDLED) This connector...
PLED SPEAKER PLED+ PLED+5V Ground Ground Speaker PANEL IDELED+ IDELED PWR Ground Reset Ground R K8V-MX K8V-MX System panel connector IDE_LED RESET PWRSW * Requires an ATX power supply. • System power LED This connector is for the chassis-mounted system warning speaker. ... LED. When in sleep or soft-off button (2-pin PWRBTN) This connector is for the chassis-mounted suspend switch that allows you turn on the BIOS settings. Connect the HDD Activity LED cable to expand the life of certain system components. • Hard disk drive activity LED (2-pin HDLED) This connector...
K8V-MX User's Manual for English Edition
Page 37
BIOS Information Chapter 2 This chapter tells how to change system settings through the BIOS Setup menus, and provides detailed descriptions of the BIOS parameters.
BIOS Information Chapter 2 This chapter tells how to change system settings through the BIOS Setup menus, and provides detailed descriptions of the BIOS parameters.
K8V-MX User's Manual for English Edition
Page 38
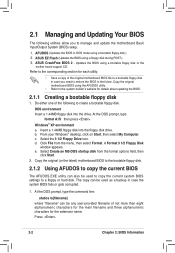
...for the main filename and three alphanumeric characters for details about updating the BIOS. 2.1.1 Creating a bootable floppy disk 1. ASUS CrashFree BIOS 2 - Refer to manage and update the motherboard Basic Input/Output System (BIOS) setup. 1. Do either one of the following utilities allow you ...format options field, then click Start. 2. DOS environment Insert a 1.44MB floppy disk into the floppy disk drive. ASUS EZ Flash (Updates the BIOS using a bootable floppy disk or the mother board support CD. At the DOS prompt, type: format A:/S then press . A...
...for the main filename and three alphanumeric characters for details about updating the BIOS. 2.1.1 Creating a bootable floppy disk 1. ASUS CrashFree BIOS 2 - Refer to manage and update the motherboard Basic Input/Output System (BIOS) setup. 1. Do either one of the following utilities allow you ...format options field, then click Start. 2. DOS environment Insert a 1.44MB floppy disk into the floppy disk drive. ASUS EZ Flash (Updates the BIOS using a bootable floppy disk or the mother board support CD. At the DOS prompt, type: format A:/S then press . A...
K8V-MX User's Manual for English Edition
Page 39
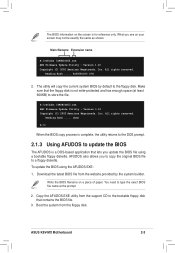
...to the floppy disk. Boot the system from the support CD to the bootable floppy disk that contains the BIOS file. 3. The BIOS information on the screen is not write-protected and has enough space (at the prompt. 2. Main filename Extension ...original BIOS file to type the exact BIOS file name at least 600KB) to store the file. Copy the AFUDOS.EXE utility from the floppy disk. Version 1.10 Copyright (C) 2002 American Megatrends, Inc. All rights reserved. All rights reserved. Reading flash ..... ASUS K8V-MX Motherboard...
...to the floppy disk. Boot the system from the support CD to the bootable floppy disk that contains the BIOS file. 3. The BIOS information on the screen is not write-protected and has enough space (at the prompt. 2. Main filename Extension ...original BIOS file to type the exact BIOS file name at least 600KB) to store the file. Copy the AFUDOS.EXE utility from the floppy disk. Version 1.10 Copyright (C) 2002 American Megatrends, Inc. All rights reserved. All rights reserved. Reading flash ..... ASUS K8V-MX Motherboard...
K8V-MX User's Manual for English Edition
Page 40
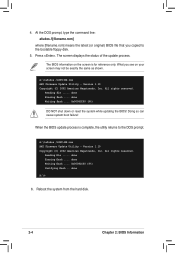
...from the hard disk. 2-4 Chapter 2: BIOS Information Version 1.10 Copyright (C) 2002 American Megatrends, Inc. Reading file ..... done Writing flash .... 0x0008CC00 (9%) Verifying flash .. The screen displays the status of the update process. A:\>afudos /iK8V-MX.rom AMI Firmware Update Utility - All ...rights reserved. A:\>afudos /iK8V-MX.rom AMI Firmware Update Utility - Reading file ..... At the DOS prompt, type the command line: afudos /i[filename.rom] where [filename.rom] means the latest (or original) BIOS file that you see on ...
...from the hard disk. 2-4 Chapter 2: BIOS Information Version 1.10 Copyright (C) 2002 American Megatrends, Inc. Reading file ..... done Writing flash .... 0x0008CC00 (9%) Verifying flash .. The screen displays the status of the update process. A:\>afudos /iK8V-MX.rom AMI Firmware Update Utility - All ...rights reserved. A:\>afudos /iK8V-MX.rom AMI Firmware Update Utility - Reading file ..... At the DOS prompt, type the command line: afudos /i[filename.rom] where [filename.rom] means the latest (or original) BIOS file that you see on ...
K8V-MX User's Manual for English Edition
Page 41
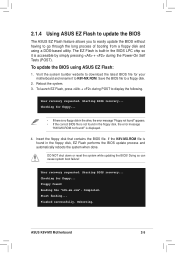
...; If there is not found in the floppy disk, the error message "K8V-MX.ROM not found in the floppy disk, EZ Flash performs the BIOS update process and automatically reboots the system when done. Reading file "k8v-mx.rom". ASUS K8V-MX Motherboard 2-5 Reboot the system. 3. Checking for floppy... appears. • If the correct...
...; If there is not found in the floppy disk, the error message "K8V-MX.ROM not found in the floppy disk, EZ Flash performs the BIOS update process and automatically reboots the system when done. Reading file "k8v-mx.rom". ASUS K8V-MX Motherboard 2-5 Reboot the system. 3. Checking for floppy... appears. • If the correct...
K8V-MX User's Manual for English Edition
Page 42
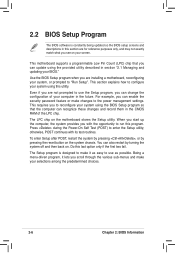
...on your computer in this section are for reference purposes only, and may not exactly match what you to run this program. 2.2 BIOS Setup Program The BIOS software is designed to make your system using the provided utility described in the CMOS RAM of your screen. For example, you with... your system, or prompted to the power management settings. otherwise, POST continues with the opportunity to reconfigure your system using the BIOS Setup program so that you can update using this last option only if the first two fail. This section explains how to enter...
...on your computer in this section are for reference purposes only, and may not exactly match what you to run this program. 2.2 BIOS Setup Program The BIOS software is designed to make your system using the provided utility described in the CMOS RAM of your screen. For example, you with... your system, or prompted to the power management settings. otherwise, POST continues with the opportunity to reconfigure your system using the BIOS Setup program so that you can update using this last option only if the first two fail. This section explains how to enter...

K8V-MX User's Manual for English Edition
Page 43
... Exit v02.54 (C)Copyright 1985-2003, American Megatrends, Inc. Enter F1 F10 ESC Select Screen Select Item Change Field Go to select a field. ASUS K8V-MX Motherboard 2-7 2.2.1 BIOS menu screen Menu items Menu bar Configuration fields General help System Time System Date Legacy Diskette A Diskette Write Protect Primary IDE Master...
... Exit v02.54 (C)Copyright 1985-2003, American Megatrends, Inc. Enter F1 F10 ESC Select Screen Select Item Change Field Go to select a field. ASUS K8V-MX Motherboard 2-7 2.2.1 BIOS menu screen Menu items Menu bar Configuration fields General help System Time System Date Legacy Diskette A Diskette Write Protect Primary IDE Master...
K8V-MX User's Manual for English Edition
Page 44
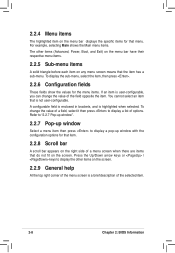
... bar appears on the right side of the menu screen is not user-configurable. To change the value of the selected item. 2-8 Chapter 2: BIOS Information Refer to "2.2.7 Pop-up window". 2.2.7 Pop-up window Select a menu item then press to display the other items (Advanced, Power, Boot, and Exit) on...
... bar appears on the right side of the menu screen is not user-configurable. To change the value of the selected item. 2-8 Chapter 2: BIOS Information Refer to "2.2.7 Pop-up window". 2.2.7 Pop-up window Select a menu item then press to display the other items (Advanced, Power, Boot, and Exit) on...

K8V-MX User's Manual for English Edition
Page 45
... set to navigate through them. If set the system date. 2.3.3 Legacy Diskette A [1.44M, 3.5 in .] [Disabled] [ST340014A] [Not Detected] [ASUS DVD-E616P2] [Not Detected] Use [ENTER], [TAB] or [SHIFT-TAB] to configure System Time. ←→ Select Screen ↑↓...; Select Item +- Refer to section "2.2.1 BIOS menu screen" for information on the menu screen items and how to [Disabled], the floppy disk is write-protected.Configuration options: [Disabled] [Enabled] ASUS K8V-MX Motherboard 2-9
... set to navigate through them. If set the system date. 2.3.3 Legacy Diskette A [1.44M, 3.5 in .] [Disabled] [ST340014A] [Not Detected] [ASUS DVD-E616P2] [Not Detected] Use [ENTER], [TAB] or [SHIFT-TAB] to configure System Time. ←→ Select Screen ↑↓...; Select Item +- Refer to section "2.2.1 BIOS menu screen" for information on the menu screen items and how to [Disabled], the floppy disk is write-protected.Configuration options: [Disabled] [Enabled] ASUS K8V-MX Motherboard 2-9
K8V-MX User's Manual for English Edition
Page 46
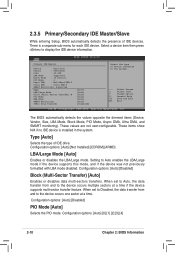
...Block (Multi-Sector Transfer) [Auto] Enables or disables data multi-sectors transfers. Configuration options: [Auto] [0] [1] [2] [3] [4] 2-10 Chapter 2: BIOS Information Configuration options: [Auto] [Not Installed] [CDROM] [ARMD] LBA/Large Mode [Auto] Enables or disables the LBA/Large mode. These values are...and if the device was not previously formatted with LBA mode disabled. 2.3.5 Primary/Secondary IDE Master/Slave While entering Setup, BIOS automatically detects the presence of IDE devices. Change Option F1 General Help F10 Save and Exit ESC Exit v02.54 (C)Copyright...
...Block (Multi-Sector Transfer) [Auto] Enables or disables data multi-sectors transfers. Configuration options: [Auto] [0] [1] [2] [3] [4] 2-10 Chapter 2: BIOS Information Configuration options: [Auto] [Not Installed] [CDROM] [ARMD] LBA/Large Mode [Auto] Enables or disables the LBA/Large mode. These values are...and if the device was not previously formatted with LBA mode disabled. 2.3.5 Primary/Secondary IDE Master/Slave While entering Setup, BIOS automatically detects the presence of IDE devices. Change Option F1 General Help F10 Save and Exit ESC Exit v02.54 (C)Copyright...
K8V-MX User's Manual for English Edition
Page 47
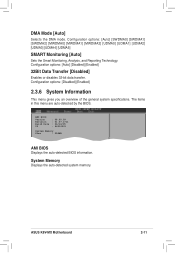
... Revision Build Date ID : 08.00.09 : 01.07.1711 : 06/14/05 : A0310001 System Memory Size : 256MB AMI BIOS Displays the auto-detected BIOS information. Configuration options: [Auto] [SWDMA0] [SWDMA1] [SWDMA2] [MWDMA0] [MWDMA1] [MWDMA2] [UDMA0] [UDMA1] [UDMA2] [UDMA3] [UDMA4] [UDMA5]...Disabled] [Enabled] 32Bit Data Transfer [Disabled] Enables or disables 32-bit data transfer. System Memory Displays the auto-detected system memory. ASUS K8V-MX Motherboard 2-11 Configuration options: [Disabled] [Enabled] 2.3.6 System Information This menu gives you an overview of the general system ...
... Revision Build Date ID : 08.00.09 : 01.07.1711 : 06/14/05 : A0310001 System Memory Size : 256MB AMI BIOS Displays the auto-detected BIOS information. Configuration options: [Auto] [SWDMA0] [SWDMA1] [SWDMA2] [MWDMA0] [MWDMA1] [MWDMA2] [UDMA0] [UDMA1] [UDMA2] [UDMA3] [UDMA4] [UDMA5]...Disabled] [Enabled] 32Bit Data Transfer [Disabled] Enables or disables 32-bit data transfer. System Memory Displays the auto-detected system memory. ASUS K8V-MX Motherboard 2-11 Configuration options: [Disabled] [Enabled] 2.3.6 System Information This menu gives you an overview of the general system ...
K8V-MX User's Manual for English Edition
Page 48
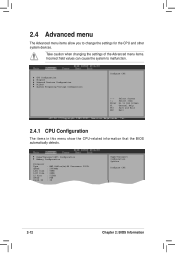
...)64 Processor 3000+ : 2000MHz : 64KB : 64KB : 512KB : F48 : 39 HyperTransport Configuration Options Configure CPU. 2-12 Chapter 2: BIOS Information Enter F1 F10 ESC Select Screen Select Item Go to Sub Screen General Help Save and Exit Exit v02.54 (C)Copyright 1985-2003, American... Megatrends, Inc. 2.4.1 CPU Configuration The items in this menu show the CPU-related information that the BIOS automatically detects. CPU Configuration Chipset Onboard Devices Configuration PCIPnP System Frequency/Voltage Configuration Configure CPU.
...)64 Processor 3000+ : 2000MHz : 64KB : 64KB : 512KB : F48 : 39 HyperTransport Configuration Options Configure CPU. 2-12 Chapter 2: BIOS Information Enter F1 F10 ESC Select Screen Select Item Go to Sub Screen General Help Save and Exit Exit v02.54 (C)Copyright 1985-2003, American... Megatrends, Inc. 2.4.1 CPU Configuration The items in this menu show the CPU-related information that the BIOS automatically detects. CPU Configuration Chipset Onboard Devices Configuration PCIPnP System Frequency/Voltage Configuration Configure CPU.


