Motherboard DIY Troubleshooting Guide
Page 12
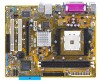
... motherboards! This processor is damaged or missing, contact your motherboard package for buying an ASUS® K8N-VM motherboard! The AMD Sempron™ is based on it another standout in compatibility, performance, investment protection, and reduced total ... Latest processor technology The motherboard supports AMD Athlon™ 64 and AMD Sempron™ desktop processors. Before you for the following items. Motherboard ASUS K8N-VM motherboard Cables 1 x Serial ATA cable 1 x Serial ATA power cable 1 x Ultra DMA 133/100/66 cable 1 x Floppy disk drive cable Accessories I/O...
... motherboards! This processor is damaged or missing, contact your motherboard package for buying an ASUS® K8N-VM motherboard! The AMD Sempron™ is based on it another standout in compatibility, performance, investment protection, and reduced total ... Latest processor technology The motherboard supports AMD Athlon™ 64 and AMD Sempron™ desktop processors. Before you for the following items. Motherboard ASUS K8N-VM motherboard Cables 1 x Serial ATA cable 1 x Serial ATA power cable 1 x Ultra DMA 133/100/66 cable 1 x Floppy disk drive cable Accessories I/O...
Motherboard DIY Troubleshooting Guide
Page 13
... features, including Native Command Queueing (NCQ), and Power Management (PM) Implementation Algorithm. The S/PDIF technology turns your computer into a high-end entertainment system with USB 1.1. ASUS K8N-VM 1-3 USB 2.0 technology The motherboard implements the Universal Serial Bus (USB) 2.0 specification, dramatically increasing the connection speed from the 12 Mbps bandwidth on USB...
... features, including Native Command Queueing (NCQ), and Power Management (PM) Implementation Algorithm. The S/PDIF technology turns your computer into a high-end entertainment system with USB 1.1. ASUS K8N-VM 1-3 USB 2.0 technology The motherboard implements the Universal Serial Bus (USB) 2.0 specification, dramatically increasing the connection speed from the 12 Mbps bandwidth on USB...
Motherboard DIY Troubleshooting Guide
Page 15
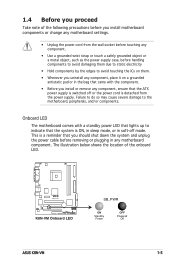
... case, before handling components to avoid damaging them due to static electricity • Hold components by the edges to the motherboard, peripherals, and/or components. R K8N-VM K8N-VM Onboard LED SB_PWR ON Standby Power OFF Powered Off ASUS K8N-VM 1-5 1.4 Before you proceed Take note of the onboard LED.
... case, before handling components to avoid damaging them due to static electricity • Hold components by the edges to the motherboard, peripherals, and/or components. R K8N-VM K8N-VM Onboard LED SB_PWR ON Standby Power OFF Powered Off ASUS K8N-VM 1-5 1.4 Before you proceed Take note of the onboard LED.

Motherboard DIY Troubleshooting Guide
Page 17
The edge with external ports goes to the chassis. Place this side towards the rear of the chassis as indicated in the correct orientation. Doing so can damage the motherboard. Do not overtighten the screws! 1.5.2 Placement direction When installing the motherboard, make sure that you place it into the chassis in the image below. 1.5.3 Screw holes Place six (6) screws into the holes indicated by circles to secure the motherboard to the rear part of the chassis R K8N-VM ASUS K8N-VM 1-7
The edge with external ports goes to the chassis. Place this side towards the rear of the chassis as indicated in the correct orientation. Doing so can damage the motherboard. Do not overtighten the screws! 1.5.2 Placement direction When installing the motherboard, make sure that you place it into the chassis in the image below. 1.5.3 Screw holes Place six (6) screws into the holes indicated by circles to secure the motherboard to the rear part of the chassis R K8N-VM ASUS K8N-VM 1-7
Motherboard DIY Troubleshooting Guide
Page 19
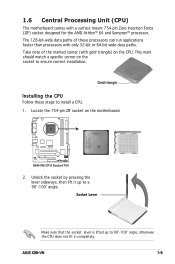
.... 1. Socket Lever Make sure that the socket lever is lifted up to 90°-100° angle, otherwise the CPU does not fit in completely. ASUS K8N-VM 1-9 R K8N-VM K8N-VM CPU Socket 754 2. Locate the 754-pin ZIF socket on the CPU. 1.6 Central Processing Unit (CPU) The motherboard comes with only 32-bit or 64...
.... 1. Socket Lever Make sure that the socket lever is lifted up to 90°-100° angle, otherwise the CPU does not fit in completely. ASUS K8N-VM 1-9 R K8N-VM K8N-VM CPU Socket 754 2. Locate the 754-pin ZIF socket on the CPU. 1.6 Central Processing Unit (CPU) The motherboard comes with only 32-bit or 64...
Motherboard DIY Troubleshooting Guide
Page 21
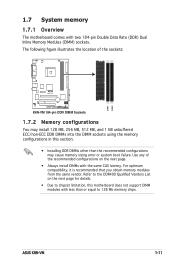
...; Installing DDR DIMMs other than or equal to 128 Mb memory chips. DIMM1 DIMM2 ASUS K8N-VM 1-11 For optimum compatibility, it is recommended that you obtain memory modules from the same vendor. Use any of the sockets: R K8N-VM K8N-VM 184-pin DDR DIMM Sockets 1.7.2 Memory configurations You may cause memory sizing error or system...
...; Installing DDR DIMMs other than or equal to 128 Mb memory chips. DIMM1 DIMM2 ASUS K8N-VM 1-11 For optimum compatibility, it is recommended that you obtain memory modules from the same vendor. Use any of the sockets: R K8N-VM K8N-VM 184-pin DDR DIMM Sockets 1.7.2 Memory configurations You may cause memory sizing error or system...

Motherboard DIY Troubleshooting Guide
Page 25
... the expansion card, configure it and make the necessary hardware settings for later use . Refer to use . 4. Keep the screw for the card. 2. ASUS K8N-VM 1-15 The following sub-sections describe the slots and the expansion cards that you intend to the tables on the system and change the necessary...
... the expansion card, configure it and make the necessary hardware settings for later use . Refer to use . 4. Keep the screw for the card. 2. ASUS K8N-VM 1-15 The following sub-sections describe the slots and the expansion cards that you intend to the tables on the system and change the necessary...
Motherboard DIY Troubleshooting Guide
Page 27
ASUS K8N-VM 1-17 The figure shows a graphics card installed on the PCI Express x1 slot. 1.8.5 PCI Express x16 slot This motherboard has supports PCI Express x16 ...
ASUS K8N-VM 1-17 The figure shows a graphics card installed on the PCI Express x1 slot. 1.8.5 PCI Express x16 slot This motherboard has supports PCI Express x16 ...
Motherboard DIY Troubleshooting Guide
Page 29
...otherwise, the system will not power up the computer from S3 and S4 sleep modes. USBPW1234 3 2 2 1 +5V (Default) +5VSB R K8N-VM USBPW5678 123 123 K8N-VM USB Device Wake-Up +5V (Default) +5VSB • The USB device wake-up from S1 sleep mode (CPU stopped, DRAM refreshed, system running...mode. Set to +5VSB to wake up feature requires a power supply that you can provide 500mA on the +5VSB lead for each USB port; ASUS K8N-VM 1-19 The USBPW5678 jumper is for the internal USB connectors that can connect to wake up . • The total current consumed must NOT exceed...
...otherwise, the system will not power up the computer from S3 and S4 sleep modes. USBPW1234 3 2 2 1 +5V (Default) +5VSB R K8N-VM USBPW5678 123 123 K8N-VM USB Device Wake-Up +5V (Default) +5VSB • The USB device wake-up from S1 sleep mode (CPU stopped, DRAM refreshed, system running...mode. Set to +5VSB to wake up feature requires a power supply that you can provide 500mA on the +5VSB lead for each USB port; ASUS K8N-VM 1-19 The USBPW5678 jumper is for the internal USB connectors that can connect to wake up . • The total current consumed must NOT exceed...

Motherboard DIY Troubleshooting Guide
Page 31
... Lime Pink Headset 2-speaker Line In Line Out Mic In 4-speaker Surround Out Front Speaker Out Mic 6-speaker Surround Out Front Speaker Out Center/Bass ASUS K8N-VM 1-21 LAN (RJ-45) port. Microphone port (pink). This 25-pin port connects a parallel printer, a scanner, or other audio sources. Line In port (light blue...
... Lime Pink Headset 2-speaker Line In Line Out Mic In 4-speaker Surround Out Front Speaker Out Mic 6-speaker Surround Out Front Speaker Out Center/Bass ASUS K8N-VM 1-21 LAN (RJ-45) port. Microphone port (pink). This 25-pin port connects a parallel printer, a scanner, or other audio sources. Line In port (light blue...
Motherboard DIY Troubleshooting Guide
Page 33
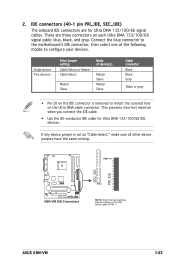
... jumpers have the same setting. There are for Ultra DMA 133/100/66 IDE devices. If any device jumper is removed to PIN 1. ASUS K8N-VM 1-23 2. PIN1 SEC_IDE PRI_IDE R K8N-VM K8N-VM IDE Connectors PIN 1 NOTE: Orient the red markings (usually zigzag) on the IDE ribbon cable to match the covered hole on the Ultra...
... jumpers have the same setting. There are for Ultra DMA 133/100/66 IDE devices. If any device jumper is removed to PIN 1. ASUS K8N-VM 1-23 2. PIN1 SEC_IDE PRI_IDE R K8N-VM K8N-VM IDE Connectors PIN 1 NOTE: Orient the red markings (usually zigzag) on the IDE ribbon cable to match the covered hole on the Ultra...
Motherboard DIY Troubleshooting Guide
Page 35
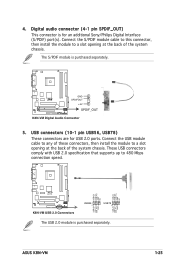
... then install the module to a slot opening at the back of the system chassis. ASUS K8N-VM USB+5V USB_P7USB_P7+ GND USB+5V USB_P8USB_P8+ GND NC 1-25 USB+5V USB_P6USB_P6+ GND NC R K8N-VM K8N-VM USB 2.0 Connectors USB56 1 USB+5V USB_P5USB_P5+ GND USB78 1 The USB 2.0 module is...the back of the system chassis. Digital audio connector (4-1 pin SPDIF_OUT) This connector is for USB 2.0 ports. R K8N-VM GND SPDIFOUT +5V SPDIF_OUT K8N-VM Digital Audio Connector 5. These USB connectors comply with USB 2.0 specification that supports up to 480 Mbps connection speed. ...
... then install the module to a slot opening at the back of the system chassis. ASUS K8N-VM USB+5V USB_P7USB_P7+ GND USB+5V USB_P8USB_P8+ GND NC 1-25 USB+5V USB_P6USB_P6+ GND NC R K8N-VM K8N-VM USB 2.0 Connectors USB56 1 USB+5V USB_P5USB_P5+ GND USB78 1 The USB 2.0 module is...the back of the system chassis. Digital audio connector (4-1 pin SPDIF_OUT) This connector is for USB 2.0 ports. R K8N-VM GND SPDIFOUT +5V SPDIF_OUT K8N-VM Digital Audio Connector 5. These USB connectors comply with USB 2.0 specification that supports up to 480 Mbps connection speed. ...

Motherboard DIY Troubleshooting Guide
Page 37
... Volts +5V Standby Power OK Ground +5 Volts Ground +5 Volts Ground +3 Volts +3 Volts Ground +5 Volts +5 Volts +5 Volts -5 Volts Ground Ground Ground PSON# Ground -12 Volts +3 Volts ASUS K8N-VM 1-27 otherwise, the system will not boot up if the power is inadequate. • You must install a PSU with a higher power rating if you use...
... Volts +5V Standby Power OK Ground +5 Volts Ground +5 Volts Ground +3 Volts +3 Volts Ground +5 Volts +5 Volts +5 Volts -5 Volts Ground Ground Ground PSON# Ground -12 Volts +3 Volts ASUS K8N-VM 1-27 otherwise, the system will not boot up if the power is inadequate. • You must install a PSU with a higher power rating if you use...
Motherboard DIY Troubleshooting Guide
Page 41
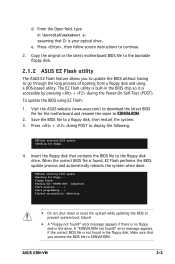
...found , EZ Flash performs the BIOS update process and automatically reboots the system when done. Floppy found !" Start erasing.......| Start programming...| Flashed successfully. ASUS K8N-VM 2-3 Press + during the Power-On Self-Test (POST). Reading file "K8NVM.ROM". To update the BIOS using a DOS-based utility....the BIOS to go through the long process of booting from a floppy disk and using EZ Flash: 1. d. Visit the ASUS website (www.asus.com) to download the latest BIOS file for floppy... error message appears if the correct BIOS file is...
...found , EZ Flash performs the BIOS update process and automatically reboots the system when done. Floppy found !" Start erasing.......| Start programming...| Flashed successfully. ASUS K8N-VM 2-3 Press + during the Power-On Self-Test (POST). Reading file "K8NVM.ROM". To update the BIOS using a DOS-based utility....the BIOS to go through the long process of booting from a floppy disk and using EZ Flash: 1. d. Visit the ASUS website (www.asus.com) to download the latest BIOS file for floppy... error message appears if the correct BIOS file is...
Motherboard DIY Troubleshooting Guide
Page 43
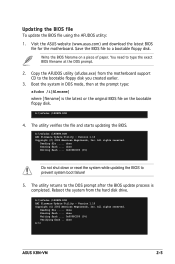
... support CD to type the exact BIOS filename at the prompt type: afudos /i[filename] where [filename] is completed. done A:\> ASUS K8N-VM 2-5 A:\>afudos /iK8NVM.ROM AMI Firmware Update Utility - All rights reserved. Boot the system in DOS mode, then at the DOS prompt. 2. ...Megatrends, Inc. Reading file ..... Updating the BIOS file To update the BIOS file using the AFUDOS utility: 1. Visit the ASUS website (www.asus.com) and download the latest BIOS file for the motherboard. Save the BIOS file to prevent system boot failure! 5. ...
... support CD to type the exact BIOS filename at the prompt type: afudos /i[filename] where [filename] is completed. done A:\> ASUS K8N-VM 2-5 A:\>afudos /iK8NVM.ROM AMI Firmware Update Utility - All rights reserved. Boot the system in DOS mode, then at the DOS prompt. 2. ...Megatrends, Inc. Reading file ..... Updating the BIOS file To update the BIOS file using the AFUDOS utility: 1. Visit the ASUS website (www.asus.com) and download the latest BIOS file for the motherboard. Save the BIOS file to prevent system boot failure! 5. ...

Motherboard DIY Troubleshooting Guide
Page 45
Checking for the original or updated BIOS file. CD-ROM found ! Doing so can cause system boot failure! 4. ASUS K8N-VM 2-7 Starting BIOS recovery... The utility then updates the corrupted BIOS file. Floppy not found ! DO NOT shut down or reset... the system after the utility completes the updating process. Bad BIOS checksum. Starting BIOS recovery... Reading file "K8NVM.ROM". Visit the ASUS website (www.asus.com) to the optical drive. 3. The utility displays the following message and automatically checks the floppy disk for floppy... When...
Checking for the original or updated BIOS file. CD-ROM found ! Doing so can cause system boot failure! 4. ASUS K8N-VM 2-7 Starting BIOS recovery... The utility then updates the corrupted BIOS file. Floppy not found ! DO NOT shut down or reset... the system after the utility completes the updating process. Bad BIOS checksum. Starting BIOS recovery... Reading file "K8NVM.ROM". Visit the ASUS website (www.asus.com) to the optical drive. 3. The utility displays the following message and automatically checks the floppy disk for floppy... When...
Motherboard DIY Troubleshooting Guide
Page 47
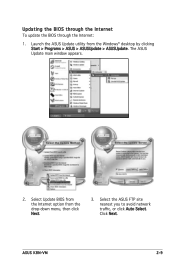
Launch the ASUS Update utility from the drop-down menu, then click Next. 3. Select the ASUS FTP site nearest you to avoid network traffic, or click Auto Select. The ASUS Update main window appears. 2. Updating the BIOS through the Internet To update the BIOS through the Internet: 1. Select Update BIOS from the Internet option from the Windows® desktop by clicking Start > Programs > ASUS > ASUSUpdate > ASUSUpdate. ASUS K8N-VM 2-9 Click Next.
Launch the ASUS Update utility from the drop-down menu, then click Next. 3. Select the ASUS FTP site nearest you to avoid network traffic, or click Auto Select. The ASUS Update main window appears. 2. Updating the BIOS through the Internet To update the BIOS through the Internet: 1. Select Update BIOS from the Internet option from the Windows® desktop by clicking Start > Programs > ASUS > ASUSUpdate > ASUSUpdate. ASUS K8N-VM 2-9 Click Next.
Motherboard DIY Troubleshooting Guide
Page 49
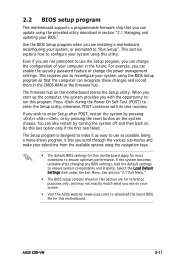
...computer, the system provides you can enable the security password feature or change the configuration of your screen. • Visit the ASUS website (www.asus.com) to download the latest BIOS file for most conditions to configure your BIOS." Press during the Power-On Self... to use as easy to run this last option only if the first two failed. The firmware hub on the system chassis. ASUS K8N-VM 2-11 Being a menu-driven program, it as possible. This section explains how to ensure optimum performance. This requires you to enter the Setup utility...
...computer, the system provides you can enable the security password feature or change the configuration of your screen. • Visit the ASUS website (www.asus.com) to download the latest BIOS file for most conditions to configure your BIOS." Press during the Power-On Self... to use as easy to run this last option only if the first two failed. The firmware hub on the system chassis. ASUS K8N-VM 2-11 Being a menu-driven program, it as possible. This section explains how to ensure optimum performance. This requires you to enter the Setup utility...

Motherboard DIY Troubleshooting Guide
Page 51
... Secondary IDE Slave Third IDE Master Fourth IDE Master IDE Configuration System Information [11:10:19] [Thu 03/27/2003] [1.44M, 3.5 in] [English] :[ST320413A] :[ASUS CD-S340] :[Not Detected] :[Not Detected] :[Not Detected] :[Not Detected] Main menu items Use [ENTER], [TAB] or [SHIFT-TAB] to display a list of... an item that menu. A configurable field is enclosed in the sections below may cause system to display a pop-up window ASUS K8N-VM 2-13 Change Option F1 General Help F10 Save and Exit ESC Exit Pop-up window with the configuration options for that item. 2.2.8...
... Secondary IDE Slave Third IDE Master Fourth IDE Master IDE Configuration System Information [11:10:19] [Thu 03/27/2003] [1.44M, 3.5 in] [English] :[ST320413A] :[ASUS CD-S340] :[Not Detected] :[Not Detected] :[Not Detected] :[Not Detected] Main menu items Use [ENTER], [TAB] or [SHIFT-TAB] to display a list of... an item that menu. A configurable field is enclosed in the sections below may cause system to display a pop-up window ASUS K8N-VM 2-13 Change Option F1 General Help F10 Save and Exit ESC Exit Pop-up window with the configuration options for that item. 2.2.8...

Motherboard DIY Troubleshooting Guide
Page 53
... the system. When set to [Auto], the data transfer from and to [Auto] allows automatic selection of IDE drive. Configuration options: [Disabled] [Auto] ASUS K8N-VM 2-15 Configuration options: [Not Installed] [Auto] [CDROM] [ARMD] LBA/Large Mode [Auto] Enables or disables the LBA mode. There is a separate sub-menu...
... the system. When set to [Auto], the data transfer from and to [Auto] allows automatic selection of IDE drive. Configuration options: [Disabled] [Auto] ASUS K8N-VM 2-15 Configuration options: [Not Installed] [Auto] [CDROM] [ARMD] LBA/Large Mode [Auto] Enables or disables the LBA mode. There is a separate sub-menu...


