
User Guide
Page 4
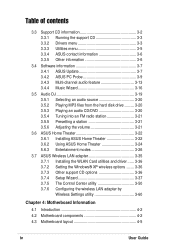
... Theater 3-22 3.6.1 Installing ASUS Home Theater 3-22 3.6.2 Using ASUS Home Theater 3-24 5.6.3 Entertainment modes 3-26 3.7 ASUS Wireless LAN adapter 3-35 3.7.1 Installing the WLAN Card utilities and driver ...... 3-36 3.7.2 Setting the Windows® XP wireless options ....... 3-36 3.7.3 Other support CD options 3-36 3.7.4 Setup Wizard 3-37 3.7.5 The Control Center utility 3-50 3.7.6 Configuring the wireless LAN adapter by Wireless Settings utility 3-60 Chapter 4: Motherboard Information 4.1 Introduction 4-2 4.2 Motherboard components 4-2 4.3 Motherboard layout 4-5 iv User Guide
... Theater 3-22 3.6.1 Installing ASUS Home Theater 3-22 3.6.2 Using ASUS Home Theater 3-24 5.6.3 Entertainment modes 3-26 3.7 ASUS Wireless LAN adapter 3-35 3.7.1 Installing the WLAN Card utilities and driver ...... 3-36 3.7.2 Setting the Windows® XP wireless options ....... 3-36 3.7.3 Other support CD options 3-36 3.7.4 Setup Wizard 3-37 3.7.5 The Control Center utility 3-50 3.7.6 Configuring the wireless LAN adapter by Wireless Settings utility 3-60 Chapter 4: Motherboard Information 4.1 Introduction 4-2 4.2 Motherboard components 4-2 4.3 Motherboard layout 4-5 iv User Guide

User Guide
Page 5
... Power Up Control 5-23 5.5.2 Hardware Monitor 5-24 5.6 Boot menu 5-25 5.7 Exit menu 5-27 Appendix A.1 Subsystem A-2 A.1.1 Front and rear panel features A-2 A.1.2 Removing the top cover A-3 A.1.3 Installing a hard disk drive A-3 A.1.4 Connecting the Subsystem to DiGiMatrix A-4 A.2 DiGiMatrix remote controller A-5 A.2.1 Specifications A-5 A.2.2 Remote control layout A-5 A.2.3 Remote control functions in Audio DJ A-6 A.2.4 Remote control functions in Home Theater .......... A-7 A.3 Optical drive technical specifications A-9 A.4 Wireless LAN adapter channels A-10 ASUS DiGiMatrix...
... Power Up Control 5-23 5.5.2 Hardware Monitor 5-24 5.6 Boot menu 5-25 5.7 Exit menu 5-27 Appendix A.1 Subsystem A-2 A.1.1 Front and rear panel features A-2 A.1.2 Removing the top cover A-3 A.1.3 Installing a hard disk drive A-3 A.1.4 Connecting the Subsystem to DiGiMatrix A-4 A.2 DiGiMatrix remote controller A-5 A.2.1 Specifications A-5 A.2.2 Remote control layout A-5 A.2.3 Remote control functions in Audio DJ A-6 A.2.4 Remote control functions in Home Theater .......... A-7 A.3 Optical drive technical specifications A-9 A.4 Wireless LAN adapter channels A-10 ASUS DiGiMatrix...
User Guide
Page 8
... on the DiGiMatrix Subsystem, remote controller, optical drive technical specifications, and IEEE 802.11b channels for experienced users and integrators with the system. Chapter 3: Starting up This chapter helps you power up the system and install drivers and utilities from the support CD. 4. viii User Guide Safeguards About this guide is intended for the wireless LAN adapter. How this guide Audience This guide provides general information and installation instructions about the P4SQ motherboard that came...
... on the DiGiMatrix Subsystem, remote controller, optical drive technical specifications, and IEEE 802.11b channels for experienced users and integrators with the system. Chapter 3: Starting up This chapter helps you power up the system and install drivers and utilities from the support CD. 4. viii User Guide Safeguards About this guide is intended for the wireless LAN adapter. How this guide Audience This guide provides general information and installation instructions about the P4SQ motherboard that came...
User Guide
Page 10
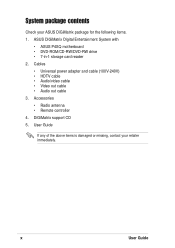
... • Remote controller 4. User Guide If any of the above items is damaged or missing, contact your ASUS DiGiMatrix package for the following items. 1. System package contents Check your retailer immediately. ASUS DiGiMatrix Digital Entertainment System with • ASUS P4SQ motherboard • DVD-ROM/CD-RW/DVD-RW drive • 7-in-1 storage card reader 2. Cables • Universal power adapter and cable (100V-240V) • HDTV cable • Audio/video cable • Video out cable • Audio out cable 3.
... • Remote controller 4. User Guide If any of the above items is damaged or missing, contact your ASUS DiGiMatrix package for the following items. 1. System package contents Check your retailer immediately. ASUS DiGiMatrix Digital Entertainment System with • ASUS P4SQ motherboard • DVD-ROM/CD-RW/DVD-RW drive • 7-in-1 storage card reader 2. Cables • Universal power adapter and cable (100V-240V) • HDTV cable • Audio/video cable • Video out cable • Audio out cable 3.
User Guide
Page 12
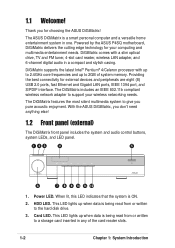
... of the card reader slots. 1-2 Chapter 1: System Introduction The DiGiMatrix features the most silent multimedia system to the hard disk drive. 3. VOLUME + 6 7 8 9 10 11 12 1. DiGiMatrix supports the latest Intel® Pentium® 4/Celeron processor with a slim optical drive, TV and FM tuner, 4-slot card reader, wireless LAN adapter, and 6-channel digital audio in a compact and stylish casing. Power LED. Powered by the ASUS P4SQ motherboard, DiGiMatrix delivers the cutting edge technology for your wireless networking needs. When lit...
... of the card reader slots. 1-2 Chapter 1: System Introduction The DiGiMatrix features the most silent multimedia system to the hard disk drive. 3. VOLUME + 6 7 8 9 10 11 12 1. DiGiMatrix supports the latest Intel® Pentium® 4/Celeron processor with a slim optical drive, TV and FM tuner, 4-slot card reader, wireless LAN adapter, and 6-channel digital audio in a compact and stylish casing. Power LED. Powered by the ASUS P4SQ motherboard, DiGiMatrix delivers the cutting edge technology for your wireless networking needs. When lit...
User Guide
Page 15
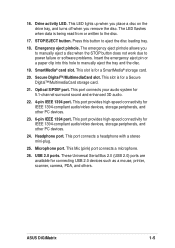
... card. 20. This port connects a headphone with a stereo mini-plug. 25. USB 2.0 ports. STOP/EJECT button. Press this hole to the disc. 17. This slot is for 5.1-channel surround sound and enhanced 3D audio. 22. 4-pin IEEE 1394 port. Optical S/PDIF port. Secure Digital™/MultimediaCard slot. These Universal Serial Bus 2.0 (USB 2.0) ports are available for IEEE 1394-compliant audio/video devices, storage peripherals, and other PC devices. 23. 6-pin IEEE 1394 port. The LED flashes when...
... card. 20. This port connects a headphone with a stereo mini-plug. 25. USB 2.0 ports. STOP/EJECT button. Press this hole to the disc. 17. This slot is for 5.1-channel surround sound and enhanced 3D audio. 22. 4-pin IEEE 1394 port. Optical S/PDIF port. Secure Digital™/MultimediaCard slot. These Universal Serial Bus 2.0 (USB 2.0) ports are available for IEEE 1394-compliant audio/video devices, storage peripherals, and other PC devices. 23. 6-pin IEEE 1394 port. The LED flashes when...
User Guide
Page 17
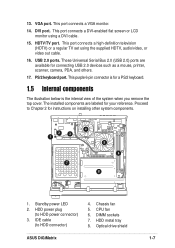
This purple 6-pin connector is the internal view of the system when you remove the top cover. HDD power plug (to HDD connector) 4. IDE cable (to HDD power connector) 3. DIMM sockets 7. USB 2.0 ports. Chassis fan 5. CPU fan 6. HDD metal tray 8. This port connects a VGA monitor. 14. Optical drive shield ASUS DiGiMatrix 1-7 This port connects a high-definition television (HDTV) or a regular TV set using a DVI cable. 15. Proceed to Chapter 2 for a PS/2 keyboard. 1.5 Internal components The illustration below is for instructions on installing other system ...
This purple 6-pin connector is the internal view of the system when you remove the top cover. HDD power plug (to HDD connector) 4. IDE cable (to HDD power connector) 3. DIMM sockets 7. USB 2.0 ports. Chassis fan 5. CPU fan 6. HDD metal tray 8. This port connects a VGA monitor. 14. Optical drive shield ASUS DiGiMatrix 1-7 This port connects a high-definition television (HDTV) or a regular TV set using a DVI cable. 15. Proceed to Chapter 2 for a PS/2 keyboard. 1.5 Internal components The illustration below is for instructions on installing other system ...
User Guide
Page 22
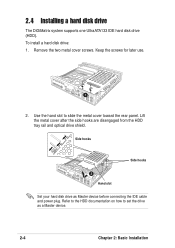
... disengaged from the HDD tray rail and optical drive shield. To install a hard disk drive: 1. Refer to the HDD documentation on how to slide the metal cover toward the rear panel. Keep the screws for later use. 1 2. Side hooks Side hooks 2 Hand slot Set your hard disk drive as a Master device. 2-4 Chapter 2: Basic Installation Use the hand slot to set the drive as Master device before connecting the IDE cable and power plug. 2.4 Installing a hard disk drive The DiGiMatrix system supports one UltraATA133 IDE hard disk drive (HDD).
... disengaged from the HDD tray rail and optical drive shield. To install a hard disk drive: 1. Refer to the HDD documentation on how to slide the metal cover toward the rear panel. Keep the screws for later use. 1 2. Side hooks Side hooks 2 Hand slot Set your hard disk drive as a Master device. 2-4 Chapter 2: Basic Installation Use the hand slot to set the drive as Master device before connecting the IDE cable and power plug. 2.4 Installing a hard disk drive The DiGiMatrix system supports one UltraATA133 IDE hard disk drive (HDD).

User Guide
Page 35
... detects installed devices. Install the SiS Display Driver before installing the SiS AGP Driver. ASUS DiGiMatrix 3-3 The CD automatically displays the Drivers menu if Autorun is NOT enabled in your optical drive. Double-click the ASSETUP.EXE to load the installation wizard and install the SiS 651 display driver. SiS 651 Display Driver Click this item to locate the file ASSETUP.EXE from the BIN folder. Install the necessary drivers to activate the devices. 3.3.1 Running the support...
... detects installed devices. Install the SiS Display Driver before installing the SiS AGP Driver. ASUS DiGiMatrix 3-3 The CD automatically displays the Drivers menu if Autorun is NOT enabled in your optical drive. Double-click the ASSETUP.EXE to load the installation wizard and install the SiS 651 display driver. SiS 651 Display Driver Click this item to locate the file ASSETUP.EXE from the BIN folder. Install the necessary drivers to activate the devices. 3.3.1 Running the support...
User Guide
Page 45
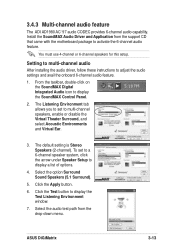
... Sound Speakers (5.1 Surround). 5. Click the Test button to multi-channel speakers, enable or disable the Virtual Theater Surround, and select Acoustic Environments and Virtual Ear. 3. ASUS DiGiMatrix 3-13 Setting to multi-channel audio After installing the audio driver, follow these instructions to display a list of options. 4. Install the SoundMAX Audio Driver and Application from the drop-down menu. Select the audio test path from the support CD that came with the motherboard package to display the SoundMAX Control Panel...
... Sound Speakers (5.1 Surround). 5. Click the Test button to multi-channel speakers, enable or disable the Virtual Theater Surround, and select Acoustic Environments and Virtual Ear. 3. ASUS DiGiMatrix 3-13 Setting to multi-channel audio After installing the audio driver, follow these instructions to display a list of options. 4. Install the SoundMAX Audio Driver and Application from the drop-down menu. Select the audio test path from the support CD that came with the motherboard package to display the SoundMAX Control Panel...
User Guide
Page 68
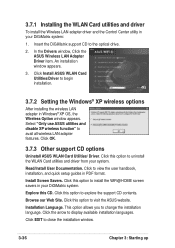
... Install ASUS WLAN Card Utilities/Driver to the optical drive. 2. Read/Install User Documentation. Explore this option to visit the ASUS website. Insert the DiGiMatrix support CD to begin installation. 3.7.2 Setting the Windows® XP wireless options After installing the wireless LAN adapter in PDF format. Select "Only use ASUS utilities and disable XP wireless function" to view the user handbook, installation, and quick setup guides in Windows® XP OS, the Wireless Option window appears. Click to avail all wireless LAN adapter features. Install Screen Savers. This option...
... Install ASUS WLAN Card Utilities/Driver to the optical drive. 2. Read/Install User Documentation. Explore this option to visit the ASUS website. Insert the DiGiMatrix support CD to begin installation. 3.7.2 Setting the Windows® XP wireless options After installing the wireless LAN adapter in PDF format. Select "Only use ASUS utilities and disable XP wireless function" to view the user handbook, installation, and quick setup guides in Windows® XP OS, the Wireless Option window appears. Click to avail all wireless LAN adapter features. Install Screen Savers. This option...

User Guide
Page 73
... wireless LAN adapter is set to Ad-hoc mode, click Next to set up Internet Connection Sharing (ICS). See "Internet Connection Sharing" section on page 3-60 for TCP/IP configuration. Obtain the SSID of the created soft AP or wireless LAN network including the operating mode, SSID, channel, and WEP encryption information. ASUS DiGiMatrix 3-41 Connecting to a hidden wireless LAN Some access points disable their SSID broadcasting to prevent a wireless device from the network administrator. The wizard displays...
... wireless LAN adapter is set to Ad-hoc mode, click Next to set up Internet Connection Sharing (ICS). See "Internet Connection Sharing" section on page 3-60 for TCP/IP configuration. Obtain the SSID of the created soft AP or wireless LAN network including the operating mode, SSID, channel, and WEP encryption information. ASUS DiGiMatrix 3-41 Connecting to a hidden wireless LAN Some access points disable their SSID broadcasting to prevent a wireless device from the network administrator. The wizard displays...
User Guide
Page 80
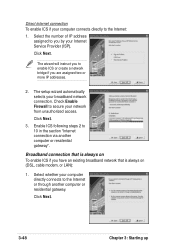
... internet connection To enable ICS if your network from unauthorized access. The wizard will instruct you to enable ICS or create a network bridge if you have an existing broadband network that is always on (DSL, cable modem, or LAN): 1. Check Enable Firewall to secure your computer connects directly to the Internet or through another computer or residential gateway". Click Next. 3-48 Chapter 3: Starting up The setup...
... internet connection To enable ICS if your network from unauthorized access. The wizard will instruct you to enable ICS or create a network bridge if you have an existing broadband network that is always on (DSL, cable modem, or LAN): 1. Check Enable Firewall to secure your computer connects directly to the Internet or through another computer or residential gateway". Click Next. 3-48 Chapter 3: Starting up The setup...
User Guide
Page 83
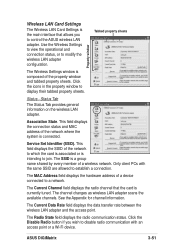
... a connection. Click the Disable Radio button if you to a network. Tabbed property sheets Property window The Wireless Settings window is composed of a device connected to control the ASUS wireless LAN adapter. This field displays the connection status and MAC address of a wireless network. Only client PCs with an access point or a Wi-Fi device. See the Appendix for channel information. ASUS DiGiMatrix 3-51 Click the icons in the property window to modify the wireless LAN adapter configuration. Wireless LAN Card Settings The Wireless LAN Card Settings...
... a connection. Click the Disable Radio button if you to a network. Tabbed property sheets Property window The Wireless Settings window is composed of a device connected to control the ASUS wireless LAN adapter. This field displays the connection status and MAC address of a wireless network. Only client PCs with an access point or a Wi-Fi device. See the Appendix for channel information. ASUS DiGiMatrix 3-51 Click the icons in the property window to modify the wireless LAN adapter configuration. Wireless LAN Card Settings The Wireless LAN Card Settings...
User Guide
Page 91
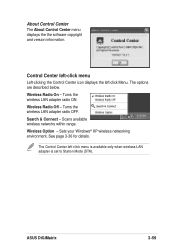
Control Center left-click menu Left-clicking the Control Center icon displays the left -click menu is available only when wireless LAN adapter is set to Station Mode (STA). Sets your Windows® XP wireless networking environment. Search & Connect - ASUS DiGiMatrix 3-59 Turns the wireless LAN adapter radio ON. Wireless Radio Off - Wireless Radio On - Turns the wireless LAN adapter radio OFF. Wireless Option - See page 3-36 for details. About Control Center The About Control Center menu displays the the software copyright and version information. The options are ...
Control Center left-click menu Left-clicking the Control Center icon displays the left -click menu is available only when wireless LAN adapter is set to Station Mode (STA). Sets your Windows® XP wireless networking environment. Search & Connect - ASUS DiGiMatrix 3-59 Turns the wireless LAN adapter radio ON. Wireless Radio Off - Wireless Radio On - Turns the wireless LAN adapter radio OFF. Wireless Option - See page 3-36 for details. About Control Center The About Control Center menu displays the the software copyright and version information. The options are ...
User Guide
Page 108
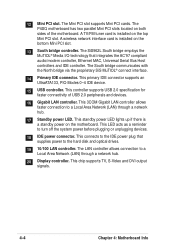
... power plug that integrates the AC'97 compliant audio/modem controller, Ethernet MAC, Universal Serial Bus Host controllers and IDE controller. The Mini PCI slot supports Mini PCI cards. This controller supports USB 2.0 specification for faster connectivity of the motherboard. This LED acts as a reminder to the hard disk and optical drives. 19 10/100 LAN controller. This standby power LED lights up if there is a standby power on both sides of USB 2.0 peripherals and devices. 16 Gigabit LAN controller. This connects to a Local Area Network (LAN...
... power plug that integrates the AC'97 compliant audio/modem controller, Ethernet MAC, Universal Serial Bus Host controllers and IDE controller. The Mini PCI slot supports Mini PCI cards. This controller supports USB 2.0 specification for faster connectivity of the motherboard. This LED acts as a reminder to the hard disk and optical drives. 19 10/100 LAN controller. This standby power LED lights up if there is a standby power on both sides of USB 2.0 peripherals and devices. 16 Gigabit LAN controller. This connects to a Local Area Network (LAN...
User Guide
Page 120
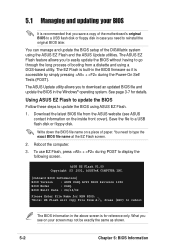
... the motherboard's original BIOS to a USB flash disk or floppy disk in case you to easily update the BIOS without having to download an updated BIOS file and update the BIOS in the Windows® operating system. You can manage and update the BIOS setup of the DiGiMatrix system using ASUS EZ Flash. 1. Reboot the computer. 3. What you to go through the long process of booting from A:\, Press [ESC] to update the BIOS using the ASUS EZ Flash and the ASUS Update utilities. See...
... the motherboard's original BIOS to a USB flash disk or floppy disk in case you to easily update the BIOS without having to download an updated BIOS file and update the BIOS in the Windows® operating system. You can manage and update the BIOS setup of the DiGiMatrix system using ASUS EZ Flash. 1. Reboot the computer. 3. What you to go through the long process of booting from A:\, Press [ESC] to update the BIOS using the ASUS EZ Flash and the ASUS Update utilities. See...
User Guide
Page 122
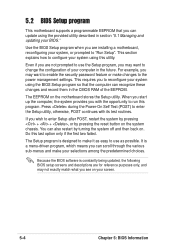
... through the various sub-menus and make changes to the power management settings. 5.2 BIOS Setup program This motherboard supports a programmable EEPROM that the computer can also restart by pressing the reset button on your computer in the CMOS RAM of your screen. 5-4 Chapter 5: BIOS Information This section explains how to configure your system using the BIOS Setup program so that you can update using this last option only if the first two...
... through the various sub-menus and make changes to the power management settings. 5.2 BIOS Setup program This motherboard supports a programmable EEPROM that the computer can also restart by pressing the reset button on your computer in the CMOS RAM of your screen. 5-4 Chapter 5: BIOS Information This section explains how to configure your system using the BIOS Setup program so that you can update using this last option only if the first two...
User Guide
Page 124
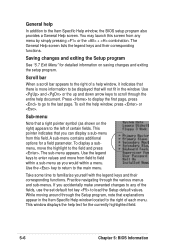
... Help screen lists the legend keys and their corresponding functions. Saving changes and exiting the Setup program See "5.7 Exit Menu" for a field parameter. To exit the help In addition to load the Setup default values. A sub-menu contains additional options for detailed information on the right) appears to the left of the fields, use the set default hot key to the Item Specific Help window, the BIOS setup...
... Help screen lists the legend keys and their corresponding functions. Saving changes and exiting the Setup program See "5.7 Exit Menu" for a field parameter. To exit the help In addition to load the Setup default values. A sub-menu contains additional options for detailed information on the right) appears to the left of the fields, use the set default hot key to the Item Specific Help window, the BIOS setup...

User Guide
Page 129
...] ASUS DiGiMatrix 5-11 To make changes to this field, set the Type field to [User Type HDD] and the Translation Method field to [User Type HDD]. Maximum LBA Capacity This field shows the drive's maximum LBA capacity as calculated by the BIOS based on the drive information you entered. Multi-Sector Transfers [Maximum] This option automatically sets the number of sectors per block to [Manual]. Translation Method [LBA] Select the hard disk drive type...
...] ASUS DiGiMatrix 5-11 To make changes to this field, set the Type field to [User Type HDD] and the Translation Method field to [User Type HDD]. Maximum LBA Capacity This field shows the drive's maximum LBA capacity as calculated by the BIOS based on the drive information you entered. Multi-Sector Transfers [Maximum] This option automatically sets the number of sectors per block to [Manual]. Translation Method [LBA] Select the hard disk drive type...


