
User Guide
Page 3
... 2-12 2.8.4 Video out cable 2-12 2.8.5 HDTV cable 2-13 2.8.6 Audio out cable 2-13 2.9 Connecting external devices 2-14 Chapter 3: Starting up 3.1 Installing an operating system 3-2 3.2 Powering up 3-2 ASUS DiGiMatrix iii
... 2-12 2.8.4 Video out cable 2-12 2.8.5 HDTV cable 2-13 2.8.6 Audio out cable 2-13 2.9 Connecting external devices 2-14 Chapter 3: Starting up 3.1 Installing an operating system 3-2 3.2 Powering up 3-2 ASUS DiGiMatrix iii

User Guide
Page 5
A-7 A.3 Optical drive technical specifications A-9 A.4 Wireless LAN adapter channels A-10 ASUS DiGiMatrix v Table of contents 4.4 Central Processing Unit (CPU 4-6 4.5 System memory 4-7 4.6 Jumper 4-8 4.7 Connectors 4-9 Chapter 5: BIOS information ... features A-2 A.1.2 Removing the top cover A-3 A.1.3 Installing a hard disk drive A-3 A.1.4 Connecting the Subsystem to DiGiMatrix A-4 A.2 DiGiMatrix remote controller A-5 A.2.1 Specifications A-5 A.2.2 Remote control layout A-5 A.2.3 Remote control functions in Audio DJ A-6 A.2.4 Remote control functions in Home Theater ..........
A-7 A.3 Optical drive technical specifications A-9 A.4 Wireless LAN adapter channels A-10 ASUS DiGiMatrix v Table of contents 4.4 Central Processing Unit (CPU 4-6 4.5 System memory 4-7 4.6 Jumper 4-8 4.7 Connectors 4-9 Chapter 5: BIOS information ... features A-2 A.1.2 Removing the top cover A-3 A.1.3 Installing a hard disk drive A-3 A.1.4 Connecting the Subsystem to DiGiMatrix A-4 A.2 DiGiMatrix remote controller A-5 A.2.1 Specifications A-5 A.2.2 Remote control layout A-5 A.2.3 Remote control functions in Audio DJ A-6 A.2.4 Remote control functions in Home Theater ..........
User Guide
Page 7
... adding or removing devices to or from connectors, slots, sockets and circuitry. • Avoid dust, humidity, and temperature extremes. LASER PRODUCT WARNING CLASS 1 LASER PRODUCT ASUS DiGiMatrix vii Replace only with the package. • Before using the product, make sure all cables are correctly connected and the power cables are connected. •...
... adding or removing devices to or from connectors, slots, sockets and circuitry. • Avoid dust, humidity, and temperature extremes. LASER PRODUCT WARNING CLASS 1 LASER PRODUCT ASUS DiGiMatrix vii Replace only with the package. • Before using the product, make sure all cables are correctly connected and the power cables are connected. •...
User Guide
Page 8
... This chapter gives a general description of personal computers. Chapter 4: Motherboard Information This chapter gives information about the ASUS DiGiMatrix. Chapter 5: BIOS information This chapter tells how to install components in the ASUS DiGiMatrix system. 3. Safeguards About this guide is intended for the wireless LAN adapter. This chapter includes the motherboard layout... this guide Audience This guide provides general information and installation instructions about the P4SQ motherboard that came with hardware knowledge of the ASUS DiGiMatrix. viii User Guide
... This chapter gives a general description of personal computers. Chapter 4: Motherboard Information This chapter gives information about the ASUS DiGiMatrix. Chapter 5: BIOS information This chapter tells how to install components in the ASUS DiGiMatrix system. 3. Safeguards About this guide is intended for the wireless LAN adapter. This chapter includes the motherboard layout... this guide Audience This guide provides general information and installation instructions about the P4SQ motherboard that came with hardware knowledge of the ASUS DiGiMatrix. viii User Guide
User Guide
Page 9
... information Refer to aid in this guide WARNING: Information to prevent injury to yourself when trying to complete a task. ASUS websites The ASUS websites worldwide provide updated information on ASUS hardware and software products. ASUS DiGiMatrix ix Conventions used in completing a task. CAUTION: Information to prevent damage to the components when trying to complete a task...
... information Refer to aid in this guide WARNING: Information to prevent injury to yourself when trying to complete a task. ASUS websites The ASUS websites worldwide provide updated information on ASUS hardware and software products. ASUS DiGiMatrix ix Conventions used in completing a task. CAUTION: Information to prevent damage to the components when trying to complete a task...
User Guide
Page 10
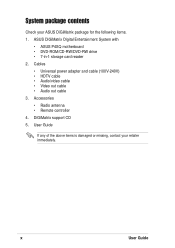
... • Audio out cable 3. User Guide If any of the above items is damaged or missing, contact your ASUS DiGiMatrix package for the following items. 1. DiGiMatrix support CD 5. x User Guide ASUS DiGiMatrix Digital Entertainment System with • ASUS P4SQ motherboard • DVD-ROM/CD-RW/DVD-RW drive • 7-in-1 storage card reader 2. System package contents...
... • Audio out cable 3. User Guide If any of the above items is damaged or missing, contact your ASUS DiGiMatrix package for the following items. 1. DiGiMatrix support CD 5. x User Guide ASUS DiGiMatrix Digital Entertainment System with • ASUS P4SQ motherboard • DVD-ROM/CD-RW/DVD-RW drive • 7-in-1 storage card reader 2. System package contents...
User Guide
Page 11
The chapter lists the system features including introduction on the front and rear panel, and internal components. System Introduction Chapter 1 This chapter gives a general description of the ASUS DiGiMatrix. ASUS DiGiMatrix
The chapter lists the system features including introduction on the front and rear panel, and internal components. System Introduction Chapter 1 This chapter gives a general description of the ASUS DiGiMatrix. ASUS DiGiMatrix
User Guide
Page 12
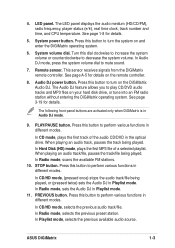
...tuner, 4-slot card reader, wireless LAN adapter, and 6-channel digital audio in any of system memory. With the ASUS DiGiMatrix, you for choosing the ASUS DiGiMatrix! This LED lights up when data is being read from or written to a storage card inserted in a compact... and stylish casing. 1.1 Welcome! The ASUS DiGiMatrix is ON. 2. Providing the best connectivity for your wireless networking needs. The DiGiMatrix features the most silent multimedia system to support your computing and multimedia entertainment needs. VOLUME + 6...
...tuner, 4-slot card reader, wireless LAN adapter, and 6-channel digital audio in any of system memory. With the ASUS DiGiMatrix, you for choosing the ASUS DiGiMatrix! This LED lights up when data is being read from or written to a storage card inserted in a compact... and stylish casing. 1.1 Welcome! The ASUS DiGiMatrix is ON. 2. Providing the best connectivity for your wireless networking needs. The DiGiMatrix features the most silent multimedia system to support your computing and multimedia entertainment needs. VOLUME + 6...
User Guide
Page 13
...turn the system on your hard disk drive, or tune into an FM radio station without entering the DiGiMatrix operating system. In CD mode, plays the first track of a selected playlist. ASUS DiGiMatrix 1-3 When playing an audio track, pauses the track being played. In CD/HD mode, (pressed once...) stops the audio track/file being played, or (pressed twice) sets the Audio DJ in the optical drive. See page 1-8 for details on the DiGiMatrix Audio DJ. Press...
...turn the system on your hard disk drive, or tune into an FM radio station without entering the DiGiMatrix operating system. In CD mode, plays the first track of a selected playlist. ASUS DiGiMatrix 1-3 When playing an audio track, pauses the track being played. In CD/HD mode, (pressed once...) stops the audio track/file being played, or (pressed twice) sets the Audio DJ in the optical drive. See page 1-8 for details on the DiGiMatrix Audio DJ. Press...
User Guide
Page 15
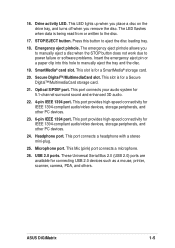
... LED. Secure Digital™/MultimediaCard slot. This port connects your audio system for connecting USB 2.0 devices such as a mouse, printer, scanner, camera, PDA, and others. ASUS DiGiMatrix 1-5
... LED. Secure Digital™/MultimediaCard slot. This port connects your audio system for connecting USB 2.0 devices such as a mouse, printer, scanner, camera, PDA, and others. ASUS DiGiMatrix 1-5
User Guide
Page 17
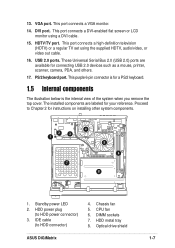
... sockets 7. This port connects a DVI-enabled flat screen or LCD monitor using the supplied HDTV, audio/video, or video out cable. 16. Optical drive shield ASUS DiGiMatrix 1-7 HDD metal tray 8. Chassis fan 5. 13. USB 2.0 ports. HDTV/TV port.
... sockets 7. This port connects a DVI-enabled flat screen or LCD monitor using the supplied HDTV, audio/video, or video out cable. 16. Optical drive shield ASUS DiGiMatrix 1-7 HDD metal tray 8. Chassis fan 5. 13. USB 2.0 ports. HDTV/TV port.

User Guide
Page 19
Basic Installation Chapter 2 This chapter provides step-by-step instructions on how to install components in the ASUS DiGiMatrix system. ASUS DiGiMatrix
Basic Installation Chapter 2 This chapter provides step-by-step instructions on how to install components in the ASUS DiGiMatrix system. ASUS DiGiMatrix
User Guide
Page 21
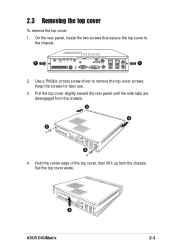
Use a Phillips (cross) screw driver to the chassis. 1 1 2. Pull the top cover slightly toward the rear panel until the side tabs are disengaged from the chassis. Set the top cover aside. 4 ASUS DiGiMatrix 2-3 Keep the screws for later use. 3. On the rear panel, locate the two screws that secure the top cover to remove the top cover screws. 2.3 Removing the top cover To remove the top cover: 1. Hold the center edge of the top cover, then lift it up from the chassis. 3 3 2 2 4.
Use a Phillips (cross) screw driver to the chassis. 1 1 2. Pull the top cover slightly toward the rear panel until the side tabs are disengaged from the chassis. Set the top cover aside. 4 ASUS DiGiMatrix 2-3 Keep the screws for later use. 3. On the rear panel, locate the two screws that secure the top cover to remove the top cover screws. 2.3 Removing the top cover To remove the top cover: 1. Hold the center edge of the top cover, then lift it up from the chassis. 3 3 2 2 4.
User Guide
Page 23
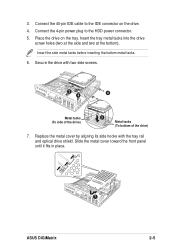
... tray rail and optical drive shield. Place the drive on the drive. 4. Slide the metal cover toward the front panel until it fits in place. 7 ASUS DiGiMatrix 2-5 Connect the 40-pin IDE cable to the HDD power connector. 5. Insert the side metal tacks before inserting the bottom metal tacks. 6. 3.
... tray rail and optical drive shield. Place the drive on the drive. 4. Slide the metal cover toward the front panel until it fits in place. 7 ASUS DiGiMatrix 2-5 Connect the 40-pin IDE cable to the HDD power connector. 5. Insert the side metal tacks before inserting the bottom metal tacks. 6. 3.
User Guide
Page 25
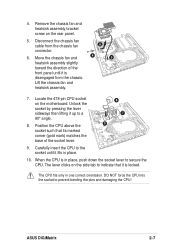
... socket to secure the CPU. Unlock the socket by pressing the lever sideways then lifting it fits in place. 10. When the CPU is locked. ASUS DiGiMatrix 2-7
... socket to secure the CPU. Unlock the socket by pressing the lever sideways then lifting it fits in place. 10. When the CPU is locked. ASUS DiGiMatrix 2-7
User Guide
Page 27
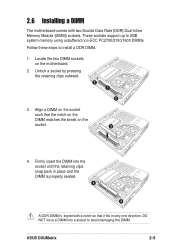
ASUS DiGiMatrix 2-9 Unlock a socket by pressing the retaining clips outward. 2 1 2 3. Align a DIMM on the socket such that it fits in place and the DIMM is properly seated. 4 4 A ...
ASUS DiGiMatrix 2-9 Unlock a socket by pressing the retaining clips outward. 2 1 2 3. Align a DIMM on the socket such that it fits in place and the DIMM is properly seated. 4 4 A ...
User Guide
Page 29
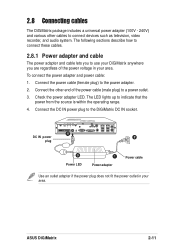
... such as television, video recorder, and audio system. Check the power adapter LED. ASUS DiGiMatrix 2-11 To connect the power adapter and power cable: 1. The LED lights up to the power adapter. 2. 2.8 Connecting cables The DiGiMatrix package includes a universal power adapter (100V - 240V) and various other end of ...cable (female plug) to indicate that the power from the source is within the operating range. 4. Connect the DC IN power plug to the DiGiMatrix DC IN socket. 4 DC IN power 2 plug 3 Power LED 1 Power adapter Power cable Use an outlet adapter if the power plug does...
... such as television, video recorder, and audio system. Check the power adapter LED. ASUS DiGiMatrix 2-11 To connect the power adapter and power cable: 1. The LED lights up to the power adapter. 2. 2.8 Connecting cables The DiGiMatrix package includes a universal power adapter (100V - 240V) and various other end of ...cable (female plug) to indicate that the power from the source is within the operating range. 4. Connect the DC IN power plug to the DiGiMatrix DC IN socket. 4 DC IN power 2 plug 3 Power LED 1 Power adapter Power cable Use an outlet adapter if the power plug does...
User Guide
Page 31
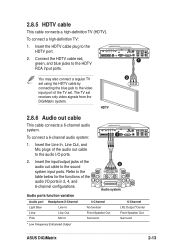
..., and Mic plugs of the audio out cable to the table below for the functions of the TV set receives only video signals from the DiGiMatrix system. To connect a high-definition TV: 1. Refer to the audio I /O ports in 2, 4, and 6-channel configurations. 2 Audio system Audio ports ...Line In Line Out Mic In 4-Channel No function Front Speaker Out Surround 6-Channel LFE Output*/Center Front Speaker Out Surround * Low Frequency Enhanced Output ASUS DiGiMatrix 2-13 The TV set . 2.8.5 HDTV cable This cable connects a high-definition TV (HDTV). You may also connect a regular TV 2 set ...
..., and Mic plugs of the audio out cable to the table below for the functions of the TV set receives only video signals from the DiGiMatrix system. To connect a high-definition TV: 1. Refer to the audio I /O ports in 2, 4, and 6-channel configurations. 2 Audio system Audio ports ...Line In Line Out Mic In 4-Channel No function Front Speaker Out Surround 6-Channel LFE Output*/Center Front Speaker Out Surround * Low Frequency Enhanced Output ASUS DiGiMatrix 2-13 The TV set . 2.8.5 HDTV cable This cable connects a high-definition TV (HDTV). You may also connect a regular TV 2 set ...
User Guide
Page 33
Starting up Chapter 3 This chapter helps you power up the system and install drivers and utilities from the support CD. ASUS DiGiMatrix
Starting up Chapter 3 This chapter helps you power up the system and install drivers and utilities from the support CD. ASUS DiGiMatrix

User Guide
Page 35
... Display Driver before installing the SiS AGP Driver. SiS AGP Driver Click this item to load the installation wizard and install the SiS AGP driver. ASUS DiGiMatrix 3-3 SiS 651 Display Driver Click this item to load the installation wizard and install the SiS 651 display driver. The CD automatically displays the Drivers...
... Display Driver before installing the SiS AGP Driver. SiS AGP Driver Click this item to load the installation wizard and install the SiS AGP driver. ASUS DiGiMatrix 3-3 SiS 651 Display Driver Click this item to load the installation wizard and install the SiS 651 display driver. The CD automatically displays the Drivers...


