C8HM70-I User's Manual
Page 7
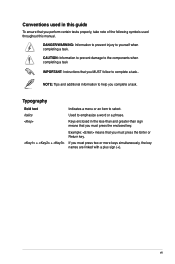
... to prevent injury to help you complete a task. NOTE: Tips and additional information to yourself when completing a task. CAUTION: Information to prevent damage to the components when completing a task IMPORTANT: Instructions that you MUST follow to select. Keys enclosed in this guide To ensure that you perform certain tasks properly, take...
... to prevent injury to help you complete a task. NOTE: Tips and additional information to yourself when completing a task. CAUTION: Information to prevent damage to the components when completing a task IMPORTANT: Instructions that you MUST follow to select. Keys enclosed in this guide To ensure that you perform certain tasks properly, take...

C8HM70-I User's Manual
Page 11
... supply. This is a reminder that you should shut down the system and unplug the power cable before touching any component. • Before handling components, use a grounded wrist strap or touch a safely grounded object or a metal object, such as the power supply...Power LED The motherboard comes with the component. • Before you install or remove any component, ensure that the system is ON, in sleep mode, or in any motherboard component. SB_PWR C8HM70-I/HDMI ON OFF Standby Power Powered Off C8HM70-I/HDMI Onboard LED ASUS C8HM70-I Series 1-1 Product introduction 1 1.1 ...
... supply. This is a reminder that you should shut down the system and unplug the power cable before touching any component. • Before handling components, use a grounded wrist strap or touch a safely grounded object or a metal object, such as the power supply...Power LED The motherboard comes with the component. • Before you install or remove any component, ensure that the system is ON, in sleep mode, or in any motherboard component. SB_PWR C8HM70-I/HDMI ON OFF Standby Power Powered Off C8HM70-I/HDMI Onboard LED ASUS C8HM70-I Series 1-1 Product introduction 1 1.1 ...
C8HM70-I User's Manual
Page 12
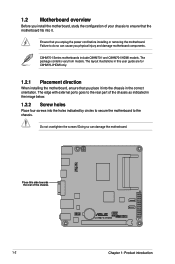
... image below. 1.2.2 Screw holes Place four screws into the chassis in the correct orientation. Place this user guide are for C8HM70-I/HDMI only. 1.2.1 Placement direction When installing the motherboard, ensure that you unplug the power cord before installing or removing the motherboard.... Do not overtighten the screws! Doing so can cause you physical injury and damage motherboard components. The layout illustrations in this side towards the rear of the chassis 1-2 C8HM70-I /HDMI models. Failure to the chassis. 1.2 Motherboard overview Before you install the motherboard, study ...
... image below. 1.2.2 Screw holes Place four screws into the chassis in the correct orientation. Place this user guide are for C8HM70-I/HDMI only. 1.2.1 Placement direction When installing the motherboard, ensure that you unplug the power cord before installing or removing the motherboard.... Do not overtighten the screws! Doing so can cause you physical injury and damage motherboard components. The layout illustrations in this side towards the rear of the chassis 1-2 C8HM70-I /HDMI models. Failure to the chassis. 1.2 Motherboard overview Before you install the motherboard, study ...
C8HM70-I User's Manual
Page 16
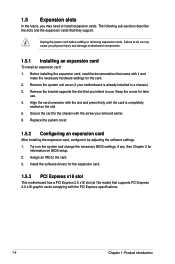
... the necessary BIOS settings, if any. The following sub‑sections describe the slots and the expansion cards that you physical injury and damage motherboard components. 1.5.1 Installing an expansion card To install an expansion card: 1.
... the necessary BIOS settings, if any. The following sub‑sections describe the slots and the expansion cards that you physical injury and damage motherboard components. 1.5.1 Installing an expansion card To install an expansion card: 1.
C8HM70-I User's Manual
Page 21
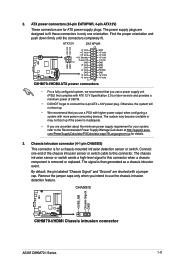
...proper orientation and push down firmly until the connectors completely fit. Connect one orientation. CHASSIS +5VSB_MB Chassis Signal GND C8HM70-I/HDMI C8HM70-I/HDMI Chassis intrusion connector ASUS C8HM70-I /HDMI ATX power connectors • For a fully configured system, we recommend that you use a power supply unit ...350 W. • DO NOT forget to this connector when a chassis component is removed or replaced. The power supply plugs are shorted with a jumper cap. ATX12V EATXPWR +12V DC +12V DC C8HM70-I/HDMI GND GND +3 Volts +12 Volts +12 Volts +5V Standby Power...
...proper orientation and push down firmly until the connectors completely fit. Connect one orientation. CHASSIS +5VSB_MB Chassis Signal GND C8HM70-I/HDMI C8HM70-I/HDMI Chassis intrusion connector ASUS C8HM70-I /HDMI ATX power connectors • For a fully configured system, we recommend that you use a power supply unit ...350 W. • DO NOT forget to this connector when a chassis component is removed or replaced. The power supply plugs are shorted with a jumper cap. ATX12V EATXPWR +12V DC +12V DC C8HM70-I/HDMI GND GND +3 Volts +12 Volts +12 Volts +5V Standby Power...
C8HM70-I User's Manual
Page 22
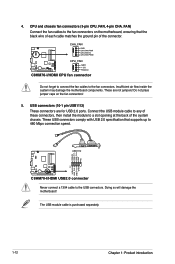
... are not jumpers! The USB module cable is purchased separately. 1-12 Chapter 1: Product introduction USB+5V USB_P11USB_P11+ GND NC PIN 1 USB+5V USB_P12USB_P12+ GND USB1112 C8HM70-I/HDMI C8HM70-I /HDMI CPU fan connector Do not forget to connect the fan cables to the fan connectors on the fan connectors! 5. Doing so will damage the motherboard... chassis fan connectors (3-pin CPU_FAN, 4-pin CHA_FAN) Connect the fan cables to the fan connectors. Insufficient air flow inside the system may damage the motherboard components. 4.
... are not jumpers! The USB module cable is purchased separately. 1-12 Chapter 1: Product introduction USB+5V USB_P11USB_P11+ GND NC PIN 1 USB+5V USB_P12USB_P12+ GND USB1112 C8HM70-I/HDMI C8HM70-I /HDMI CPU fan connector Do not forget to connect the fan cables to the fan connectors on the fan connectors! 5. Doing so will damage the motherboard... chassis fan connectors (3-pin CPU_FAN, 4-pin CHA_FAN) Connect the fan cables to the fan connectors. Insufficient air flow inside the system may damage the motherboard components. 4.

C8HM70-I User's Manual
Page 59
ASUS Recycling/Takeback Services ASUS recycling and takeback programs come from our commitment to responsibly recycle our products, batteries, other components as well as the packaging materials. REACH Complying with the REACH (Registration, ...be able to the highest standards for protecting our environment. This product has been designed to http://csr.asus.com/english/Takeback.htm for disposal of the crossed out wheeled bin indicates that the battery should not... detailed recycling information in municipal waste. This symbol of electronic products. C8HM70-I Series A-3
ASUS Recycling/Takeback Services ASUS recycling and takeback programs come from our commitment to responsibly recycle our products, batteries, other components as well as the packaging materials. REACH Complying with the REACH (Registration, ...be able to the highest standards for protecting our environment. This product has been designed to http://csr.asus.com/english/Takeback.htm for disposal of the crossed out wheeled bin indicates that the battery should not... detailed recycling information in municipal waste. This symbol of electronic products. C8HM70-I Series A-3
