

CUW-RM User Manual
Page 4
... 53 4.4 Advanced Menu 58 4.4.1 Chip Configuration 62 4.4.2 I/O Device Configuration 64 4.4.3 PCI Configuration 66 4.4.4 Shadow Configuration 69 4 ASUS CUW-RM User's Manual HARDWARE SETUP 14 3.1 Motherboard Layout 14 3.2 Layout Contents 15 3.3 Hardware Setup Procedure 17 3.4 Motherboard Settings... 17 3.5 System Memory (DIMM 24 3.5.1 General DIMM Notes 24 3.5.2 Memory Installation 25 3.6 Central Processing Unit (CPU 26 3.7 Expansion Cards 27 3.7.1 Expansion Card Installation Procedure 27 3.7.2 Assigning IRQs for Expansion Cards 28 3.7.3 Audio Modem Riser ...
... 53 4.4 Advanced Menu 58 4.4.1 Chip Configuration 62 4.4.2 I/O Device Configuration 64 4.4.3 PCI Configuration 66 4.4.4 Shadow Configuration 69 4 ASUS CUW-RM User's Manual HARDWARE SETUP 14 3.1 Motherboard Layout 14 3.2 Layout Contents 15 3.3 Hardware Setup Procedure 17 3.4 Motherboard Settings... 17 3.5 System Memory (DIMM 24 3.5.1 General DIMM Notes 24 3.5.2 Memory Installation 25 3.6 Central Processing Unit (CPU 26 3.7 Expansion Cards 27 3.7.1 Expansion Card Installation Procedure 27 3.7.2 Assigning IRQs for Expansion Cards 28 3.7.3 Audio Modem Riser ...
CUW-RM User Manual
Page 9
... 4Mbit firmware gives a new easy-to -digital conversions, which provides more control and protection over the motherboard. Provides Vcore and CPU/ SDRAM frequency adjustments, boot block write protection, and HD/SCSI/MO/ ZIP/CD/Floppy boot selection. Hardware random number generator supports...8226; Enhanced ACPI & Anti-Boot Virus Protection! Supports chassis intrusion monitoring through a new design, battery drain is removed and through the ASUS ASIC. Programmable BIOS (Flash EEPROM), offering enhanced ACPI for keeping time! • Firmware Hub! Software Audio and Hardware AC'97 ...
... 4Mbit firmware gives a new easy-to -digital conversions, which provides more control and protection over the motherboard. Provides Vcore and CPU/ SDRAM frequency adjustments, boot block write protection, and HD/SCSI/MO/ ZIP/CD/Floppy boot selection. Hardware random number generator supports...8226; Enhanced ACPI & Anti-Boot Virus Protection! Supports chassis intrusion monitoring through a new design, battery drain is removed and through the ASUS ASIC. Programmable BIOS (Flash EEPROM), offering enhanced ACPI for keeping time! • Firmware Hub! Software Audio and Hardware AC'97 ...
CUW-RM User Manual
Page 10
...; so that you do not fall asleep waiting for configuring and managing all the energy saving standards. To fully utilize the benefits of all ASUS smart series motherboards. Both the BIOS and hardware levels of +90dB. AC'97 DAC/ADC built into the audio codec reduces noise to improve...best of ACPI, an ACPI-supported OS, such as required by PC'99. • HighestAudio Quality! Concurrent PCI optimizes system performance with concurrent PCI and CPU bus activities. • SDRAM Optimized Performance! Suspend-To-RAM (STR) provides maximum power savings as Tape Backup, CD-ROM, CD-R/RW, and LS...
...; so that you do not fall asleep waiting for configuring and managing all the energy saving standards. To fully utilize the benefits of all ASUS smart series motherboards. Both the BIOS and hardware levels of +90dB. AC'97 DAC/ADC built into the audio codec reduces noise to improve...best of ACPI, an ACPI-supported OS, such as required by PC'99. • HighestAudio Quality! Concurrent PCI optimizes system performance with concurrent PCI and CPU bus activities. • SDRAM Optimized Performance! Suspend-To-RAM (STR) provides maximum power savings as Tape Backup, CD-ROM, CD-R/RW, and LS...
CUW-RM User Manual
Page 11
To prevent system overheat and system damage, the CPU, power supply, and system fans can be monitored for more than 4 seconds will enter the Soft-Off mode. • Remote Ring On (requires modem)! Suspend ... critical for more information) button. Chassis LEDs now act as Windows 98, Windows NT, and OS/2, require much more efficiently. • Dual Function Power Button! ASUS CUW-RM User's Manual 11 2. All the fans are monitored to ensure stable current to the user. • Peripheral Power Up! The system resource monitor...
To prevent system overheat and system damage, the CPU, power supply, and system fans can be monitored for more than 4 seconds will enter the Soft-Off mode. • Remote Ring On (requires modem)! Suspend ... critical for more information) button. Chassis LEDs now act as Windows 98, Windows NT, and OS/2, require much more efficiently. • Dual Function Power Button! ASUS CUW-RM User's Manual 11 2. All the fans are monitored to ensure stable current to the user. • Peripheral Power Up! The system resource monitor...

CUW-RM User Manual
Page 15
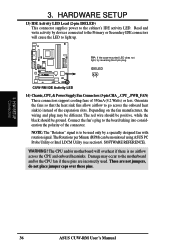
...Setting (Enable 3 VSB/Disable 3 VSB) p.20 Safe Mode (Enable/Disable) p.21 Automatic Timeout Reboot (Enable/Disable) p.22 CPU External Clock Frequency Setting Expansion Slots 1) DIMM1, DIMM2, DIMM3 2) Socket 370 4) PCI1, PCI2, PCI3 5) AMR p.25 168...-Ring Connector (2 pins) 13) IDELED p.36 IDE Activity LED Lead (2 pins) 14) CHA_, CPU_, PWR_FAN p.36 Chassis, CPU, Power Supply Fan Connectors (Three 3-pin) 15) IR_CON p.37 Infrared Module Connectors (10-1 pins) 16) COM2 p.37 Serial ...Intrusion Lead (2-pins) 22) ATXPWR p.40 ATX Power Supply Connector (20 pins) ASUS CUW-RM User's Manual 15
...Setting (Enable 3 VSB/Disable 3 VSB) p.20 Safe Mode (Enable/Disable) p.21 Automatic Timeout Reboot (Enable/Disable) p.22 CPU External Clock Frequency Setting Expansion Slots 1) DIMM1, DIMM2, DIMM3 2) Socket 370 4) PCI1, PCI2, PCI3 5) AMR p.25 168...-Ring Connector (2 pins) 13) IDELED p.36 IDE Activity LED Lead (2 pins) 14) CHA_, CPU_, PWR_FAN p.36 Chassis, CPU, Power Supply Fan Connectors (Three 3-pin) 15) IR_CON p.37 Infrared Module Connectors (10-1 pins) 16) COM2 p.37 Serial ...Intrusion Lead (2-pins) 22) ATXPWR p.40 ATX Power Supply Connector (20 pins) ASUS CUW-RM User's Manual 15
CUW-RM User Manual
Page 17
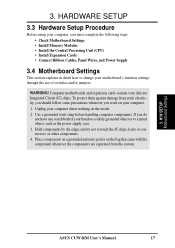
... should follow some precautions whenever you must complete the following steps: • Check Motherboard Settings • Install Memory Modules • Install the Central Processing Unit (CPU) • Install Expansion Cards • Connect Ribbon Cables, Panel Wires, and Power Supply 3.4 Motherboard Settings This section explains in detail how to change your motherboard... through the use of your hands to a safely grounded object or to touch the IC chips, leads or connectors, or other components. 4. H/W SETUP Motherboard Settings ASUS CUW-RM User's Manual 17
... should follow some precautions whenever you must complete the following steps: • Check Motherboard Settings • Install Memory Modules • Install the Central Processing Unit (CPU) • Install Expansion Cards • Connect Ribbon Cables, Panel Wires, and Power Supply 3.4 Motherboard Settings This section explains in detail how to change your motherboard... through the use of your hands to a safely grounded object or to touch the IC chips, leads or connectors, or other components. 4. H/W SETUP Motherboard Settings ASUS CUW-RM User's Manual 17
CUW-RM User Manual
Page 18
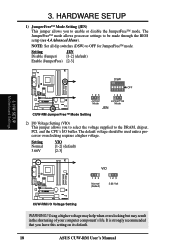
HARDWARE SETUP 1) JumperFree™ Mode Setting (JEN) This jumper allows you leave this setting on its default. 18 ASUS CUW-RM User's Manual H/W SETUP Motherboard Settings CUW-RM ® 123 DSW ON 12345 123 OFF Jumper Mode JumperFree Mode JEN CUW-RM ... select the voltage supplied to enable or disable the JumperFree™ mode. It is strongly recommended that you to the DRAM, chipset, PCI, and the CPU's I /O Voltage Setting WARNING! NOTE: Set all dip switches (DSW) to be used unless processor overclocking requires a higher voltage. The JumperFree™ mode allows...
HARDWARE SETUP 1) JumperFree™ Mode Setting (JEN) This jumper allows you leave this setting on its default. 18 ASUS CUW-RM User's Manual H/W SETUP Motherboard Settings CUW-RM ® 123 DSW ON 12345 123 OFF Jumper Mode JumperFree Mode JEN CUW-RM ... select the voltage supplied to enable or disable the JumperFree™ mode. It is strongly recommended that you to the DRAM, chipset, PCI, and the CPU's I /O Voltage Setting WARNING! NOTE: Set all dip switches (DSW) to be used unless processor overclocking requires a higher voltage. The JumperFree™ mode allows...
CUW-RM User Manual
Page 22
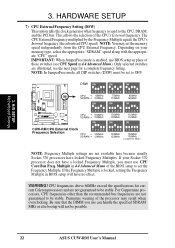
...for a complete frequency listing. If your memory type, select the appropriate "SDRAM" speed along with the appropriate "CPU" speed. Be sure that the DIMM you must be possible. 22 ASUS CUW-RM User's Manual Multiple in BIOS setup will not be set the Frequency Multiple. NOTE: You may ...result when overclocking. HARDWARE SETUP 7) CPU External Frequency Setting (DSW) This option tells the clock generator what frequency to...
...for a complete frequency listing. If your memory type, select the appropriate "SDRAM" speed along with the appropriate "CPU" speed. Be sure that the DIMM you must be possible. 22 ASUS CUW-RM User's Manual Multiple in BIOS setup will not be set the Frequency Multiple. NOTE: You may ...result when overclocking. HARDWARE SETUP 7) CPU External Frequency Setting (DSW) This option tells the clock generator what frequency to...
CUW-RM User Manual
Page 23
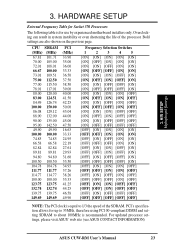
... DIMM and setting SDRAM to about 100MHz is equal to 1/3 the speed of the processor. PCI's specification allows for use by experienced motherboard installers only. CPU SDRAM (MHz) (MHz) 67.81 101.71 70.00 105.00 72.01 108.01 66.67 100.00 73.01 109.51 75.00...: The PCI clock is recommended. Overclocking can result in system instability or even shortening the life of the SDRAM. For updated processor settings, please visit ASUS' web site (see ASUS CONTACT INFORMATION) ASUS CUW-RM User's Manual 23 H/W SETUP Motherboard Settings 3.
... DIMM and setting SDRAM to about 100MHz is equal to 1/3 the speed of the processor. PCI's specification allows for use by experienced motherboard installers only. CPU SDRAM (MHz) (MHz) 67.81 101.71 70.00 105.00 72.01 108.01 66.67 100.00 73.01 109.51 75.00...: The PCI clock is recommended. Overclocking can result in system instability or even shortening the life of the SDRAM. For updated processor settings, please visit ASUS' web site (see ASUS CONTACT INFORMATION) ASUS CUW-RM User's Manual 23 H/W SETUP Motherboard Settings 3.
CUW-RM User Manual
Page 26
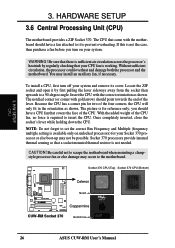
...Socket 370 processor or else boot-up may not be possible. Socket 370 CPU (Top) Socket 370 CPU (Bottom) Celeron CUW-RM ® Notch Coppermine CUW-RM Socket 370 Gold Arrow 26 ASUS CUW-RM User's Manual Without sufficient circulation, the processor could overheat and ...damage both the processor and the motherboard. HARDWARE SETUP 3.6 Central Processing Unit (CPU) The motherboard provides a ZIF Socket 370. You may occur...
...Socket 370 processor or else boot-up may not be possible. Socket 370 CPU (Top) Socket 370 CPU (Bottom) Celeron CUW-RM ® Notch Coppermine CUW-RM Socket 370 Gold Arrow 26 ASUS CUW-RM User's Manual Without sufficient circulation, the processor could overheat and ...damage both the processor and the motherboard. HARDWARE SETUP 3.6 Central Processing Unit (CPU) The motherboard provides a ZIF Socket 370. You may occur...
CUW-RM User Manual
Page 36
Read and write activity by a specially designed fan with rotation signal. IDELED CUW-RM IDE Activity LED 14) Chassis,CPU,&PowerSupplyFanConnectors(3-pinCHA_,CPU_,PWR_FAN) These connectors support cooling fans of the connector. WARNING! CUW-RM ® TIP: If the case-mounted LED does...up. The red wire should be positive, while the black should be monitored using ASUS PC Probe Utility or Intel LDCM Utility (see section 6. SOFTWARE REFERENCE). The CPU and/or motherboard will cause the LED to go across the CPU and onboard heatsinks. Damage may be used . 3. NOTE: The "Rotation" ...
Read and write activity by a specially designed fan with rotation signal. IDELED CUW-RM IDE Activity LED 14) Chassis,CPU,&PowerSupplyFanConnectors(3-pinCHA_,CPU_,PWR_FAN) These connectors support cooling fans of the connector. WARNING! CUW-RM ® TIP: If the case-mounted LED does...up. The red wire should be positive, while the black should be monitored using ASUS PC Probe Utility or Intel LDCM Utility (see section 6. SOFTWARE REFERENCE). The CPU and/or motherboard will cause the LED to go across the CPU and onboard heatsinks. Damage may be used . 3. NOTE: The "Rotation" ...
CUW-RM User Manual
Page 43
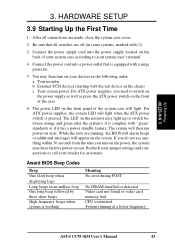
... the ATX power switch is working Meaning No error during POST No DRAM installed or detected Video card not found or video card memory bad CPU overheated System running , the BIOS will alarm beeps or additional messages will then run power-on the chain) c. H/W SETUP Powering Up 3. After... devices (starting with ). 3. The system will appear on the front panel of the case. 6. While the tests are running at a lower frequency ASUS CUW-RM User's Manual 43 Award BIOS Beep Codes Beep One short beep when displaying logo Long beeps in the following order: a.
... the ATX power switch is working Meaning No error during POST No DRAM installed or detected Video card not found or video card memory bad CPU overheated System running , the BIOS will alarm beeps or additional messages will then run power-on the chain) c. H/W SETUP Powering Up 3. After... devices (starting with ). 3. The system will appear on the front panel of the case. 6. While the tests are running at a lower frequency ASUS CUW-RM User's Manual 43 Award BIOS Beep Codes Beep One short beep when displaying logo Long beeps in the following order: a.
CUW-RM User Manual
Page 58
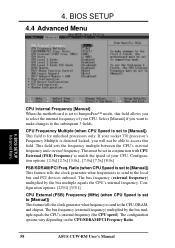
... frequency and external frequency. This must be able to match the speed of your CPU. The configuration options vary depending on the CPU/SDRAM/PCI Freqency Ratio. 58 ASUS CUW-RM User's Manual 4. Select [Manual] if you will not be set to [Manual]) This feature tells the clock generator what frequencies to send...
... frequency and external frequency. This must be able to match the speed of your CPU. The configuration options vary depending on the CPU/SDRAM/PCI Freqency Ratio. 58 ASUS CUW-RM User's Manual 4. Select [Manual] if you will not be set to [Manual]) This feature tells the clock generator what frequencies to send...
CUW-RM User Manual
Page 59
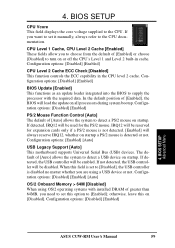
... will be used for expansion cards only if a PS/2 mouse is not detected. [Enabled] will be enabled. BIOS SETUP Advanced Menu ASUS CUW-RM User's Manual 59 If detected, IRQ12 will load the update on [Disabled]. otherwise, leave this on all processors during system ...detected or not. Configuration options: [Disabled] [Enabled] BIOS Update [Enabled] This functions as an update loader integrated into the BIOS to the CPU documentation. Configuration options: [Disabled] [Enabled] 4. In the default position of greater than 64MB, you are using OS/2 operating systems with the ...
... will be used for expansion cards only if a PS/2 mouse is not detected. [Enabled] will be enabled. BIOS SETUP Advanced Menu ASUS CUW-RM User's Manual 59 If detected, IRQ12 will load the update on [Disabled]. otherwise, leave this on all processors during system ...detected or not. Configuration options: [Disabled] [Enabled] BIOS Update [Enabled] This functions as an update loader integrated into the BIOS to the CPU documentation. Configuration options: [Disabled] [Enabled] 4. In the default position of greater than 64MB, you are using OS/2 operating systems with the ...
CUW-RM User Manual
Page 60
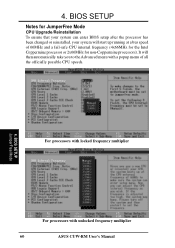
...or 2x66MHz for JumperFree Mode CPU Upgrade/Reinstallation To ensure that your system can enter BIOS setup after the processor has been changed or reinstalled, your system will then automatically take you to the Advanced menu with unlocked frequency multiplier 60 ASUS CUW-RM User's Manual ...4. It will start up running at a bus speed of all the officially possible CPU speeds. 4. BIOS SETUP Notes for non-Coppermine processors).
...or 2x66MHz for JumperFree Mode CPU Upgrade/Reinstallation To ensure that your system can enter BIOS setup after the processor has been changed or reinstalled, your system will then automatically take you to the Advanced menu with unlocked frequency multiplier 60 ASUS CUW-RM User's Manual ...4. It will start up running at a bus speed of all the officially possible CPU speeds. 4. BIOS SETUP Notes for non-Coppermine processors).
CUW-RM User Manual
Page 61
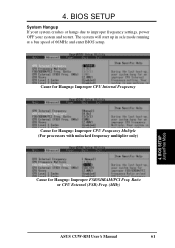
BIOS SETUP System Hangup If your system crashes or hangs due to improper frequency settings, power OFF your system and restart. Cause for Hangup: Improper CPU Internal Frequency Cause for Hangup: Improper CPU Frequency Multiple (For processors with unlocked frequency multiplier only) Cause for Hangup: Improper FSB/SDRAM/PCI Freq. Ratio or CPU External (FSB) Freq. (MHz) 4. 4. The system will start up in safe mode running at a bus speed of 66MHz and enter BIOS setup. BIOS SETUP JumperFree Mode ASUS CUW-RM User's Manual 61
BIOS SETUP System Hangup If your system crashes or hangs due to improper frequency settings, power OFF your system and restart. Cause for Hangup: Improper CPU Internal Frequency Cause for Hangup: Improper CPU Frequency Multiple (For processors with unlocked frequency multiplier only) Cause for Hangup: Improper FSB/SDRAM/PCI Freq. Ratio or CPU External (FSB) Freq. (MHz) 4. 4. The system will start up in safe mode running at a bus speed of 66MHz and enter BIOS setup. BIOS SETUP JumperFree Mode ASUS CUW-RM User's Manual 61
CUW-RM User Manual
Page 63
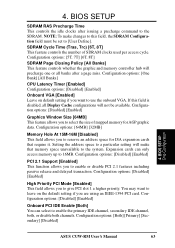
...] Graphics Window Size [64MB] This feature allows you to use the onboard VGA. BIOS SETUP Chip Configuration ASUS CUW-RM User's Manual 63 NOTE: To make that require it. Configuration options: [One Bank] [All Banks] CPU Latency Timer [Enabled] Configuration options: [Disabled] [Enabled] Onboard VGA [Enabled] Leave on default setting if you...
...] Graphics Window Size [64MB] This feature allows you to use the onboard VGA. BIOS SETUP Chip Configuration ASUS CUW-RM User's Manual 63 NOTE: To make that require it. Configuration options: [One Bank] [All Banks] CPU Latency Timer [Enabled] Configuration options: [Disabled] [Enabled] Onboard VGA [Enabled] Leave on default setting if you...
CUW-RM User Manual
Page 74
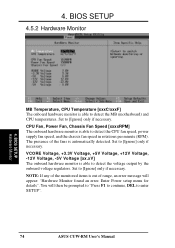
... to detect the voltage output by the onboard voltage regulators. BIOS SETUP Hardware Monitor MB Temperature, CPU Temperature [xxxC/xxxF] The onboard hardware monitor is out of the fans is able to enter SETUP". 74 ASUS CUW-RM User's Manual The presence of range, an error message will then be prompted to... "Press F1 to continue, DEL to detect the CPU fan speed, power supply fan speed, and the chassis fan speed in rotations...
... to detect the voltage output by the onboard voltage regulators. BIOS SETUP Hardware Monitor MB Temperature, CPU Temperature [xxxC/xxxF] The onboard hardware monitor is out of the fans is able to enter SETUP". 74 ASUS CUW-RM User's Manual The presence of range, an error message will then be prompted to... "Press F1 to continue, DEL to detect the CPU fan speed, power supply fan speed, and the chassis fan speed in rotations...
CUW-RM User Manual
Page 81
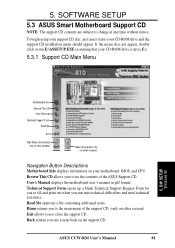
... back on other screens) Back (arrow button only on certain screens) Navigation Button Descriptions Motherboard Info displays information on your motherboard, BIOS, and CPU. If the menu does not appear, double click or run into your CD-ROM drive is drive E:). 5.3.1 Support CD Main Menu 5. Technical... Support Form opens up a file containing additional notes. Home returns you to the main menu of the ASUS Support CD. ASUS CUW-RM User's Manual 81 Browse This CD allows you run E:\ASSETUP.EXE (assuming that your CD-ROM drive and the support CD ...
... back on other screens) Back (arrow button only on certain screens) Navigation Button Descriptions Motherboard Info displays information on your motherboard, BIOS, and CPU. If the menu does not appear, double click or run into your CD-ROM drive is drive E:). 5.3.1 Support CD Main Menu 5. Technical... Support Form opens up a file containing additional notes. Home returns you to the main menu of the ASUS Support CD. ASUS CUW-RM User's Manual 81 Browse This CD allows you run E:\ASSETUP.EXE (assuming that your CD-ROM drive and the support CD ...
CUW-RM User Manual
Page 103
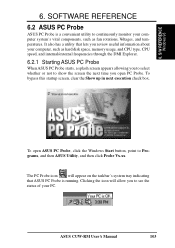
... a convenient utility to continuously monitor your computer system's vital components, such as hard disk space, memory usage, and CPU type, CPU speed, and internal/external frequencies through the DMI Explorer. 6.2.1 Starting ASUS PC Probe When ASUS PC Probe starts, a splash screen appears allowing you to select whether or not to show the screen the...
... a convenient utility to continuously monitor your computer system's vital components, such as hard disk space, memory usage, and CPU type, CPU speed, and internal/external frequencies through the DMI Explorer. 6.2.1 Starting ASUS PC Probe When ASUS PC Probe starts, a splash screen appears allowing you to select whether or not to show the screen the...


