
User Manual
Page 5
... Statement This device complies with Part 15 of the monitor to the graphics card is connected. • Consult the dealer or an experienced radio/TV technician for radio noise emissions from that interference will not occur in a particular installation. This equipment has been tested and found to which can radiate radio frequency energy and, if not installed and used in...
... Statement This device complies with Part 15 of the monitor to the graphics card is connected. • Consult the dealer or an experienced radio/TV technician for radio noise emissions from that interference will not occur in a particular installation. This equipment has been tested and found to which can radiate radio frequency energy and, if not installed and used in...

User Manual
Page 10
Recovery DVD • Optional items are purchased separately. • Specifications depend on the desktop PC you purchased. DVD • Support DVD x1 5. Accessories • Mouse pad x1 4. Optional items 1. Memory card reader 3. ASUS Desktop PC with your supplier for the following items. Standard items 1. LAN cable 4. Power strip 5. They are not included in the system package. Documentation • User Manual x1 • Warranty card x1 If any of the above items is...
Recovery DVD • Optional items are purchased separately. • Specifications depend on the desktop PC you purchased. DVD • Support DVD x1 5. Accessories • Mouse pad x1 4. Optional items 1. Memory card reader 3. ASUS Desktop PC with your supplier for the following items. Standard items 1. LAN cable 4. Power strip 5. They are not included in the system package. Documentation • User Manual x1 • Warranty card x1 If any of the above items is...

User Manual
Page 13
...drive bays Power button HDD LED 2 x 5.25 inch optical disk drive bays 1 x Headphone port 2 x USB 2.0 ports 1 x Microphone port 2 x USB 2.0 ports Reset button BM5320 • The 5.25 inch optical disk drive bay is for a 5.25 inch DVD-ROM / CD-RW / DVD-RW device. • The 3.5 inch drive bay is for a 3.5 inch hard disk drive / memory card reader. • The memory card reader is for Secure Digital™ / MultimediaCard / Memory Stick® / CompactFlash® / Microdrive™ / SmartMedia® memory cards. 1.2 Rear panel 1 x Voltage selector 1 x Power connector 1 x PS/2 Mouse port...
...drive bays Power button HDD LED 2 x 5.25 inch optical disk drive bays 1 x Headphone port 2 x USB 2.0 ports 1 x Microphone port 2 x USB 2.0 ports Reset button BM5320 • The 5.25 inch optical disk drive bay is for a 5.25 inch DVD-ROM / CD-RW / DVD-RW device. • The 3.5 inch drive bay is for a 3.5 inch hard disk drive / memory card reader. • The memory card reader is for Secure Digital™ / MultimediaCard / Memory Stick® / CompactFlash® / Microdrive™ / SmartMedia® memory cards. 1.2 Rear panel 1 x Voltage selector 1 x Power connector 1 x PS/2 Mouse port...

User Manual
Page 32
... the Power-On Self-Test (POST). 2.6 Recovery DVD The ASUS PC Recovery DVD assists you in reinstalling the OS and restoring it on other partitions, and creates a new system partition as network settings. 2.6.1 Recovering a Windows® XP OS: 1. Click Next to install a new system. The recovery process starts. 7. Follow the onscreen instructions to a network drive and make note of any customized configuration settings such as drive "C". Before using the Recovery DVD, copy your hard disk and creates a new system partition as the boot device. 3. Options...
... the Power-On Self-Test (POST). 2.6 Recovery DVD The ASUS PC Recovery DVD assists you in reinstalling the OS and restoring it on other partitions, and creates a new system partition as network settings. 2.6.1 Recovering a Windows® XP OS: 1. Click Next to install a new system. The recovery process starts. 7. Follow the onscreen instructions to a network drive and make note of any customized configuration settings such as drive "C". Before using the Recovery DVD, copy your hard disk and creates a new system partition as the boot device. 3. Options...

User Manual
Page 7
...tested and found to comply with manufacturer's instructions, may cause undesired operation. Changes or modifications to this unit not expressly approved by the party responsible for compliance could void the user's authority to operate this equipment does cause harmful interference to radio or television reception, which the receiver is connected... the Class B limits for connection of the monitor to the graphics card is no guarantee that may cause harmful interference to correct the interference by turning the equipment off and on, the user is subject to the following measures...
...tested and found to comply with manufacturer's instructions, may cause undesired operation. Changes or modifications to this unit not expressly approved by the party responsible for compliance could void the user's authority to operate this equipment does cause harmful interference to radio or television reception, which the receiver is connected... the Class B limits for connection of the monitor to the graphics card is no guarantee that may cause harmful interference to correct the interference by turning the equipment off and on, the user is subject to the following measures...

User Manual
Page 9
... power supply is broken, do not try to the product. • Before using the ASUS BP5220/AS-D592 Desktop PC, carefully read the general precautions below 35ºC. • Use this product only with the correct voltage as they may become very warm and hot. Check if the system receives proper ventilation. • Before you add or remove a peripheral device...
... power supply is broken, do not try to the product. • Before using the ASUS BP5220/AS-D592 Desktop PC, carefully read the general precautions below 35ºC. • Use this product only with the correct voltage as they may become very warm and hot. Check if the system receives proper ventilation. • Before you add or remove a peripheral device...

User Manual
Page 12
Cables • AC power cable x1 3. They are purchased separately. • Specifications are not included in the system package. LAN cable 4. DVD • Support DVD x1 • Recovery DVD x1 5. Optional items 1. Storage card reader / Floppy disk drive 3. Check with • ASUS Desktop x1 • Mouse x1 • Keyboard x1 2. Accessories • Mouse pad x1 4. Documentation • User Manual x1 • Warranty card x1 If any of the above items is damaged or missing, contact...
Cables • AC power cable x1 3. They are purchased separately. • Specifications are not included in the system package. LAN cable 4. DVD • Support DVD x1 • Recovery DVD x1 5. Optional items 1. Storage card reader / Floppy disk drive 3. Check with • ASUS Desktop x1 • Mouse x1 • Keyboard x1 2. Accessories • Mouse pad x1 4. Documentation • User Manual x1 • Warranty card x1 If any of the above items is damaged or missing, contact...

User Manual
Page 14
... CF MD 1 x Headphone port 4 x USB 2.0 ports 1 x Microphone port ODD LED Power button / Power LED • The storage card reader, optical disk drive, and floppy disk drive are optional items which are purchased separately. • The 5.25 inch optical disk drive bay is for a 5.25 inch DVD-ROM / CD-RW / DVD-RW device. • The 3.5 inch drive bay is for a 3.5 inch hard disk drive / floppy disk drive / USB storage card reader. • The storage card reader is for Secure Digital™ / MultimediaCard / Memory Stick® / CompactFlash®...
... CF MD 1 x Headphone port 4 x USB 2.0 ports 1 x Microphone port ODD LED Power button / Power LED • The storage card reader, optical disk drive, and floppy disk drive are optional items which are purchased separately. • The 5.25 inch optical disk drive bay is for a 5.25 inch DVD-ROM / CD-RW / DVD-RW device. • The 3.5 inch drive bay is for a 3.5 inch hard disk drive / floppy disk drive / USB storage card reader. • The storage card reader is for Secure Digital™ / MultimediaCard / Memory Stick® / CompactFlash®...

User Manual
Page 15
... shows the rear panel and the components on it. 1 x Parallel port 1 x PS/2 Mouse port 1 x RJ-45 port 4 x Expansion slots 1 x Power connector LINE IN MIC IN 1 x PS/2 Keyboard port 1 x COM port 6-Channel audio ports 1 x VGA port 4 x USB 2.0 ports 15 Voltage selector Audio 2, 4, or 6-channel configuration Port Light Blue Lime Pink Headset 2-channel Line In Line Out Mic In 4-channel Rear Speaker Out Front Speaker Out Mic In 6-channel Rear Speaker Out Front Speaker Out Bass/Center LAN port LED indications Activity/Link LED Speed LED Status...
... shows the rear panel and the components on it. 1 x Parallel port 1 x PS/2 Mouse port 1 x RJ-45 port 4 x Expansion slots 1 x Power connector LINE IN MIC IN 1 x PS/2 Keyboard port 1 x COM port 6-Channel audio ports 1 x VGA port 4 x USB 2.0 ports 15 Voltage selector Audio 2, 4, or 6-channel configuration Port Light Blue Lime Pink Headset 2-channel Line In Line Out Mic In 4-channel Rear Speaker Out Front Speaker Out Mic In 6-channel Rear Speaker Out Front Speaker Out Bass/Center LAN port LED indications Activity/Link LED Speed LED Status...

User Manual
Page 34
... a network drive and make note of any customized configuration settings such as network settings. 2.6.1 Recovering a Windows® XP OS: 1. Select where to keep other systems. Visit the ASUS website at www.asus.com for updates. 2-16 Chapter 2: Getting started The system restarts. 8 . The ASUS PC Recovery DVD is for ASUS Desktop PC only. Options are going to confirm. A confirmation screen pops up. Before using the Recovery DVD, copy your data files to a USB flash disk...
... a network drive and make note of any customized configuration settings such as network settings. 2.6.1 Recovering a Windows® XP OS: 1. Select where to keep other systems. Visit the ASUS website at www.asus.com for updates. 2-16 Chapter 2: Getting started The system restarts. 8 . The ASUS PC Recovery DVD is for ASUS Desktop PC only. Options are going to confirm. A confirmation screen pops up. Before using the Recovery DVD, copy your data files to a USB flash disk...
User Manual
Page 38
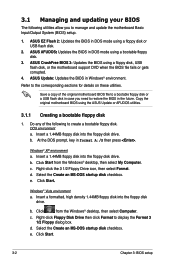
.... c. DOS environment a. ASUS EZ Flash 2: Updates the BIOS in DOS mode using a floppy disk or USB flash disk. 2. ASUS AFUDOS: Updates the BIOS in DOS mode using a bootable floppy disk. 3. ASUS CrashFree BIOS 3: Updates the BIOS using the ASUS Update or AFUDOS utilities. 3.1.1 Creating a bootable floppy disk 1. Save a copy of the following utilities allow you need to manage and update the motherboard Basic Input/Output System (BIOS) setup. 1. Insert a 1.44MB floppy disk into the floppy disk drive. d. Click Start. Windows® Vista environment a. Insert...
.... c. DOS environment a. ASUS EZ Flash 2: Updates the BIOS in DOS mode using a floppy disk or USB flash disk. 2. ASUS AFUDOS: Updates the BIOS in DOS mode using a bootable floppy disk. 3. ASUS CrashFree BIOS 3: Updates the BIOS using the ASUS Update or AFUDOS utilities. 3.1.1 Creating a bootable floppy disk 1. Save a copy of the following utilities allow you need to manage and update the motherboard Basic Input/Output System (BIOS) setup. 1. Insert a 1.44MB floppy disk into the floppy disk drive. d. Click Start. Windows® Vista environment a. Insert...

User Manual
Page 39
... motherboard from a floppy disk and using a DOS‑based utility. Launch EZ Flash 2 using EZ Flash 2: 1. When the correct BIOS file is accessible by pressing + during POST to prevent system boot failure! Press . ASUS BP5220/AS-D592 3-3 The EZ Flash 2 utility is built in the BIOS chip so it is found, EZ Flash 2 performs the BIOS updating process and automatically reboots the system when done. • This function supports devices such as USB flash disks...
... motherboard from a floppy disk and using a DOS‑based utility. Launch EZ Flash 2 using EZ Flash 2: 1. When the correct BIOS file is accessible by pressing + during POST to prevent system boot failure! Press . ASUS BP5220/AS-D592 3-3 The EZ Flash 2 utility is built in the BIOS chip so it is found, EZ Flash 2 performs the BIOS updating process and automatically reboots the system when done. • This function supports devices such as USB flash disks...
User Manual
Page 42
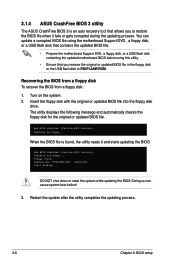
... USB flash disk to restore the BIOS file when it and starts updating the BIOS. Turn on the system. 2. The utility displays the following message and automatically checks the floppy disk for floppy... Starting BIOS recovery... Checking for floppy... DO NOT shut down or reset the system while updating the BIOS! Completed. You can cause system boot failure! 3. When the BIOS file is an auto recovery tool that you to P5KPLAMP.ROM. 3.1.4 ASUS CrashFree BIOS 3 utility...
... USB flash disk to restore the BIOS file when it and starts updating the BIOS. Turn on the system. 2. The utility displays the following message and automatically checks the floppy disk for floppy... Starting BIOS recovery... Checking for floppy... DO NOT shut down or reset the system while updating the BIOS! Completed. You can cause system boot failure! 3. When the BIOS file is an auto recovery tool that you to P5KPLAMP.ROM. 3.1.4 ASUS CrashFree BIOS 3 utility...
User Manual
Page 44
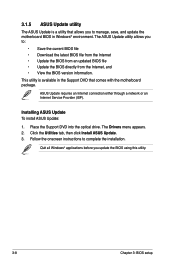
...; Save the current BIOS file • Download the latest BIOS file from the Internet • Update the BIOS from an updated BIOS file • Update the BIOS directly from the Internet, and • View the BIOS version information. ASUS Update requires an Internet connection either through a network or an Internet Service Provider (ISP). The ASUS Update utility allows you update the BIOS using this utility. 3-8 Chapter 3: BIOS setup Place the Support DVD into the optical drive. 3.1.5 ASUS Update utility The ASUS Update is available in Windows® environment.
...; Save the current BIOS file • Download the latest BIOS file from the Internet • Update the BIOS from an updated BIOS file • Update the BIOS directly from the Internet, and • View the BIOS version information. ASUS Update requires an Internet connection either through a network or an Internet Service Provider (ISP). The ASUS Update utility allows you update the BIOS using this utility. 3-8 Chapter 3: BIOS setup Place the Support DVD into the optical drive. 3.1.5 ASUS Update utility The ASUS Update is available in Windows® environment.
User Manual
Page 47
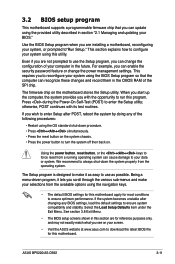
... password feature or change the configuration of your BIOS." Being a menu-driven program, it as easy to use the Setup program, you can update using the navigation keys. • The default BIOS settings for this motherboard apply for this section are not prompted to make it lets you scroll through the various sub-menus and make your selections from the available options using the provided utility described in section "2.1 Managing...
... password feature or change the configuration of your BIOS." Being a menu-driven program, it as easy to use the Setup program, you can update using the navigation keys. • The default BIOS settings for this motherboard apply for this section are not prompted to make it lets you scroll through the various sub-menus and make your selections from the available options using the provided utility described in section "2.1 Managing...

User Manual
Page 51
... are specifically configuring a CD-ROM drive. Type [Auto] Selects the type of IDE devices. Setting to Auto allows automatic selection of device connected to display the IDE device information. Configuration options: [Disabled] [Auto] Block (Multi-sector Transfer) M [Auto] Enables or disables data multi-sectors transfers. Setting to Auto enables the LBA mode if the device supports this mode, and if the device was not previously formatted with LBA mode disabled. Select ARMD (ATAPI Removable Media Device) if your device is installed...
... are specifically configuring a CD-ROM drive. Type [Auto] Selects the type of IDE devices. Setting to Auto allows automatic selection of device connected to display the IDE device information. Configuration options: [Disabled] [Auto] Block (Multi-sector Transfer) M [Auto] Enables or disables data multi-sectors transfers. Setting to Auto enables the LBA mode if the device supports this mode, and if the device was not previously formatted with LBA mode disabled. Select ARMD (ATAPI Removable Media Device) if your device is installed...
User Manual
Page 59
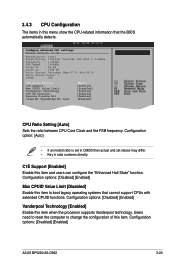
...change the configuration of this item. Configuration options: [Disabled] [Enabled] Vanderpool Technology [Enabled] Enable this item and users can configure the "Enhanced Halt State" function. Users need to reset the computer to boot legacy operating systems that the BIOS automatically detects. Configuration options: [Disabled] [Enabled] ASUS BP5220/AS-D592 3-23 3.4.3 CPU Configuration The items in ratio numbers directly. Configure advanced CPU settings Module Version: 3C.0E Manufacturer: Intel Brand String: Intel(R) Core(TM) CPU 6300 @ 1.86GHz Frequency : 1.86GHz FSB Speed...
...change the configuration of this item. Configuration options: [Disabled] [Enabled] Vanderpool Technology [Enabled] Enable this item and users can configure the "Enhanced Halt State" function. Users need to reset the computer to boot legacy operating systems that the BIOS automatically detects. Configuration options: [Disabled] [Enabled] ASUS BP5220/AS-D592 3-23 3.4.3 CPU Configuration The items in ratio numbers directly. Configure advanced CPU settings Module Version: 3C.0E Manufacturer: Intel Brand String: Intel(R) Core(TM) CPU 6300 @ 1.86GHz Frequency : 1.86GHz FSB Speed...

User Manual
Page 63
...Parallel Port mode. This item allows you to enable or disable the boot ROM in the onboard LAN controller. Configuration options: [Enabled] [Disabled] LAN Option ROM [Disabled] Allows you to set to select the Serial Port1 base address. Configuration options: [DMA0] [DMA1] [DMA3] Parallel Port IRQ [IRQ7] Allows you to enable or disable the onboard LAN controller. Configuration options: [IRQ5] [IRQ7] ASUS BP5220/AS-D592 3-27 3.4.5 Onboard Devices Configuration Configure Win627DHG-A Super IO Chipset Onboard PCIE GbE LAN [Enabled] LAN Option ROM [Disabled] Serial...
...Parallel Port mode. This item allows you to enable or disable the boot ROM in the onboard LAN controller. Configuration options: [Enabled] [Disabled] LAN Option ROM [Disabled] Allows you to set to select the Serial Port1 base address. Configuration options: [DMA0] [DMA1] [DMA3] Parallel Port IRQ [IRQ7] Allows you to enable or disable the onboard LAN controller. Configuration options: [IRQ5] [IRQ7] ASUS BP5220/AS-D592 3-27 3.4.5 Onboard Devices Configuration Configure Win627DHG-A Super IO Chipset Onboard PCIE GbE LAN [Enabled] LAN Option ROM [Disabled] Serial...
User Manual
Page 70
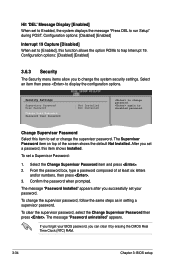
... settings. From the password box, type a password composed of the screen shows the default NotFE1SIn0CstSEaaxlvileetda.nAdftEexriytou set a password, this item shows Installed. To clear the supervisor password, select the Change Supervisor Password then press . The message "Password uninstalled" appears. The message "Password Installed" appears after you successfully set your BIOS password, you can clear it by erasing the CMOS Real Time Clock (RTC) RAM. 3-34 Chapter 3: BIOS setup If you to trap Interrupt 19. Configuration options: [Disabled] [Enabled...
... settings. From the password box, type a password composed of the screen shows the default NotFE1SIn0CstSEaaxlvileetda.nAdftEexriytou set a password, this item shows Installed. To clear the supervisor password, select the Change Supervisor Password then press . The message "Password uninstalled" appears. The message "Password Installed" appears after you successfully set your BIOS password, you can clear it by erasing the CMOS Real Time Clock (RTC) RAM. 3-34 Chapter 3: BIOS setup If you to trap Interrupt 19. Configuration options: [Disabled] [Enabled...

User Manual
Page 71
... Date and Time. On the password box that appears, type a password composed of the screen shows the default Not Installed. Clear User Password Select this item to disabled password. Security Settings Supervisor Password : Installed User Password : Installed Change Supervisor Password User Access Level Change User Password Clear User Password Password Check [Full Access] [Setup] to selected fields, such as in the Setup utility. After you have set a supervisor password, the other security settings. Configuration options: [Setup] [Always] ASUS BP5220/AS-D592 3-35
... Date and Time. On the password box that appears, type a password composed of the screen shows the default Not Installed. Clear User Password Select this item to disabled password. Security Settings Supervisor Password : Installed User Password : Installed Change Supervisor Password User Access Level Change User Password Clear User Password Password Check [Full Access] [Setup] to selected fields, such as in the Setup utility. After you have set a supervisor password, the other security settings. Configuration options: [Setup] [Always] ASUS BP5220/AS-D592 3-35


